


msmcleod
-
Posts
7,120 -
Joined
-
Last visited
-
Days Won
39
Everything posted by msmcleod
-

Native Instruments Midi Controllers & Cakewalk
msmcleod replied to Nobletonmusic's topic in Cakewalk by BandLab
This sounds like you've got a MIDI feedback loop somewhere. One of your VSTi's is probably echoing the MIDI it's receiving back out, and another is picking it up, causing MIDI feedback. Go through each of your synths, and make sure the "Enable Midi Output" is unchecked, e.g.: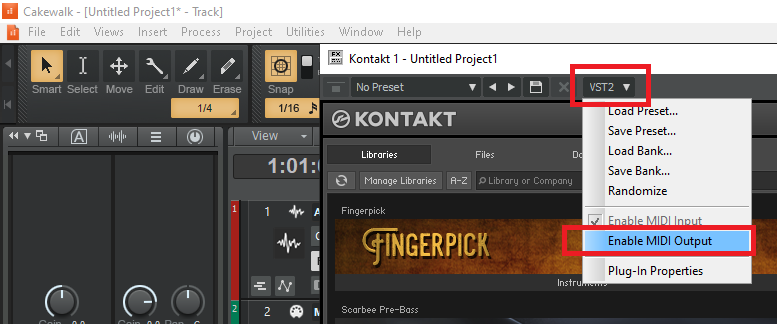
-
Save CWP as MIDI Format 1 cause the effects setting set to default value
msmcleod replied to Tuan Hoang's question in Q&A
@Tuan Hoang - open up TTSSEQ.INI in notepad ( you should find it in %APPDATA%\Cakewalk\Cakewalk Core\ ) and add the following to the [Options] section: LegacyAutomation=1 As an example, here's my TTSSEQ.INI after the change [Options] PumpDataMsec=200 LegacyAutomation=1 [MIDI Input Devices] 0=microKEY2 1=nanoKONTROL Studio 2=Focusrite USB MIDI MaxInPort=2 [MIDI Output Devices] 0=nanoKONTROL Studio 1=Focusrite USB MIDI MaxOutPort=1 [MIDI Echo Devices] MaxEchoPort=-1 -
This came up in a discussion with the beta testers, but I thought I'd share it here.... You have a reference track and you want to switch between your mix and the reference track with a single click: 1. Engage Exclusive Solo Mode 2. Select all, then deselect your reference track 3. Use CTRL + left click on the solo button to toggle between your mix & and the reference track:
-
@jono grant / @razor7music - if either of you have a small project (preferably with only stock CbB VST's) that can reproduce the multiclip gain issue, please zip it up and send it to @Jonathan Sasor. We did think this issue had gone away due to fixes in related code (our existing repro's don't exhibit the issue anymore), but obviously not. So a solid repro would be a great help.
-
Turn off Velocity Sensivity - MIDI Controller
msmcleod replied to lucas98cp's topic in Cakewalk by BandLab
The velocity MFX plugin will do this. -
This better demonstrates why you might need to "Apply Trimming" before you do any operations on the Process->Apply Effect menu. I'm using Normalize as an example, but it also applies to Clip Gain, Remove DC Offset etc.. This might not always be desired though: If you're likely to slip edit the hidden areas back in, you're going to want to have had the hidden areas processed too. In which case Apply Trimming isn't what you want, as the hidden parts will be a completely different level.
-
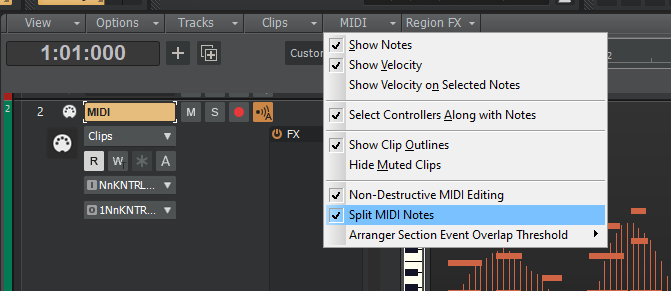
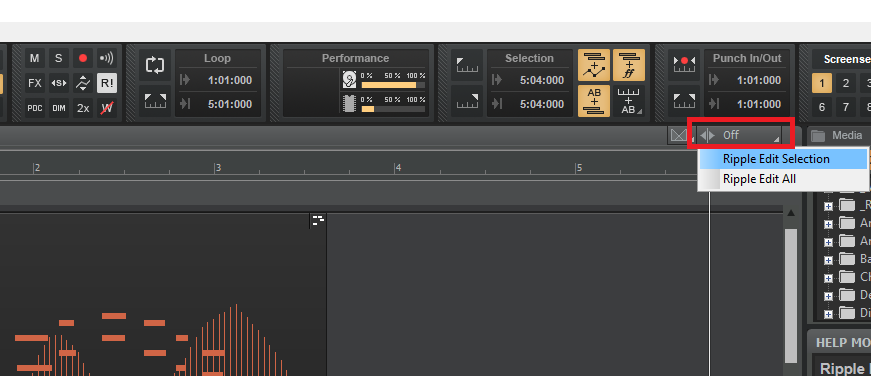
You may also want to consider playing with the "Split MIDI Notes" setting if you're not getting the results you expect: When this is off, any note that intersects the selection will be deleted - regardless of its start & end time. When this is on, the note will be split at the selection boundaries, and only the parts that are covered by the selection will be deleted. Also, if you want to "close the gap" after deleting, switch on Ripple Editing: Deleting with "Ripple Edit Selection" on will close the gap on just the parts you deleted. "Ripple Edit All" will close the gap on the whole project.
-
You could always export using Broadcast waves - this embeds the actual start time in the waveform, so when they're imported into the other DAW they should retain their start time.
-
Has anyone tried using a virtual machine for their DAW?
msmcleod replied to craigb's topic in Computer Systems
That's surprising, as AFAIK they both use exactly the same audio device drivers. The DS2416 has an additional ymix2416.dll which allows applications to control the mixer functions on the card, but the actual audio interface IC on both devices is the same. So I guess there must be some other hardware differences that were causing this. The main issue with motherboards and the DS2416 wasn't the chipset so much as the voltages on the PCI slot. A lot of motherboards stopped offering both 5V and 3.3v, and the DS2416 requires the 5V supply. Also when Intel moved from the Ivy Bridge ( true 16 bit PCI ) to Haswell (emulated 16 bit PCI) the cards no longer worked. I'm just grateful I managed to get nearly 20 years of use out of them, before being forced to go to 64 bit. I hardly touched plugins up until that point! -
This used to annoy me when I first moved from SONAR 8.5 to X1... I was always wondering where half the controls were. I'm so used to using the track inspector nowadays (which shows all of the controls), I just go with the default layout in the Track View. It does depend on your workflow though. I use a control surface, so it doesn't bother me that I can't access those controls within the Track View. For those that don't have a control surface, and want to quickly adjust volume/pan though... I can definitely see that having the volume/pan widgets there makes sense.
-
Yes, I know - if you're using the built-in Process->Apply Effect->Gain, make sure you "bounce to clip(s)" or "apply trimming " on each clip first. My video was an alternative that doesn't require you to do that.
-
This video has some great tips for audio monitoring for recording vocals:
-
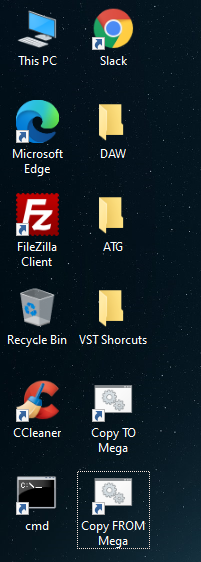
I do this often between my office PC, Studio PC and laptop. The way I do it is by using my mega cloud account (although you could use any other cloud sync app like Microsoft OneDrive, Dropbox etc). My setup is as follows: I have a project sync drive E:\Projects The Mega client is setup to sync the E:\Projects directory My main cakewalk projects live in E:\SEQUENCE, picture cache is E:\PICTURES, global audio is E:\WAVEDATA, templates are E:\TEMPLATES When I first boot up any of the PC's, I let Mega do it's sync (takes around 20 secs) and then run my CopyFromMega.bat batch file: ROBOCOPY F:\Projects\SEQUENCE F:\SEQUENCE *.* /XO /E /COPYALL /DCOPY:DAT ROBOCOPY F:\Projects\PICTURE F:\PICTURE *.* /XO /E /COPYALL /DCOPY:DAT ROBOCOPY F:\Projects\TEMPLATES F:\TEMPLATES *.* /XO /E /COPYALL /DCOPY:DAT ROBOCOPY F:\Projects\WAVEDATA F:\WAVEDATA *.* /XO /E /COPYALL /DCOPY:DAT ROBOCOPY "F:\Projects\FX Chain Presets" "C:\Cakewalk Content\Cakewalk Core\FX Chain Presets" *.* /XO /E /COPYALL /DCOPY:DAT ROBOCOPY "F:\Projects\FX Chain Graphics" "C:\Cakewalk Content\Cakewalk Core\FX Chain Graphics" *.* /XO /E /COPYALL /DCOPY:DAT When I've finished using CbB, I run the CopyToMega.bat batch file: ROBOCOPY F:\SEQUENCE F:\Projects\SEQUENCE *.* /XO /E /COPYALL /DCOPY:DAT ROBOCOPY F:\PICTURE F:\Projects\PICTURE *.* /XO /E /COPYALL /DCOPY:DAT ROBOCOPY F:\TEMPLATES F:\Projects\TEMPLATES *.* /XO /E /COPYALL /DCOPY:DAT ROBOCOPY F:\WAVEDATA F:\Projects\WAVEDATA *.* /XO /E /COPYALL /DCOPY:DAT ROBOCOPY "C:\Cakewalk Content\Cakewalk Core\FX Chain Presets" "F:\Projects\FX Chain Presets" *.* /XO /E /COPYALL /DCOPY:DAT ROBOCOPY "C:\Cakewalk Content\Cakewalk Core\FX Chain Graphics" "F:\Projects\FX Chain Graphics" *.* /XO /E /COPYALL /DCOPY:DAT ...and wait around a minute or so for my files to be uploaded to Mega. Then I can switch my PC off. I've got a similar set up on all three PC's. As soon as Mega has done its sync on start up, I can run CopyFromMega.bat to get my latest projects. I've put shortcuts to the batch files on my desktop, so I just double click them to run: BTW - the options for ROBOCOPY ensure only newer files are copied, so it skips anything that hasn't changed. Your BandLab projects, as opposed to Cakewalk projects live on the cloud in any case, so they're automatically sync'd up.
-
The trick is to do a bounce to clip(s), or apply trimming on each clip before applying the gain. This seems to make it much more reliable. Most of the time though, I tend to use this method nowadays:
-
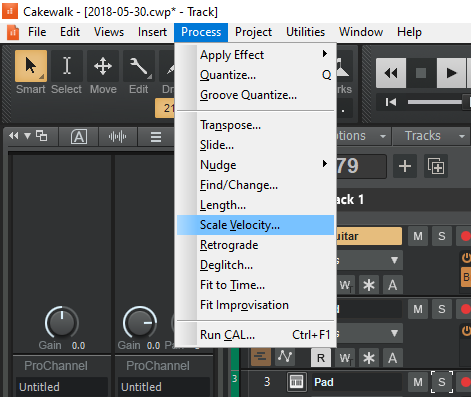
@reko tomo - I think some of the issues you're having are maybe down to you using a basic workspace. For the time being, I'd recommend switching your workspace to "None" to give you access to all of Cakewalk's menus. Once you're familiar with what's available, you can then decide whether to design a workspace of your own or not. The other issue is that it's now 21 years since Cakewalk Pro Audio 9 was released. Many things have been changed / moved about since then. I strongly recommend watching some tutorial videos if possible. I appreciate that most tutorials will be in English, but even if you don't always understand what the user is saying, you'll at least see them using the features. The Groove 3 SONAR tutorials are very good, as is this free collection on YouTube (with this you can also turn on CC's and auto translate to your native language): Anyhow, in answer to your questions: This is where the Track's Edit Filter control is: Operations like Scale Velocity that do processing on your clips are now in the Process menu:
-
Has anyone tried using a virtual machine for their DAW?
msmcleod replied to craigb's topic in Computer Systems
Yes, finding a useable motherboard was very difficult. I think I went through 3 or 4 until I found one. I've got an ASUS P8B75-V, which supports 3rd gen i5 / i7 processors. The PCI bus gives both 5V & 3V, and isn't emulated... which is what the DS2416 / SW1000XG needs. They're pretty hard to get hold of, so I've got a couple spare just in case. -
Has anyone tried using a virtual machine for their DAW?
msmcleod replied to craigb's topic in Computer Systems
Yeah, the XP drivers work fine in Windows 7 32 bit - if they are actually XP drivers... I've a feeling they might actually be Windows 2000 drivers. IIRC the DS2416 came out in 1997, about a month before Cakewalk Pro Audio 7. I used it in Windows 95 using the old 16 bit drivers on a P166 with 64MB of RAM to begin with! -
Send Assignment Bug [Not a bug - problem solved]
msmcleod replied to Bill Phillips's topic in Feedback Loop
This isn't a bug, but how the sends are ordered. Sends that are sent to "none" are essentially inactive, and will be moved to the bottom, whereas sends to active buses will be ordered in bus order as they appear in the bus section. Because you're send levels are so similar this behaviour isn't immediately apparent - try setting one of your buses to 9pm and the other to 3pm, and watch how they're re-ordered when you change which bus they're sent to. -
Has anyone tried using a virtual machine for their DAW?
msmcleod replied to craigb's topic in Computer Systems
I've looked into PCI pass-thru a couple of times in the past. A lost of virtualization software doesn't support this, but those that do require the host operating system to be Linux, which in my case was a show-stopper. I needed the host OS to be a Windows 64 bit, and the VM to be Windows 32 bit. For the moment, I've got my 32 bit boot partition. This is fine for dealing with issues with older projects, or projects that rely on mixer settings in the DS2416, but when I get around to it, I'll just build a new machine and link it to my main daw either over ethernet or ADAT. -
Has anyone tried using a virtual machine for their DAW?
msmcleod replied to craigb's topic in Computer Systems
My Yamaha DS2416 cards only work with a 32 bit OS. -
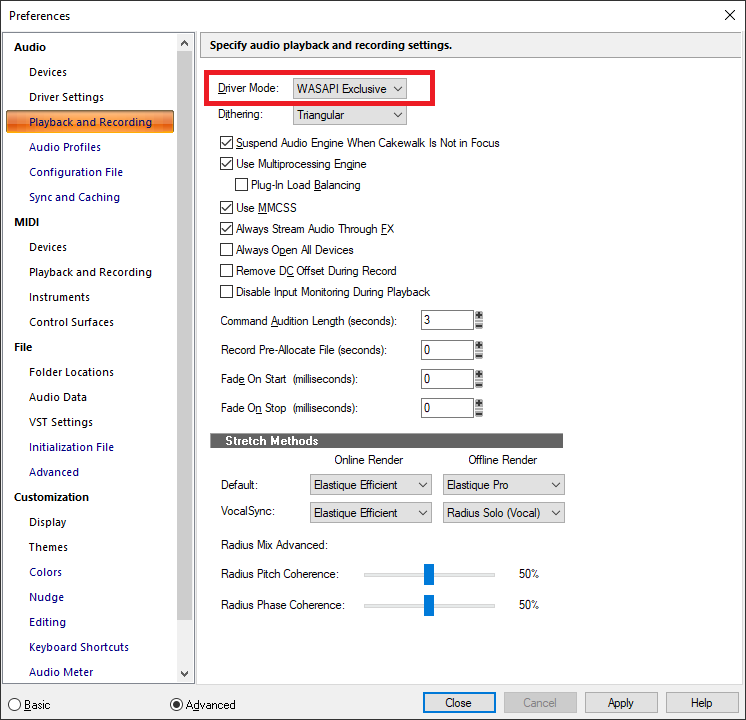
The Realtek ASIO driver is really buggy, and lots of users have had issues with it. Set your driver mode to WASAPI (either WASAPI Shared or WASAPI Exclusive) WASAPI Shared means Cakewalk will share audio with Windows, at the expense of higher latencies. WASAPI Exclusive will block all other applications from using the device, but latency is lower. Note that not all devices support WASAPI Exclusive though.
-
-
Has anyone tried using a virtual machine for their DAW?
msmcleod replied to craigb's topic in Computer Systems
There's a third option, which I use... a multi-boot machine, i.e. multiple OS's installed on multiple SSD's on the same machine. My office PC has Windows 10 (DAW), Windows 10 (Development), Windows 7 64 bit (DAW) and Windows 7 32 bit (DAW). I have two DATA drives.... DATA1 has the ProgramData directories for plugins with sample content, e.g. Omnisphere, Kontakt, Jamstix, MDrummer etc. All of the OS's refer to the same copy of this content on the DATA drive, so it's not duplicated for each OS. DATA2 has my Cakewalk projects on it. The only downside is I can't use more than one OS at a time, but I've rarely found this to be an issue. -
Sort of... but not with a single key press... and I doubt if that's what you really want in any case. For example, you may not want your synth rack, video, navigator etc. all moved to the multi-dock. The window receiving the "Dock in MultiDock" keypress must have focus. So you need to focus them one by one then press the bound key. Say the key was "/" : ALT + 2 then "/" (Console) ALT + 3 then "/" (PRV) ALT + 4 then "/" (Step Seq.) ALT + 5 then "/" ( Matrix ) ALT + 6 then "/" ( Staff ) ALT + 7 then "/" ( Loop Construction ) ALT + 8 then "/" ( Event List ) ALT + 9 then "/" ( Synth Rack ) ALT + SHIFT + 1 then "/" ( Lyrics ) ALT + SHIFT + 2 then "/" ( Video ) ALT + SHIFT + 3 then "/" ( Big Time ) ALT + SHIFT + 4 then "/" ( Markers ) ALT + SHIFT + 5 then "/" ( Tempo ) ALT + SHIFT + 6 then "/" ( Marker / Key ) ALT + SHIFT + 7 then "/" ( Sys Ex ) ALT + SHIFT + 8 then "/" ( Navigator ) ALT + SHIFT + 9 then "/" ( Surround Panner )
-
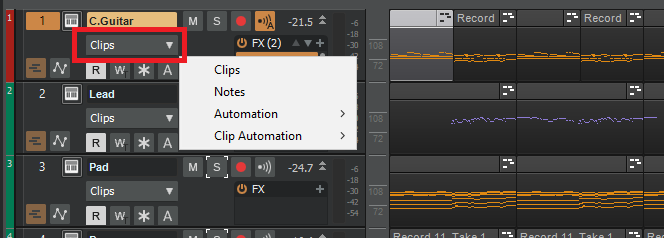
You're not recording automation here, you're recording MIDI control events in a standard take lane. Try using an automation lane with it set to Modulation on the desired channel. You don't need to record arm the track, just write enable the automation and press play: Note the two steps: 1. Assigning the automation parameter - which is what the envelope will control. 2. Assigning the remote control - telling CbB you want to use the modulation wheel (controller 1) to record the automation. The reason for the two steps, is that you could use step 2 to use your modulation wheel to record any automation parameter - not just modulation. BTW - I tend to set automation mode to "Latch" when recording automation for the first time, then set it to "Touch" for subsequent edits. Setting it to Touch means it'll only overwrite when you're actually moving the wheel, and leave everything else as is, whereas Latch will overwrite everything.


