


RexRed
-
Posts
830 -
Joined
-
Last visited
Everything posted by RexRed
-
Hello Cakewalk peeps! I have followed your suggestions they were very accurate what was left to edit in this song. The song before was very raw and in some ways that adds a sort of human touch but it also can be grating on the ears. I have added a lot of new edits. The first thing I did was manually adjusted the loudness of each syllable of the lead vocal and harmonica in Melodyne Studio. Thanks for the suggestion EmeraldSoul. Then, I added compression to the bass, the main song loop with guitars/mandolin and compression on the drums the last mix was a work in progress. This allowed the vocals to obtain a constant volume level above the mix. I also added Izotope Nectar to the vocals and used the auto settings then changed the EQ and compression to taste. I added more stereo width to the upper bass frequency range, the guitar/mandolin loop , harmonica and the lead vocal and I took some width away from the organ, cello, piano, and pad (they were so wide they were out of phase.) Then I added True Iron to the harmonica, guitar/mandolin song loop, lead vocal and the overall mix. Then I adjusted the mix to balance the bass, drum and vocals more precisely. Adding the light compression to the bass guitar and drums helped a lot. I mastered the overall song level with Fab Filter L2. Reverb on the vocal and harmonica is the BReverb "hall" I just can't seem to find a better reverb as good as that one right out of the box. I lowered the mix amount just a bit. I think it is a beautiful reverb with an unmatched character. FYI, the bass guitar is the Dimension Pro Real Basses Dull Fingered 2 prog. The pad is the Dimension Pro pad named "As Quiet As Possible". Dimension Pro Cello is the fortissimo expressive. Thanks for your helpful and very nice comments Cakewalk peeps! I was aiming for a Dylanesque/Eric Anderson sound. I sort of threw my voice into a method and channeled the sound. I would love to play this live on a hillside, great imagery and what a dream that would be! Many thanks for the listens and big love! This should sound better when played loud in the headphones. Critiques are welcome no matter how picky or minute. This song was recorded @96khz 24 bit then mixed down to a 320kbps mp3 dithering pow-r 3 for ReverbNation. Sincerely RexRed
-
My latest song, hope you like Cakewalk peeps!
-
Wow this info takes me right over the edge of absolute non comprendo (in a good way). I would really love to understand this stuff. I think it would take me weeks or maybe longer. All I know is I turn up the big knob and it makes my track sound pleasantly warmer and gives it a fiery presence. I sorry to sound so ignorant. I did notice that True Iron has a "morph" button under the "strength" knob and when i hover my mouse over it it says, enables harmonic structure morphing during strength changes. It would seem that this plugin does actually analyze the signal and morph the harmonic content depending on the strength of the signal. Once again I have no idea how this works but I can hear a more balanced signal when it is on. I am sure this comes with some computational cpu cost to the overhead. I will take the time to try and study the article you sent Dave, it seems to really explain the issue very in-depth. Magnets can make particles of metal arrange into pretty shapes and music is also particles of charged electrons. So it seem that magnets/coils/transformers are arranging the sound electrons into more symmetrical patterns and shapes. (just a guess)
-
I am not recording with or in Melodyne... but I can see why you might think that. I may have not written my post clear enough. I am recording first then adding Melodyne to a comped take and then when i find a certain line that does not work well with Melodyne after edits I try and re-sing that line into the melodyne track and that is when there are problems. If select the section I want to rerecord and change and mute it, it still plays when I record even when i have it muted and I also have comping selected for record mode. In other world mute does not work on the melodyne section. It plays even when muted when recording... and throws me off when trying to sing in a new take.
-
Wow, I hit the mother lode in this thread! Lots of great info that has helped clear things up quite a bit! Thanks for the responses! Msmcleod, your answers help me get quick answers to my questions and progress my understanding in a fast way. . I use the True Iron on a vocal track after the Waves Vocal Rider in the track view fx rack. It seems My logic is that I will get a more even harmonic distribution. (does that make sense or sound right to you all?) Dave, the book you shared is really great! I am actually going to try and read "study" it. It is way over my head as an artist but I still need to learn this stuff. I assume this will teach me to understand the difference between tube saturation and transformer saturation. Are these harmonics additive or are they modulated? If you turn them up, they cause distortion so it seems more like modulation rather than simply adding a new frequency tone to the sound. So (correct me if I am wrong) it is driving the sound with harmonic frequencies much like an FM synthesizer works with modulator feedback loops. Modulation with analogue warmth. These transformers are instruments in themselves. Alan, I am looking into some transformer preamps and mics but they are way out of my range price wise. Sadly, my mics are in the Audio Technica $100 dollar range not the Neumann and Manley $1000 dollar and up range. But I may save up for them, it is worth investing in the right gear. With the price also comes the delicacy of the diaphragm and chance of singing the mic to a premature death. That sucks. Used mics are out. The same would be with the tube saturation in the channel strip. Again, correct me if I am wrong, the channel track would be the carrier and the saturation unit would be the feedback modulator. It seems as if the sound is being driven by these analog wave forms. This would also be the case with the Console Emulator subtly feedback modulating the track carrier. Or is the transformer wave simply being added to the sound? I need to get a handle on the frequencies these tubes, transformers, consoles etc are modulating the tracks with. They seem to excite the track carrier and create a fatter warmer end result. It is like a clean guitar with modulated distortion, one amp distorting another. If i were to use analogue gear then the transformer distortion cannot be removed later. It seems nice to be able to add it after to my own taste or even in some cases, for lead instruments in particular or more clarity, to leave it out... I have always loved FM synthesis because if you have high bit sine waves you can create unique crystal clear sounds that lend themselves well to analog warmth added after. I think I will be learning this new saturation kick of mine for a while to come. I am sorry if I am all over the place with my understanding of this topic I am not bothered by not knowing this yet, this is how I learn stuff by not being afraid to appear dumb in front of a lot of people. lol
-
I believe rather than a bug this is an implementation issue. When track recording with Melodyne the previous take does not automatically mute properly. Even if muted you hear the Melodyne clip play when recording a new take. I believe this problem goes back even to v-vocal. Not only does the previous melodyne take not mute itself when a new recording is made above it, you have to completely delete the melodyne clip and then sometimes manually delete it from the melodyne window also. This makes quickly comping over melodyne takes a challenge that Cakewalk should be able to accommodate more easily. I have tried even dragging the melodyne clip to another track and even this does not work. This is something I really wish could be implemented soon so it responds like one would expect it to respond in the interface. Thanks in advance.
-
Here is the link to the plugin. True Iron Plugin Link Let's pretend I don't know anything at all about transformers (I don't). Haha, I have only heard about the movie. lol First off, I can really hear a BIG difference of warmth and presence that this plugin "demo" adds to my sound. I have a lot of questions. Question number 1: Why? Question number 2: How? Question number 3: Is this what the built in pro channel tape emulator and/or the console emulator is trying to do? Question number 4: Why do I not really hear a difference like this with the console emulator? Question number 5: I am convinced I should buy this plugin for my songs... Should I? Please explain how transformers work on sound and it this not just adding noise to my music. How can noise be good? Shouldn't I try to achieve this with eqing and mixing techniques instead? Question number 6: I recently bought the Scheps channel strip by Waves. It has a saturation preamp section and odd, even and heavy harmonics. Is that the same kind of thing? What about Cakewalk's pro channel tube saturation is that the same kind of thing and then Ozone also has saturation units... This True Iron plugin seems to have saturation done in an extensive and exhaustive way that appears to supersede any of the other methods. I am REALLY confused... Please feel free to write a book in your comments you leave. No amount of info on this topic is too much or too technical. Why add these harmonics? Why is music lacking these? When to use odd, even etc or what transformer models work best for which types of sounds? Those are questions too. How do harmonics change the wave file themselves are they additive or are they like modulators... distortion? Is it like Photoshop filters? (analogy) I am sure blown away by the fatness this True Iron plugin adds to my songs and it seems inevitable that I will soon be adding this to my effects library. It works even though I don't know why. I would like to know a lot more about this... Thanks in advance for any responses Cakewalk by BandLab peeps!
-
This video series is helping some. Yikes, this stuff is complicated.
-
I just bought the Fab Filter L2 plugin ( was using the old L filter) and it has a setting for -14db for "streaming". Well, I have always mixed my final output to where when limited it would be just under the brick wall threshold so CbB would not produce any vertical orange bars. In other words, the waveform preview would fit the entire envelope in the Cakewalk master track bus. It seems that this is too high for what is necessary on the web for streaming. I hear that streaming services just lower it if necessary to -14db. When I set the output level to a lower level then the limiter does not kick in at all. I am now completely confused. If you need more info I will be here to discuss this topic more. Thanks in advance for any suggestions or tips. How do I get the limiter to kick in and even out the peaks while still keeping the total gain around -14db? My PC will run 32bit oversampling without even breaking out a sweat. I have a music song loop track that I got off audio blocks and I am trying to attenuate loud and soft sections so it has a perfectly flat response. I tried the stock compressors in the the pro channel and I tried the Waves stereo Vocal Rider and I tried CA-2A and set it to limiter. When I look at the waveform in the CbB master bus in the Fab Filter plugin it keeps jumping in volume at the same point no matter what I do. I only have that track playing. Am I missing something here like relative gain versus something else? I used to have a specific way of mastering and now it all seems confused with this new plugin approach. I am watching YouTube videos but this Fab Filter L2 plugin is so new there are not many tutorials on it. I need to read the manual I guess. Please kindly contribute any advice you can to help me possibly understand how this relates to Cakewalk's optimal output level for exporting files. Thanks.
-
Does Cakewalk use more resources to exclude plugins?
-
Okay the dump file is 4 GB, I can create a zip file and I can place this in a shared One Drive folder. Please let me know the email address to share the One Drive folder to. Thx
-
I have the latest versions of Melodyne Studio and CBB. Cakewalk has been locking up like this for years so your idea about it being a plugin is probably correct, I have tons of them installed. I am wondering if it is a plugin from X3 that perhaps is no longer compatible or another 3rd party plugin perhaps a 32bit plugin? Will a dump file tell you which module or plugin caused the lock up or is it sometime too vague to find out exactly what caused it? I will create and send a dump file within a zip file. When should I create the dump file after a lock up or can I create it anytime? Will it keep a long history of past lock-ups? Where do I send the dump file? Thanks in advance for your help Noel.
-
I used to be a hardcore V-Vocal fan but Melodyne Editor (Essential is nearly useless) won me over and I eventually bought Melodyne Studio when it went on a major sale. I work with a lot of harmonies and being able to have my blobs in the same editor window is an absolute necessity. I found myself editing and re-editing lines in V-Vocal over and over rather than getting them right and being able to leave them. I have had trouble with the lack of ability to "draw" pitch lines in Melodyne but now I use a two pronged strategy. I get the pitch as close as I can in Melodyne using mostly the auto align and then the pitch drift tool and then I use the real-time pitch correction in Izotope Nectar (not full strength). Together these work perfectly and place the pitch granularly where it needs to be.
-
I am not writing this as an outright criticism of Cakewalk just to get feedback from others who may experience this same thing. I would never even dream of using another DAW than Cakewalk. Every project I make has occasional lockups where the Cakewalk program will stop responding. I also have experienced program lockups in Studio One so this in not specific to Cakewalk. But I do not experience the same lockups ever in Adobe Premiere when I am working with both audio and video. Premiere may freeze and halt for a moment but it always comes back. But in Premiere I am usually only using one or two audio tracks. When Cakewalk locks-up, I have to restart it and unplug my audio interface a plug it back in several times until Cakewalk can detect it again. First off, is this something others experience also? I have an Intel I9 12 core CPU with a fully updated version of Windows 10 and an Nvida 1080ti graphics card. This lockup problem has occurred for many years on many different systems I have used with other audio interfaces also. My current audio interface is a Roland quad capture. Lately it is usually when I am working with Melodyne studio when the program locks up. It is when I try and overlap Melodyne takes in the same track which is apparently a big no no. I have often speculated as to why this occurs. Though the lockups can occur simply editing a midi track also. I have sometimes thought it is a latency problem. It seems to happen when I have latency set really low. But it can happen when latency is high also. Latency might explain why it also happens in Studio One. This makes me think that maybe I might need a USB 3.0 audio interface and that might correct this problem. It is always my audio interface that seems to go kaput. Cakewalk "always" loses connection to my AI when the lockups occur. Am I overloading my USB bus? But these lockups also happened when I had an Emu 1820M and X3 with an internal sound card... These lockups have been happening for many years with other PC computer systems and older OS also. I have also wondered if the lockups have been occurring because of a problem with the way history saves previous edits. The lockups seem to happen when I have not saved my work for a while so I lose a lot of progress. But they can happen when I do not have a long history also. It could be a Windows problem and that is why it happened with Studio One... But this would have to be a very old Windows problem perhaps something to do with ASIO. In order for it to be a history problem Studio One would have to have the same history architecture as Cakewalk and maybe that is because both programs are borrowing from a basic Windows history routine where Premiere seems to have come out of the Mac world. I really don't know, but I would love to get this stabilized somehow. Is there someone out there who uses Cakewalk a lot on large projects and does not have Cakewalk lockups? Ever? Let me know your own thoughts on this, thanks.
-
New song peeps! Ever experimenting with new genres. Best to you all! RR
-
Thank for the awesome comments peeps! We were aiming for an Everly Brothers type of thing. I thanks for the tips too, I will work on the mix a bit more soon! Best to you all!
-
Yea, I have been using Cakewalk since MS-DOS lol
-
-

Correlation Trace with Dimension Pro presets
RexRed replied to RexRed's topic in Cakewalk by BandLab
Here is a video I just made with Cakewalk By Bandlab and correlation trace using Izotope's Ozone 8 imager. Sorry about the audio problem I was having, my song sounds like it is in a can. I had two audio sources coming from my DAW into my recording mixer. It is only there when I play my song. The information though about correlation trace is still there. Any comments on this video are welcome. Sometime later today YouTube will be done processing the video and it will be in 4K. Cakewalk By Bandlab Correlation Trace Ozone 8 RexRed -
Correlation Trace with Dimension Pro presets
RexRed replied to RexRed's topic in Cakewalk by BandLab
Hello Mscleod, thanks for your comment. You have to look at the patches through a correlation trace and you will notice that most of them hover directly on top of the center line. Many of the strings, the pianos, the Hammond patch, the pad "as quiet as possible", French horn... nearly all of them are that way. I will make a YouTube video showing the trace and how it displays them, and how I correct them. I will post a link here soon. -
Let us into your BandLab Audio LAB...
RexRed replied to Shawn Lee Farrell's topic in Cakewalk by BandLab
Nvidia 1080ti, with 12 core Intel I9 PC, w/3000mhz RAM (and tons of hard drive space) sitting on the floor, Kustom speakers, (1) 4k Sceptre monitor (1) 4k TLC Roku TV and one standard def Acer monitor, M-Audio Oxygen 49 keyboard controller, Elgato Stream Deck, Logitech BRIO webcam and Logitech C920 webcam, Panasonic HC-X1000 60p 4k camcorder, Epson Tank 2550 printer, Nokia phone (taking the picture) and Samsung tablet, Audio-Technica AT2035 large-diaphragm condenser microphone, Roland Quad-Capture audio interface. (12 stringed instruments in the closet) My latest song.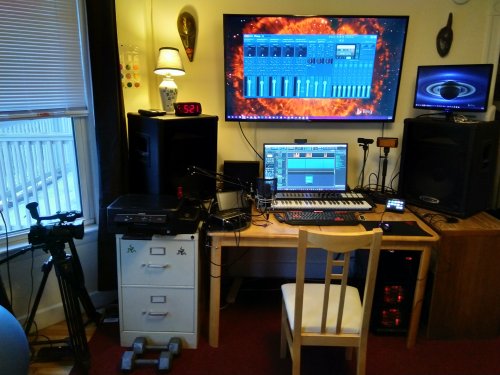
-
I thought I would bring this subject up to help CBB people who (like me) use a lot of Dimension pro presets in their music. One day I was listening to one of my songs on a phone speaker and noticed that the song sounded bare and had hardly any music with the voice. This was when I discovered that my favorite Dimension Pro pad had completely canceled itself out when the song was played in mono. Then I discovered that nearly all Dimension Pro presets are not tuned properly in phase, someone here in a blog (I think it was Craig Anderton) said something to the effect that the presets are put out of phase to make them appear to sound better (wider). Well, this can lead to many problems down the road when using them in your "radio ready" song. I use the correlation trace feature in Izotope Ozone 8 on each and every track to make sure that they are in proper phase. Otherwise your track can completely disappear when played in mono situations. Also, my ears have become trained to prefer sources that are in phase, when they are out of phase they sometimes seem hot and aurally "excited" and appealing but they do not fit into a mix properly. A track should always have its correlation trace corrected not only for mono purposes but also for getting the song landscape to meld together in a more focused way. Nearly every Dimension Pro preset is out of phase and needs to have its correlation trace phase corrected. In other words out of the box they are unuseable in production without correcting their phase. Otherwise you may find yourself in the situation i found myself in where your instruments simply disappear when played in certain playback configurations. Also the correlation trace is necessary to give mono vocals and bass guitar some width in the mix. Both vocal and bass both often appear as a sharp spike up the center in the stereo field. You should always cut the width out of the bass frequency range but it is okay to add a little widening in the treble ranges in both the bass and the lead vocal. This helps fill out the center of your mix so there is not a huge hole in the center of your sound landscape with the vocal huddled sharply in the center. It also helps the vocal nestle into the mix better. Please let me know if you agree or disagree with what I have written here. I am interested in other opinions on this topic.
-
Thank you for that very helpful video msmcleod! :)Best to you! RR
-
How do I restore CBB back to factory keyboard shortcut layout?
-
Here is a new song Cakewalk peeps! Just released today I can still add and subtract changes. Let me know what you think. It is so new I still have some minor tweaks. By Your Side - RexRed

