tulamide
-
Posts
57 -
Joined
-
Last visited
Everything posted by tulamide
-
You might confuse the audio engine with an export format here. Wether the engine is set to 32-bit or 64-bit has no influence on the export formats you use. Those are seperate from the audio engine's inner workings. You can always render to a format, that other tools, distributers or hardware understands. Or make a mistake and choose a format that they don't understand.
-
I agree. My contribution was just to explain what is actually meant with a rather non-explaining term like "64-bit engine". Wether you see a need to use it or not, is everyone's personal decision. If you don't mind dc-offsets, denormals and other symptoms caused by it, leave double precision off. It of course is not doubling your memory usage, as it's just the engine that uses a 64-bit value instead of a 32-bit. I doubt you will even notice a memory difference, since apps are dynamically allocating and releasing memory. But yes, if concerned about some bytes of memory, while loading your 60 GB string library, don't use it. Yes, 32 bit is just fine with audio streams. If all audio streams had 32-bit each. Unfortunately, you're mixing like 40 tracks to just one stereo track, which would benefit so much from double precision while mixing. But if you're frightened of 64-bit data types, you better don't use it. Yes, do the blind A/B test. Erm, wait a second, you do this on your hardware, don't you? The hardware, that never gets in touch with 64-bit precision, but gets down-rendered audio, like 24-bit @ 44.1 kHz? Maybe even dithered? So you don't listen to 64-bit audio, but 24-bit or maybe even 16-bit audio, which says nothing about the 64-bit precision within your DAW. So what's the test then for? Ah, probably to see if your hardware really doesn't make a difference between 24-bit and 24-bit! Yes, that makes sense. In other words, using an apple to judge the quality of a banana. And of course, let's not forget that some years ago, it was 16 bit @ 44.1 kHz, that was considered the best possible audio. Yet, most studios expect you to deliver 24-bit @ 48 kHz nowadays. How strange that we have to work with formats that are better than the best possible audio format. Don't progress, I say, let's keep things, where they were. Like 40 years ago, when OS developers stated "640 kB of RAM is enough". And it was. For like half a year. Then things progressed. With bitflipper and my remarks, you now have a lot of personal opinions, which you can either use or not, to decide wether to use 64-bit precision or 32-bit precision, when calculating numbers.
-
That's the point. A 64-bit CPU communicates based on the length of 64 bits (or multiples thereof). Be it busses or address registers. Everything can be done on 64-bit wide communication. But that's the hardware side of things. On the software side of things, apps at all times use data types, that are totally detached from a processor's architecture. We wouldn't have seen the game Elite, which used 32-bit data types although running on a 16-bit processor architecture. Cakewalk internally uses certain data types to represent audio samples. A sample in dsp is the smallest slice of data in audio streams, a sample point. Because recording audio is done by getting a sample of the original every x seconds, where x is usually very small, like 44100 times per second. The value of a sample is a representation of how strong it makes the membrane of your speaker/headphone/etc deflect outwards or inwards, which is why it is considered to be in the range of -1 and +1, and so naturally such a number will have quite a few digits at times. In the past, for example when working with 16-bit data types, this was less of an issue, because the number was actually stored as a so called 16-bit signed integer, in the range -32768 to +32767. But that means, you only have 65536 descrete steps to represent a sound wave's "curviness". And so DAWs soon switched to using what's called a single-precision floating point format, or single float in short. This is a format that instructs the CPU about the actual value, instead of really being a value by itself. It is 32-bits wide, and this range is divided into 3 fields, the sign, exponent and mantissa. The CPU uses a single to do this calculation: -1^sign * 2^(exponent-127) * 1.mantissa the sign is 1 bit, the exponent 8 bits, and the mantissa 23 bits. To pass this scary part, let's just say, both exponent and mantissa are limiting. This format can't represent every possible value. And so the cpu rounds numbers to nearest neighbor, if the exact value can't be reached. This makes things imprecise on edge cases. For example, a sound wave's value could become a very small number instead of 0. And many more unwanted effects. When using "64-bit engine", Cakewalk switches the whole audio stream pipelines to so called double-precision floating point format, or double float in short. A double is 64-bits wide and its exponent is 11 bits wide and its mantissa 53 bits wide. This is still error-prone, but now there is way more headroom, before inaccuracies appear. This higher precision of course means, that everything takes a tiny bit longer to calculate and the memory usage of course is higher. Both is of no concern if your PC is a rather recent one, say, 5 years old. You also get a higher dynamic range (but of course only inside Cakewalk). As soon as you render to anything other than 64-bit, you will raise the noise floor again. So just use 64-bit engine mode, whenever you want (best, by activating it via Edit > Settings > Audio > Driver settings, I'm on the German version, so the path might be named a bit differently in English), the downside is neglectable and the higher precision will yield more accurate results (even if often we won't notice them).
-
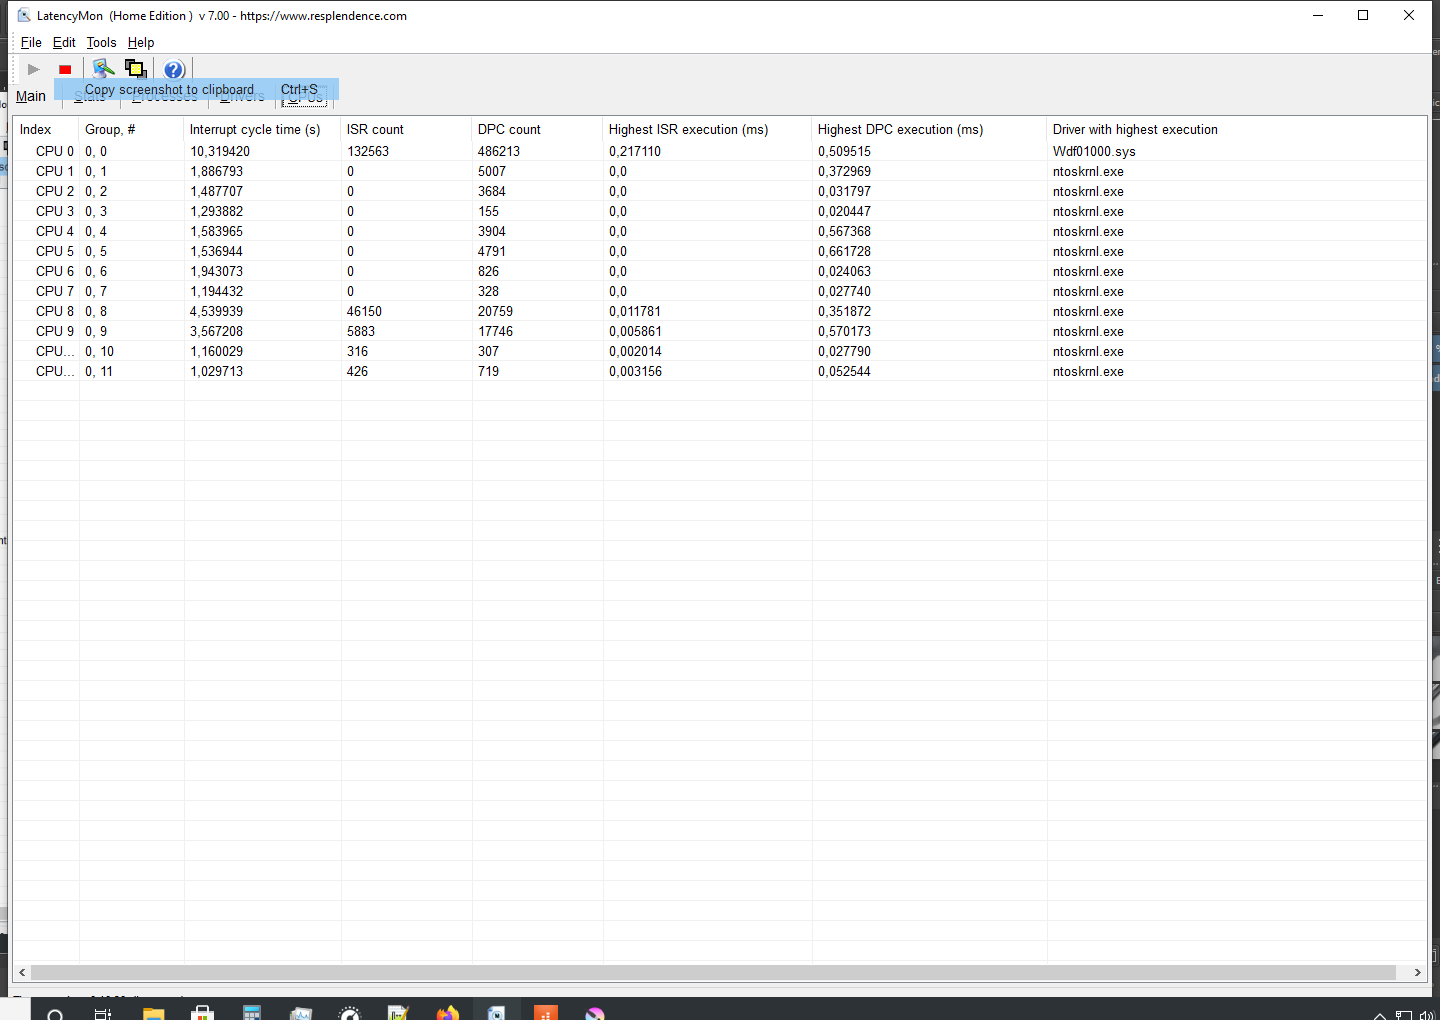
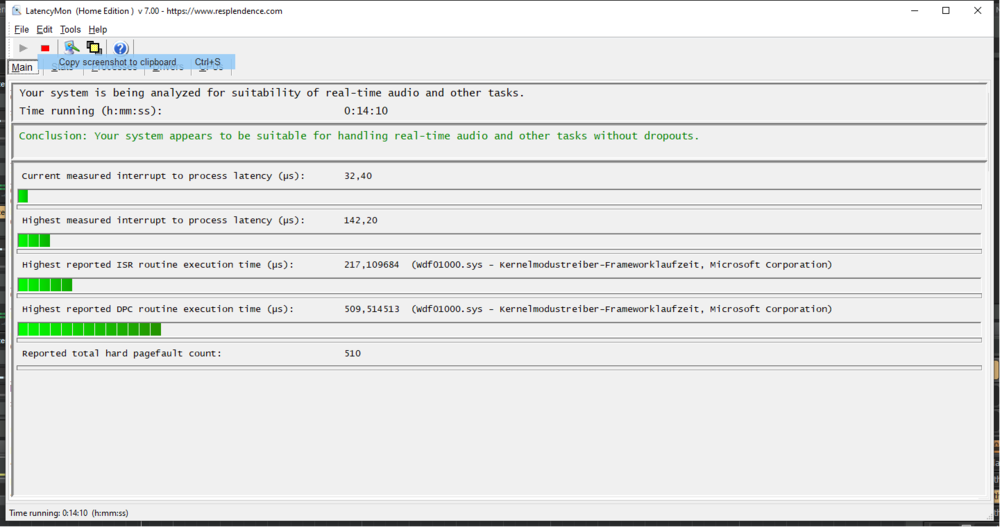
Thank you so much for the tips! I installed and ran the software. Unfortunately, I can't interpret, what it tells me! I attached, what it said. Maybe you see something, that shouldn't be as it is? I did that before and I had issues. But I did it again, and this time ran the Waves Analyzer. After that I had a setting of 411 samples buffer and 11 ms latency, which is equal to ASIO. I worked for 20 minutes, during which the issue didn't appear! That's good news. But I have to do a longer session, before I know if this really fixed it. It's on my list! But after my new PC, there wasn't enough money on hand to buy that as well. summary.txt


-
I really hope somebody has a tip, although I doubt it. I searched the whole internet and couldn't find a single matching issue. I start Cakewalk and everything is just fine. I load my VST instruments and start making music. But somewhere between 5 to 15 minutes in, the typical crackling sound, you normally get when audio buffers are too small, appears. However it's not the buffer size! Whatever I change it to (large or small), after a change it's all working again for 5 to 15 minutes. I have this issue for a while now. First on an i3 4th gen, which I used as an itermediate. Now I have a brand new PC, with Ryzen 5 5600G, 16 GB RAM 3200 MHz and M.2 NVME, and it still is present. This new PC also has a newer version of Win 10 (20H2), whereas the older one had, I think, 1900 or something like that. The issue occurs, no matter the driver. I tested ASIO4ALL, FL Asio and WASAPI. Even more, I don't even need to change driver settings. When the issue appears, it is sufficient to just start any other application (a text editor, a browser, even the calculator, etc.) and then go back to the DAW and all is good again - for 5 to 15 minutes. I was carefully preparing the PCs (the old one and the new one) for use as a music production tool. No background apps, no updates while running Cakewalk, no energy saving, CPU runs always at 100%, etc. And I have no other issues. Wether video editing, UX design, gaming - everything works just fine. Cakewalk is the newest official version (but not the test versions), Win 10 Pro 64 bit 20H2, no third party AV (just Windows Defender). I'm out of ideas and extremely frustrated that I can't do what I love most, music making sessions of several hours. Please, if you think you know the solution, or at least have a not so common tip, help me! (Don't feel insulted if I don't react immediately, I might not have the time to check the forum several times a day) EDIT: I didn't mention that this only happens with VSTs. Pure mixing of audio tracks with no VSTs involved works fine. Also, it seems (but I'm not sure), that whenever the issue comes up, even after the playback is stopped and all tracks silent, the audio engine still does some work (the load isn't 0%), while stopping playback without the issue seems to go to 0% all the time. It doesn't matter which VST though. All of them are affected.
-
And it was! Thank you so much, the solution was so easy, that I'm embarassed now. But also glad to have it sorted out!
-
This is driving me crazy! I love the control bar docked at the bottom. But it doesn't save this setting. Each time I load a project, I briefly see the bar at the bottom, then it moves to the top. New projects also need to be adjusted. In short, I have to move the bar to the bottom each time I want to work on something. I stayed away from manually editing any config files, because I tend to mess things up. But please, if there is a possibility to have the bar docked at the bottom by default using the config file, please share what I have to do! Thanks a lot!