


JL
-
Posts
59 -
Joined
-
Last visited
Posts posted by JL
-
-
-
go to the Menu->Views-> Tempo or press alt shit 5 to bring up the tempo map pane
you can adjust the tempo at any point by going to the specific point in the timeline and press the + sign at the top left. you can add a gradual tempo change by using the draw tool and drawing a line between the 2 points
-
 1
1
-
-
3 hours ago, Chuck E Baby said:
I am interested in picking up a touch screen myself. have been for a while now. Back to your problem,
It appears to be a focus issue which is typical. You must first set focus by touching the fader, then the second touch will command fader movements. It is evident by watching you as soon as you touch the fader, you can clearly see the fader becomes focused (the track meter becomes highlighted).
This is done with a mouse differently because clicking on the mouse accesses focus instantly and them mouse movement changes fader values. Its going to take a double click in your instance. Normally a mouse double click would reset the fader value to 0db (or your set snap value). But in your case touch needs to have focus first.
Just tried this, doesnt seem to work. even with a single tap which causes the meter to be in focus (rectangle appears around the fader) it still has the slight jump.
2 hours ago, pwalpwal said:from the vid it looks like it only "detects" a touch after a certain amount of movement, rather then from the actual first touch, maybe to avoid accidental touches?
seems like this is the issue, i realized i could move my finger sideways first to "activate it" then move downward. but its really not intuitive to do it this way esp if i want to be able do multiple faders at once. It also seems like its a cakewalk thing as knobs and faders in plugins doest have this threshold and immediately moves.
-
So i bought an Acer T232HL touch screen a while back thinking i could use it as a mini Slate Raven ? as cakewalk has touch support. But one thing has always bugged me is how the fader always has an initial jump when u try to move it, so i never actually adopted the touch capabilities for automation and only used it as a secondary monitor.
Is anyone else using a touchscreen monitor have this problem too or is this a problem with my specific monitor/touch setting?
heres a short vid showing the issue, pardon my bad fader skills as i was trying to move it while seeing from the phone screen
-
What soft synth/vsti are u using in the project?
-
3 hours ago, Gatters said:
Interesting - I've not come across clip fx before. Is this the main reason why you split them up like this, so you can have different processing for those different sections? There's nothing in this particular band's set that would need this (it's all acoustic, no pedals etc), but it'd be a good thing to know about in the future
for example sometimes u may get a small section of a clip with some crackling or clipping you can chop that clip up, drop in a declip or decrackle plugin and just bounce that section instead of having the plugin on the track running throughout the entire set.
-
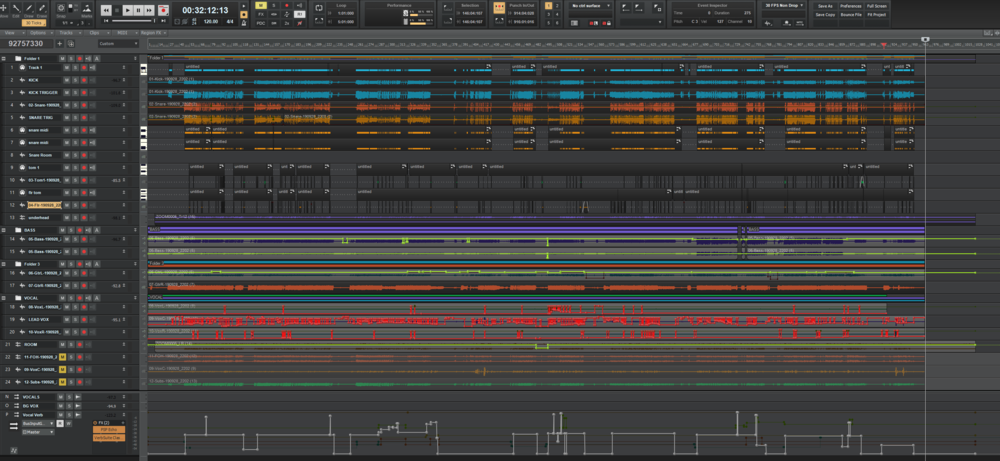
i usually mix it in one large project file mainly to be able to export as one continuous audio file to be sync to video.
Like Ludwig said always make a backup first before starting. I would suggest to start by identifying the start and end of each songs with markers.
There's gonna be a lot of automation of clip gain/volume to reduce the amount of bleed and stuff, reverb mix, delay tempo, panning etc etc
Splitting of clips is also very useful for example if the guitarist changes patches between distorted and cleans, Vocalist doing screams and clean singing.
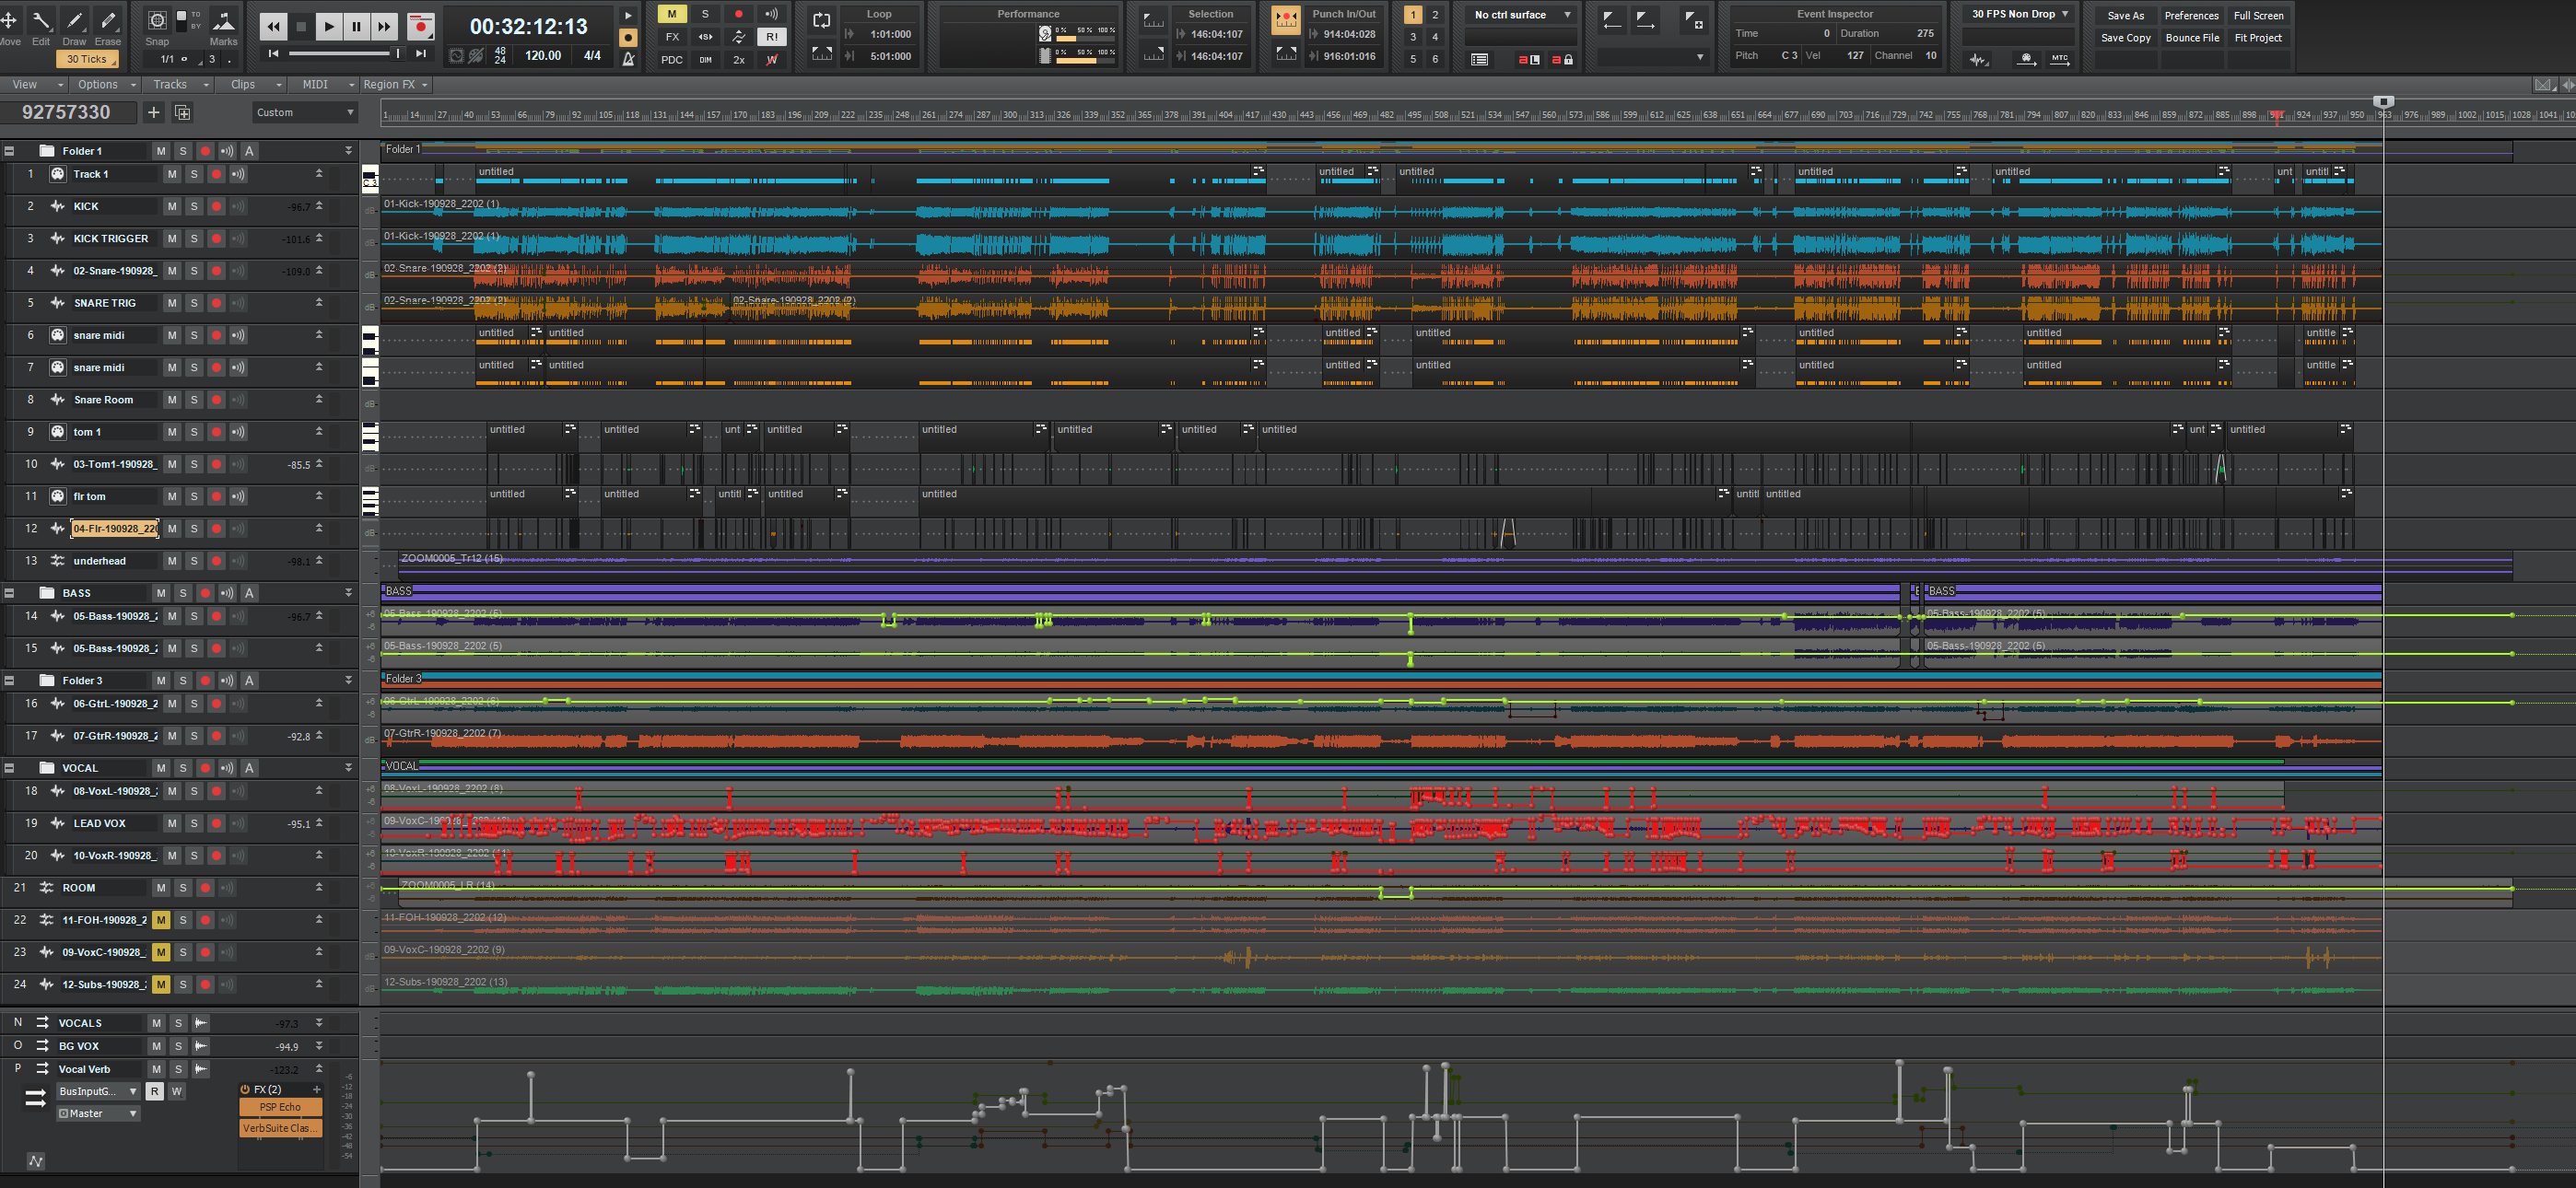
Clip fx are also your friend, but it can really add up and get very heavy on your cpu . You may also lose track of your clip fx easily so i suggest bouncing to clip once you feel your clip fx has achieved your desired goal.
Here's a screencap of my mix for a 30min metal/hardcore set of a 5-piece band
-
1
-
-
On 9/28/2019 at 10:26 AM, JL said:
i used to be able to hold shift and extend multiple clips by specific duration but i cant seem to do it in this version. Not sure if this is a feature that requires additional step to turn on in this release. here's a gif trying to show the issue.
UPDATE: just realised its because of this new feature:
Holding SHIFT on Comp track (lanes collapsed) now allows for adjusting split location across lanesis there a way to keep this feature, but still have the ability to extend the multiple clips by a specific duration?
@Noel Borthwick is there to bypass that new feature or has the key modifier for adjusting multiple clips at once been changed?
-
i used to be able to hold shift and extend multiple clips by specific duration but i cant seem to do it in this version. Not sure if this is a feature that requires additional step to turn on in this release. here's a gif trying to show the issue.
UPDATE: just realised its because of this new feature:
Holding SHIFT on Comp track (lanes collapsed) now allows for adjusting split location across lanesis there a way to keep this feature, but still have the ability to extend the multiple clips by a specific duration?
-
Singapore
-
14 hours ago, Grem said:
Yep, I like it heavy, somewhat. I'll give it a listen. It's good to get a variety of music in here. That's what I like about this place. It's all over the place!!
Listened to Desolation and Requiem and I can say that's a little harder than I usually listen to. You did a good job on the Prodution. Both songs sounded like they came off the same album. Playing was executed well as was the recording/mix/mastering.
At the end of Requiem, is that drummer really that fast? : ) If so, give him props!! That was quite a finish!!
thanks for the kind words! All the songs were recorded across a long period of time so there was quite a bit of sonic variations.
yes the drummer is pretty sick, i've help filmed some of his live drum stuff too
-
1
-
-
Any fans of heavy music here? A deathcore band ,No Rest for the Weary, i helped produce just dropped their album today.
Recorded, edited, mixed and mastered fully in Cakewalk.

-
On 8/7/2019 at 5:01 AM, RevSpyder said:
Well thank you! I think we may be making progress. Setting the Monitor switch to 3/4 and the headphones the same, I eliminate the echo. However, it also eliminates the drum track. The whole point is to hear the drum track and sing or play along to it. To hear the midi drum track from the DAW I have to set the headphones to 1/2. With the monitor set at both 1/2 and 3/4 but the headphones at 1/2 (so I can hear the drum), there is still an echo.
Seems like your cakewalk project's master output is routed to only the 1/2 output hence you dont hear the midi drum track or the echo. Based on your observation that the echo only appears on 1/2, that means the latency is probably caused by having the input monitoring in the cakewalk turn on.
Just turn input monitoring off (speaker icon becomes grey) and switch back your monitor button to 1/2 and you should be able to hear cakewalk, youtube etc.
input monitoring button in cakewalk: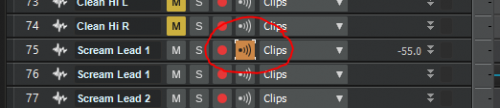
if direct monitoring is too soft, you can probably turn down your backing music (or the drum track) and turn everything way up.
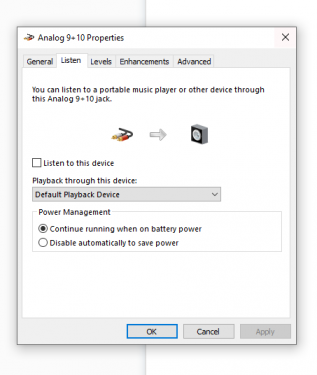
if turning input monitoring off doesnt fix the echo, it could be the "listen to this device" from windows recording device:
find your interface input under the recording device tab and make sure "listen to this device" is not checked
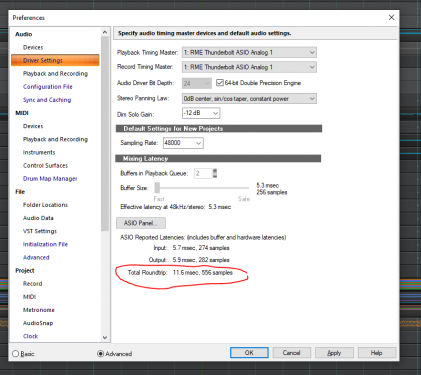
if you really want to hear your vocals through certain plugins/effects you need to use low latency plugins and have a low buffer size/interface with good drivers. Let us know whats the latency number your interface is currently reporting.
Press P (for preference)>driver settings and check the round trip latency value
-
+1 this is really irritating if you're dealing with multi-mic stuff like drums and after spending a number of minutes trying to get them all to show up nicely then accidentally hitting F which resets everything... *facepalm*
-
4 hours ago, Jim Roseberry said:
I was running an Apollo-8 (Quad) and Quad Satellite expander (both via Thunderbolt) for a good while.
Fidelity is excellent (super low noise-floor).
Stability was excellent.
My only gripe with the UA audio interfaces is that (due to their onboard DSP), round-trip latency is a little higher than something like a UFX+ or Quantum.
Of course, if you're wanting to run UAD plugins, you can play/monitor in realtime thru UAD plugins with 2ms round-trip latency (via their Unison tech).
The lowest round-trip latency you'll achieve with the Apollo series (and Arrow) is ~3.7ms.
If you go Thunderbolt, you've got to make sure all the details have been tended-to.
The combination of Asus Thunderbolt EX3 and the Apple Thunderbolt-3 to Thunderbolt-2 adapter has worked extremely well in all scenarios we've tested. This includes many different desktop builds, laptops, etc...
Though Presonus recommends the StarTech Thunderbolt-3 to Thunderbolt-2 adapter, the Apple adapter works perfectly fine with Quantum.
Yup I'm using a x299 mobo with Asus ex 3 card. I've even went to buy both the startech and apple adapters. Could just be an isolated issue with my pc but I realized the dropouts were also due to using non vst3 plugins. Thunderbolt as a whole is really more of a Mac thing, way better drivers implemented in Mac than in windows. Hence u don't see a ton of thunderbolt interfaces with windows drivers right out of the box e.g. slate vrs8 (beta), Steinberg arx, antelope discrete (beta)
The Apollo is a great interface and I wished that it would work well with my setup but eventually I have to go for a more stable option even if it meant spending the extra dough.
Yup the extra buffer for their plugins' delay compensation adds quite a bit of latency. You can adjust this extra buffer but like what Jim said, if you intend to use a lot of vsti with midi controllers, the UA stuff are not the best.
-
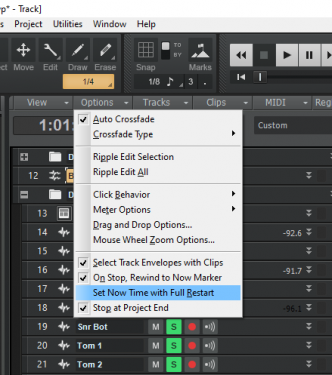
sometimes when you are playing back and you drag and drop a plugin to a track it might need a playback restart to probably recalibrate the delay compensation of that plugin. I also noticed that if your project has melodyne regions it is also prone to have playback issues when u jump between different parts of the track without stopping the transport first.
one way is to check this option and see if your problem persists
-
ive avoided elastique mode for a while now as i've realized that even though it might sound better, it has caused more glitches than any of the radius modes.
-
On 7/30/2019 at 8:52 PM, Davydh said:
I'm considering different soundcards/audio interfaces for a new computer.
I'd like to know does anyone use Universal Audio and does anyone know if their gear works well with Cakewalk? And their proprietary in-house plugins?
Thanks guys!
I don't want to buy it then find out they don't go together well...
ive used the blackface apollo 8p via thunderbolt 3 and faced many issues, mainly dropouts in cakewalk. I couldnt figure out why, ive tried all buffer sizes, windows optimization and bios changes to no avail. Email UAD support and they couldnt help much too. Could be an isolated issue with my PC but ive since sold that apollo and gotten an RME UFX+.
Also WDM drivers are really bad that causes lots of crackling when playing audio from your browser etc. Also, the bad wdm drivers causes your recording source to be badly distorted when using the apollo with discord or skype etc.
You can read several issues in their bug reporting forum
Sources:UAD WDM Drivers issue (first reported in 2017 in the first link):
https://uadforum.com/support-troubleshooting/30545-apollo-8-thunderbolt-recording-crackle-sound-non-daw-apps-problem-windows-10-a.html
https://uadforum.com/support-troubleshooting/40666-apollo-thunderbolt-wdm-issue-ever-fixed.html
https://uadforum.com/support-troubleshooting/42211-windows-audio-crackling-randomly-possible-solution.html#post290032
UAD Arrow WDM crackling (supposed fix): https://uadforum.com/support-troubleshooting/43635-amazing-solved-crackling-distortion-windows-44-1-48khz-100%-working2019.html -
Thanks so much for listening to our feedback! Cakewalk forever!
-
 1
1
-
-
4 hours ago, Noel Borthwick said:
@Walter Treppler and @btbrock I understand where you are coming from. We thought a lot about this change because we understand that muscle memory can be hard to relearn.
However one of the basic workflow's during playback is seeking visually to time positions and previously it required shifting your focus away from where you are looking at the clip to set the time. i.e. imagine you are trying to playback and jump to a peak in the waveform to audition from that point, you now have to travel all the way to the time ruler to set the time which can also be distracting.
We have made a small change to help accomodate your workflow better. CTRL clicking will no longer set the time so you can ctrl click in white space and it will clear the selection. Alternatively you can do what btrock suggested and right click lasso whitespace to clear. If you still hate it after trying it out let us know.
Ive been searching throughout the settings trying to revert this behaviour. Please let this be optional, i believe cubase has a setting that disables this feature. For one it's kinda hard to relearn the muscle memory and another reason is that also I use cakewalk as a daw for live playback and patch change, I don't want a have to deal with a random misclick on the touchpad to ruin our set.
-
I noticed this happens sometimes too, there are times when it certain templates are saved correctly. Other times it might not.
I think it also happens when there's multiple soft synths in your track template, like its probably loading the audio tracks first before loading the right soft synth hence the routing gets routed to a different soft synth as the correct soft synth hasnt been loaded. its kinda frustrating to reroute everything esp if you're dealing with huge multi-out stuff.
hope it get fixed
-
1
-
-
thanks guys! this is my first tutorial, hope i manage to get my point across well. My new year's resolution is to do more vids and definitely more cakewalk ones, so subscribe if you wanna see more!
-
1
-
-
A few days ago someone asked about multi-track drum editing in cakewalk on the facebook user group, so i decided to record a short tutorial on how i usually proceed with non-destructive editing drums with the help of audiosnap!
Check out the video here:
-
2
-
2
-
-
This was probably been mentioned in the old forums, but it will be really cool to have Visual Clip Gain, where the waveforms of the clip increases/decreases based on the amount of gain applied to the clips. This will really help with editing stuff like ghost notes for drums and stuff.
-
9
-
 1
1
-
Any one experiencing (intermittent) 2 second sync delay?
in Q&A
Posted
it has happened to me before, no idea why. recording vocals into a punched region with no count in enabled had some sync-ing issue, i think its gotta to do with the delay compensation. usually ill just need to restart cakewalk and it works normally again.
this also always happens when im reamp-ing or recording my axe fx-3 via AES, the first take of that session is always off sync, seems like a clocking issue thing, but subsequent takes will be alright