


-
Posts
3,376 -
Joined
-
Last visited
-
Days Won
8
Posts posted by Will.
-
-
Unlike every other top DAW company, we have a very-very small team trying their best to give us a top performance DAW. Let's all give a hand in gratitude for what has been done since the new team took over. I'm sure there are plenty of features yet to come, but it requires some patience to see this new world to arrive. Let's all keep the team's spirit high.
-
 5
5
-
 1
1
-
-
9 hours ago, Starship Krupa said:
Ah, I guess I should have included the actual sample I was trying to work with rather than the "mix."
Mostly LCV did a good enough job putting in the markers, once I told it how many beats were actually in the sample.
I can't even repro the horrid result.
Here it is in MP3 form:
What is the BPM of the project?
-
20 minutes ago, Max Arwood said:
Thanks for jogging my memory. I forgot that regular kick can be tuned too. That could add a little something to a mix. I wish there was a plug-in that could track the bass and add a little sub in the pitch of the bass when it hits. ?
There is. There are plenty out there. Waves got one. You can use Serum too. Though, if you can dive a little deeper in your "Sound Design" knowledge you wont need to use fancy plugins.
You can even just use saturation, upward compression, parallel compression or the use of a multiband compressor to achieve that sub frequency. Theres literally thousand of techniques that you can use. You can even use just a distortion in the lower frequency region to bring out the thump. It all depend on the sound you're after.
You can use two instances of XSampler (achievable with the Loop Construction too) to transpose one Kick to a lower register within the key and the other one to a higher register and blend the two together. Throw some distortion on it and EQ to taste.
-
 1
1
-
-
Yeeck! What a tale to tell.
-
18 minutes ago, Max Arwood said:
I agree with Helis.G waves pitch is super light weight and good for +-2-3.
Thanks Will I have never used loop construction but this good to know.I use it a lot to change a key of an 808 or sometimes used it on vocals to fine tune to key. It is extremely limited, but it serve me daily with certain small edits. Sometimes you dont need melodyne.
-
1
-
-
2 hours ago, Starship Krupa said:
I decided to give Cakewalk's Loop Construction View a try. It's not gone so well. It did at first, but then things went into the hay in a big way.
I'm trying to use a 4 bar intro of an old rock song as my loop, and I've opened it in the Loop Construction View, hit the "Loop" button, set the correct number of beats, adjusted the pitch using that control. I dragged the loop onto an empty audio track, then opened the Loop Construction View and there it was. I
It all looks fine and plays perfectly using the Loop Construction View's preview button, but when I engage Cakewalk's global Play it makes this horrendous plastic jackhammer sound like one of those old cheap aquarium pumps.
I tried exporting the project and it did the same thing.
Also, the fist part of the clip has one of those weird diagonal lines across it that Cakewalk sometimes puts on my audio clips for no apparent reason. I never know why they appear or how to make them go away, but they don't seem to hurt anything, so I've just written them off as a cosmetic thing. But I would kind of like to know if they mean anything, and if it's possible to make them go away, I would like to do that. While I'm asking here on the forum.

We're Floating Inside the Cloud.flac 1.45 MB · 2 downloads
Pretty trippy, eh?
It's not how I want it to sound, obviously. As you can see, there are no FX on the track except for kHs Limiter. There are no FX on the Master bus, which is where I'm taking the export from.
Please help me cure my project of Spurious Diagonal Line Syndrome as well as Cacophonous Aquarium Pump Syndrome.
You have to set the loops key accordingly as well. I work daily with it but for some reason cant picture tge layout infront of me right now. ?
Oh- yeah! Click on the clip TAB within the LC view and enable it. Then, tweak the clip without any issues. I'm away from home and dont have a windows laptop with me.
-
1
-
-
20 minutes ago, Brian Johnston said:
Sorry about that... I'm referring to Cakewalk. I have the latest version and downloads. Now it doesn't work... will play, but not record.
What version of Cakewalk do you have? CbB or the Sonar BSP? If it is SONAR BSP what subscription package do you have - the monthly of yearly?
When you want to record, you have to select and arm the track (ALT+R) first and then press R only to record.
-
2 hours ago, John Vere said:
I think it’s auto save!
Bingo! This is a known issue with CbB too. My every attempt trying to use Autosave in CbB has ended in a guaranteed crash - haven't trying it with Sonar. Think I should try it out.
FWIW: Session drummer run smooth on myside in Sonar. I can't tell you why Vegas is crashing, I use Premiere.
-
Your Input Echo is on. In Sonar Backstage Pass its the little headphone botton. In CbB its the one next to the record button on the right side.
-
46 minutes ago, Mr No Name said:
good morning John,
Can you provide a place to find this CBb full installer file you mentioned in your post above. thanks.
Read the post here to understand what is happening with CbB. When done, click the link in that post to get the web install called Cakewalk Product Center -- it should be the 051 version.
Click here Link to Installer
-
1
-
-
3 hours ago, greg54 said:
However, when I listen on headphones, the issues are either not there or they are barely audible.
Always trust your Monitors -- Always! Headphones "might"(using it loosely) work on certain drums and instruments, but it will never work for vocals.
-
1
-
-
Try the these two. Vahalla Freq Echo (Its free.) and the Vahalla Supper Massive (Its also free.)
These are two great delay plugins made by Vahalla.
-
1
-
-
9 minutes ago, John Vere said:
I was even thinking I should just uninstall CbB
Thats what I did. ?
-
8 hours ago, Tez said:
UPDATE:
I signed in to Bandlab using Firefox (my default system browser) and stayed signed in. Rebooted my system, performed sundry activities, following which I launched CbB and had no activation issues, or related activation notifications. Hopefully, in my case, this fixed the issue, we'll see going forward ?
Glad your issue has been solved Tez.
As I have stated many times before, it "sometimes" still requires you to sign in to the bandlab site randomly at times. I have this happen many times in CbB since the in app sign in was introduced. I did my duty to report it on many occassions, but was ignored. Like I've said - if it happens again, I will record the process.
So far in Sonar, I havent had this issue yet.
-
On 3/11/2024 at 3:19 AM, sjoens said:
And has no one noticed Concrete Limiter is now a free module?
Its been available in CbB for . . . since early last year. Cant remember the exact version it was released in, so its not new to Sonar.
-
1
-
1
-
-
4 minutes ago, Noel Borthwick said:
I can assure you that it is not.
It does. I too have my share of login issues from time to time in CbB. When the in app login kicks me out and doesnt want to login again, I have to open my browser, jump to www.bandlab.com sign in there, then back to the app to login - and voila.
It works with the old sign method for me at least . . . I'll record you the process when I do run in to that problem again.
-
1
-
-
6 minutes ago, Noel Borthwick said:
Logging in to bandlab.com is irrelevant.
Not if it works. Which it does. It is still somehow linked to bandlab login.
I have reported this many times before. You've ignored it, like you're doing now.
-
6 hours ago, C. A. Hamman said:
Everytime I open Cakewalk I get the same message that Cakewalk is not activated!? Yet you can see I'm logged in ?? Both in bandlab and in Cakewalk ?? Every time now this is happening ?? Ideas anyone? and before you ask it is version 2024.02 the latest update!
Make sure to login at www.bandlab.com as well.
-
1 hour ago, Hillmy said:
Because they didn't publicly announce that you can get all their membership services
It has been on the Cakewalk website for over a month! Before it was even announced on the forum!
It includes access to free Distribution for a year. Free access to thousands of sound libraries, help to build you a fanbase and to stay intouch with them. This offers are a great start for those that are independent in their field.
-
Again.
Those who purchase a Backstage Pass now, will always be part of the BACKSTAGE PASS MEMBERSHIP aka "Early Access program."
You are being given the opportunity to take advantage of this offer and to be an Early Access owner with all its offers included. Its a great and exciting offer to be part of before the general public.
-
7 hours ago, Hillmy said:
Sonar has not been released yet. The BandLab Membership includes Early Access to software. Sonar is out of internal beta and is now offered as public early access. When Sonar is released it will no longer be "early access" and no longer be a part of the BandLab Membership. So if you purchase an annual subscription to BandLab Membership for the sole reason of using Sonar, then don't be surprised when you no longer have access to Sonar if it gets released in under a year and you have to actually buy the program to use it again.
Just stating the obvious in case people don't like reading fine AND large print elsewhere and don't like figuring things out.
This is very very wrong information!
People should not be reading into this. Bandlab owns Sonar, so it will always be part of a Bandlab's membership - irrespective of new price plans that might come out later | and | if Sonar starts to run on separate servers. It will always be owned by Bandlab.
Those who purchace a Backstage Pass gets an Early Access membership. This means that if you own a Backstage Pass you have the privilledge of getting the full DAW including new releases and updates before the general Public! Its in the name "B A C K S T A G E P A S S"
Call it a V.I.P. Membership.
-
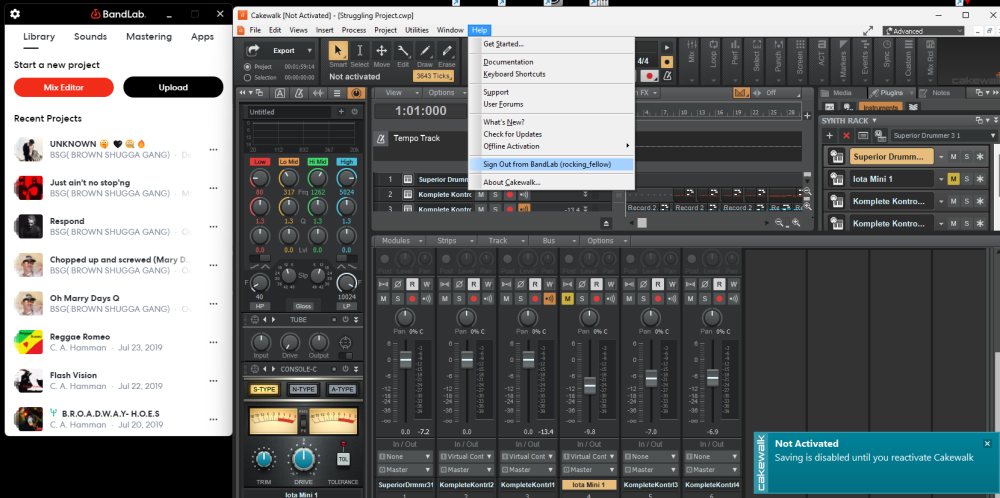
11 hours ago, sjoens said:
CbB

Sonar
Top one is Sonar
Bottom is CbB.
How I know this? In Sonar the strips border dividers are thinner than in CbB.
-
5 hours ago, sjoens said:
A new graphic issue: When opening a project saved in CbB, the Inspector bleeds thru from underneath MultiDock views.

Whats your refresh rate of your monitor? Are you using onboard graphics or a dedicated one? Try to update all your VCredist files - old versions and new versions.
-
On 2/13/2024 at 5:50 PM, TheHum said:
Is it possible to have sidechaining in Sonar 6?
Thanks
Steve
You'll have to use it with bus tracks. Lets say you want to sidechain vocals to a track for radio.
1: Create a Bus
2: Route the output of the track to a stereo bus.
3: Insert a sidechain compressor (not all compressors can do sidechain)
4: Send the vocal track to the compressor input on the stereo bus track.
5: Tweak until you find your desired effect.


Xsampler
in Cakewalk by BandLab
Posted
Which version of Sonar do you have?