


-
Posts
2,612 -
Joined
-
Last visited
Posts posted by Will.
-
-
I want to be sarcastic with this one 😂 but i wont.
With laptops theres no way to get around this unfortunetly. Even condenser mics picks up the A/C in your studio including other noises.
Because its a built-in mic the motor of the fan vibrates through the casing/chasis of the laptop in to the mic creating the hum and air noice you hear, even when its quiet to the naked ear - considering where the mic sits and fan is located in that tiny case.
If this was with outboad gear, I wouldve suggested you check all wall sockets for earth leak related issues and even in your cables, but - yeah: There's no way to avoid/isolate/remove these noises within a laptop.
Grab yourself the BM-800 condenser mic kit for as little as $8. Its crazy how decent this mic sounds for its price - that's why it's so popular amongst the youth and podcasters on youtube today.
-
Ouch!
• When automating one channel in the Sonitus Delay manually - automation introduce clicks and pops.
• When automating one channel in the Valhalla delay it starts in stereo on replay.
• Same clicks and pops with the Manny delay when automating one channel.
So basically when you're creating a mono out to stereo | or | a longer time delay in on channel - theres bugs.
Yikes! It even exports with these sounds too.
-
15 minutes ago, Jacques Boileau said:
I'm curious, what would that achieve over using the drive knob on the console emulation ProChannel plugin? Or the ProChannel Tube plugin?
I can give you a lot of reasons. So i will start by saying - it affects the FX bin.
In the world of creativity - you only want have a little bit of drive on the Compressor or only the EQ because you want your compressor clean or an uncolored EQ sound. This is where using a compressor with a built-in drive or an EQ with a built-in drive comes handy as this only affects the compressor an not the entire chain.
It is most commonly used in HIPHOP, EDM, Heavy Metal and certain Rock styles especially where the use of "Autotune" on vocals and heavy hitting 808's are prominent.
-
On 9/29/2022 at 2:55 PM, Xel Ohh said:
Ok... Cool... I have never heard or seen that before... Not sure how I would use drive on an EQ... Is there an EQ that you use that has a drive knob?
What? Dude, you're missing out big time on your 808's and vocals with this feature.
Download buy the W2395c EQ by Fuse Audio Labs.
Theres the Scheps 73 EQ and SonEQ by Sonimus as well. Just to mention a few. Theres great freebies too with this built-in.
You get compressors with a built-in drive knob as well.
-
-
6 minutes ago, Xel Ohh said:
A drive knob on the EQ or in the Pro channel 🤔
On the EQ itself.
-
6 hours ago, IgoRr said:
I'm sorry, I do not speak English well enough, and Google translate gives some strange translation, can you explain what you mean? ☹️
Sure.
Vote or your topic on a weekly basis, so people can see it.
-
6 hours ago, John T said:
Hey dude, read my answers again. Or, if you've nothing to contribute - which you don't - go and be rude and brusque elsewhere.
Aw man! Do you need a box of kleenex?
Crying over spil milk when you do not understand hour zoom levels! Best that you educate yourself on how resolutions work!
Seeing that you think i was "RUDE."
Go do an eye test. We cant repeat the same thing over and over to you. This is by design to tell you that there is information on the clip. These dots does not "disappear" with a higher resolution monitor at "low zoom."
"Hey dude . . ." Go and read everyones answers again. I've explained this now so that even a grade 1 kid would understand it.
It was said and i will quote is for you
13 hours ago, bdickens said:There's nothing to fix. That is a design feature.
This is not a BUG. It works just right here.
-
Bumping up.
-
Perhaps a drive knob too.
-
@IgoRr You not gona bump this up to keep it alive? ☺
-
I believe this was possible in X1 LE and X1 Producer. It got removed when x2 dropped at our doors. I think theres still a video on Youtube about this.
It was called "Split track" or so . . . It was mainly to create a drum matrix as one clip, but you could create a stereo track too. I think the lane section took its place.
Let me dig a little. Maybe the feature has been tucked away and forgotten about.
EDIT: I remember now . . . There was a merge feature for both the track and clips.
-
44 minutes ago, CJ8073 said:
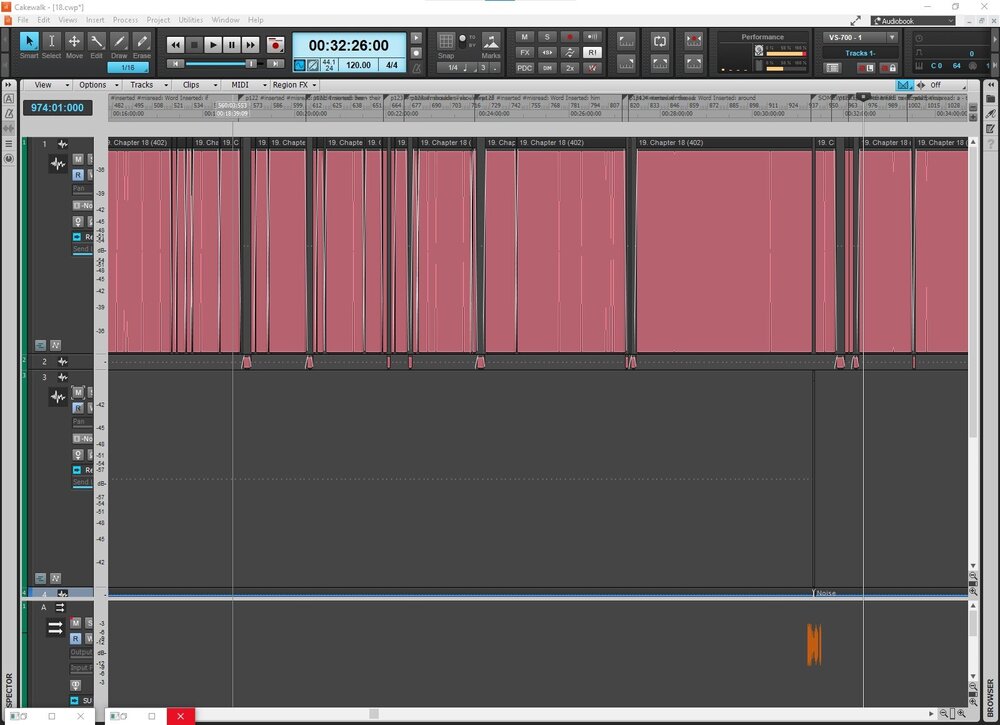
Hello, I am new to Cakewalk and I need some help with the concept of grouping clips. I have been using cakewalk to record my volunteer audiobook chapters (I don't like audacity - I know, everyone says to use that one) and I really have been enjoying my experience with it so far. I love the interface and have learned so much since beginning using it. My problem is, I noticed that while recording, I whistle my "s". I have tried using a couple de-essers and I don't have the money to invest in an expensive pay version(s), so I have found the best way for me to deal with my annoying "s" is to isolate them, group them, move them to another track and then use send to a compressor and minimize them. I have successfully done this for one chapter. When I grouped my "s" sounds they formed a group labeled 01 and they all successfully grouped. When I selected one, they all got selected, which I liked because I could work with them as a whole. However, this takes forever to click every "s" sound in one fell swoop. So, I am trying to group as I go, so-to-speak. I figure if I record, edit and check in one session then that will cut down my edit time later. To deal with my "s" sounds, in the same session after I check my work to make sure all mistakes are taken care and my reading is good, I would like to isolate those "s" using the split feature to split before the "s" sound and after the "s" sound for each sound and then group those together for that day. When I come back the next day and get to isolated my new "s" sounds, I want to be able to add those to the previous day. Now, I tried this, but somewhere I screwed up and wound with with copies of "s" sounds on top of their same "s" sounds and when I create a group it makes like a label like 40. How did I wind up with 40 groups? I am so confused. How do I change it to say 02 for a label, if I want it to? And how do I successfully add each day's "s" without creating copies or new group labels? Every time I add the next day's, the group name changes. I'm sorry if this is confusing, but I'm so confused and I have tried researching what I'm doing wrong, but I can't for the life of me figure it out. All of my other Cakewalk complications I have managed to figure out just by painstakingly researching for myself. But, this, I am totally confused. Did I accidentally create craptons of groups when I was initially splitting my "s"? I have a lot of "s", I would imagine it would be way more than 40 if that were the case. Also, is there a place I can see all of the groups created so I can see what's going on? Lastly, I tried removing all my clips from the group and start over grouping just a couple together, but again my group label starts at like, 42 or another higher number... argh. Anway, thanks, ahead for any help. I really appreciate it.
What you are looking is called a "De-esser" plugin. It tames the harshness of these plosive sounds - all eight of them in the english language.
The best free De-esser in my opinion is from Analog Obsession - called: Analog Obsession Loades.
DOWNLOAD LINK: They also have a ton of free plugins to choose from.
https://www.patreon.com/analogobsession
My second option for beat free pluvin bundles that includes a De-esser, is the melda fx bundles.
https://www.meldaproduction.com/effects/free
"DE-ESSERS" makes life so easier.
-
56 minutes ago, John T said:
No, I know what the dots are, and I do want them to be displayed. This is about dots disappearing when they shouldn't.
Read everyones answers again.
-
The things that has been on repeat in this forum. Its only the melody that changes - the lyrics are same.
-
 1
1
-
-
26 minutes ago, John T said:
Here's a thing that's been a niggle for a long time, but I've never got around to documenting.
So, among the things I do in Cakewalk is post production for audiobooks. And when dropping in pickups, I end up dealing with a lot of really tiny slivers of audio.
Anyway, here's a view of the dots showing up to the last sliver in the third track (just to the left of the Now Time Marker)
Now here's a slight zoom out from there. Notice how the sliver becomes invisible at a certain level of zoom. But more importantly, the dots now don't extend that far, and instead stop at a prior still-visible sliver.
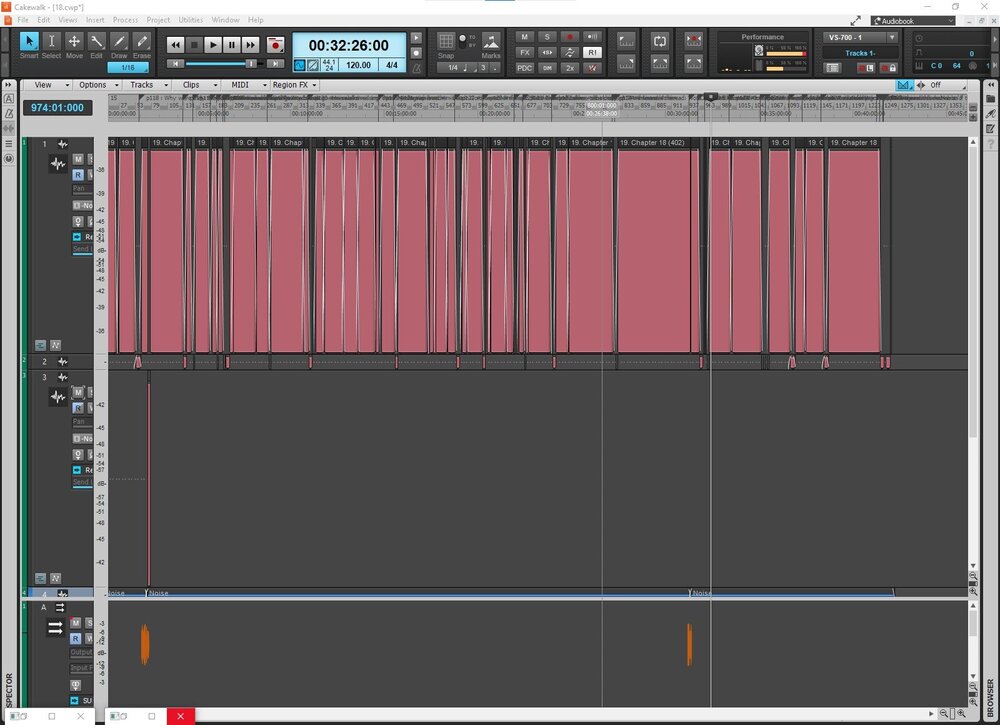
I realise this is a fairly fringe case, but would be really handy for me if it got fixed.
Those dots are there to tell you that theres information on that track.
Its a helpful visual feature.
-
On 9/26/2022 at 6:24 PM, El Diablo said:
I understand I might be able to edit the title and write in it Solved, but I want to know before doing that if there's a feature that does this for you?
Just type [SOLVED] infront of the title.
-
On 9/26/2022 at 4:34 PM, Cactus Music said:
This is way too much for my voice. I roll off at 120Hz. But definitely I always use hi pass filters on every track. Most are below 50 Hz but it’s definitely a tool everyone should be using when mixing.
Not really. If it doesnt need any form of EQ why use one. Also, one should not be using a hipass on every track. Its one of those tweaks you need to lookout for.
Think i'm lying? Well, test it for yourself and keep an eye on your reading. Hipass bump up the volume on the band depending on your slopes. If you havw good monitors and a tuned ear - this will be highly noticable.
So every single time you hipass you raise the peak level. Lower a volume slider or gain wont help much the peaks will still hit the ceiling. This is where a lowshelf is your friend.
If theres nothing in the bottom region - why use a hipass and ruin the track?
On 9/23/2022 at 11:14 PM, LNovik@aol.com said:I recorded my voice in a project. I then duplicated the track twice. In the 2nd and 3rd tracks, I nudged one to the right and the other to the left. I did lower the volume of these extra tracks. However, my volume is much higher than the instruments. What is the best plug-in (hopefully one that comes with Cakewalk, but not necessarily) to lower in amplitude the vocals. I HAVE tried lowering the gain of each track, but it only helps somewhat. I even tried to lower gains in the Nectar plugin, but it's still too loud. I know I could just keep lowering gain and volume everywhere, but I wonder if there is a good plug in that will lower and compress it so I don't loss the quieter volume parts completely.
Thanks.
LNovik
Best advice i can give right now, learn how level Peaks, RMS (root means square) and Dynamics work.
Read up on some articles from well-known people. (Apologies to John) Not to downplay Cactus Music channel or walk all over his tutorials, you can learn a lot from his videos and obviously because John is a great guy, but dont read to much in to youtube videos. People there just tell you how they do things and not really tell you why or give you the technical side of things.
Your levels might just be perfect, but your peaks are screaming as its hitting the ceiling. So equipt yourself with just the basic of knowledge in mixing and setting up mic levels with techniques too and invest in some decent "Flat" monitors that actually exposes these things to you.
-
1 hour ago, murat k. said:
Normally we use Shift key for sensitive controls in the Cakewalk.
It works in with both Shift and Ctrl seperately in increments here.
-
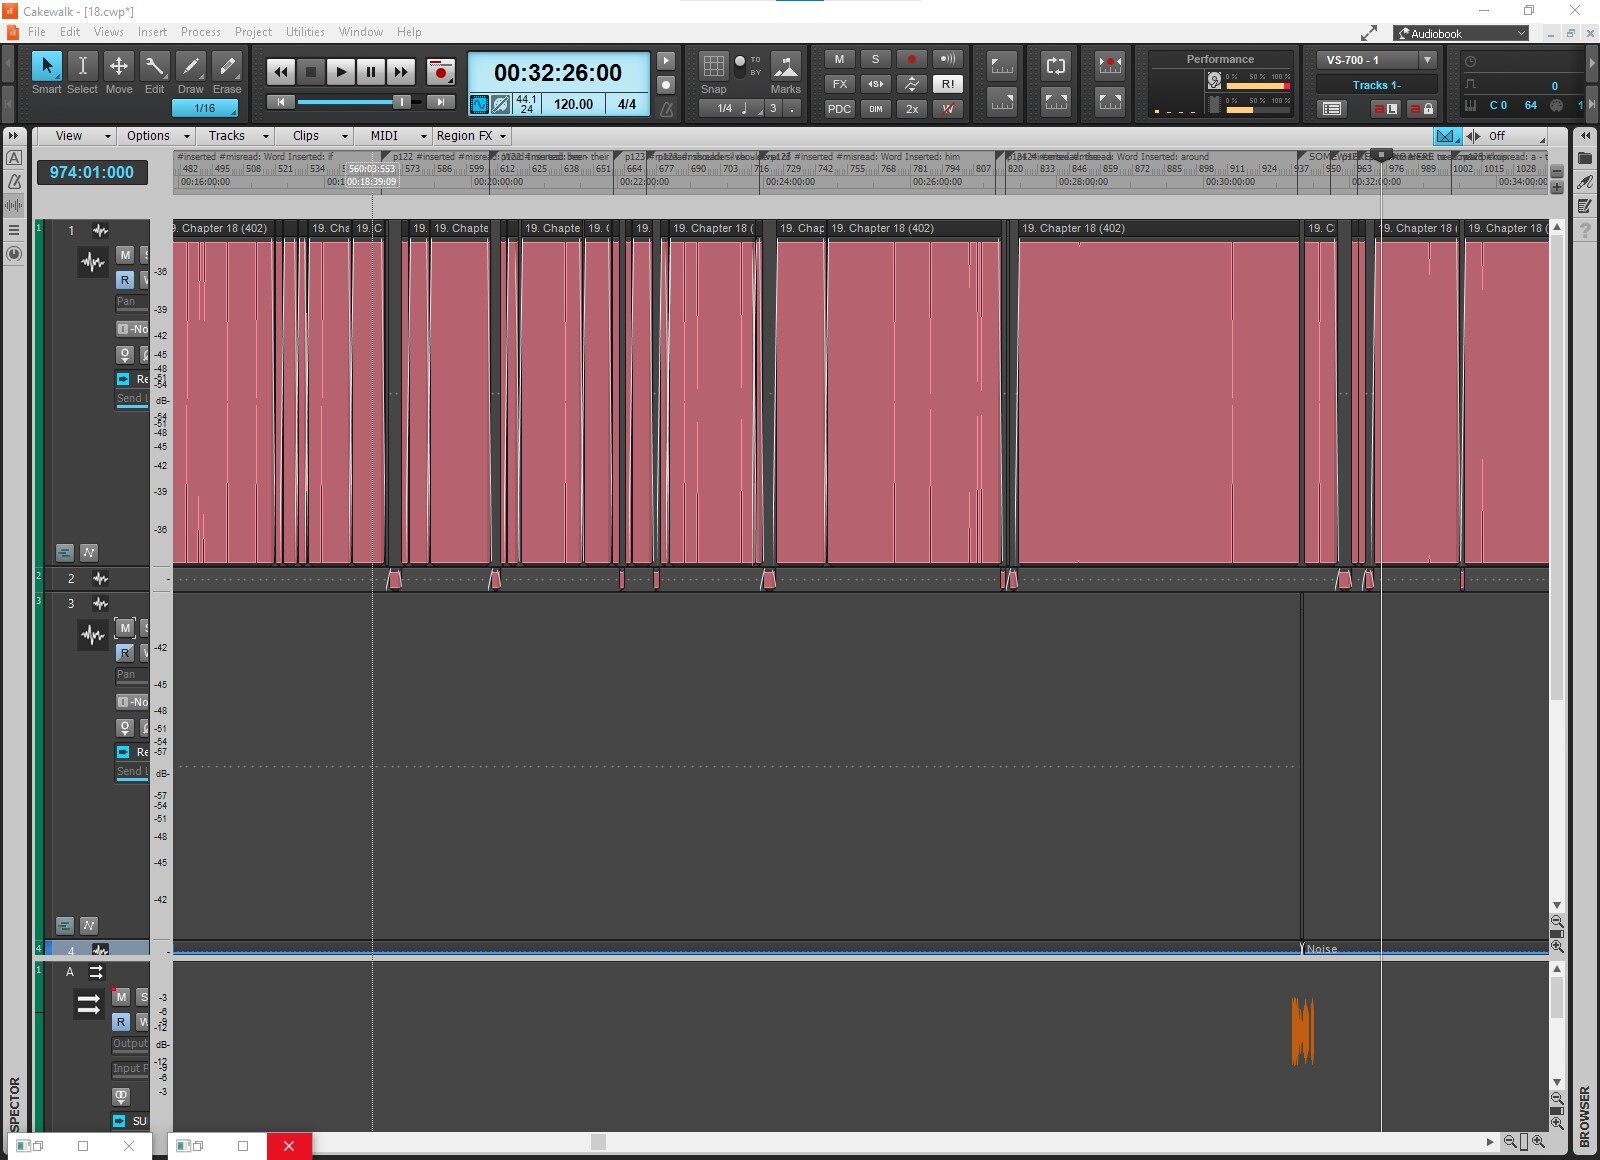
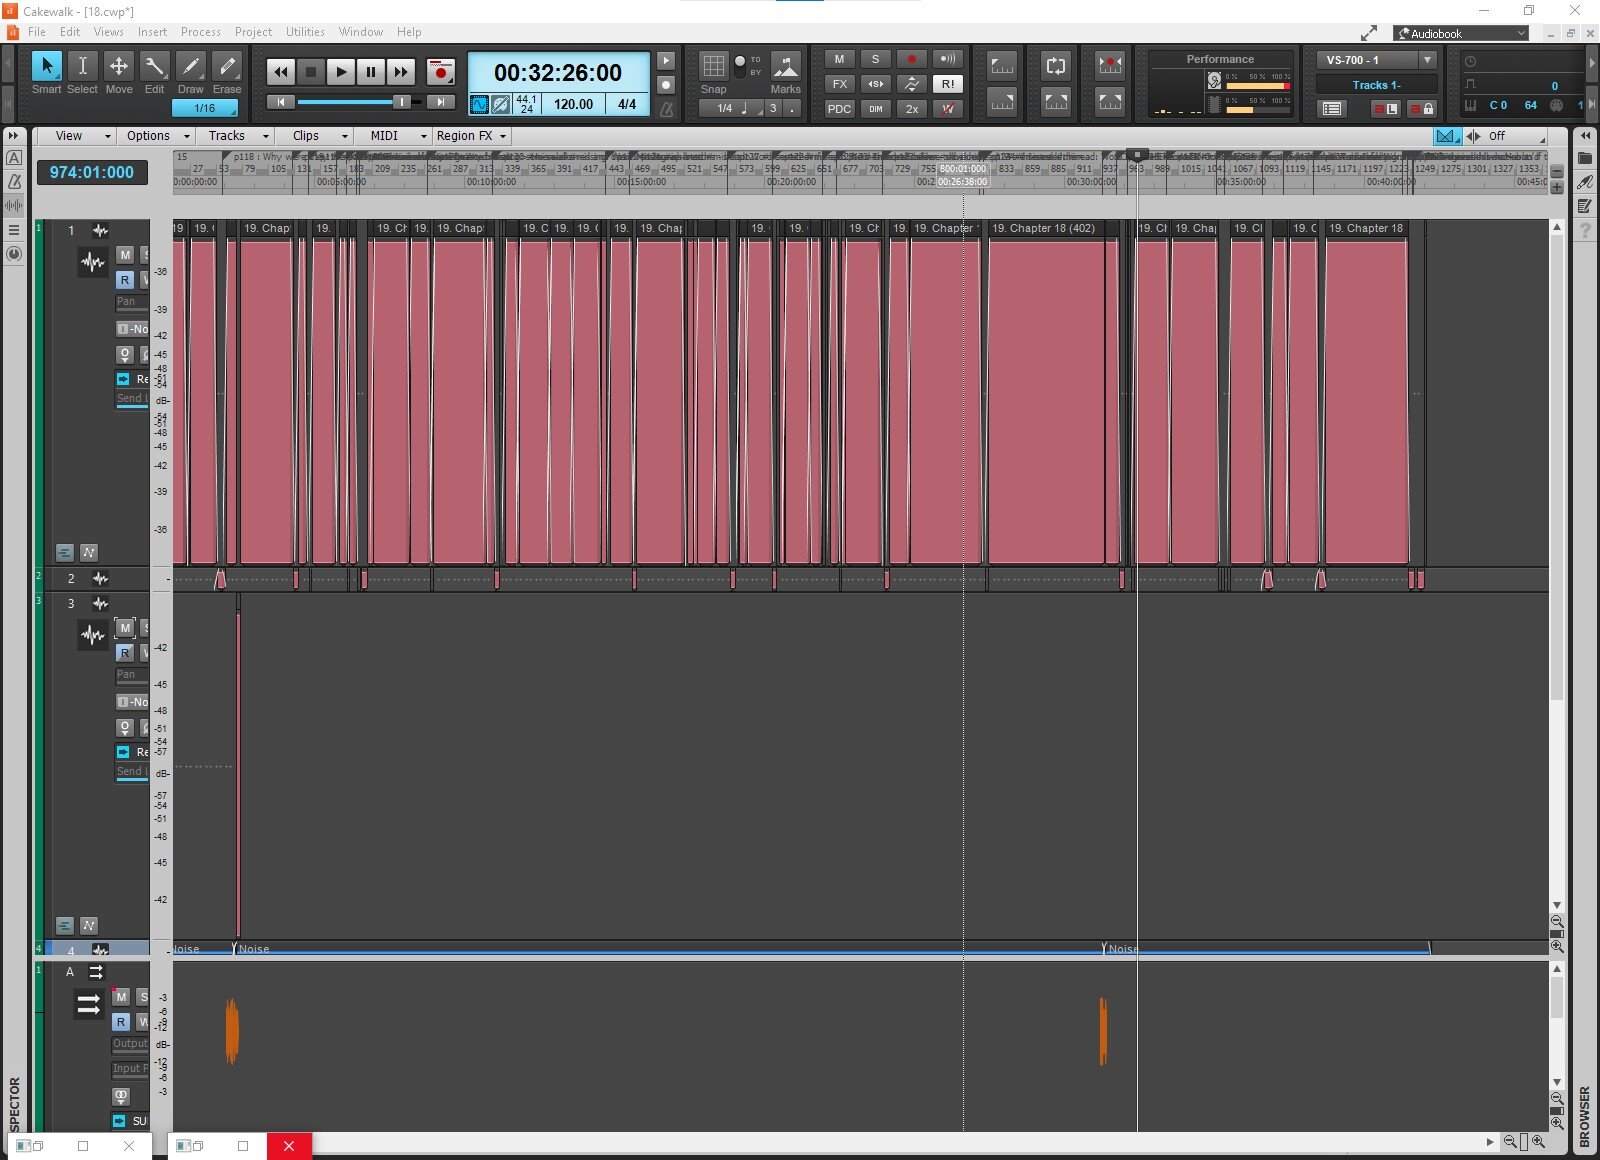
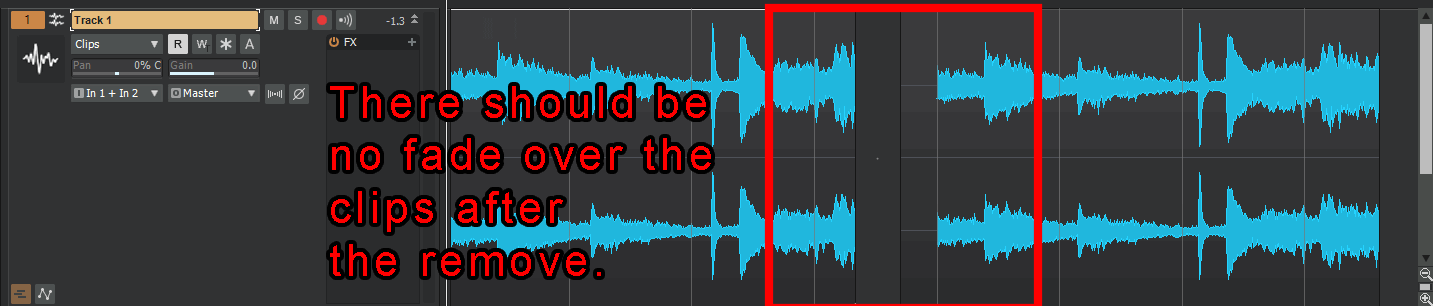
On 9/28/2022 at 12:04 PM, murat k. said:
But if we remove an autocrossfaded clip to a non-crossfade necessary position, the last crossfaded position is remaining over the clips.

I prefer the auto crossfades. It makes life easy.
Maybe just have an extra option to auto remove while holding down a key?
-
51 minutes ago, msmcleod said:
In the studio I use a single 27" 1920x1080 monitor at just under 1.5 meters away, which is perfect.
I was actually thinking of buying a 27" but decided not too. It would've been big for me.
I've hooked up CbB in the studio and at 4k on a 27" ultrawide Full HD - things were too small even at 1 meter away, though my desk is 1.5 meter in its vertical length which is a perfect distance for the sweetspot away from my monitors.
The main studio is in my backyard. So, I just wanted an extra monitor to hook Cakewalk up in the extra room I use in the house. So the 24" monitor turned out to be a perfect fit and match for The Cake so far.
-
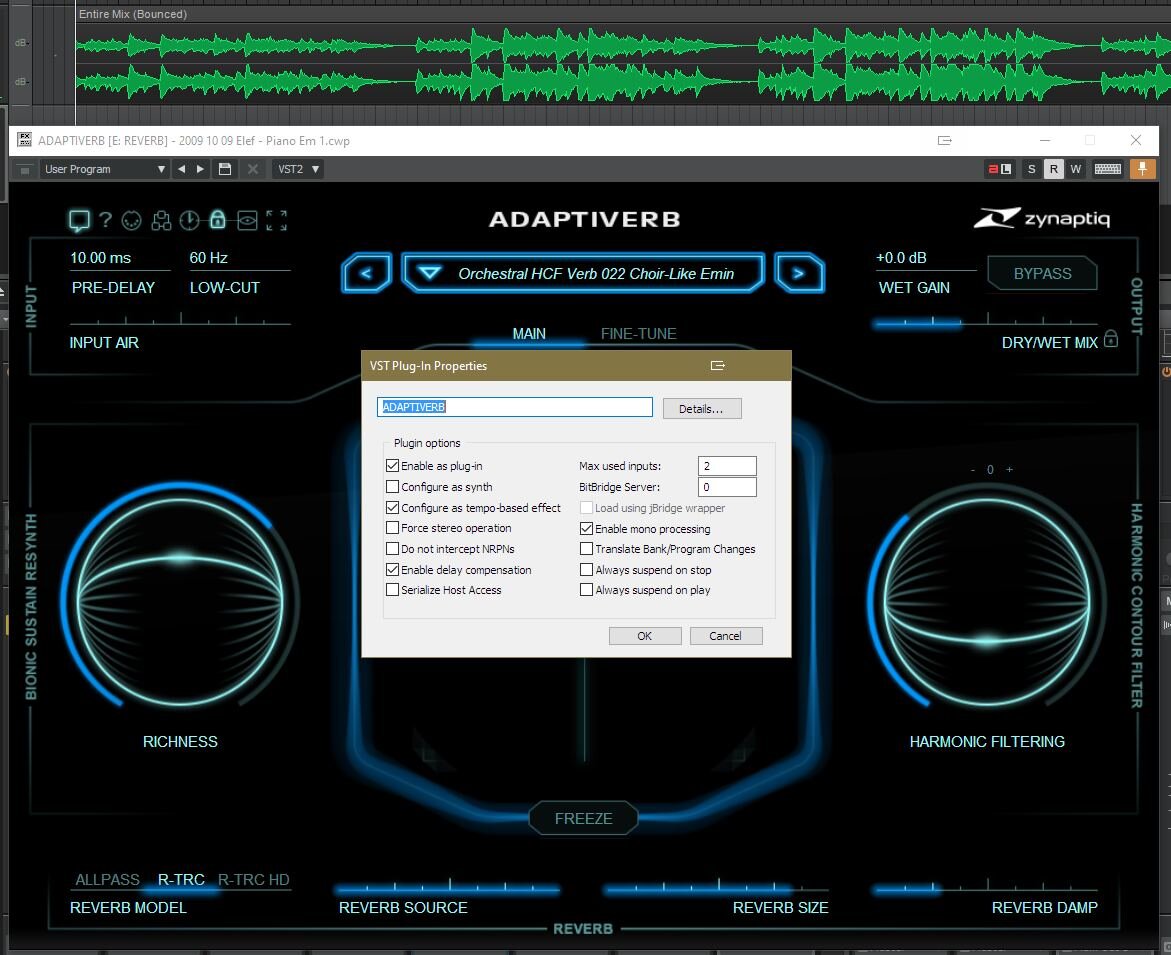
On 9/25/2022 at 4:35 PM, sadicus said:
Anyone using ADAPTIVERB ?
While waiting for zynaptiq tech support, ADAPTIVERB to get back, thought I'd ask here on what setting to check when a VST3 or VST2x64 plugin cannot process in realtime even when a "LIVE" option is available on the plugin. For years All my plugins are x64 and I thought this type of issue was in the past.
The issue is audio crunchies in playback or realtime or when track bounced crashed Cbb.
I use another of their plugins WORMHOLE and it does not have this issue.win10x64 AMD 12Core 32GB RAM
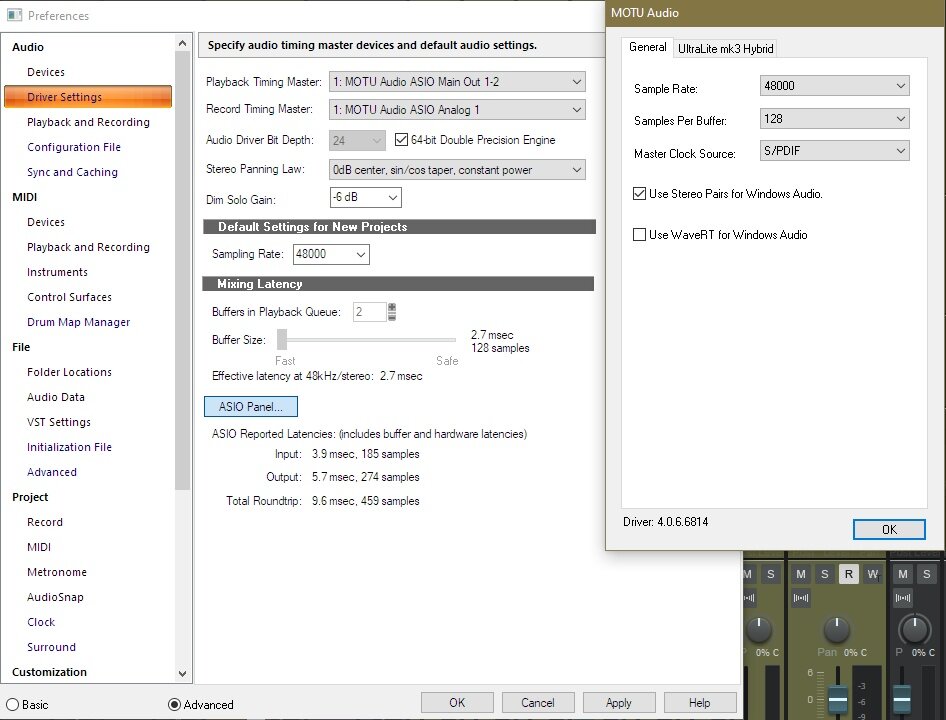
Currently the DAW settings are working as expected for playback and recording (when not using ADAPTIVERB)and I'm reluctant to change them for one plugin.
will I have to change this buffer setting back everytime I record without this plugin?
don't want latency issues when tracking in real time.This is the current ASIO setup.
Is the is the correct buffer setting to change to 1024 samples?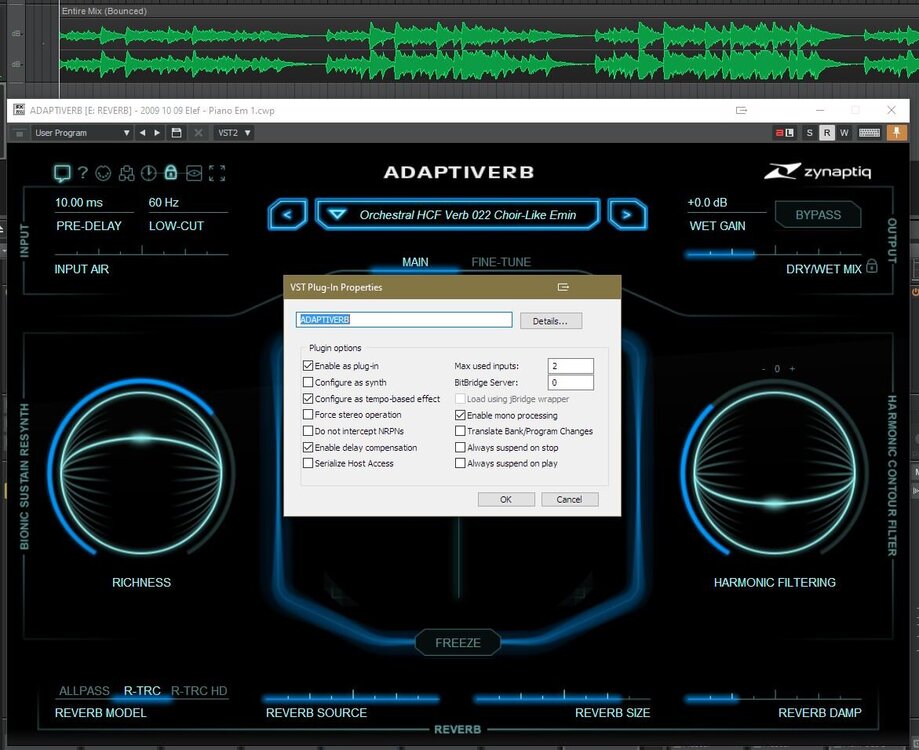
Perhaps its not 48000 compatible. Try running it in 44100.
-
What's wrong with the period (.) dot/point - what ever it's called in different parts of the world.
-
On 9/16/2022 at 12:10 AM, Starship Krupa said:
monitors at 1920x1280. I consider that to be just at the edge
I finally bought that extra monitor. 24inch at 1920x1280 and you're not wrong. It is right there on the edge, yikes.
Almost like a perfect fit.
Mix Recall
in Cakewalk by BandLab
Posted
Not sure if its a bug, I hardly make use of this feature.
Mix recall resets everything except the gain knobs/controls.