


David Baay
-
Posts
4,446 -
Joined
-
Last visited
-
Days Won
5
Everything posted by David Baay
-
Solo the track, bypass all FX and switch the Master or other downstream bus to mono interleave. If the only thing that changes is the L/R balance with no tonal change or narrowing of a stereo image, it's a "dual-mono" track.
-
Yes, looks like a display bug. But I don't see "Deselect the track and the button fades again." Once the track focus is moved by any means, the Arm button in the Inspector continues to show the 'active' state until playback is restarted.
-
Glad to help.
-
The highlight in the PRV is part of the Aim Assist function, the vertical line that follows your cursor. I am not aware that it's possible to disable the highlight other than by toggling off Aim Assist (shortcut X).
-

single Left click to add a CC value in a track
David Baay replied to David Thiel's topic in Feedback Loop
That dedicated Draw tool will insert a single controller with a single click. The Draw mode of the Smart tool will do it if you hold Alt. I'm not sure whether the difference is deliberate or an oversight in the evolution of the Smart tool. -
PRV multi-track editing: Show notes of only ONE track at a time
David Baay replied to Dave G's topic in Cakewalk by BandLab
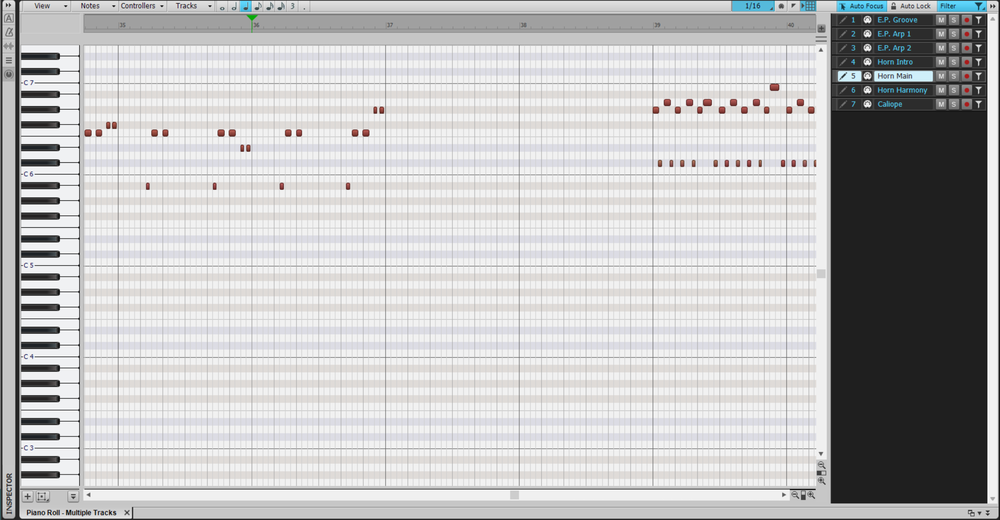
The screenshot below shows the PRV Track Pane with Filter enabled to hide drum MIDI and audio tracks I'm not concerned with from both the Notes and Track panes. Auto Lock is enabled to prevent inadvertent editing of any track that is not currently focused. Notes are displayed only for the tracks that are selected (track number highlighted) and only the notes in the currently focused track (track number and name highlighted white) show color and are editable. Selecting the track name in the track pane changes focus without affecting selection. If you sweep-select track numbers of multiple tracks, the first one you click will end up focused. You can Ctrl+click to add non-consecutive tracks to the selection as usual. Auto Focus is an alternative to Auto Lock that lets you change focus by clicking on a note. I prefer Auto Lock and changing focus by the Track Pane. See the documentation for more info. Here's the same view with only the one track selected and focused in the Track Pane: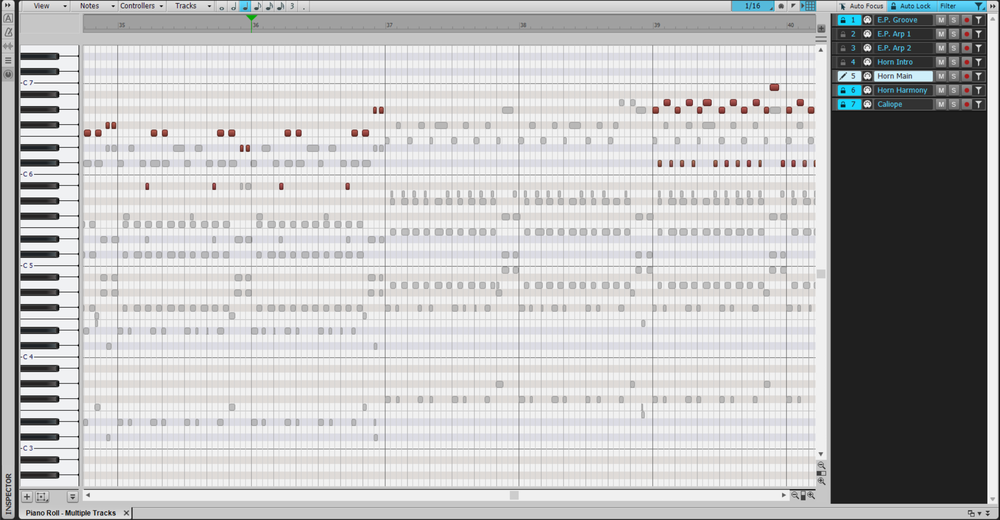
-
This came up in another thread a while back. The only way to 'undo" the activation of the take lane indication is to move the track content to another track, delete the single take lane in the original track, and move the content back - or just use the new "unexpanded" track and delete the original if it doesn't have FX, automation, control settings our routing that you need to preserve.
-
And PDC can't be overridden on a track that's hosting the plugin directly or for a track that goes through a bus with the PDC-inducing plugin on it. PDC override let's you input monitor a dry signal (or with non-PDC-inducing FX) on another track without experiencing the delay affecting playback of existing tracks. If the PDC-inducing plugin is on the Master bus, you're out of luck.
-
I'm not intending to be argumentive. I'm just reporting that I can't immediately repro the problem with basic steps in the same project I used to check the MIDIChFilter workaround. In order for anything to get fixed, the Bakers will need a reproducible case.
-
I mis-read SirWillyDS12's comments, including "I start all my projects at measure two" as being from the OP. The OP hasn't really made clear where his clips start or which direction he's trying to nudge.
-
I can't repro that. The input to the now-orphaned audio track for the deleted synth is set to None. The re-assignment of the MIDI output depends on how the remaining virtual outputs are ordered and where the now-missing output was in the list, but I;m not seeing that I/O assignments of other tracks are affected in any case. As a rule, I would say deleting a synth without first re-assigning the tracks that use it is not a best practice. If you're going to re-use the tracks with another virtual instrument, you should using Replace Synth rather than Delete.
-
I'm not seeing a problem nudging frozen audio clips earlier when MIDI from which they were generated starts at 2:01. Possibly you're are actually selecting a time range all the way back to 1:01 by selecting the track rather than just the clip...? But I'm curious why such a high buffer, and why so much latency at that buffer size (1024 samples is only 21.3ms at 48kHz). Was 75ms calculated or measured? Moreover I'm curious why latency has any bearing on freezing virtual instruments which is an offline process not subject to real-time latency.
-
It's not a bug; it's a missing feature. A bug is a feature that does not work as documented. It is not documented anywhere that one MIDI track can drive more than one instrument in CbB. The MIDIChFilter option is a workaround for the missing feature that was proposed by another user, and not verified or endorsed by any CbB developer. That said, I did a quick test and had no problem driving four instruments from two MIDI tracks outputting to two instances of MIDIChFilter. You'll need to give exact sequence of steps to reproduce your problem with it.
-
Inexplicable behavior is breaking projects
David Baay replied to sean72's topic in Cakewalk by BandLab
This could definitely be the root of the problem. Inserting instuments in the FX bins is supported for backward compatibility with legacy projects that used this configuration, but is definitely not the preferred routing and has some longstanding issues with stuck meters and stuck notes. -
My guess is you're seeing the difference between CWP projects that were created before or after Mix Recall was implemented. Newer projects will have been created with the MixScenes folder already in place when they were first saved so there won't be any changes to the project folder when they're re-opened. I can almost guarantee a fresh install of CbB is not going to behave any differently.
-
This is not new to CbB or any particular Windows version. Long before SONAR became CbB, it would create a "MixScenes" subfolder to support the Mix Recall feature on opening a WRK file that would cause the parent's Last Modified date to change. This continues to be the case. Even if you don't re-save the project and the MixScenes folder is discarded/deleted on closing the project, the parent folder's Modified Date will already have been permanently updated - first by creation of the subfolder and again when it's deleted. I long ago copied all my old WRK projects to a "Old Files" directory that I use whan I want to resurrect one of them and archived the original directory in a different location specifically for this reason to preserve the Modified Dates. As I convert them to use modern templates, plugins and routing. I move the copied WRK folders/files to a "Converted" subdirectory with a shortcut link to the new project location. I have actually done this a number of times as some projects have been repeatedly updated to work with different MIDI and audio interface and routing configurations over 30+ years. It's worth taking some time to work out a process and directory structure to reflect your evolving project setup conventions, PC configurations and studio layout, and rebuild old projects using current templates rather than just updating them and resaving in the current release which won't capture all your preferred default project preferences.
-
You should let @Noel Borthwick take a look at the project that's still misbehaving with all plugins removed.
-
Same here. It's pretty common that the velocity and/or timing needs to be offset or I only want doubling on the chorus or the instruments need different values for some MIDI controlle. But I do have a couple common setups where I've tweaked two patches to work together with identical MIDI input and it would be convenient to use a single MIDI source.
-
To a great extent this is constrained by tempo scale zoom level and mouse/screen resolution. There is no way you are going to be able to draw tempos with decimal values when the scale is at the default 100bpm range and less than a 1000 pixels high. At maximum zoom and minimum height the range is only 5bpm wide, and I can draw in increments of 0.1 bpm. But the minute you go outside that range, the tempo track will automatically re-scale to be 100bpm wide. It seems to me what's really needed is more positive control over the range and centering of the scale with the ability to disable auto-scaling. The old Tempo View wasn't perfect but was more manageable in this respect.
-
Abandon all hope, ye who enter The Drum Map Manager
David Baay replied to Starship Krupa's topic in Feedback Loop
Notes in the PRV will show the same velocity adjustment tool cursor when you hover of the upper edge of the note near the center. -
Abandon all hope, ye who enter The Drum Map Manager
David Baay replied to Starship Krupa's topic in Feedback Loop
Can you (or someone) please explain this? I don't quite understand. Thanks, Bob Bone I'm not seeing a problem saving a track template that uses a drum map. My guess is the drum map had not been saved or was not available in the expected path when the template was reloaded. -
midi keyboard is recording and playing back to only one side of headset
David Baay replied to marieal gaines's question in Q&A
It does sound like that, but OP said it was a VST which will almost certainly have a stereo output. So then the question is: how is the synth being inserted? As a simple Instrument track or separate MIDI and Synth audio tracks? I sould suggest trying something more mainstream in freeware synths than CT-WS1 or one of the bundled synths in CbB to get started. -
If the tempo of the 110 project can't be changed because it already has audio, I would enable Audiosnap in Autostretch mode on the clip in the 150bpm project, temporarily change the tmepo of that project to 110, and export the audio. Then close the 150bpm project without saving changes, and import the stretched audio file. If the 110bpm project doesn't yet have audio (i.e. it's all MIDI and soft synths), I would temporarily raise it's tempo to match the 150bpm, import the audio, and do the change to 110bpm with Audiosnap in the new project. Two things to keep in mind, though: You'll want to try different rendering algorithms for the export to get the best result, and lowering the tempo generally produces more artifacts than raising it.
-
When to do "Render in real-time"?
David Baay replied to A Tolerable Quietude's topic in Cakewalk by BandLab
The primary use for offline/real-time rendering is to include audio from external hardware FX or synths while bouncing. In line with what Mark said, I have encountered very few issues with fast bouncing of VSTs and they were never subtle. Some could be resolved by raising the buffer size or setting a non-zero value for BounceBufSizeMsec in the Config File to override the real-time value which is the default for offline rendering. I've had this set to 20 (milliseconds) for years, and have not had a problem rendering Iris 2, but I've only used it in a couple projects. https://www.cakewalk.com/Documentation?product=Cakewalk&language=3&help=INI_Files.6.html Also, since you mention automation, there is a setting for how fine a resolution is used to process parameter automation that may have bearing: https://www.cakewalk.com/Documentation?product=Cakewalk&language=3&help=NewFeatures.033.html -
What's the pitch reference? If it's an audio file and all your VSTs are in tune with each other, it's probably playback of that file that's off. And are you sure about the interval? Sample rate mismatch (either between CbB and the audio interface or between the audio file metadata and the actual audio data) is the most likely cause, but the difference between 48kHz and 44.1kHz is more than a half step.


