Roger W
-
Posts
89 -
Joined
-
Last visited
Everything posted by Roger W
-

Melodyne, can't see clip notes in editor
Roger W replied to Roger W's topic in Instruments & Effects
I figured it out . . . after wasting an hour of being frustrated at trying many useless things, including going to Melodyne's online Help. (Maybe the answer is somewhere in the documentation, but searching the documentation didn't bring me there . . . something I often experience with documentation in general.) As I said, if you've already edited a region, you can't just select another clip with a different region and have the notes for that clip appear in the editor. In that way it's different than a midi clip. You also can disappear the Editor by hitting "D", and the Editor will disappear. But if you open it again, that same previous region is shown, not the region of the newly selected clip that you need to work on. The solution: You have to close down the Editor by Xing out the tab for the Editor at the bottom of the screen. Then, when you double-click another Melodyne-region clip, the Editor will pop up showing the notes for that clip. -
Using Melodyne Studio 5 . . . . In a song, I've got 4 different clips with separate Melodyne Regions. I select a clip, then choose "Show region in Editor". It shows the selected region in the Editor. If I select another clip, then choose "Show region in Editor", it will not show the newly selected region in the Editor, but instead stays with the 1st region I worked on. I went to the Melodyne online manual, and it says there is a button on the Editor window Pane to show all instances in plugin, but there is not. If I close down Cake, then reopen, I can then work on another region in the editor. But when I want to work on a second region, I can't make it show in the Editor. Has anyone seen this problem and come up with a solution? Thanks
-
Does Bounce-To-Clip degrade the sound quality in any way? Can it be done several times without degradation?
-
I've concluded that this problem is a Kontakt issue, so I've filed a ticket with them. The problem is simple to reproduce, and perhaps they will come up with a solution.
-
4 reasons why I don't think this is a waste of time for me: Yes, using a single instance of K for each instrument is a workaround. But using multiple instruments in 1 instance of K has some advantages, so I'd like to be able to have that as an option. If this is a bug, I think the publisher would like to know about it, especially since the default preset the SP instrument opens with is distorted. It could be that there is no bug, and I'm somehow making a mistake in what I'm trying to do, i.e., operator error. If so, I'd like to know that. Sometimes I enjoy figuring things out. It's like a puzzle. This is not a case of a faulty (too hot) preset. It's deeper than that. As I mentioned before, I can open up the preset in a single instance of SP, and there is no distortion. Distortion only appears when I have multiple instruments on one instance of K, and it only occurs with SP. This seems to be a problem in how K, or the SP instrument itself, handles being in a multiple-instrument K setup.
-
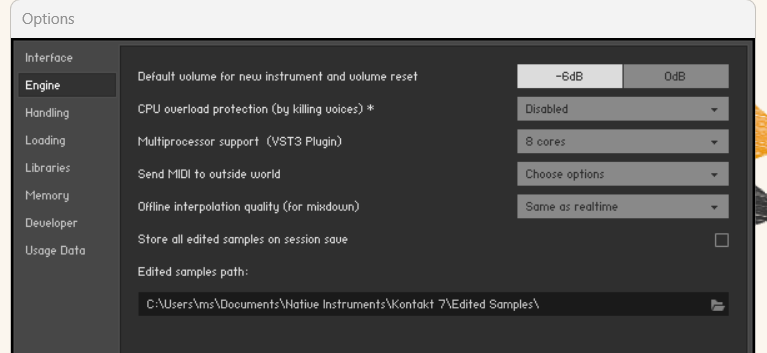
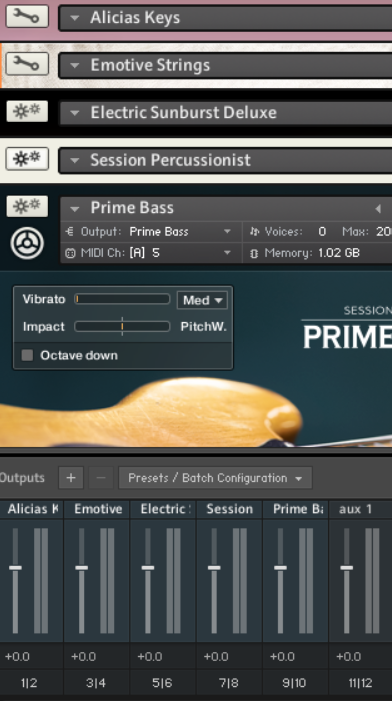
Session Percussionist is set up so that there are up to 5 players, to which you can assign various instruments and choose from a multitude of patterns those instruments will play. You can customize the patterns as well, with a grid-type set-up. The whole ensemble, or individual instruments, can be triggered with key switches, so the track is played by triggering by one or more midi notes. It's not like a drum instrument where you have midi notes for each drum strike. Thus, there up to 5 voices but only one output with Session Percussionist. One instance of Kontakt can be used in one track to play one instrument. Or, one instance of Kontakt can be set up to host several instruments. Each method has its advantages. I am only having a problem with Session Percussionist using the latter method.
-
In the multiple-instrument Kontakt, all the individual instrument Outputs are putting out the same level. No apparent clipping in the SP or other outputs. However, when I look at the main Output meters and play only SP, that clips. But this clipping does not happen in the single-instance Kontakt with SP playing. In CW, the SP track clips in the Pro Channel EQ meter and the track meter. However, in the CW track with SP on a single instance of Kontakt, the EQ meter and track meter do not clip, and the volume in the headphones is significantly lower. Pro Channel is on in every track, and the EQ curve is set flat in all Pro Channels is flat. I have touched any of the gain or volume controls in CW or Kontakt.
-
What is the "global output section"? Is that in Cakewalk or Kontakt? Thanks
-
I tried another experiment that removes several of the confounding variables . . . . I created a new Cakewalk project: Set up a track with one instance of Kontakt and 4 instruments, one of which was Session Percussionist (SP). I created 3 Appended tracks in CW so each instrument had its own track. Set up another track with Kontakt and only Session Percussionist on it. I didn't change any settings in CW or Kontakt In the multiple-instance Kontakt with 4 instruments, playback in SP was distorted. In the single instance of Kontakt with only SP, there was no distortion during playback. Since I didn't change any controls or settings, this would seem to rule out Operator Error. Since there is negligible CPU load and RAM, I don't think we can blame the computer hardware for being insufficient. This suggests there is a bug somewhere . . . either in Kontakt, or CW, or in the SP instrument. Somehow when there is a multi-instrument Kontakt setup, and SP is one of those instruments, the volume is boosted into distortion on SP. Any thoughts?
-
As you suggested, I set up 4 instruments in Stand Alone, and there was no distortion with Session Percussionist. I don't have a 2nd DAW to try it there.
-
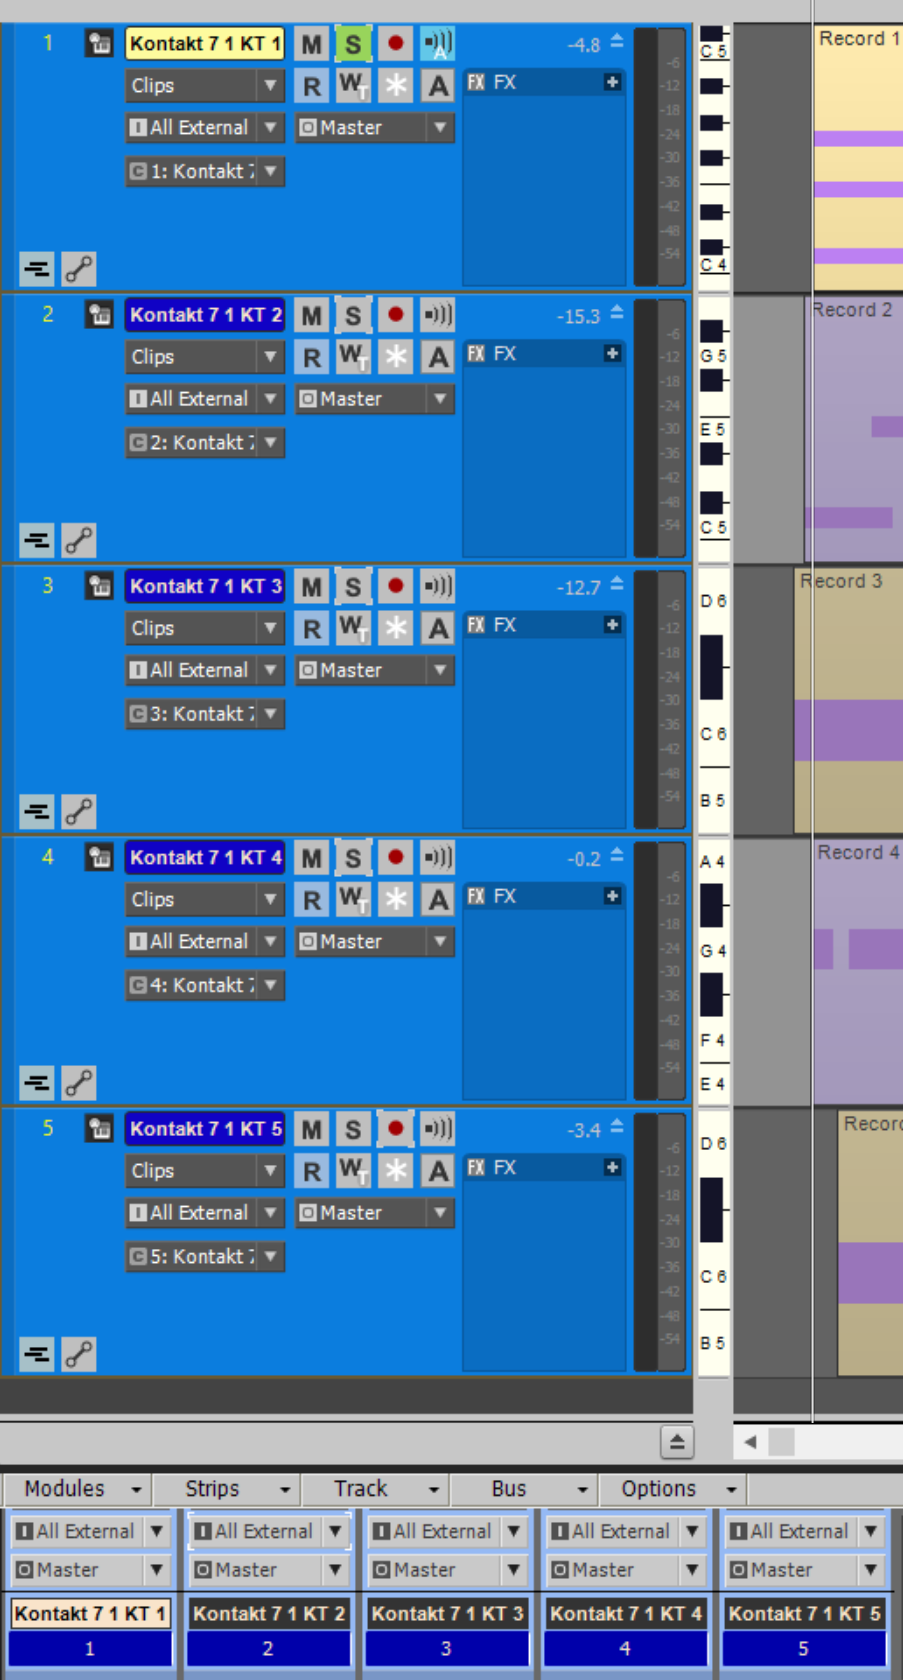
Here's what Kontakt's Engine tab says -- I have never made changes to any of these settings: My processor is 8 core with 8 Efficiency cores. Does anything look amiss with these settings? Should Multiprocessor support be changed to 16?
-
Thanks for your replies . . . . 🙂 Session Percussion sharing one Kontakt instance with three other instruments -- distorted on playback. I added another track with the same Kontakt instrument alone. Both tracks in Cakewalk set to same volume and gain. No clipping Both instruments showing same Output level in Kontakt Both instruments have their own separate output channel in Kontakt. No plugins on either CW track. Headphone volume level the same for both tracks on playback. Track with Session Percussionist on the Kontakt with 3 instruments -- distorted. Other instruments are OK. Pro Channel EQ on CW track is constantly red. Track on the Kontakt alone - not distorted. CW Pro Channel EQ not clipping. What ?!?!?!?!? 😲
-
That was my first thought -- that something was being overdriven. But the SP track's meters were not clipping . . . .
-
I've got a song where I'm using 5 Kontakt instruments in one instance of Kontakt. The last instrument I added was Session Percussionist (SP), which can have up to five different percussion instruments at once. When I added this instrument, there was distortion on it (not on any other tracks). I thought that I must have reached my computer's processing or RAM limits. My computer was 4 years old and had a lot of fan noise, so I decided to build a new one that would be more quiet and more powerful. After a few days of research on what to buy, and 2 days of computer hell setting it all up, I loaded in the song I was working on. The distortion was still there 😲 I started experimenting and discovered that in this song, if I created a separate instance of Kontakt for Session Percussionist, there was no distortion. (I did not remove the first instrument of SP residing in the single instance of Kontakt with 4 other instruments.) So my question is, "What's going on?" Why would a single instance of Kontakt running 4 instruments cause distortion, but adding another instance of Kontakt for Session Percussionist would solve the problem? I thought that it was possible to run many instruments in one instance of Kontakt . . . . ________________________________________ Two minor questions . . . . The Performance module in Cakewalk shows CPU usage and the Disk Usage for Drive C. Why do I care about disk usage for Drive C? Wouldn't it be more useful to show RAM usage? In changing over to the new computer, mysteriously the Cakewalk icon disappeared. It's not on cakewalk.exe or the Shortcut. I solved this by using the icon on the Run as Administrator cakewalk.exe file for the Shortcut, but I'd like to know why the original icon disappeared? And, why is it not possible AFAIK to change the icon on an .exe file in Windows. By the way, I'm very happy with the new computer 🙂 I'll share some of my experience for anyone that might be considering upgrading: The Intel CPU chip that I was buying already had high resolution graphics on it, so I did not need a separate graphics card. IIRC, the chip was only $20 more than the chip without graphics. The motherboard had 2 monitor inputs (Display and HDMI), which was all I needed. I guess because of not having a graphics card, the computer doesn't consumes a lot of electricity. I got one of those Power Supplies where the fan doesn't come on until there is a 300-watt load, and so far its fan has never come on. The CPU cooler fans and 2 chassis fans run all the time, but they are very quiet. I used SSD drives which results in more noise reduction. From two feet away I don't hear any noise from the computer, no matter what I running on it. The radiator for the CPU cooler was too big for the case. However, I discovered that I could install it behind the front panel if I only use 2 of the 3 fans. I added an additional case fan, and one came with the case. This setup seems to work OK. CPU temp is usually around 30 to 50 C, which I believe is well below where throttling kicks in. I moved the Windows 10 drive from the old to the new computer, and updated to Windows 11. Everything works fine so far -- except that somehow I lost the Cakewalk icon logo 😁. Also, my Behringer XR18 interface is not recognized by Windows 11 if I start the computer with the unit on. I have to turn the interface off, then back on to get recognition. I don't know why that's happening, either. The main components I installed: i7 14700 14th Gen 16 Core, 64 DDR5 RAM, Cooler Master Liquid PL360 FLUX for CPU, ASUS ROG Strix Z790-F Gaming WiFi II, Fractal Design Define 7 case. Not counting two NVMe M.2 SSD drives, it cost around $1600.
-
I had assumed that having 1 instance of Kontakt with several instruments would be easier on RAM and CPU usage, so I was eager to learn how to use this method. But after reading what msmcleod said, and several different forum threads on this issue from a variety of sources, it appears that is not the case. The general consensus seems to be that running a single instance of Kontakt with many instruments, versus running one instance of Kontakt for each instrument, there is no significant difference in RAM or CPU usage . . . .
-
I think I've figure out how to delete and instrument in Kontakt, then add a new one . . . and make it work in CW. The steps have to be done in this order: 1) Delete the undesired instrument in Kontakt. 2) Add another instrument. It will automatically appear in the place of the deleted instrument in the list. 3) Open Outputs, then re-Batch using the top choice of the three choices presented. 4) In CW, delete the track of the instrument previously deleted in K. 5) Rt click on any of the K tracks and choose Append Instrument. 6) If desired, move the newly created CW track to keep the instruments in the same visual order as in Kontakt. If this is done out of order, there will be trouble.
-
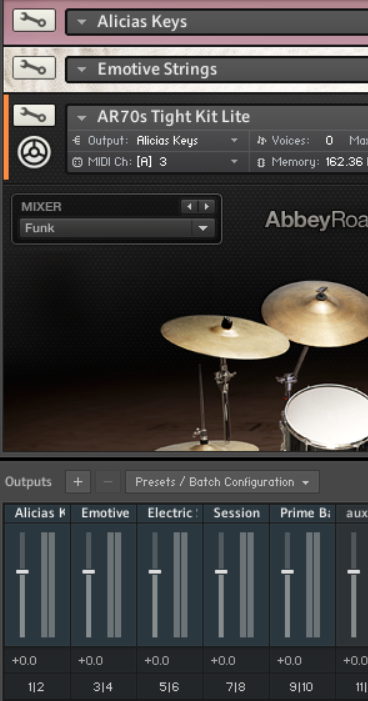
Thanks for your feedback. Here is the initial set up, which works . . . . 5 Instruments in Kontakt 7.7 In CW, 5 Instrument tracks, with only the first one with an instance of Kontakt. All inputs and outputs apparently correct. Everything is OK. If I delete one instrument, everything still behaves normally. (below Electric Sunburst Deluxe - instrument 3 - has been deleted) As expected, CW track 3 no longer sounds during playback, since its instrument has been removed. If I now add a new drum instrument in Kontakt, it shifts up to 3rd place automatically to take the place of the deleted instrument, and now show MIDI Ch 3, but the output says "Alicia Keys" which is the first instrument. Track 3 in CW does not play anything, and the MIDI on track 3 does not play the Alicia Keys piano. All the other tracks play correctly. In Kontakt, I reBatch the Outputs, and the output of the 3rd track now says correctly AR 70s Tight Kit. However, the drums do not playback on CW track 3. But strangely, the Output meters in Kontakt and the CW meter in track 3 are both being triggered by the MIDI. And, the CW Master Output is not showing any activity on its meter from track 3. It appears that Kontakt is transmitting the drum audio to CW, and CW is receiving it on right track, but the sound is not being sent internally to CW's Master Output. I'd like to understand what's going on . . . but more importantly, I want to how to add a Kontakt instrument after deleting an instrument.

-
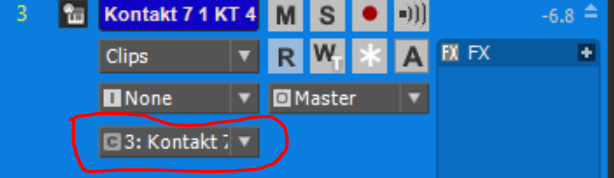
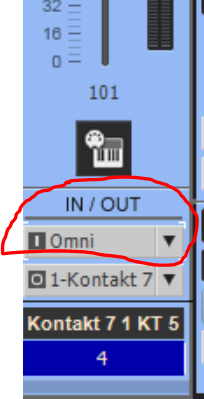
One roadblock that's prevented me from understanding how to set up multiple instruments in Kontakt7 was that my Cakewalk GUI setup did not display the MIDI Ch control that normally appears at the bottom of the horizontal track strip controls. If I understand you correctly, this is the "forced MIDI channel" control that you were referring to. Somehow my Cakewalk was not configured to show that. I've now enabled it: Up to that point, the only MIDI Ch settings I knew about were at the bottom of the Track strip in the Inspector and the Console: So in your previous post, you said that if the forced MIDI Ch setting is changed after setting Kontakt up with the "Per-Output Track functionality", then problems arise. In other words, this a bug? Anyway, after receiving your and others' advice here, I was doing OK when I set up one instance of Kontakt with multiple instruments. But later, when I decided to delete one instrument in the list and replace it with another, strange things happened. I started with 5 instruments, and all worked well. I could record and play back with no difficulty. Then I deleted one of the instruments. I re-Batched. All instruments would sound when playing back the song. However, when I attempted to Solo some of the tracks, some would sound in Solo, while others would go dead. Having discovered the new-to-me MIDI ch control, I attempted to get all the inputs and outputs synced up so playback would work correctly, but I failed. Was this a case of me running into the problem (bug?) that you described that results from forcing a channel? If that is the case, how does one get it to work after deleting an instrument from the list ? Or is the only solution to completely start over and set up the instruments again? Roger
-
Nectar - A question about using Harmonies (called Voices in v.4)
Roger W replied to Roger W's topic in Instruments & Effects
deleted post -
Nectar - A question about using Harmonies (called Voices in v.4)
Roger W replied to Roger W's topic in Instruments & Effects
Thanks for your pointers 🙂 Some people may think that auto-harmonies are not worth using because the sound is robotic. And it's true that the Nectar harmonies soloed do not sound highly realistic. However, when they are positioned in the background and not too loud -- and doing this is highly customizable in Nectar -- they do sound quite good - I dare say adequate even for "pro" usage. In an application like Simon & Garfunkle, where the two singers are equally prominent, the Nectar harmonies would not be adequate. But when used in the right way, these harmonies really add something positive to the vocals of a song. When I said "automate Nectar harmonies" in my initial post, I should have said, "apply automation to Nectar harmonies". The way they have it set up, it's possible to create automation "lines" in Cakewalk . . . just like you would use automation to increase volume in one phrase of the vocal, but leave the rest of the vocal at normal volume. So for example, I can draw an automation line that bypasses the Nectar harmonies on the verses, but enables them on the choruses. Or, even cooler, if I put an "automated" Nectar harmony on large sections of a song, but part of a word sounds "off" when a chord changes, I can draw in automation that will give me a good sounding harmony note. Or, at least I think I can . . . . Here is a list of the choices in the types of automation for Nectar harmonies. I've put in comments what I think some of these mean, but would appreciate feedback if I'm wrong. I haven't experimented much, and doing that will probably make things more clear for me. (I was unable to find out anything about these Automation settings in the Nectar 4 manual.) Harmony Bypass -- bypasses all harmonies Wet Mix -- Set the amount of wet signal V1 Enable -- Turn on/off Voice 1 harmony. Well, they've got Mute below. What's the difference between Muting and dis-Abling? Seems duplicative. V4 Enable -- Turn on Voice 4 harmony. Why did they skip V2 and V3 Enable? V1 Maj/Min Int -- Not sure about this. Does it mean being able to set the harmony using any of the scale tones? V2 Maj/Min Int V1 Chrom Int -- Not sure about this. Does it mean being able to set the harmony using any of the 12 tones? V2 Chrom Int V1 Mute- - Mute Voice 1 harmony V2 Mute -- Mute Voice 2 harmony V4 Mute -- Mute Voice 4 harmony. Why is V3 left out. Global Bypass -- bypasses all Nectar effects By the way, the automation for the Nectar Voice has it's own section, with several additional parameters that can be automated. -
Nectar - A question about using Harmonies (called Voices in v.4)
Roger W replied to Roger W's topic in Instruments & Effects
Through experimentation, I've learned that it's possible to automate Nectar harmonies. It looks like it will do what I want . . . but due to my lack of understanding of music theory, I'm going to have to do a bit more learning before I can implement it. Time to read the manual . . . . 😲 -
I'm just starting to use Nectar . . . I have v4, but what works in some older versions would probably work in 4. I've got a typical song with verse, chorus and bridge sections. What I'm trying to do is put different harmonies on each section. I can think of ways to do that, but those ways are neither simple or efficient. Can anyone suggest a good way to do this? Something else . . . . I can select a harmony, and it sounds mostly good throughout a song. But there are a few places where it's unharmonic. Is it possible to keep a selected harmony, but insert a correction here and there? Thanks!
-
Your wisdom is deep, Master. Thanks again 🙂 Grasshopper
-
Thanks for everyone's help 🙂 I was finally able to get multiple Kontakt instruments playing in Cakewalk very efficiently -- without needing to change the Channels on my keyboard or elsewhere. I was confused in part because there are inputs and outputs in both the Kontakt instruments and Cakewalk, and I wasn't clear on exactly was being suggested. For my own understanding, I've compiled a step-by-step description of how to set it up, and will paste it here for those who are as confused as I was. If any of those more knowledgeable than I am about this see a way this can be improved, please chime in. 1. Cakewalk Drag Kontakt 7 from the Instruments list at the right. In Synth Menu window that appears, check the following: Instrument Track per Output Stereo Audio Output Synth Property Page Synth Rack View Number of Tracks/Track Pairs to Create Limit to 1 Enable Midi Output 2. Kontakt v 7.7 In View at top, click on Side Pane to show instruments on the left. Add all desired Instruments by dragging desired Instrument -- .nki file -- from the list at left into the Main window. Can hold Shf or Ctl to make multiple selections. Open Outputs from View menu - Presets/Batch Batch Functions "Clear output settings and create one individual channel for each loaded instrument". 3. Cakewalk Right Click on track number of new Kontakt track, select Append Instrument Track. Repeat this to create tracks for each Instruments that is loaded. To add additional instruments later, repeat steps 2 and 3 above. A few notes: * I noticed that after setting things up, the Cakewalk input on the instrument tracks initially said "Omni", but soon mysteriously changed to "All External Inputs". * To input midi from the keyboard, the target instrument track in Cakewalk needs to have focus (be "activated"). * The Input Echo seems plays a role, but I haven't quite figured it out yet. Try setting Input Echo = ON for all instrument tracks.
-
I attempted to do what you suggested . . . but after changing settings, pressing a note on the keyboard triggered multiple Cakewalk tracks at the same time. Not the desired goal. I must be misunderstanding your instructions in some way . . . . For example, when you said, "The forced output Channel setting on each track . . . .", I didn't know whether you were referring to a Kontakt or a Cakewalk setting. In any evernt, I know of only 4 routing settings that seem to pertain to using multiple Kontakt instruments in Cakewalk: * The keyboard's output settings, which I set to 1, and left it there. * In Cakewalk, there is an Input setting for each track, which I set to 1 for all tracks. * In Kontakt, there is a MIDI Ch setting, which I set to one for all instruments. * The Output setting in Kontakt I left as the Batch Function created it for each track. Unfortunately, pressing a key on the keyboard triggers all the tracks. I don't know what I'm doing wrong. Please advise . . . . .