


-
Posts
4,917 -
Joined
-
Last visited
-
Days Won
5
Everything posted by David Baay
-
If you have the old BFD ECO version, I just discovered BFD is offering an upgrade to BFD3 for just $49.99. Just enter your ECO serial in the promo code box at checkout: https://www.bfddrums.com/drum-software/bfd3.html
-
I would say step one is to set the Volume widget of the MIDI track (or MIDI side of the Inspector for an Instrument track) so that the VSTi will always be initialized to the same level (CC7 master volume is sent every time you open the project, and every time you start playback). By default the MIDI Volume widget will show (101). The parens indicate that it's disabled. Moving it automatically enables it, and you should see the level control in the VSTi's UI follow its movement. Depending on what synth you're using, and what tracks/channels you have set up it may be the volume of a single channel or the volume of the instrument's main output. If you have more than one MIDI track riving the synth, you should enable the Volume widget on only one track (right-click and Disable the others as necessary). If more than one MIDI track has volume enabled, the level of the highest numbered track will supersede earlier ones. Beyond that you would need to give us a run down of you track/bus/send routing, what drum plugin you're using and how it's configured, how you're entering MIDI (drum controller, keyboard controller, PRV or Step Sequencer) , and let us know what export options you're using. I generally recommend exporting with source = buses, and unchecking everything but the Master bus. This generally ensures the level of the resulting audio file is the same as what you see in the Master bus meters, and what you hear while playing/recording. My standard workflow is to bounce the Master bus to a 'Master Bounce' track in the project that routes directly to the main hardware outs in parallel with the Master bus, and group the mute on that track in opposition with the Master bus mute so I can A/B between them. Once I'm confident the rendered bounce is an accurate representation of the live mix, I'll export just that track.
-
Right-click a clip that you think is using a file that Clean Audio is going to delete, and choose Associated Audio Files to verify the path and name it's referencing. My guess is that Clean Audio is not wrong, and either the content is in one of the four remaining files or the clip is referencing a file in the original source location. Regardless of what you find, the easy way to clean it all up wiithout risking data loss will be to Save-As the project to a new folder with 'Copy All Audio' enabled. Only needed files will be copied, and any files referenced from another location will also be copied to the new audio folder as needed.
-

Question About CPU load among DAWS
David Baay replied to Stephen Rybacki's topic in Cakewalk by BandLab
Ha! You got me. I know Adventure and Lunar Lander, but not the hardware. For the uninitiated/curious/nostalgic, I Googled up this: https://www.pcmag.com/news/the-forgotten-world-of-teletype-computer-games Fond memories. Apologies to the OP. Your thread is now well, and truly, hijacked. -
Question About CPU load among DAWS
David Baay replied to Stephen Rybacki's topic in Cakewalk by BandLab
Ah, but did you ever play Star Trek on a teletype terminal? -
Question About CPU load among DAWS
David Baay replied to Stephen Rybacki's topic in Cakewalk by BandLab
Comes from 'driving' tape across the magnetic head in a tape-based storage system using a capstan and pinch roller. -
[SOLVED] Problem: Sticky solo? Only one track plays?!?!
David Baay replied to Jacques Boileau's topic in Cakewalk by BandLab
I can't think of anything that could cause those symptoms other than some corruption. of the project or the program state in RAM. If a reboot doesn't fix it, the brute force solution would be to move the track content to a new track and delete the one that's misbehaving. -
+1 for getting a real controller, and learning to enter to record parts in real time with control of velocity and duration as well as pitch. Even if you make a lot of mistakes at first, you will improve quickly with, fixing them will be faster than entering and editing one note at a time using the mouse and/or PC keyboard. Recording drum parts from a controller keyboard keyboard is especially easy (and a good place to start) because you can record just one or two kit pieces at a time, and you don't have to worry about duration or fingering.
-
Bounce to tracks and Flatten Comp are applicable only to Audio. Bounce to clips is applicable to both Audio and MIDI, and will combine all selected clips. I generally only use bounce to clips with material in the same lane, so not sure offhand where the combined clip will end up when they come from different lanes - I'm guessing the first lane. When entering notes in the PRV, if a new note is more than 2 beats later than the previous note, Cakewalk will start a new clip rather than extending the existing clip to encompass the new note. There really should be a setting to control this, but I don't believe there is - another reason to learn to use controller to record parts in real time, rather than drawing with a mouse. The advantages of having drum parts in separate lanes are primarily related to editing/arranging in the track view - being able to easily select and cut/copy/paste pieces of individual parts to different places or apply clip FX or changes with the Event Inspector selectively. It also facilitates soloing/muting parts and or trying out different patterns by making changes to a copy in a new lane.
-
Select all clips (or just select the track number), then right-click a clip and Bounce to Clips. But having different drum parts on different lanes of a track can be very useful, and I recommend just leaving it that way.
-
sales KONTAKT 6 50% Off Until The End Of September
David Baay replied to Simeon Amburgey's topic in Deals
Thanks for the heads up. I've been waiting to get a deal on the 'crossgrade' option at for owners of 'qualifying' Kontakt Player-compatible libraries - now just $125. I picked up Morphestra 2 on sale last year which made me eligible, but then did not do a good job of watching out for the sale. I'm really not that big on samplers in general, but Kontakt libraries are so ubiquitous it's pretty much essential if you want access to even a few. I picked up a few other deals on Kontakt Full-only libraries last year, knowing I would eventually get the to use them. Looking forward to playing with the new toys! -
Is there a way for trim volume automation?
David Baay replied to Michael Zagas's topic in Cakewalk by BandLab
There's a button for it in the Mix Module in the Control Bar. 'I' in this image: https://www.cakewalk.com/Documentation?product=Cakewalk&language=3&help=Automation.13.html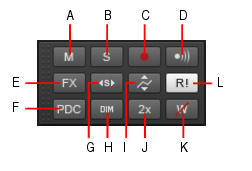
-
Is there a way for trim volume automation?
David Baay replied to Michael Zagas's topic in Cakewalk by BandLab
As Craig noted, Offset mode works 'under the covers', and will not affect the displayed position or dB values of your automation envelope. Moving the whole envelope up and down is an alternate way of dealing with the problem. I don't know of a shortcut or gesture that would inadvertently select and entire envelope other than clicking the track number to select the whole track with the Edit Filter set to the envelope. -
Is there a way for trim volume automation?
David Baay replied to Michael Zagas's topic in Cakewalk by BandLab
That works, too, but not every track is going to have a dedicated bus where you can do that. And if the track has any post-fader sends, you're generally going to want the level of the track to be right at the output. Offset mode is the quick, easy and recommended way. of doing this. Incidentally, you can tell you're in offset mode because all the widgets will have a '+' in them. But it's easy to overlook in the heat of battle which is why users sometimes get in trouble by inadvertently enabling Offset mode (more so when 'O' was the default shortcut). -
In the distant past, the PRV would sometimes get in odd states depending on where it was opened - .i.e. docked, undocked but not floating, or floated. You might try playing with that. Also I'd be curious whether this is all projects or just your current one.
-
You need to select the Autostretch mode from the drop-down next to Clip Follows Project before enabling it.
-
The track you use as a guide track for Fit to Improvisation is sacrificial. Its timing will go out of sync with the timeline and existing MIDI and Audio to which you're trying to align the timeline with tempo changes. If you want to keep a copy that stays in sync, copy it to another track or to another lane in the same track before executing Fit.
-
Muted Waveforms still Audible on Export/Bounce
David Baay replied to Wong Jian Ming's topic in Cakewalk by BandLab
Hey, no fair, and where's the fun in that? The (unwritten) rules of the forum say you have to figure stuff out without being able to look at the project directly. ;^) -
I cannot repro this. Since you're not recording, record options should not have a bearing. I thought the status of Non-Destructive MIDI Editing might, so i changed that, but still could not reproduce the problem. If you can reproduce it a second time, you might need to share exact steps. When you did the 3x drag-copy of the 'base' pattern was that also done in the PRV with looping already encompassing the 4 x 4 bars (if I'm reading the PRV interpreting correctly with the timeline out of view), or did you do that part in the Track View? And what's in the apparently empty clips?
-
Muted Waveforms still Audible on Export/Bounce
David Baay replied to Wong Jian Ming's topic in Cakewalk by BandLab
Okay, my second guess is that you're exporting 'Entire Mix', and you have a send of that track (or the first bus it hits) to a second hardware out (maybe via another bus), like a headphone mix. What you hear in your monitors is only the master bus coming through the main outs, but what you get on export is a mix of the main outs and that other hardware output. Try exporting with Source=Buses, and select only the Master bus. EDIT: Hmmm... just looked back at your screenshot and see you have only one stereo output. But I would still recommend you export only your Master bus. -
Flanging/Phasing generally only occurs when two identical signals (both frequency and timbre) go out of phase. If you're adding MIDI instruments to a recording that used real instruments or other virtual instruments., that should not happen. If it did, we'd all be in a world of hurt all the time. But if Mark's shifting-tempo trick made whatever you were hearing go away, I guess that's all that matters.
-
Indeed it was Brundlefly. Not sure why the new forum defaulted to my real name, but I decided to just leave it. I figured my avatar would be recognized by the old-timers. ;^) All your points are well taken with one exception: System performance should not alter latency. Latency should always just be fixed based on config settings, plugin delays and hardware/firmware interface buffers, and if the limit of CPU performance is reached, the audio engine will drop out.
-
Ah, okay. I thought you were just trying to avoid having to open the PRV track pane, and I missed the part about using a keybinding.
-
In the mean time (and maybe indefinitely, given that Pick Tracks was deliberately removed from the PRV in favor of the track pane a long time ago)... Depending on your workflow, and the number of tracks you have to deal with, this could be a workaround or maybe even the preferred solution: Enable editing on all tracks in the PRV track pane by sweeping through all track numbers, enable Autofocus, then close it. All notes will display as 'ghosted except for the currently active/focused track. Clicking on any note will 'pick' that track and un-ghost all the notes. If you know you're only going to be needing to work on a subset of all tracks, you can Ctrl+click in the PRV track pane to enable just those tracks for editing to reduce the 'clutter' of ghosted notes. This should at least reduce the amount of time you need to have the track pane open.
-
This could be an issue if the OP is playing a direct-monitored hardware synth, but in any circumstance where the audio passes through or originates from the box, 25ms of Plugin Delay Compensation would make performing pretty uncomfortable. So I doubt that's a factor in this case. Also, just so the OP understands, not all plugins add latency. only those with internal 'lookahead' buffers to 'see what's coming' in order to do their processing (e.g. transient shapers, convolution reverbs, any linear phase FX), some compressors/limiters). Plugins that do this are generally classified as 'mastering' plugins that are not intended to be used in the 'tracking' phase of a project. Also, Cakewalk allows overriding delay compensation on input-monitored tracks so you can still record external sources without feeling the extra latency in some cases. But, as John says, it's best to avoid tracking with plugins that need PDC.


