


msmcleod
-
Posts
7,120 -
Joined
-
Last visited
-
Days Won
39
Everything posted by msmcleod
-
Please contact support regarding this: support@cakewalk.com
-
This happened to me a while back when I upgraded my Focusrite drivers. It was down to conflicting settings in my AUD.INI. With cakewalk NOT running, delete AUD.INI from %APPDATA%\Cakewalk\Cakewalk Core , then start Cakewalk. Cakewalk will generate a fresh AUD.INI I'm running the 1st gen 2i2, 6i6 & 18i20 on three different machines, and although I normally use a buffer size of 64, I can get as low as 32 for tracking, or 16 for playback without effects. Tracking guitar without latency when only using VST effects can be tricky though. Typically I record both the dry & effected signal using hardware effects to avoid any VST latency, then add the VST effects afterwards. However if this isn't an option, make sure all other effects are bypassed apart from your guitar effects when tracking.
-
Are you using a Workspace ? It may be that it's set up to be too "pervasive" in the workspace settings. Try setting it to none, close down Cakewalk, restart it and re-load your project.
-

Your suggestion/opinion, please - on old PC cards & Software
msmcleod replied to Toddskins's topic in The Coffee House
Personally, I'd recommend sticking them on ebay - its surprising how many people use/rely on legacy gear, and when something breaks, ebay is the only real source of a replacement. For example, I saw a YouTube video recently by Lewitt (the microphone guys), who were filming at a mastering studio in London. The studio had a range of PC's/Mac's dating back to the early 90's - just in case they needed to work on a session they worked on 25 years ago for a client. No doubt these machines get very little use, but if one of them breaks its a big deal. So not only might you be doing someone a huge favour in allowing them to keep their old gear working, you'll make a bit of money out of it too. -
I don't have WAVES Vst in "Audio Fx" with Windows 10
msmcleod replied to jorvel's topic in Cakewalk by BandLab
If you're scan settings are set to manual, you'll need to re-scan to pick them up. 1. Go to Preferences->VST Settings 2. Make sure the location of the Waves plugins is in the VST path list 3. Click the Scan button. -
Are you using a workspace? Try setting it to None.
-
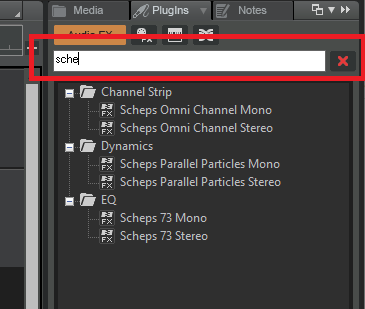
I find by far the easiest method is to type in part of the name into the browser, then drag it on to my track:
-
The main difference between the previous version of the MackieControl.dll and the latest one is the auto config, which is based on the order in which the control surfaces are added. So all you should need to do is add the control surfaces in the following order: Mackie Control - US2400 port 1 Mackie Control XT - US2400 port 2 Mackie Control XT - US2400 port 3 However pressing the reconfigure button will override the auto config - and any preset you've previously saved will also override this in any case. There's thread here that describes a similar issue you're having:
-
ALT + Z get's you back. I'm always forgetting it too!
-
Trying Nanokontrol 2 to control vsti in cakewalk
msmcleod replied to mats's topic in Instruments & Effects
Running the nanoKONTROL 2 in Mackie/SONAR mode will emulate the Mackie MCU, which is pretty much limited to how Korg have programmed it and also by the limitations of the MCU. I did add some enhancements back in the 2019.12 release to give access to the effects & synth racks, but it still basically behaves like an MCU does. The MCU was never meant to be a generic controller (the Mackie C4 was meant to be that, but never really took off). If you want generic control, run the nanoKONTROL 2 in CC mode and use either Cakewalk's Generic Surface Controller or AZ Controller. -
Mike - I've been in this place too... and had similar thoughts only a few weeks ago, as I seem to be spending all my time writing code (which I do enjoy), and really not getting much music done. The thing that snapped me out of it was spending the day with my daughter recording a song - just a cover, but it got me actually using my gear again. So that would be my advice - just record a cover of something. During the process you'll no doubt find a use for a lot of the stuff you've acquired over the years.
-
Does anyone still use Addictive Drums 2?
msmcleod replied to Feral State Sound's topic in Instruments & Effects
AD2 is still my go to for drums, and like @Michael A.D. I also quite often use it with Jamstix. -
All of your Sonar X1 effects should be available in Cakewalk. Check any of the VST paths you've got set up in X1 are also set up in Cakewalk.
-
CbB continues to work on WIndows 7 - we just don't officially support it any more, hence the warning when you install it. There's nothing new that has been added ( AFAIK ) that wont work on Windows 7, however this is likely to change at some point in the future.
-
@scook is correct - this is where it's stored. The values look like this for the various default modes: Universal: <string>com.celemony.analyzerParameterSet.polyphonicUnpitched</string> Percussive: <string>com.celemony.analyzerParameterSet.percussive</string> Melodic: <string>com.celemony.analyzerParameterSet.melodic</string> Polyphonic Sustain: <string>com.celemony.analyzerParameterSet.polyphonic</string> Polyphonic Decay: <string>com.celemony.analyzerParameterSet.polyphonicWithDistinctAttacks</string> I've found best results for Audio->MIDI are from Melodic (or Polyphonic Sustain if you have Editor or Studio). Be VERY careful when editing this file though. If you get one of them wrong, it'll crash Cakewalk.
-
A couple of things: 1. WASAPI Exclusive isn't supported by all sound devices. 2. In WASAPI Exclusive mode, Cakewalk takes exclusive control of the sound device... which means it won't share it with Windows. You've two choices: 1. Use WASAPI Shared; or 2. Continue to use WASAPI Exclusive, but check "Suspend Audio Engine When Cakewalk is not in Focus"
-
When I last spoke to Noel about this, he said it used whatever one Melodyne was set to... so I guess that would be the last one you set it to within Melodyne's UI. Now this has got me wondering... if you were using the trial, and it was previously set it to one of the polyphonic modes... that might explain it not working.
-
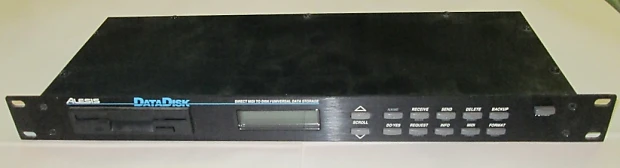
I bought one of these a long time ago... actually I traded in my YAS-32 sax for it (still regret that ) - but it's great for both saving/restoring patches & also playing sequences. It also worked great in the studio. I could sequence all my keys at home, "bounce" it to the data-disk then sync it up to the BRC in an ADAT system. Random access to anywhere in the song on the ADAT worked a treat. The only downside was manually entering tempo maps into the BRC. For live, I'd store each song as a combination of sysex/patch changes so that my whole rig was set up exactly how I wanted in around 2-3 secs.
-
Cakewalk NRPN problem? (Prophet Rev2 controlling Omnisphere)
msmcleod replied to Jezric's topic in Cakewalk by BandLab
A lot of VST's use NRPN's for their automation parameters. By default CbB expects this, but you can switch it off. Have you tried checking "Do not intercept NRPNs" in Omnisphere's plugin properties ?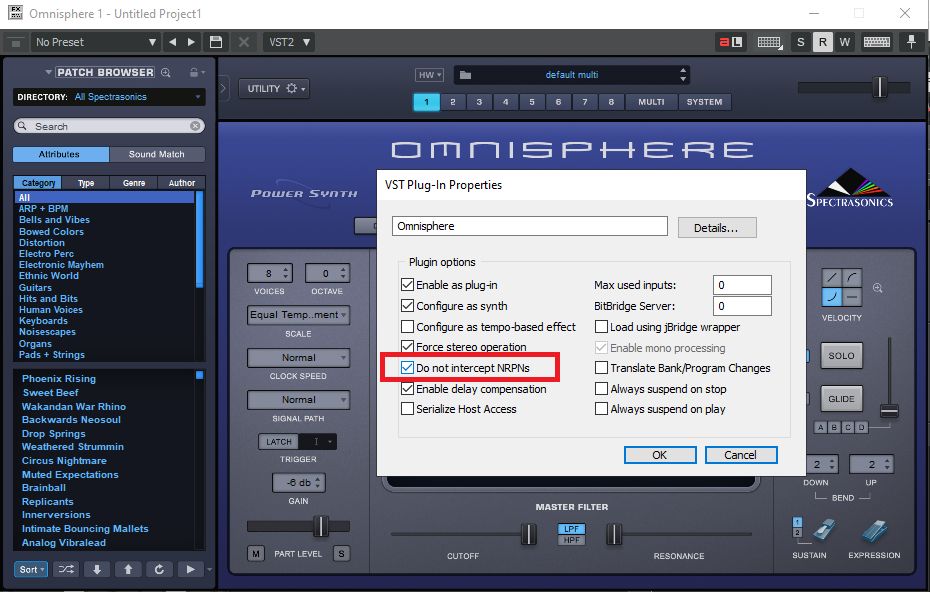
-
@Gary Shore - did you install Melodyne via BandLab assistant? CbB uses ARA directly to perform the audio to MIDI conversion outside of the Melodyne interface, so while you can't use it as a Region FX or plugin when the trial is over, you should still be able to drag clips from an audio track to an empty MIDI track to do conversion from audio to MIDI. If this has stopped working, I'd advise uninstalling Melodyne and re-install it via BandLab assistant. As far as alternatives, I find MAutoPitch ( https://www.meldaproduction.com/MAutoPitch ) fantastic for just doing vocal tuning, and best of all it's free. Although you can't edit it in the same way as Melodyne, you can automate it in & out as necessary. When I've used this method, I'll usually "bounce to clip(s)" afterwards to make it permanent.
-
[BUG] Freezing archived track crashes Cakewalk?
msmcleod replied to Cristiano Sadun's topic in Feedback Loop
FYI - we found a similar crash with freeze, which has been fixed for the next release. It fixes this issue too. -
Dragging the audio clip to a MIDI track *should* still work, even if your trial has ended.
-
Do you have any audio tracks that have no import source (i.e. it's set to "none") ? We've just fixed a freeze issue where this was causing an issue. Export/Bounce is a similar operation, so it could be related. Until the next release is available, make sure your all your audio tracks have an input source before exporting.
-
Running your mix through this into the Lurssen Mastering Console is a very nice combination.
-
From personal experience... Antares VST2 plugins work much better than the VST3 ones in CbB. UJAM virtual guitarist series work better with smaller ASIO buffer sizes if JBridged in CbB (as a 64 bit to 64 bit bridge - not a bridged 32bit plugin)


