


msmcleod
-
Posts
7,120 -
Joined
-
Last visited
-
Days Won
39
Everything posted by msmcleod
-

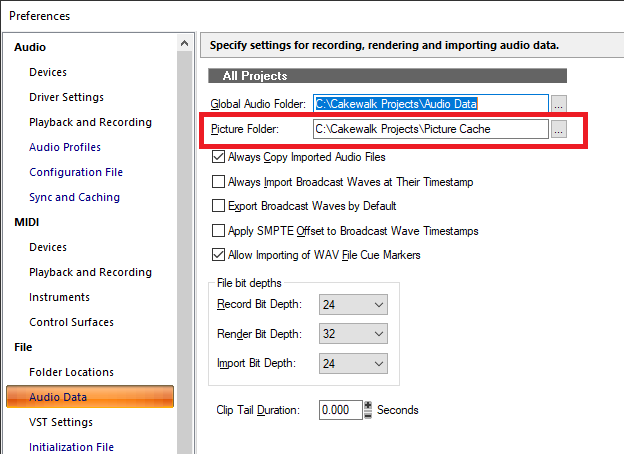
EZ Tune-Up: Delete ALL from picture cache
msmcleod replied to user390096's topic in Cakewalk by BandLab
Yes, deleting the picture cache is pretty harmless as they will get regenerated when you next load your project. However it doesn't regenerate them every time, it'll only regenerate them if the audio has changed or the the picture isn't there in the cache to begin with... otherwise it'll use the existing pictures in the cache. It's probably worth clearing out the cache from time to time, but too often will increase the time it takes for the project to load if it's having to regenerate them all the time. Especially projects with lots of audio clips. -
Korg, Roland and GAK fined millions for price fixing.
msmcleod replied to Philip G Hunt's topic in The Coffee House
This is verging into politics now... locking this thread. -
It was on sale for $29, but it's now back up to $174. I grabbed it a week or so ago. Audio plugin deals do this - they have a deal running for a week or so, then it's gone... I've never seen anything go back to their "base" price regardless of what rewards you have.
-
We'll look into this. For the moment, a workaround is to disable Autocross fade when nudging on the comp track. The thing is though, once you've nudged a clip the cross fades no longer make sense. The clip you've nudged has now overlapped the adjacent clip far more than a normal crossfade, so you'll have to adjust the fade manually. This is especially true when dealing with clips in multiple lanes.
-
Cakewalk Doesn't Release When Closed
msmcleod replied to Moving Air Productions's topic in Cakewalk by BandLab
Cakewalk closes fine for me with Scheps Omni Channel. The version I'm using on this machine is 11.0.60.49 : I'm just checking for updates now..... Ok, just updated to 11.0.64.135: Cakewalk is still closing fine for me.
-
I'll need to discuss this with the team. It sounds to me like the only change that is needed (on the surface anyhow) is to stop right click from clearing the selection and selecting just the one note. This is in effect what pressing CTRL is doing: it's keeping the selection. This is why releasing CTRL half way turns it into a move operation. CTRL allows you to start moving the whole selection - if CTRL is still pressed at the time you drop, then its a copy, otherwise its a move. @jieva - this is also why holding CTRL changes the context menu, because it isn't clearing the selection... allowing the "selection" based context menu to show. The question is, how the majority of staff users will view such a change? If users have been used to knowing that right click & move will always move the one note, it might be very annoying if it starts moving the whole selection. I'll talk with the team and see what they say.
-
New Demo Projects to Demonstrate Arranger Track
msmcleod replied to Starship Krupa's topic in Feedback Loop
The issue is that there's so many different ways you can use the arranger. Some will just use the sections as markers. I pretty much do this in any case, as it makes project navigation from the arranger inspector dead easy. Others will use the arranger to build up a blank song format and fill in the blanks. You can also use sections as a "permanent selection" if you want to move or copy sections of your project around. I quite often create temporary sections, as it's just as easy to create a section as it is to select from the time ruler, but I know that moving/copying a section will copy EVERYTHING rather than having to revert to cut/copy special and check a bunch of options. Others will use it for the arrangements feature - which has a bunch of workflows as well.... It's original intended purpose was to experiment with different song formats... e.g. you've written a verse & a chorus, and you want to try out different arrangements of verses & choruses. When mixing, you can create arrangements that only contain a section from the beginning of the song and one at the end so you can check the relative balance between the two. You could also use it as part of an album mastering process - put each stereo mix back to back (either on separate tracks or the same track), and mark out each song with its own section. Then create an arrangement for each song (i.e. each arrangement only contains the one section). Once you've done your mastering, you can then go to export, and export all arrangements and it'll export each song as an individual file. We've purposely designed the arranger to be as flexible as possible, without dictating any particular workflow. -
@jieva - the snap issue is fixed for the next release, but I'm struggling to find a situation where CTRL + right click is any different from right click... can you give an example?
-
-
lol - now I remember why I rarely use mine as a controller... did they ever fix this for the K1 mkII ? I think I used to filter this message out years ago in my Music-X days, but it was a pain. On a positive note though, the K1 was the only synth I could write a patch AND play at the same time during a live performance because all my other gear reset themselves.
-
CbB mouse behaviour using Remote Desktop (Win10 Pro)
msmcleod replied to gokidsmusic's topic in Cakewalk by BandLab
As a workaround in the meantime, consider using the mouse wheel for moving the sliders/pan knobs. -
CbB mouse behaviour using Remote Desktop (Win10 Pro)
msmcleod replied to gokidsmusic's topic in Cakewalk by BandLab
Have you tried one of the VNC varieties as an alternative ? -
Simple way to monitor mid or sides in Cakewalk
msmcleod replied to Jono J Grant's topic in Cakewalk by BandLab
Not at the moment unfortunately. -
Simple way to monitor mid or sides in Cakewalk
msmcleod replied to Jono J Grant's topic in Cakewalk by BandLab
I use Cakewalk's Channel Tools which came with SONAR. The key is to keep the input mode as Stereo, then reduce the Mid gain to nothing to solo the sides. Double clicking the Mid gain brings it back to unity gain. This does however give a very "fractured" version of the sides, as it's unnaturally split across left/right with nothing in the middle. It may be what is actually only coming on the sides, but it's difficult for the ear to deal with. Setting the input mode to Mid-Side makes it mono, which does give a clearer representation making it easier on the ear.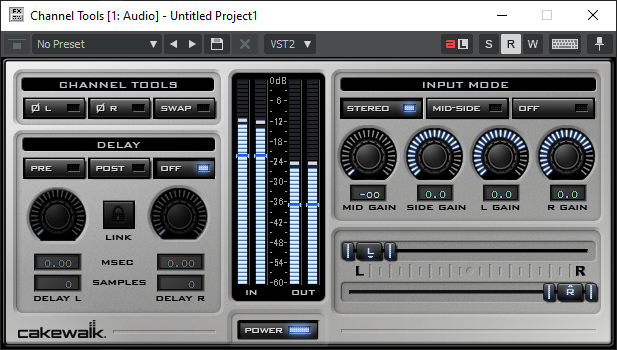
-
The plugin layouts are stored in separate files here: %APPDATA%\Cakewalk\Cakewalk Core\Plug-in Menu Layouts The details & plugin options of the plugins are stored in the registry under: Computer\HKEY_CURRENT_USER\Software\Cakewalk Music Software\Cakewalk\Cakewalk VST X64\Inventory So if you wanted to back your plugin configs, make a copy of your plugin layout files and export the registry key above within regedit.
-
Can I open a sonar platinum bun. file with cakewalk by bandlab?
msmcleod replied to Lawrence William Smith's question in Q&A
Does it say what the audio path its trying to find is? Maybe you just have to copy the bundle to your hard drive first.... either that, or the bundle may be corrupt. -
Not sure if this helps, but on Windows 8 / 10 you can press Windows Key + CTRL + O to show/hide the virtual keyboard. To get to it without pressing Windows Key + CTRL + O: Start Menu -> Settings Click Ease of Access Scroll down and pick Interaction->Keyboard from the left Enable "Use the on screen keyboard" using the on/off slider You can then resize/position it anywhere you like & access all the keyboard modifiers / key presses using the mouse. https://mcmw.abilitynet.org.uk/windows-7-and-8-using-windows-on-screen-keyboard?gclid=Cj0KCQjw3Nv3BRC8ARIsAPh8hgLZTnMwKqATwdN9CccJWk2w6kEqtnTm3DPHePV_XiFWbCP201L-OaYaAr_BEALw_wcB
-
Shortcut for opening VST on Instrument Track
msmcleod replied to Tim Flannagin's topic in Feedback Loop
Before you guys search too hard for an alternative solution... there will be a key binding in the next release. -
It's fading more than one clip because you've got more than one clip selected. Either clear the selection, or select only the clip you want to fade.
-
Feature: Partial clip gain via control shortcut + selection
msmcleod replied to Josh Wolfer's topic in Feedback Loop
You mean like this? -
Unless there is a way to map combinations of MIDI CC / Channel to another port and channel, anything else would be ambiguous. The current behaviour is actually unambiguous in that it sends the CC to all combinations of ports/channels defined in the drum map. It's been a while since I used drum maps, but I did used to use them on a combination of hardware drum units. In this case I absolutely wanted controllers such as CC 7 (volume) to be sent to every port/channel in my drum map - because it is in effect being treated as a single destination, and I wanted all units to respond to volume changes. I realise this behaviour is the opposite to what you want, but the only way to get around it at the moment is to bypass the drum map for CC messages and go straight to the MIDI port if you want per channel/port MIDI Messages sent.
-
Hi Ronny - I've just had a look. I believe this a limitation of drum maps rather than a bug. Drum maps only give you the ability to route notes, not CC's. When you have multiple output ports and channels, the drum map has no way of knowing where to send CC messages, so all CC's are routed to each unique channel/port combination defined in your drum map (in this case TTS-1 #1 Channel 1 & 2 and TTS-1 #2 Channel 1 & 2). The actual port & MIDI channel in the event list is irrelevant as it has been overridden by the drum map (in the same way you can override MIDI events' MIDI channels by setting the output port/channel of a MIDI track in the inspector). On a standard MIDI track using a standard port, leaving the MIDI channel as "None" will mean the MIDI channels for each event are respected. Setting the MIDI channel for the track will override any channel in the MIDI events and force them to the channel set for the track. This is not the case when using drum maps. CC's are sent to each unique channel/port combination defined in your drum map, The only way around this is to put the CC events on separate MIDI tracks. For this example, you'd need 2 MIDI tracks: one for TTS-1 #1 & one for TTS-1 #2, with their respective ports set to TTS-1 #1 / TTS-1 #2. The MIDI channel, bank and program should be left as None in the inspector so you are able to send MIDI events to different channels. M.
-
Latest MMcL MackieControl.dll available with HUI Support
msmcleod replied to msmcleod's topic in Cakewalk by BandLab
Apart from a few tweaks, I've really not done much with the C4 in code, as CbB's implementation is pretty much complete. The best thing is to look at the code on github for Cakewalk's implementation: https://github.com/Cakewalk/Cakewalk-Control-Surface-SDK Take a look at /Surfaces/MackieControl/MackieControlC4TxDisplay.cpp -
I stopped getting BSOD with 4.63.24 if I use CbB to change the ASIO buffer size.... I don't do it that often though.
-
I still use version 4 on an old 32 bit Win XP box... I tried v5 when it came out, but it confused the hell out of me.


