Search the Community
Showing results for 'prv' in content posted in Feedback Loop.
-
 YMMV. Don't know if any of it is possible, just my experience and thoughts, FWIW. Trying to edit a group of tracks in PRV can be convoluted for me. Sometimes I have no idea where the paste went until I discover duped notes later on. There's a key binding/right-click routine that copies selected notes to the current track in PRV but it's tricky and I can never remember what it is. Many issues are alleviated by editing one track in PRV, then drag/copying it to the other tracks in TV... but it means switching back&forth between TV & PRV. Linking clips helps but once they're unlinked (because one track needs a different note arrangement here&there) you can't relink them easily. There's also the rare occasion when I want duped notes for certain effects.
 -
 How do you “Disconnect PRV completely with TV” when they are both representing the same event data? Maybe I am missing something. I spend most of my time in the PRV when sequencing. I do most my copying and pasting in the PRV. For me, the pasted events always end up where they are supposed to, TV or PRV. I do use CAL scripts for a lot of my copy and pasting. I also have a CAL script that shifts the NOW cursor to the correct paste location based on how far the FROM is from the nearest measure. This is to capture any notes that might start before the measure. Note: I rarely quantise. There are those rare times when I paste a group of events to a destination, and some events already exist (especially with rhythms) - creating some duplicates. It does not happen often, but often enough to make the Unduplication CAL script useful feature to have if you need it. Sure beats manually finding duplicates.
 -
I wouldn't need this except for the fact that copy&paste never ends up where it's supposed to. Fix that and note doubling would almost never happen here. It can be fixed by correlating track selection and Now Time position in PRV with TV so they are in sync. OR Disconnect PRV completely with TV so that TV selection isn't overriding what I do in PRV. It's crazy to be going in and out of PRV to accomplish this. Unless I'm doing it all wrong. My workaround is to do any copy&pasting with clips in TV instead of PRV.
-
I know I know, there are places to officially log feature requests, but never ever in my long life has a feature request I have ever suggested ever made it ever to any piece of software ever, so I'm basically just howling at the rain here. Apologies. You can skip. #1 Here is my workflow: I export a song that is in progress to audio, then copy the resulting mp3 to a Google Drive folder so that I can listen on my phone as I go about my day, jotting down a few notes for the next time I'm at the DAW. Half the time I do this, I then go off and later discover that only one track got exported, because that track happened to be selected at export time. Grrrr.... And when exporting I can't choose "Project" instead of "Selection" in my export because I have all kinds of crap in my project far off to the right of the real song, so I need to make a selection from the true start to end. It seems like it would be easy for Sonar to pop up a warning: "Your exported audio will not include all non-muted tracks. Are you sure you want to export?" Then there would be an option to cancel export, and another option "Include all non-muted tracks in exported audio." #2 - It also seems obvious that when I have selected some notes in PRV and want to drag them around or edit them somehow as a group , that I shouldn't have to put my mouse riiiiiiiiight over ONE of the notes in the group to drag it. Once the selection is made, I should just be able to drag anywhere within the "box" of selected notes. Same with editing velocities or lengths. If I simply want to change the length of a passage of very short notes, I'm required to first zoom in so that I can get the cursor over the right edge of one of the notes. I should just be able to treat the selection as a single thing. I'm thinking something like the Transform Tool box with the buttons on the borders. Thanks for indulging me.
-

The inexplicable wretchedness of trying to use the drum pane
AxlBrutality replied to Starship Krupa's topic in Feedback Loop
I just want to hop in here and say I'm glad someone is still beating this drum (heh). I also share the frustration of bring up issues with drum maps and the drum pane and having 800 people be like "well I just use the regular PRV". Okay, well that's great, but please stop jumping in and encouraging devs to kick it to the back burner just because it doesn't affect you or you don't use it. I mean this with all due politeness and respect, but "I just use the PRV" isn't helpful to the discussion and doesn't encourage changes to be made. Speaking more for myself here....some of us specialize in genres with typically far more complex and fast drum arrangements with a ton of subtleties (technical death metal, deathcore, etc.) where the drum grid is INFINITELY easier to work with when it comes to manual programming and adjustments. We may not be the "norm", but we are not insignificant either. NO ONE I know who works in these genres uses the regular PRV and regular note displays (in any DAW) for their drum programming. (So @Starship Krupa, no, you are not alone and it's not "fallen out of fashion" in any way...it's actually MORE common now in certain genres than it ever was.) The unintuitiveness and clunkiness of setting up new drum maps and even setting up the drum pane and getting it to work in new projects was definitely a barrier for me many years ago. I had the advantage of a close friend and professional who primarily used Cakewalk at the time (he has since long moved on from Cake) to guide me through some of it, but it was still frustrating. I was then of course able to set up templates and simply copy/paste them over the years. But I recently made the switch from AD2 to Krimh Drums and had to create new maps and templates and oh boy, that involved me going through a lot of the same nonsense all over again. It reminded me of just how disastrous Cakewalk/Sonar is compared to other DAWs in how they handle MIDI drums in general. For example, no one on planet earth seemed to have a drum map for Krimh for Cakewalk yet, so I had to create one. Got everything input and saved after about an hour of work, only for nothing to work....because I wasn't aware that for some god forsaken reason, you have to pitch everything up two octaves when inputting your mapping values in Cakewalk. Cakewalk does so many things here in a bizarre and outdated fashion from other DAWs and there's literally no way for a new user to know. Only reason I figured it out is because that same friend from many years ago instantly recognized the issue because he's worked extensively with several DAWs and a half a dozen or more drum programs over the last 5-10 years. Not everyone has a friend like mine. Lol. Many of these issues are little, stupid issues, but they add up and at the end of the day, many of us are musicians first and it interrupts our creative workflow. But more to the point, we have been begging for specific and general changes to these system for literal years and we always go through the same cycle of devs "taking note" and "making plans" but it's the one system that has never actually been updated....and that's frustrating. -
I have played with screen adjustments but that affects everything, and with CbB and previous SONARs it's not an issue since PRV colors can be changed at will. Since X1, colors are slowly turning gray until all color is gone from life. Sonar now has a theme returning the record button red again, but only after enough people said something. For me ability to see and use trumps features, tho when I finally can't see at all it won't matter. 😎
-
Anymore, my eyes are slowly going South and since I work mostly in PRV, the ability to change the background is important.
-
I don't have Sonar currently installed but you could try importing an exported color.clr set from CbB to see if the PRV colors will carry over. This actually worked with some Sonar 8 colors that X1 had removed,
-

The inexplicable wretchedness of trying to use the drum pane
JnTuneTech replied to Starship Krupa's topic in Feedback Loop
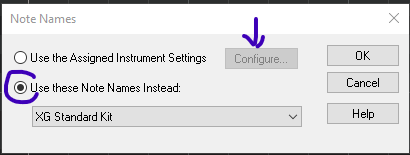
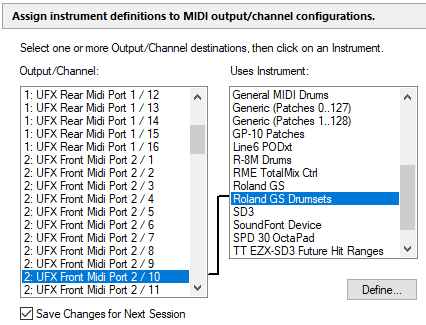
Pardon my adding in here, but it sounds like you are both referring to the PRV display when the MIDI track's output selection is using a mapped instrument definition, and one that has the programming note @Starship Krupa mentioned to force display of the notes as percussion. -In the example above, I also went into the right-click menu for the keyboard/note names section, and changed the default, which was blank at first. -The option to set this up does only come around when you are selecting a hardware output, AFAIK. It can be done via the "Configure..." option in the dialog as represented above, or from Preferences > MIDI > Instruments. -It can be setup without an actual hardware port, by using a virtual port (such as loopMIDI, etc.) , or, if you are not needing to monitor the playback of the notes (I know some folks who can write music without hearing it first {not me!}, you can also use the mapping temporarily (see the Save Changes... checkbox) on an existing hardware port to experiment if you like. In the examples above, I have used default instrument/note definitions included in Cakewalk products for years now. The ones that have "drums" in the name usually have the percussion view flag enabled. Now, I wanted to follow on to a previous post here, and state that while note mapping can be handy, and with time & patience (!) can be created/edited manually, I still find that creating/modifying a Drum Map is what I choose for in-depth day-to-day drum programming. It gets me the note names and selected organization in a few steps. I also prefer standard note view in PRV for drums, as it gives me the option of creating note lengths that help me see the intended dynamics - as it would be in an actual Piano Roll for say a player piano or music box. -But that's just me. In any case, there are lots of choices, and I only wish I had been able to learn these things more quickly when I was getting started. That still frustrates me - finding examples & detailed, easy to search documentation using real-world procedures. -Of course, I am just slow sometimes, I will easily admit.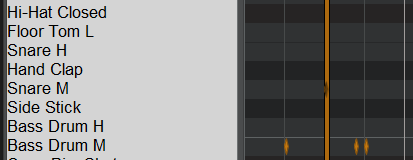
-
 Hmm. I haven't tried to do this in years, and now I can't remember exactly what steps I did that ended up with the colored diamonds. I'm sure I saw a third drum editing display type, it wasn't the rectangular blocks of the standard PRV or the squares-with-velocity tails of the Drum Pane. And I recall that it only showed up when I had the MIDI channel output set to 10. Can't find anything about it in the Reference Guide except a passing reference to specifying that an instrument is a drum instrument in the instrument definitions maker. I stumbled upon it by accident while flailing, but since it didn't output to a virtual drum synth, it wasn't something I could use. @Base 57, am I misremembering this? Isn't there a third display for drum editing? And I don't mean in Staff View. It was very crisp and used (green, I think) diamonds to represent drum hits. Was it something my mind conjured up out of frustration?
 -
This issue, which is unrelated to the zoom value or the end of the clip, occurs in both version of Cakewalk. In the PRV, the length of the last drawn note is memorized, and this length is automatically repeated. However, in the Inline PRV and Drum Pane, the length of the last drawn note appears momentarily, and if the cursor does not reach the half of the note being created, it snap backs, and the note is created with a length of 2 ticks. This issue seems to be caused by a legacy piece of code likely related to the Drum Pane. What needs to be done is this: The rule causing the note to be created with a length of 2 ticks should be removed. That's it.
-
The inline PRV is handy when comparing to or working off audio tracks. In CbB however, I find drawing notes in there don't always stick to the length I draw them at. Like the OP they sometimes snap back to a tiny blip. But this only happens occasionally. Zooming in helps. Even tho the Help files allude to the 2 PRVs have the same feature set, they don't, but I don't think the inline PRV was meant to be as robust as the main PRV.
-
Just as a matter of interest have you checked what it looks like in the actual PRV? Just interested to know never used the in line personally always used the Staff or PRV views. Presumably you have made a formal support report through the appropriate channels
-
Possibly related: There used be (might still be) an issue that if you draw a note in TrackView's InlinePRV near the end of a clip, if the note is longer than the remainder of the clip, it will be cut off by the end of the clip. And if you draw a note outside the clip, it will "disappear" when you let go of the mouse button (but may still be in the clip if you unroll it). I don't recall if it affected the full PRV or not. IIRC turning off NonDestructive MIDI Editing makes these do the expected thing (of putting the note where it should be and as long as it should be), but it shouldn't be required for drawing notes (it should just work).
-
Another issue that has not been fixed for years. Will any steps be taken to solve this issue, or are we expected to just accept living with it? By the way, the same issue also occurs in the Drum Pane when 'Show Durations in Drum Grid' is enabled. It seems that the Drum Pane and the Inline PRV share the same old problematic code; they need to function like the PRV.
-
The inexplicable wretchedness of trying to use the drum pane
JnTuneTech replied to Starship Krupa's topic in Feedback Loop
Well, in reading this thread over several weeks now, I seem to glean only that everyone has differing tastes on working with percussion MIDI in CbB & Sonar. So far I can only agree generally about the definite issues of naming conventions, and challenges learning/discovering the drum map and PRV note name toolset itself. I began many moons ago discovering MIDI mapping tools, and have since lost the taste for default sample maps and drum grid views, but that's not to say I won't use them, when it seems the best fit for the material being edited. I do find that any time a drum map view seems empty, it will be a view setting carried over from a previous session, or just a wrong track output assignment/selection. I get what I click, though there are the odd times when editing a drum map that the PRV doesn't immediately update when doing modifications. I then close, re-open. A few clicks. As others have stated, understanding & organizing the maps & templates is a bit clunky, -once you finally learn how they are set up by default, of course, and that selectively changing that helps a lot. For me doing that also helps backup the data, though it's never as critical as realizing the exact drum map(s) you want are saved within each project anyway. Whether it's little rectangles, or asterisks, note views can be entirely up to each project, so it seems good there is a choice. Sorting the view really seems to be the key tool to have, for me. I mostly hate the default instrument mapping in drum synths, and am happy to do away with duplications and have only instruments I need for the project at hand, organized by my tastes. I happen to mostly prefer using note value views (rectangles), as I use them in varying sizes to visually emphasize certain aspects of dynamics, not to mention that several samplers I use have uses for varying note values on select instrument notes. Everyone has their comfort zone, but drum maps did seem a bit complex to me at first. I don't know if that could quite be called wretchedness, but that is a colorful way of putting it! -

The inexplicable wretchedness of trying to use the drum pane
aleo replied to Starship Krupa's topic in Feedback Loop
I’m returning with the results of my “experiments” with the Drum Map feature in Sonar (v. 2024.09, build 105). I’m working with the Session Drummer 2 plug-in that comes with Sonar and tested it in four different templates that I use when composing plus the Sonar Basic template, suggested by David, which I hadn’t used before. In each template I created a simple instrument track for Session Drummer, then going to the Output field on the MIDI console strip selected New Drum Map. The list that appears offers two choices for Session Drummer; I chose Session Drummer 2 Default because this one gives you the Drum Note Pane (white letters on grey background) when you go to Piano Roll View. Once you’ve selected a particular kit in the Program field of Session Drummer and have Input Echo on in the Track header, you can play the various pieces in the drum kit, record what you play, and edit what you’ve recorded—no problem, everything worked fine in all five templates. There are however three annoyances I encountered in every template and every project I created that I wish could be corrected in future versions of Sonar: 1. When you slide the vertical border between the Drum Note Pane and the Note Grid to the left, the names of the kit pieces disappear instead of truncating, so if you see blank lines in the Names column of the Note Pane, slide the border over to the right about three inches and all the names of the various kit pieces should appear. 2. Even though Show Note Names has been checked in PRV, no labels appear on the notes in the note grid whether you go with the rectangular notes that allow you to show duration or the short diamond shaped notes. 3. When you select New Drum Map a very long list of maps appears and it takes quite a while to scroll down the list if you are looking for a map or kit that is near the end of the alphabet. It would be great to have a vertical thumb on this list to enable faster scrolling. Also, rather than calling it New Drum Map, I think Select Drum Map or Drum Map Menu would be a lot easier, particularly for new Sonar users, to understand. Some of these annoyances may have been caused by me setting something up incorrectly or not clicking a on the right item; if so, I apologize for any confusion this caused, but this is what I observed. -

The inexplicable wretchedness of trying to use the drum pane
David Baay replied to Starship Krupa's topic in Feedback Loop
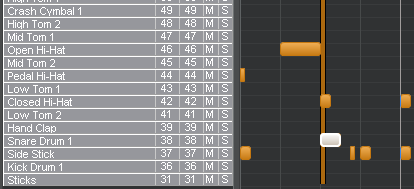
This is what you get when no map is assigned. Session Drummer has custom note names that are displyed in the PRV by default. I suspect you started the project from a template that was saved with the names pane minimized. If you were to use the Basic template, the Drum Pane should open with the names showing, but maybe not wide enough to show the complete names. I'm not seeing any difference in behavior between CbB and Sonar when the names pane is narrowed; the names get truncated, then the In and Out note number columns get closed and the name continue to be truncated further until only the mute/solo buttons remain. -
The inexplicable wretchedness of trying to use the drum pane
aleo replied to Starship Krupa's topic in Feedback Loop
I only worked with Drum Maps on a few experimental projects when I was using CbB, but they did work. I hadn't gotten around to trying Drum Maps in Sonar, but inspired by the lively discussions in this thread, I decided to create a test project using Session Drummer (included in Sonar) and build the project following David's instructions. At Step 2, I found two choices for a Session Drummer Map on the list: Session Drummer 2 and Session Drummer 2 Default. I selected Session Drummer 2 then completed Steps 3 and 4. The names of the various drum kit pieces do appear on the left side of PRV, but it is not the Drum Map pane. You see a plane, white background with the names abbreviated to the point where they are difficult to read and interpret, and there are no columns for Note In, Note Out, Mute, or Solo. Any notes that you record or draw in the PVR grid are named if Show Note Names has been checked and I had no problem editing them. Next, I created a similar project, but selected Session Drummer 2 Default in the Output selector. At Step 4 the Drum Map pane appeared (white letters on a medium grey background), but no instrument names were listed--at first. Scrolling down a way, I discovered one instrument, claves. I widened the column to about two inches and suddenly all the instruments appeared! Unlike Drum Map panes in CbB, the kit instrument names in Sonar are not truncated when the column is narrowed, they disappear(!?) as you slide the vertical border line to the left. The columns for Note In, Note Out, Mute, and Solo are there, but in the PRV grid, notes have no names when Show Note Name has been checked(?). I didn't have any problems with recording, drawing, or editing notes. I agree with others in this thread that the Drum Map feature needs to be more intuitive to work with and generally improved. The two problems mentioned above should be corrected and a thorough explanation of how to create a drum map for both MIDI and Instrument tracks needs to be included in the much-needed Sonar Reference Guide and Off-Line Help which I hope will be coming soon. -
The inexplicable wretchedness of trying to use the drum pane
David Baay replied to Starship Krupa's topic in Feedback Loop
This is all more or less useful stuff to know about how the Drum Map Manager works, but the steps are kind of a recipe for how not to do things. In order to use an existing/built-in map with a known drum synth, all you should have to do is: - Add the synth with an associated MIDI track (or as one or more Instrument tracks). - Click the Ouput selector of the MIDI track (on the MIDI tab of the Inspector for Instrument tracks), choose New Drum Map, and select the relevant map. You can use quick-grouping to assign the Ouputs of all Instrument-per-Output tracks in one go if applicable. - Double-click in the clips pane of the MIDI/Instrument track to open the PRV. - It should open with the Drum Pane and kit piece names showing. - Click a kit piece name and you should hear it; only if this isn't working for some reason do you need to go to the Drum Map Manager and modify the Output port and/or channel to match the synth. This should not be necessary most of the time. That's five steps, but only the second and third are the actual process of "adding" a drum map to a project and opening the Drum Pane. 90% of the time, it should be that simple. -
.thumb.jpg.ee8fd6efe0a58cb14f108898c279bdb6.jpg)
The inexplicable wretchedness of trying to use the drum pane
Base 57 replied to Starship Krupa's topic in Feedback Loop
I spent several hours experimenting with Drum Maps and the Drum Pane. But... I couldn't make it not work. At a loss to explain how it always works for me and rarely works for you or some others, I was going to blame it on the inexplicable differences in the way different people perceive software. For example, V Vocal. Some people loved it and hated when Cakewalk replaced it with Melodyne. I was the opposite. I couldn't get my head around V Vocal at all. But I hardly had to touch the documentation to use Melodyne. So last night I spent a couple more hours screwing around with this and had a Homer Simpson head slap moment.... Two things 01. If your Drum Pane is empty, then your active Drum Map is also empty. 02. When you open the Drum Map Manager it always opens the first Map in the project, not the map assigned to the current track. Here is a short experiment to demonstrate how this is supposed to work. Keep in mind that a Drum Map does not care what synth(s) or Port(s) it routes to, and to demonstrate this we won't use any at all. First, create a New Empty Project and add a single Midi Track to it. From that tracks output dropdown, select Drum Map Manager At the top of the Manager, click on New. Then at the bottom, click OK Next, change the track output to the Drum Map you just created (DM1). Then open the PRV. If the PRV shows the keyboard, then click its View dropdown and select Show/Hide Drum Pane. That Drum Pane will be empty because the Map is empty. Next, go back to the Track Output Dropdown and re-select Drum Map Manager. In the middle of the manager, under "Settings for DM1", Click on the New button a couple of times. You will see the added notes populate the open Drum Pane. Go back to the top of the Manager and click on New under Drum Maps Used in Current Project. Then at the bottom click on OK to close the Manager. Next, go to the Track Output Dropdown and select the 2nd Drum Map (DM2). The Drum Pane in the PRV will again be empty (because the Map is empty). Next, create a new Midi Track and assign its output to DM1. The Drum Pane will no longer be empty. Now the output of Track 1 is assigned to DM-2, and the output of Track 2 is assigned to DM-1. Click back and forth between them and you will notice: The Drum Pane is always going to display the "Current" track regardless of Selection. Go to the output of Track 1 (DM-2) and again select Drum Map Manager. Notice that it displays the settings for DM-1, not the map assigned to the track, DM-2. This, I believe, could be the source of confusion for some users. It is not illogical to assume the Manager would display the settings for the map used in the track you opened it from. There are two other things I want to point out before closing this tldr. Any time you edit a drum map, save it as a preset with a name that will put it at the top of the list (think numbers). And you can change the output port of all the notes in a map at once by holding down Cntrl-Shift while making the selection. I hope this little experiment helps but as always, YMMV. -
The inexplicable wretchedness of trying to use the drum pane
David Baay replied to Starship Krupa's topic in Feedback Loop
Actually the word "Create" is not included; it's just "New Drum Map", and the idea is that you're adding a new map to the project that can contain multiple maps - just like adding a "new" track, folder, bus, marker, etc. It has to be applied to the Output because it's actually a realtime "mapper" that can rewrite note event numbers, channels and velocities on the fly and send them to different outputs according to input pitch, not just re-labling pitch names in the PRV. As designed, the drum pane depends on drum maps to work. I guess this boils down to a Feature Request to be able to add labels to the drum pane without invoking a drum map, but it may be that the mute/solo functions of the drum pane also depend on the map, and you might lose that; I don't know. All I know is that the existing impementation has always worked for me when I needed it with a minimum fuss and mystery. Maybe the problem is better addressed by determing exactly how the basic process falls down for you in particular situations (e.g. default output assignment, blank drum pane) and having the Bakers find ways to cure those particular issues. And possibly they could put a menu option in the PRV to "Add Drum Map" that opens the pick list and applies the selection to the output of the current track under the covers. I think this would be a better approach than adding a "labeling-only" feature. -
This requires getting it right in the first place, which is of course no mean feat. I've also had it happen where I've saved a track template from a working track and had it fail to load properly, with the point of failure either being the port routing or the blank drum pane. That is such an understatement that it should be written in 48pt. flashing red letters. It's ludicrously unintuitive. Even after the user searches with Google to figure out where to go to apply a drum map, what does the resulting menu say? "Create New Drum Map." WTH? I want to use an existing drum map, not create a new one. And yes, after nearly a decade of using the software I understand that what it really means is "create a new drum mapping." It's like saying that paper cheques and ATM-only cards were "not as convenient" as debit cards. And Cakewalk's configuration is a bank that doesn't issue debit cards in 2024 because it was founded in an era before debit cards existed. Mapping is the paper checks, still useful if you want to put one in snail mail to pay your utility bill. The nostalgic frisson of writing out the amount in long hand with the amount in cents written as "and 42/100." The Drum Pane is the card. Rather than being able to use it at the point of sale, the user has to locate an ATM, withdraw cash, then go to where they want to spend the money. Where they notice other things they want to buy and realize they didn't withdraw enough cash to get everything. Having the menu only accessible in either Console View or Track View, rather than a right click in the Drum Pane itself or the PRV menu, is like trying to use an ATM-only card for a bank that doesn't have ATM's in the town where the user is on vacation. First, find an ATM. Then hope that it still has money. Then memorize the location so that you can drive back there every time you need more money. And then when you find the ATM again, it's now out of money because it's the Monday of a three day weekend. Party like it's 1989 (in Ibiza and you're out of refreshments)! Yes, since you don't use the feature, it's not a problem for you. You get paid in cash and only use the ATM to make deposits so you can use checks when you need to pay bills. No problem if the farmer's market doesn't accept your debit card because you always have cash.😄 There's a reason why I titled this topic "drum pane" rather than "drum maps." It's because I'm talking about that specific use case and I wanted any discussion to be about displaying the note names and being able to use the drum grid rather than triggering the usual "being able to change the routing of controllers to notes is part of my workflow and the versatility of the drum maps is so awesome." It's a joint account with an estranged spouse. Note mapping is note mapping and the drum grid is the drum grid and whatever they originally had in common is no longer relevant. Long past time for a divorce. Dang, I stretched that banking metaphor like saltwater taffy🤪 The mapping part of the feature is great, I've used it myself when I wanted to remap to the GM note layout so I can play finger drums with my left thumb on the kick and middle finger on the snare, and high hats and toms with the right hand. That part of Drum Maps is wicked useful, if a bit of a slog to set up. The other use of Drum Maps is just wicked in the original sense of the term.
-
The inexplicable wretchedness of trying to use the drum pane
David Baay replied to Starship Krupa's topic in Feedback Loop
The main difference with CW is that the "button" for setting maps is the Output widget of the MIDI track (or MIDI tab of an Instrument track). You can't get to it from the PRV so it's not as intuitive, but the procedure is no more complicated if you have the Inspector showing. This where CW's track templates come in. Again, different, but equally simple after you've done the initial setup and saved the template - or acquired one that someone else created. As mentioned, I've always recorded drum parts in real time from the keyboard, and having a map in the PRV doesn't really facilitate that, which is why I don't use them all the time. But I've been at this game long enough that I've had quite a bit of experience even with features I don't use frequently. For me the usefulness of drum maps is more in their ability to map different keys to different instruments/channels and to allow muting/soloing individual notes in the PRV. I more often use them for atypical purposes like routing different note ranges to the different horns by channel in a multitimbral synth when composing for a horn section or blocking the passage of notes that don't correspond to the pitches available in a physical music box or tongue drum so that I don't compose something it can't play. I wouldn't have as much use for a "map" that just shows names without offering actual "mapping" functions. -
That's one of the frustrating things, it's worked okay in the past, but then I go to do it again and am faced with the blankness. Yes, I've obviously missed a step somewhere, but for heaven's sake, should the whole house of cards depend on so many fiddly little bits? I was spoiled by how easy it is in my previous primary DAW. There's a button in the piano roll view where you can select which scale you want to use, and drum maps are listed in there. You click the button and choose a map. Done. Similar to instrument definitions in Cakeland, except that the program knows to display a drum grid editor when the user selects a drum map vs. a scale. To make your own custom drum map, you edit a text file where the format is [MIDI Note Number] [Drum Hit Name]. If you want to get fancier, you can open this file as a CSV in a spreadsheet and add an instrument's GUID so that it will load automatically whenever you put that instrument on a track. The last represents a bit of MIDI-fiddly, but it's fully graspable by me and only needs to be done once per virtual drum instrument. Ever after, all you have to do is click that Scale button and select it. Nothing else, no changing the MIDI track's output, no having to manually tell the piano roll view to switch to a drum grid, no having to go into a dialog and reset the mappings to point to the instrument rather than the hardware out. I don't even mind the Cakewalk Drum Map Editor that much. It has its idiosyncrasies, but I can navigate it. It's where the drum map gets applied to the PRV with the intention of showing a grid editor with note names that the process falls apart. As if by magic (or more realistically, some kind of advanced AI), that other program "knows" that when I select a drum map, I want to use it on the currently-selected track, that I want to use the drum grid to edit and that I want to see the names of the drum instruments over on the left. How could a program know such things? Machine learning? Maybe they're licensing some iZotope tech. Admittedly Cakewalk covers a wider variety of use cases: What if I want to use a drum map but don't want to also edit with a drum grid and drum kit names visible? What if I want to use a drum map, but have it apply to a MIDI track other than the one I currently have selected and am displaying in the piano roll? What if I want all of the mappings set to my external MIDI port instead of the drum VI that's associated with my currently selected track? What if I want to select a drum map just for the sake of selecting a drum map and then have it sit there doing jack crap? What if I find that performing half a dozen conceptually unrelated steps before I start laying down a beat enhances my creativity? What if I want my virtual drum machines to be so virtual that they don't even produce sound? For those times, Cakewalk has them beat (no pun intended). Why has no attention been given to this feature for so long? Did programmed drum beats fall out of fashion with "the kids?" Is it just for us old people with our "Blue Monday" and "I Feel Love?" Yes, it's something I'm doing wrong or omitting, but really, must it be so fragile that a veteran user of the program finds themselves so thwarted? Why is it that when I post about my frustrations, the majority of follow-ups talk about how they don't use the feature?