


bvideo
-
Posts
189 -
Joined
-
Last visited
Posts posted by bvideo
-
-
Quote
Sampling rate is not simply dropping every other sample, etc. It's actuality done by taking the master clock rate (sampling rate like 88.2kS/s) and upsampling the data to over 30 MEGA samples per second. Once it is has been upsampled to that super high sampling rate, then it's downsampled to the appropriate sampling rate.
That quote fails to mention the quality of the algorithm used for upsampling or any bandpass filtering (also assuming they mean downsampling is taking every n'th sample). Better to quick read over the wikipedia article for an idea of digital resampling. Also, there's this site http://src.infinitewave.ca/ that offers comparisons of various daw results for 96KHz to 44.1KHz resampling.
Bottom line from infinitewave* is Sonar X3 downsampling, while not being the very very best of all possible digital SRC algorithms for all test scenarios, doesn't apparently have audible artifacts. (They don't seem to have CbB explicitly listed.)
(* Magix Vegas 17 yikes!)
-
Yes, the seeming failure to track the manual offset is not explained by known PDC factors.
However, the
constant1020 sample offset could possibly still be explained if we knew about the conditions of the soloed track, buses, and live input settings, not to mention which effects were there.Dave, your suggestion for using the latency monitor is a great one for breaking down the elements of bgewin's audio interface situation, starting with a bare project.
-
Here's my guess at explaining the PDC control:
First, the control affects just tracks with live input, meaning all echo- or record-enabled audio tracks and synth tracks (audio created by MIDI on their associated tracks or by MIDI input). The control enables or disables PDC for just those tracks. Other tracks (non-live) still have PDC enabled.
I think the idea is that you can record along with your PDC (delayed) backing tracks while hearing the live input echoed through the tracks you are recording without PDC-induced delay (i.e. minimal delay equivalent to your round-trip latency). I.e. you are playing in sync with what you hear. When recording is stopped, the material you recorded is moved earlier in time so that it will henceforth play back in time properly compensated with the required PDC of the whole project.
This kind of leaves open all questions about busses or aux tracks that are fed by these live tracks. It's easy enough to imagine that effects on your live tracks that apply plugin delay could be de-compensated, but harder to imagine how busses that mix multiple tracks could disable PDC just for a live input and not for other tracks in the mix. The manual hints about this in saying:
QuoteSome signal routings can cause tracks to be out of sync when Live Input PDC Override is enabled. To prevent any potential sync problems, follow these suggestions:
- Output the live input tracks directly to the final bus in the signal flow.
- Send live tracks directly to a hardware main.
Also, there are some disclaimers about live-input tracks that already have recorded material on them. When using PDC override on such live tracks, that prerecorded data will play back non-compensated and thus be out of sync with the PDC-compensated tracks. Ugh. So there is a note in the manual:
QuoteNote: If the live track being monitored also contains track data (or MIDI data in the case of a synth track), the streamed track data will not be delay compensated. As a result the recorded track data will not be in sync with other tracks. You should either mute any clips on the live tracks, work with an empty region of the track, or use an entirely new track while recording.
(bold emphasized by me) If you are recording in a PDC-required environment and you are matching against already-recorded material, if any of that material is on a live-input track (echo- or record- enabled) and you play against it, your recorded material will be placed (advanced) in its track not in sync with that prerecorded material.
Therefore, it seems PDC is not necessarily a one-button magic solution to recording with PDC-needing effects, depending on existing routing or preexisting recorded material. The workarounds of the above quotes need to be heeded. Bypassing effects could be a one-button solution, with the obvious limitation that what you're hearing when you record is not the same sound as the intended sound with effects. (But that could sometimes sound better anyway 😬)
-
Is some plugin not reporting its lookahead / plugin delay? (See also Live Input PDC override in the manual). Or maybe just PDC override needed?
-
Have you explored the sysx (system exclusive) view? It provides assistance in capturing and storing sysex messages, long or short. Captured messages can be copied, edited, played back, and inserted into a track.
Other thoughts: Preferences -> MIDI -> Playback and Recording has a setting to capture vs. discard incoming system exclusive; some hardware synths have settings for "do or don't" emit sysex messages for some of those button pushes.
(sorry this is so late in chiming in ...)
-
9 hours ago, scook said:
There is no need to use a drum map for alternate note labels.
The keyboard left of the notes pane in the PRV may be replaced with alternate note names from instrument definitions.
Yes, that should be simpler.
-
Your topic made me think about what Cakewalk can do to help with scales. Tuning has been pretty well covered.
The "problem" with scales is that in Cakewalk note names are represented by the 12-tone names, e.g. A, A#, etc. However, Cakewalk has a thing called a "drum map" that lets you define a different mapping of names to MIDI note numbers. In the general case, you can configure each note number with a name and an output port/synth and separate output note number. A MIDI track can be assigned to a drum map instead of a synth. The PRV for that track then labels keys with the names you configured instead of the usual A, A# etc. I don't think this was particularly intended to use for alternate scales, but maybe you can find a way to use it.
-
The DC removed by sound forge or cakewalk is only the constant bias that is computed over some length of the signal. Both sound forge and cakewalk offer a "first 5 seconds" option that computes the bias over that segment (instead of the whole clip) and then applies the bias to the whole clip. Either way, "remove DC offset" certainly fails to remove any VLF energy of any periodic waveform shorter than, say, 4 times the length of the clip.
So except for certain theatrical purposes, it does seem like a good idea to filter out inaudible periodic signal somewhere in the signal chain.
-
Here's an example of viewing a signal with a known 0 offset zoomed out, so it looks horribly skewed negative. (It's not very musical because it's a tone artificially constructed for an example.)
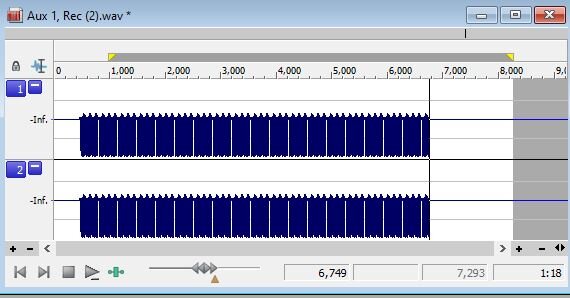
It looks like it has a large negative offset, but it is indeed 0 (as per sound forge).
But when zooming up on this signal, the line drawing is relatively thinner, so you can get a better idea of how the area above 0 might be equal to the area below zero (thus DC offset = 0).
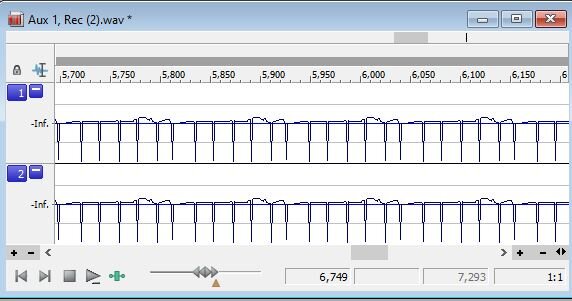
Although this signal is artificially constructed, synth waves are often quite artificially generated too. The point is you can't judge the DC offset by looking at a zoomed out drawing on your monitor.
-
I'm not sure DC offset can be observed with a waveform drawn at that scale. Actual "area" of top and bottom can't be judged by eye because the thickness of the lines is so large compared to the underlying pattern. That half waveform looks really unusual at that scale, but if it still looks that way after applying DC offset correction, it could look different zoomed way up.
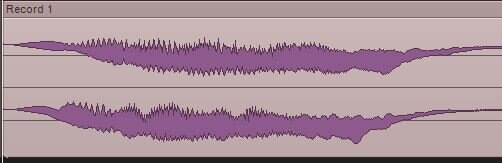
But here's another issue: that FM pad Dimension Pro patch seems to generate a very large very low subsonic component overlaid over the whole waveform. (Maybe less than .5 Hz) In viewing the waveform, parts of it could lie entirely in the positive or negative region. Removing DC offset won't change anything unless you focus on a short portion. Even then, you can still see the effect of the VLF. Putting a high pass filter (Prochannel EQ) on the Dimension Pro audio track results in a much more normal looking waveform.
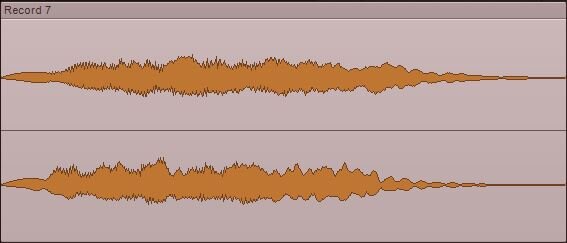
Here's the original waveform, about 5 seconds worth, 7 consecutive notes.
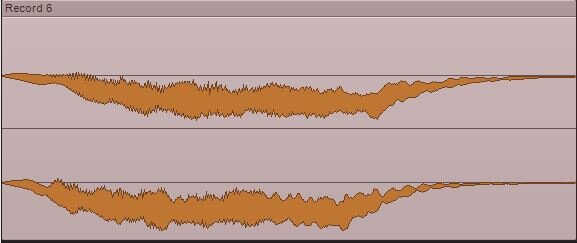
After Apply Effects -> DC offset (shifted,but not really looking 0 offset)(edited here)
 edit: image replaced
Recorded with Prochannel HP filter enabled, set to 31 HZ:
-
4 hours ago, Keni said:
Thanks Noel...
I've attempted to isolate the issue but it's still eluding me. I've stripped projects down removing all plugins and the problem remains. I increased the ASIO buffer size to 4 times the size/latency and the problem persists. I didn't try larger as it would be useless for me beyond 1024...
Going by the one error code you got, disk I/O load or performance may be marginal. Maybe whatever changed has something to do with how disk I/O is managed. Does your task manager performance tab show anything about heavy disk load?
-
Does Windows 10 still have some kind of limit (e.g. 10?) on historical MIDI hardware installations?
There can be "ghost" devices that are not shown in device manager. There's a procedure to get them shown. It involves running the cmd prompt "as administrator", issuing "set devmgr_show_nonpresent_devices=1" and then invoking the device manager: start devmgmt.msc.
Microsoft tells how here. If there are ghost copies of MIDI interface hardware, you can delete them. Whether that's what is keeping Cakewalk from seeing the current one remains to be seen.
-
Have a look at the cakewalk signal flow diagram. Maybe you can use a normal send both to your output channel and also to a patch point aux channel where you can then add the FX. The aux channel output then takes the place of your original channel output.
I don't know why external send audio output is suppressed because there is no return channel.
-
The document explains that well enough. But from what we can tell, the numerology doesn't match the document. Whereas the document says: "A window of 50 percent extends only a quarter of the way toward the adjacent quantization points", a 50% window actually reaches half the way. So all notes are quantized. Namely, all notes are at most 1/2 the distance from one of the two quantization points it lies between.
Also "would you like to try it"?😄
-
5 hours ago, pulsewalk said:
Just a quick update, plus a question about splitting clips to the notes, so a clip with several notes are automatically split into one clip for each note and is adjusted to be the length of a note too? Is this possible? I can only chose to snap to "measures" in the split-dialog.
I didn't look for "split clip to notes". That would be great for batch production of this scheme. There have been requests for this on the forum in the past. The same thing does exist for audio beats, but "Split clips at audiosnap pool" is greyed out on midi clips and "Split beats into clips" only works in the audiosnap palette (on audio clips).
Using 'tab' for "step to next note" and typing 's' to split at every note is not too bad.
After the time-mangled clips are bounced into a single clip, the "Run CAL" process using LEGATO.cal will adjust the note lengths.
-
 1
1
-
-
In order to bounce those clips back to a single clip, it is necessary to turn off the locks. So after restoring the tempo, select them all, turn lock off, then bounce. Then it can be stretched as a clip.
As far as note lengths, there may be a CAL script to extend the note lengths to match the interval between notes. I didn't see it in the quantize dialog.
It's getting to look like more of a pain to do it very often. If it's just a percussion sequence, you can store it as a groove clip in your library and modify it as needed.
-
 2
2
-
-
Now that I've tried it, apparently "time base" applies only to the start time of the clip. So each note would have to be its own clip for this method to work. So I went and tried it, splitting my original clip into individual clips per note. Then I drew a tempo curve. Then I selected all the note-clips and set the time base to absolute and also set the clip lock to "pos". Then when I reset the tempo curve, it seemed to work OK. After that, all those notes could be bounced to a clip. One thing, though: it did not lengthen the notes to match the changing speed. OK for percussion, but not for tones.
-
1
-
1
-
-
I'm thinking once you've created a clip like this it can be copied and manipulated, e.g. reversed, stretched, delete some notes ...
Somebody went to a lot of trouble making this work in Reaper, graphics and all. It must have tremendous musical value.
-
You might be able to get mathematical precision by jiggling with the clip time base as follows:
- enter a clip with all the notes you want in the decel/accel sequence, evenly distributed, starting where you want them.
- change the tempo to get those notes strung out the way you want. (Don't worry)
- lock those notes to absolute time in the clip properties time base field
- restore the tempo back where it was
The notes in your new clip should remain distributed through time, losing their musical time association, while the rest of the music is essentially undisturbed, being restored to the original tempo. It still needs some planning to get your time-disturbed sequence to end just where you want it. It's multiple steps, but saves you having to perform it perfectly or calculate each note perfectly.
Edit: By the way, once you get those notes into the right time distribution, you will still be able to adjust the overall length and speed of them by using the normal clip stretching operations.
Edit again: I've never tried this
-
1
-
parboo12, you're entitled to submit some kind of problem report to the bakers. I doubt this thread will come to their attention. Seems like the easiest thing for them to do is change the document; the functionality is OK otherwise.
By the way, for real-world quantizing, such as entering MIDI by hand or sequence and then wanting it to fit with a real performance, it seems like "groove quantize" would be the way to go. Want to check those parameters?😄
-
My only aim was to confirm the OP did bring up a valid discrepancy between the document and the result. Also to clarify the actual operation of the one parameter. I get that you're not on board with that. What anyone wants to do with quantize or why doesn't seem important to that end.
-
1
-
-
Would you like to try it? With a window of 50% (or higher) all notes get quantized. Strength is not being tested here, nor is performance. And yes, the window straddles the grid point. So as I tested, a window of 50% reaches all the notes. Whereas the document says: "A window of 50 percent extends only a quarter of the way toward the adjacent quantization points."
-
 1
1
-
-
I don't think the quantize (non-groove) dialog works exactly as the document says. I think there is no difference between setting the window at 50% and any value above 50%.
Numbers 50% and smaller seem to work, and 50% covers all notes. I think the % represents the fraction of the distance between two grid points. Using 100% would make every note part of the window of two consecutive grid points (actually 3 if the note is on a grid point). Every window N% greater than 50% could make some notes within the N% window of one grid point also be within the N% window of the other nearest grid point. For example, if window is 70%, if a note is at 60% from one grid point it is also at 40% from the nearest grid point. Quantize then favors the nearest gird point. Obviously the document is wrong in saying 100% represents half the distance between grid points.
-
Another likely scenario is that the pedal-up event was in the end section that you split off and deleted.
-
1
-
Closing Cakewalk Causes Kernal Corruption
in Cakewalk by BandLab
Posted
Might as well list your midi h/w interface and its driver version here and your OS version, since it's fairly likely the midi driver relates to both the hang and the crash.