tonemangler
-
Posts
139 -
Joined
-
Last visited
Everything posted by tonemangler
-

Smart, Select, Move, Edit, Draw, Erase
tonemangler replied to brandon's topic in Cakewalk by BandLab
Also, the F5 to F10 keys on a QWERTY keyboard select the respective Smart to Erase tools. If you hold down the selected Function Key while making your move upon release it will revert back to the previous tool. For example, you're working with the Smart Tool and want to draw an automation envelope, hold down the F9 key while drawing, when finished release the F9 key and it will revert back to the Smart Tool. Next you want to erase only part of what you drew, hold down F10 while erasing and when released will again revert to the Smart Tool. You can also use Key Bindings to customize to you're way of working. -
After reading this thread this was my exact thought, I was going to make a similar comment but your post is much more eloquent.
-
I hate when that happens, you're in the middle of a telephone conversation when all of the sudden the person you're talking to turns into a monkey and hangs up! Drives me bananas!!! (Sorry, I couldn't resist) ?
-
On my system, when latch automation is selected and either quick grouping or regular grouping is applied the automation is overwritten. I found that the behaviour you're looking for works when the automation mode is set to 'Touch'. Also, when I change automation modes in the inspector it automatically updates in the track's Write icon. Cheers
-
How to remove fades caused by auto crossfade?
tonemangler replied to twelvetone's topic in Cakewalk by BandLab
When I change my mind about a process involving multiple edits I use the undo history to revert to the original state. You could probably create a key binding for 'history' to make it more efficient. Cheers. -
I believe this is almost correct, to me the dotted line represents no automation written/input by the user. If you automate the volume of a track by recording fader moves at the beginning of the song, then press stop, then go to the middle section and record more volume automation there will be a dotted line anywhere you didn't record. CbB will read the automation until the last node of the first recording and when it sees no user automation will hold that value until it reaches another node in your second recording. I guess this is called a Jump, though I've never heard that terminology. If you split a clip that has automation on it's track and then move it, the automation envelope will display a dotted line in the gap you created (the last user automation before the split to the new user automation after the move). You wouldn't choose to do a jump because a jump happens when there is no automation data input by the user. I think it might be better to not reference 'jump' and simply regard the dotted lines as no user input. For example, when automating an On/Off parameter, when you record 'toggle on' a node for that action will be placed in a an automation envelope at that time, then no user automation is recorded until you click 'toggle off', at which point another node will be created. After recording, a dotted line will be present between the two nodes because there was no user input there. This is how I've always understood it. Cheers.
-
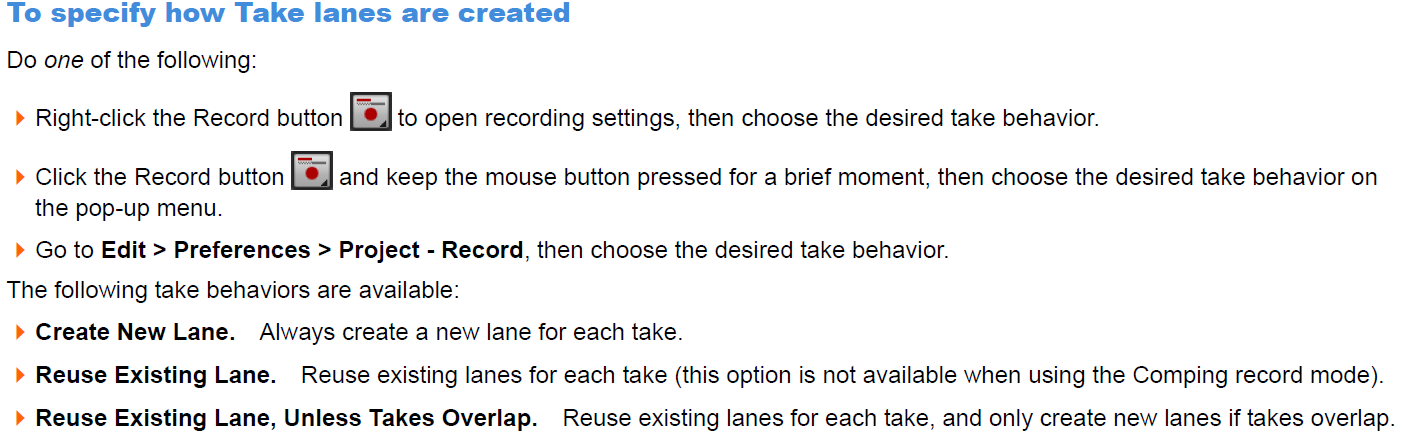
You can remove empty take lanes by right clicking the 'Parent' Clip and choosing 'Remove Empty Take Lanes'. You also can define how Take Lanes are created If I remember correctly there was a feature in Sonar 8.5 where you could rebuild layers, I think this would delete empty layers and then consolidate and reorder? I guess with CbB you would have to manually move them, however if you choose 'Reuse Existing Lane, Unless Takes Overlap' this would probably help to tidy things up in the first place. Would be nice to have a 'Rebuild Takes' button though. Cheers.
-
Why are my two MIDI tracks not syncing with each other?
tonemangler replied to Clare Sudbery's topic in Cakewalk by BandLab
Make sure the PDC (plug-in delay compensation) button is not on. You'll find it in the Control Bar in the Mix Module. -
Hi Jono, I'm not sure what you mean by organize the clips, if you mean move them from one lane to another you can do that with take lanes (Shift+Drag). If you mean edit them individually, ie. slip edit, crossfade, fade ins and outs, you can do that by either holding down the Shift key while performing the edit or by choosing the edit tool. I'm pretty sure whatever could be done with Track Layers can be done with Take Lanes. Sorry if I'm not understanding your question correctly, if not could you please elaborate? Cheers.
-
Tracks get buried -- how to pull them out?
tonemangler replied to Michael McBroom's topic in Cakewalk by BandLab
Hi Michael, I'm by no means a studio guru but this is what I've learned over the years. What you describe is masking, this happens when two or more sound sources live in similar frequency ranges, therefore when combined those frequencies accumulate or add up to blur and bury the individual sources. The first step to overcome this is to choose your sources wisely. Don't choose sounds because they sound good in solo, choose them in context of the mix. When it's possible, try to program your parts in different frequency ranges so they compliment each other. For example, if you find your string section is getting lost try transposing up or down to see if it sits better. Second, make frequency cuts or boosts to individual sound sources that occupy similar frequency ranges. Solo the drums and then add the bass, if the kick becomes slightly indistinct that means you have to carve out frequencies so they will both sound good together. Check the frequency spectrum of the kick drum with the Pro Channel EQ and see where the prominent build-up is ( usually between 50Hz - 80Hz ) and then apply a gentle cut to the bass track in that region. You should be listening to both tracks when doing this and sweep the bass cut until the kick sounds the clearest. You then may want to apply a gentle cut to the kick if it is conflicting with the bass fundamental. Keep adding different tracks to see if more EQ moves are needed. Acoustic guitars can have a lot of energy in the low frequencies that can cause havoc so a good rule of thumb is to High Pass until the bass and kick retain their desired clarity. However, in a sparse mix where the acoustic is a featured instrument you may want to keep it's fullness. This process applies to mid and high frequencies as well, electric guitars, strings, voice etc. You will probably have to convert all your midi performances to audio to do all this. Third is panning, which I believe you mentioned that you already do. Remember that in a mix it doesn't matter what things sound like in solo. nobody but you will ever here that, after doing certain EQ moves individual parts may not sound great in solo, but what matters is what they sound like combined with all the other parts. One thing I find when using multi-timbral synths is that often the patches are programmed to sound big and expansive as a selling point, however when you try to combine a lot of big expansive stereo sources the result is soon everything sounds like mush. I don't have experience with TTS-1, but if you can, reduce reverbs and convert some sources to mono. Remember that all parts in a mix can't sound up front and punchy, good mixes have depth where some sources are upfront and others sit farther back. Lastly, from experience in composition, sometimes when having too many parts the result is a smaller sounding track where the individual sources become indistinct. Sometimes the best fix is the mute button ( don't mute the whole thing, just try muting certain parts ?) Good luck with your song! -
Quick/Easy way to distribute take lanes to individual tracks?
tonemangler replied to TheSteven's topic in Cakewalk by BandLab
I just discovered a solution for this, funnily enough, in the new User Guide This will definitely improve my workflow! Good Job Bakers!
-
Quick/Easy way to distribute take lanes to individual tracks?
tonemangler replied to TheSteven's topic in Cakewalk by BandLab
I do remember that being the normal behaviour when loop recording in Sonar 8. In CbB you can achieve something similar by setting your record options (left click and hold Record button in Control Bar) to 'Overwrite' and 'Takes Create New Lane'. After loop recording all take clips are muted except for the last. This method doesn't mute the Take Lanes but the clips themselves. You probably know that you can also set loop recording to create separate tracks instead of take lanes by right clicking the Record button in the Control bar and selecting 'Store Takes in Separate Tracks'. This however doesn't mute previous takes. -
Quick/Easy way to distribute take lanes to individual tracks?
tonemangler replied to TheSteven's topic in Cakewalk by BandLab
I didn't know a new audio track would be created, that's pretty cool. I tried your method and it works great, however, if you want the newly created audio tracks to retain the original's track properties perhaps duplicating, without events, the required number and then Shift-Click and Drag would be more efficient? Alternatively, if identical track properties are not needed, and to eliminate the need for moving your track to the bottom, you could Right Click-A on an adjacent track and then Shift-Click Drag. Repeat as necessary. All ways work well, proving that there are many ways to skin that poor cat. For me this is definitely the case, my projects get pretty big and have to use folders to keep them manageable. Theoretically, Take Lanes are designed for alternate takes of the same performance so there would be no need to have them on separate tracks with different routings and effects. They are designed for comping to one performance. Of course many times a take can vary so much from the original intent that it becomes a new part and so then your method of recording to different tracks makes more sense. Back in the Sonar 8 days they were called Track Layers and they behaved like regular tracks when it came to editing, which at times I prefer. With Take Lanes in CbB many times I find myself switching between the Smart Tool and the Edit Tool in order to mimic the behaviour of the Track Layers from Sonar 8. There should be an option for the Smart Tool to behave the same on a Take Lane as on an Audio Track. Cheers. -
Quick/Easy way to distribute take lanes to individual tracks?
tonemangler replied to TheSteven's topic in Cakewalk by BandLab
I'm not sure if there is a dedicated process for that. Personally, I would duplicate the track, enter the number of repetitions equal to the number of take lanes, then manually delete appropriate take lanes until each track has one unique take lane. This is probably what you already do, since it can be tedious, depending on how many take lanes you're dealing with. It would be nice to have one process like 'Convert Takes to Tracks'. Cheers -
I'm also a long time Cakewalk user and the only thing I use in the Pro Channel is the Eq. I like that it has a frequency spectrum analyzer and is very flexible and to my ears sounds very smooth. I never liked the compression in the Pro Channel and as for saturation, console emulation etc. I have 3rd party which I prefer. I use the Sonitus suite much more, mainly for problem solving. The Sonitus Eq is great for notching out problem frequencies and I use the compressor for sidechain ducking. I use the gate, multiband compressor, delay and modulator as well. I know the Sonitus suite is old in its' look but it's my go to for many jobs and wouldn't want to work without it. Regards
-
Hi Jono, like reginaldStjohn said this is normal behaviour for for comping multiple takes. If you want to independently edit track lanes you must first switch from the Smart Tool to the Edit Tool. I agree that it is a bit tedious to constantly be switching between the Smart and Edit Tool but to my knowledge there is no way to customize Smart Tool behavioiur.
-
You should hear exactly the same stereo mix through the drum buss. Make sure the output of your drum buss is going to the master buss. The only thing I can think of is that somehow the interleave of your drum buss was set to mono? However I think that would be unlikely. An AUX track is essentially the same as a buss, but used in a different way. Say you have one reverb effect that you want many different elements of your mix to go to in different amounts. Instead of using various instances of the same reverb plugin on multiple tracks you can use one instance and send different amounts from various tracks by using sends to an AUX track. First create a buss and call it 'Reverb'. Then choose a reverb effect and place it in the effect bin. Now go to a track, eg snare, and right click in an empty area in it's track header, then hover the mouse over 'Insert Send' and choose the 'Reverb' buss you just created. You have created a send which will feed the snare audio to the reverb, you can adjust the amount of reverb with the 'Send Level' slider. AUX tracks are used for many other effects like delays, parallel compression or distortion, basically any effect you want to blend with the original signal. So in actuality an Aux is a Buss. I think the confusion lies in terminology, what you are actually comparing is an Aux track to a Subgroup. The individual tracks that feed an Aux buss do so via their sends. The individual tracks that feed a Subgroup buss do so via their outputs.
-
Very nice! Love the sound choices and programming, and the girl sounds very pretty, at least in my minds eye!! Hahaha
-
Very cool Wookie! Great electronic classical composition, made me think of the elements of nature. I recently bought the Arturia V Collection and am loving it. I'm also using the Strawberry Flutes patch on a song I'm working on, it is blowing me away! Best mellotron emulation I've heard! It sounds like you automated the A-B-C slider to crossfade the different sounds, great idea! Looking forward to hearing your next piece! Regards
-
Split clips lock together on different lanes, help please!
tonemangler replied to Wolfcub's topic in Cakewalk by BandLab
When using the Smart Tool while working in Track Lanes it defaults to the Comp Tool. If you want to independently move and crossfade split points in Track Lanes, first select the edit tool. I do this when I want to adjust a crossfade while comping. -
@Bassfaceus This is what John Bradley is describing. What you want is a drum submix. First create a new buss and call it 'Drums' or whatever you want. The output of this buss will automatically go to your Master buss but you can route it anywhere, I would just leave it there. Now go to your individual drum tracks (kik, snare etc) and set their outputs to the 'Drums' buss you just created. Now all drum components will be going to this buss where you can adjust overall volume and apply buss effects. It can be confusing because people use different names to describe the same thing, eg. aux, sub, buss etc. Another alternative is to use a Patch Point. When using Busses for a submix (in the Track View, I have no experience with the Console View) you cannot have your drum submix adjacent to your individual tracks because Busses must remain in the Buss Pane. For this you could use a Patch Point. Their are various methods of creating Patch Points but I will describe how I do it. First insert an audio track next to your drum tracks. Name the track 'Drums' or whatever you want. for the output select 'Master' or a drum buss if you have one created. For the input choose 'New Patch Point'. This will make this audio track a Patch Point that will be called 'Patch Point 1'. To change the Patch Point name click again on the input and go to 'Patch Point 1' and a submenu will appear where you can choose to rename, Call it 'Drums' or whatever you want. Now go to the individual tracks for your drums and change the output to the 'Drums' Patch Point you just created. You can do this all at once by selecting all the drum tracks and holding Ctrl while changing the output of one of the selected tracks. Now all your individual drums will be routed to your Patch Point, adjacent to your individual drum tracks, where you can adjust overall volume and apply effects. Good Luck!
-
Your Master buss output needs to be set to 'StrFcsUA...' which are your stereo outputs for your Scarlett. Currently you have it set to the left channel only. If you notice the 'Metronome' and 'Preview' busses are both set to the proper output, do the same for the Master buss and you should be good to go.
-
Hi Kitsuna, the one thing that pops to mind is to make sure you do not have the live input plug-in delay compensation override (PDC) toggle engaged during playback. This feature is used to bypass plug-in delay compensation when recording on projects that have a lot of plug-ins and VSTi's and therefore exhibit large latencies. On such projects this toggle would be engaged while recording and disengaged during playback. If it remains engaged during playback the timing between your recorded parts and VSTi parts will not be in sync. Perhaps you inadvertently turned it on at some point?
-
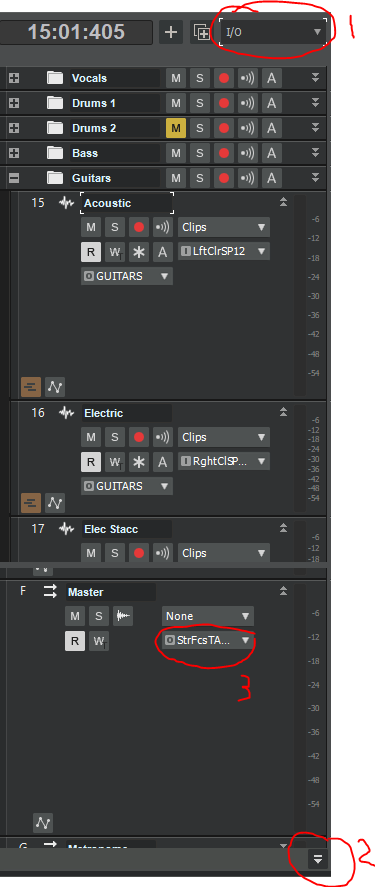
#1 : Here is where you choose what will be displayed on tracks and busses, select I/O (input/output) or All #2 : Here is where you toggle on and off the Buss Pane in Track View. I never use Console View but I am sure it is similar. #3 : Here is where you set the output for your Master Buss
-
Hi Kenrout, the input for tracks is set to the input that you are recording from your audio interface, in the above example that would be input 1 of the Scarlett. In CbB : left focusrite USB ASIO input 1 = Input 1 of your interface, right focusrite USB ASIO input 1 = Input 2 of your interface, Stereo focusrite USB ASIO input 1 = Inputs 1 and 2 on your interface when you want to record a stereo signal. If your interface has more than two inputs then the nomenclature logically follows ie. right ASIO i/p 3 = hardware i/p 3, left ASIO i/p 3 = i/p 4 etc.. The outputs from your tracks should be sent to a buss. CbB defaults to three busses when starting a new blank project (that is when not using a custom template), being 'Master, Metronome and Preview'. Your individual tracks should be routed to your Master bus, not left focusrite USB ASIO output 1. When you click on the output of your track you should see 'Master' near the bottom of the list. The next step is to set the output of your Master Buss. In the 'Track View' at the bottom of the track headers there is a small arrow. Click on that and you will see the buss pane. Go to the Master Buss and set it's output to stereo focusrite USB ASIO output 1. Now when you play back audio from a track you see a signal on the track's meter, you should also see a signal on your master buss meter, which means you should hear sound through your interface. Good luck!