

-
Posts
1,610 -
Joined
-
Last visited
-
Days Won
1
Posts posted by mettelus
-
-
Side comment, since this was touched on and not sure what the OP is pursuing... There have been so many advances in things in the last decade that relying on an accurate MIDI file is almost a thing of the past, primarily because of Melodyne. In the old days the MIDI tracks would often need to be routed to an external VSTi (although using TTS-1 to initially separate it was a good choice) and you were totally locked in to the (in)accuracy of the MIDI creator; but nowadays you can run an original commercial copy through track separation (iZotope RX or Steinberg SpectraLayers) and then drag/drop those stems on a MIDI track to let Melodyne convert them. There is often a lot of touch up required afterward (further track separation, VSTi inserts, error corrections, etc.), but you also have the advantage of having the original commercial copy in the project to work against (I leave it as track 1 and mute/unmute as needed), and since that was your source, all tempo/key changes are retained in the audio->MIDI conversions (shift+drag clips to new lanes to preserve timing positions).
-
In addition to the above, tracks default to listening to all MIDI channels (MIDI Omni). When you start working with multiple MIDI tracks it is good practice to also set the input and output channels to specific numbers (1 through 16) so that they are paired accordingly (match output of intended source # to input of intended receiver #). You can also see that in the Track View (inputs/outputs) when the view is set to "All." It is difficult to easily trace MIDI routing in Cakewalk, so assigning channels will help you when you return to old projects so you can get back into the swing of things quickly.
Another thing to consider when working is the Input Echo being activated or not. When off it only plays back what exists in the track already rather than also from input sources. Your "wavering voices" track already has MIDI data in it that it will play with the Input Echo (speaker icon to the right) off.
Edit: Just noticed the bold quote at the bottom of the OP!
-
11 hours ago, Grem said:
hauling equipment
That would be a reason for sure. The pandemic put an end to "open mic" nights in this area, but we had a few bands that would set up their gear and let others use it. Not a lot would participate in that (so the band played most of the time), but it was awesome for playing a few songs and then going off to just socialize. Very laid back bunch of folks in one of those bands (Pat Martino gave the guy who ran it a guitar when he was recovering from a bout with cancer), but I am not sure if such a thing is really that common. I am in the boonies here, so most folks know each other at events like that.
-
 1
1
-
-
3 hours ago, John Vere said:
The Focusrite Red Compressor has been one of my favorites for a long time.
+1, oddly enough I think I have used the Red Compressor more than any other compressor as well. It has a minimalist approach to it very much akin to a guitar pedal.
There have been a few really nice apps that went to freeware at EOL. Riffstation is another useful one that comes to mind. Fortunately I downloaded that version when it was announced... I found out when updating software last year that the paid version cannot register itself anymore so the free version quickly solved that issue.
-
5 hours ago, MarcL said:
What stops me the most expanding my Melda plugin collection is the installation process. I think most here on this forum may know my aversion to plugin managers. Additionally Melda adds its on under-structure for the plugins (that I always have to undo manually) and inserts a bunch of shadowy configuration files. It's an atrocity to me! The UI's are also not very inspiring for me! Other than that I agree that it is a great company 😆! Yeah, indeed!
Can you expound on this? The only thing that comes to mind for me is that the installer used to not have options to unselect VST2, etc. But installation paths are choosable. As with most anything, directory junctions can bypass "set" installers so you can just let them go to defaults after the junctions have been made. I only get concerned for this with large installs, and Melda is by far one I do not care about (I own the MCompleteBundle, and the VST2 and VST3 folders are 21.2MB each... they are files updated per cycle). The sound packs are the only things HUGE; the plugins themselves are pretty lightweight.
One benefit with the GUI that most do not consider is that it also makes the plugins less CPU-intensive. I totally stunned a guy once (sort of related to this) by saying "Are you interested in [making music] or playing a video game?" After that shock sunk in I said, "People who want to do things are unstoppable and focused.... they use the tools on hand and do great things. Those who don't really want to do things will find excuses or semi-related busy work to rationalize getting nothing done."
-
1
-
-
2 hours ago, Reid Rosefelt said:
EZKeys becomes a lot better the more MIDI files you own
Being someone unfamiliar with EZKeys, this is a bit concerning. Can you create your own MIDI styles or are you locked to theirs (I think I read that those MIDI packs are in a proprietary format)?
I definitely agree that the loyal customers are getting hosed with the buy 1, get 2 free for new users. It comes across as a customer vacuum to sell add-ons later.
-
2
-
-
2 hours ago, dubdisciple said:
In light of the waves fiasco, i think i will upgrade to the fx essential bundle. I already own Mautodynamic and a couple others so my upgrade is only 61. I don't really need , but kind of want to support companies with simpler licensing policies.
Melda is sort of my litmus test to even consider other deals. There are certainly things that Melda cannot do (right now), but there are also a lot of things Melda can do. Another advantage, beyond only buying something once, is that they (mostly) have similar structure, so you are not constantly relearning GUIs to get things done. Updates are also significantly faster than many other vendors as they simply delete/replace what you own.
-
2
-
-
There are a lot of screen capture apps available, and most video software has one built in. If you get into recoding multiple inputs (desktop and camera(s)), that is where the field gets narrower.
-
reg files will add themselves to your registry when you double click them. Always be sure you know the source of the file before you activate one.
-
 1
1
-
-
As a spectator, these Waves threads are baffling to me. There have only been a few vendors with epic "gripe threads" over the years, and reading those has been enough for me to steer clear of them. Just the time investment to deal with some of those issues seems a bit much.
-
5
-
-
As mentioned above, there are a lot of factors that go into the end product. You can also consider the options of isolating the input as much as possible (even by using an electric guitar, but that undermines the feel of playing an acoustic) and tailoring that signal as much as possible to be clean prior to applying any timed-based FX (the convolution reverb). Depending on the reverb, there are also a lot of tweaking options available. Acoustic IRs focus on the body resonance of a guitar (basically a hand-held cab), and even within the same model, they can react differently depending on variations in the build... for that tailoring the reverb is your friend.
This link has a nice list of both loader and IR resources with a brief overview of the process. I was just putzing on that and one of his links gave me a chuckle... this guy went to town doing IRs of everything he had available it seems (some of it is good though). I never thought of adding a vacuum tube IR to a vocal before... or that anyone would ever take an IR from a vacuum tube in the first place.
-
For anyone not familiar with DeoxIT, it is the shizzle for cleaning electrical connections. @Ampfixer recommended that to me over 10 years ago now when I brought my amp back online. Since then I have used it more in automotive restorations than the house (and I still have the same 5oz can), until recently....
I have a 5 speaker surround system from 2004 that the power switch started acting up on, so I left the system on for over a year straight because I had to open the case and jumper the switch when I lost power. A couple weeks ago the entire system starting acting wonky (heat from being on 24/7), so remembered the DeoxIT and figured I would spray some on the switch each time I had to open it (is a tiny push button under a plastic key) but force myself to cycle power on the system when not in use. I just saturated the switch figuring it would eventually work its way down into the tiny gap and to the contacts. "Eventually" ended up being about 5 minutes, so 20 years of oxidation is gone and the system functions like new again.
DeoxIT has over doubled in price (I think was $7 when I got it), but that stuff works wonders on anything... the slot in the back of a pot will let you hit the wiper blade directly so you can eliminate the static from a guitar knob and keep it that way for a long time, sliding contacts (faders, etc.)... any nook or cranny to an electrical contact... even household outlets (makes plugs go in with ease after use).
-
2
-
 1
1
-
1
-
-
Yeah, it is still the same as the last picture it that thread. I had bought quality pots for it, but never used them. I was going to shorten the wiring run if I did replace them but have had no issues. Lesson learned for me. Before getting excited about what "might be," be sure to evaluate "what is." Focus on finishing/assembly as top priority (the stuff that is sorta permanent), then kick the tires on the finished product to check out the things you want to alter.
The only thing I have left is the logo, and I lost the little guy who would run and sit in front of the amp to lymphoma in his stomach (vile disease). I want to put "Tigger" on the head stock in the Gibson font (already created the graphic), but I am still on the fence about vinyl lettering (lazy route) versus a resin inlay. I replaced a nasty plastic mouse pad on my desk with resin recently and it turned out awesome, but carving that stock is going to take some time; however, I prefer to honor the little guy with something awesome rather than cheesy because I got lazy.
-
I suspected that neck was drilled since there were no WTF reviews on the kit (drill presses are not a common home tool). 90% is finishing, so be patient and have fun with it.
-
To add briefly to the above for clarification, an IR curve is basically the structural response (resonance) of a sound impulse to isolate a specific physical setting (acoustic guitar body, guitar cab, room, etc.). They are then used in convolution reverbs to better replicate that setup. In that regard, acoustic/cab IRs are identical, just what they capture (why using more than one IR is not a bad thing). Acoustic IRs are focused on replicating the body of a guitar, and work wonders when doing acoustic work off an electric pickup (piezo especially), so that will give you a better Hummingbird sound, but you may still need to add another IR to get the playback mechanism/room response. Always work from instrument->environment with reverbs and be light-handed in their effect the further out you get.
-
2
-
-
So much more will make sense once you have the kit in front of you 😁 The finishing can take 10 times longer than the assembly, so have fun with it. It amazing how things have more value to you when you do them yourself.
-
1
-
-
8 hours ago, Grem said:
I just not have put my head around putting on a c-clamp to hold neck and body, and still be able to work around it. IOW how will I put that configuration on the drill press? LOL!! Nor am I seeing how I would be able to get a drill around that without leaning in some direction because of c-clamp.
")
Sorry for the confusion with that. If you are using a drill press, what is shown in that video is the way to go. You won't be able to use a clamp in the press (just do the neck like he shows in that video).
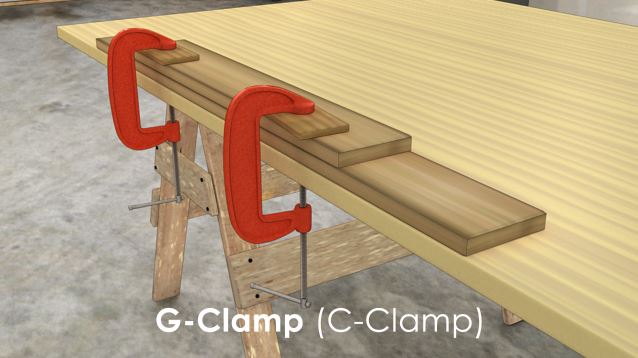
The C-clamp idea was if using a hand drill on the neck, then you can leave the neck assembled to the body and use a bit extender in the drill and the holes in the body as the drill guides. In the below image, if the body is up and the neck is down, resting the clamp against the neck and using just enough buffer material to cover the clamp pads to prevent marring (even several layers of duct tape on the body side.. the neck side you want to distribute the force with a block of wood so you do not bend frets... you do not need or want excessive force on that clamp, just enough to hold things) should leave all four holes exposed. You would most likely need a drill bit extender so that the drill chuck cannot accidentally hit the clamp. Locking extenders are preferred over magnetic ones so that you can back the bit out easily (magnetic ones will let loose if pulled too hard so they are a pain to work with). 1/8" bits are typically short, so with the body clamped you won't get deep enough into the neck, but you can disassmble the neck after all 4 are as deep as you can get and then take them to the proper depth by just working with the neck (again, those holes in the neck would be your drill guides, they should be roughly half an inch deep and already square to the body for a second pass on the neck only for proper depth).
-
1
-
-
If the body is threaded (I am assuming it is since those screws have threads to the head), the simplest way is to screw the bolts into the body a few times so that you have a matching thread set with nothing to fight on the body side. To set the neck (after holes are drilled), insert the screws into the body again so that only the tips are exposed. This will make the assembly simpler, since the tips will align to the holes for you. You won't need intense pressure to mate the surfaces, but be careful about slipping the driver from the head! Plain vegetable oil makes a great starter lubricant (just need to dip the tip in some oil), since it absorbs into the wood and leaves a tacky residue after it has done its job for you. The binding force of a screw is the friction on the back side of the threads and the elongation of the bolt/screw. Work them in evenly, a few threads at a time, and even back them out (one at a time is simplest) and restart if they begin to bind. Be very careful with the screw head itself and be sure that the driver mates so that you do not end up marring the heads (or worse, jump out and poke the body or yourself). This is one situation where I would consider getting a few identical screws from a hardware store to do the threading... mar them all you want, do the work, then replace them one at a time with the intended screws and throw the marred ones away.
Instead of buying a one-use item (a drill press). High schools, community colleges, automotive repair shops or even hardware stores have shops set up. You could call around and talk to them about what you are trying to do. It is amazing when asking around how many folks are willing to help out. Places with liberal return policies get abused for this, but I wouldn't be surprised if a hardware store didn't end up saying to buy one, do your job, and return it. The other advantage with a press is that you can put a screwdriver bit in them and thread into the neck that way as well (I would still consider "expendable" screws and use slow speed on any press for this).
-
1
-
-
13 hours ago, TomasLD said:
Do you think it is worth to try to fix / glue the old bridge to the body or buy a new bridge?
I assume you are referring to the wood part of the bridge and not the plastic insert (saddle) here. Depending how loose it is, the simplest repair is to remove the strings and clamp the bridge to the body while using a very thin superglue so that it wicks into the crack. StewMac sells a superglue that is like water (the "10" on this page) that wicks into cracks easily.
If the bridge is loose enough you can almost take it off. You can remove it (would probably tap free), but I would also use that same bridge to repair. Reason being is that any wood that is torn loose would make the repair mate back perfectly without any gaps. For that, a thinker super glue or quality wood glue would work. In either case you would want a clamp to hold it till cured, use something between the clamp and guitar to protect the finish, and wipe off any excess before it dries (why wood glue is preferred if you take the bridge off).
If you mean the plastic insert (saddle) on the bridge, those are typically loose and sometimes buzz. A quick fix for that situation is to insert a business card in the gap and trim it flush with a razor blade.
-
1
-
-
The video referenced in the manual is below. At the 1 minute mark he is showing how to set it up for marking, but it occured to me that using a 4" C-clamp (with soft wood scraps to protect the neck and body from direct contact) and having the threaded side of that clamp on the neck side (so the body side had just the hook end of the clamp) would allow you to lock the neck in place. The question at that point is if the screws thread into the body as well, i.e., the body has 1/8" holes. If so, the body holes themselves would make simple drill guides and you would only need tape on the bit to know the depth stop. Clamped down securely, the bits are not going to walk on you (drill bits make terrible routers, is not how they work), but if those holes are bigger than 1/8" (i.e., the bolts pass through without thread engagement) you would need to reassess. For situations where the body is threaded as well, you would want them mated when first threading those bolts anyway, so that a mismatch in threads doesn't try to force a gap between the neck and body.
-
1
-
-
11 hours ago, Grem said:
I found it!! Thanks for the idea.
Looking at it now.
Figures... "It’s important that these holes are drilled square to the neck, so a drill press works best for this job." Having seen some folks who cannot align holes properly or drill square to a board this knocks it out of "beginner" status in my mind. A better trick for starting (even if drilling smaller sizes up) is to use a small center punch (or anything small and pointed) to mark the exact centers before starting any drill. Depending on the wood grain, the tip can walk before it bites, and that walk will get you. Even starting with a smaller bit can walk on you.
A cheap rubber mallet is a "fretting hammer"... I did have to tap a couple in. StewMac also sells three viscosities of super glue which is awesome stuff (the 10 grade is like water and wicks into the smallest crevasses with no issues, 20 is like generic, and the 30 is thicker).
9 hours ago, Byron Dickens said:Oh, dear Jesus....
LOL... that was my thought about signing for TruOil... maybe a bunch of "deaths by TruOil" that never made the news?? Just the dumbest thing to hear that, but some tree hugger got it on a "special list" somewhere.
-
1
-
-
TruOil is typically a variation of linseed oil (sometimes Tung Oil) and spreads pretty thin. Disadvantage to this is you need like 20 coats to get a glossy finish. Advantage is that each coat dries quickly and you can use it for "surface polishing," i.e., re-gloss something already completed that has been wet sanded. As long as the original finish has cured, you can use dissimilar finishes on the same item (pretty much finish gloss anything already cured with it). Being so thin, the first coat will completely soak into unfinished wood, so that coat has zero gloss to it. Years ago I slathered 2 coats with my hand onto a red oak step into the basement... 12 years later that still has not worn through. A quick check of wetting the surface with plain water will give you a good a feel of what a final TruOil finish would look like. Depending on the wood, that may or may not be to your liking. Ironically, TruOil is the only thing I have ever had to sign a delivery receipt for... I asked the guy why and he said, "gun paraphernalia." I couldn't help but laugh about that.
As far as the the finishing kits, the kits StewMac has are translucent (more of a colored stain), so they will enhance the wood grain better than TruOil will. Just build up layers slowly, and you can light sand it back down if too thick. My kit included 6 cans... 1 sealer, 1 of each color, and 3 cans of clear (nitrocellulose lacquer). That stuff goes on pretty easy (be sure the temp is warm before spraying), thicker, and more glossy. It stinks to high heaven, so good ventilation is a must for spraying those (TruOil doesn't have that issue).
-
1
-
1
-
-
18 hours ago, Grem said:
[TOTP!!]
LOL, I keep chuckling when you do this, is like you are planning it or something
There have been so many contentious Waves posts over the years that I never touched them. I see subscriptions as sort of vendors acknowledging they don't have much more coming in terms of features but want to keep revenue going.
-
2
-
-
This reminded me to follow up with a patch issue I was having with LABS. LABS will load but most of the patches will not, and the culprit is an error in the coding of "junction bypass" they are using. I just sent them the below message and will see what happens. A few vendors do the "drive jump" directory alteration on junctions, but only a couple have mucked it up (Unify and Corel).
"I have a directory junction from "C:\Program Files\VstPlugins" to "F:\VstPlugins" and most of my LABS patches do not work. I just checked a few *.unify files and the file path is listed as "F:\Program Files\VstPlugins" which does NOT exist. I can replace the LABS in patches, but since the error occurs on load, the rest of the patch is default. There is an error in coding the "bypass" on junctions here (not sure why you would want to do that anyway TBH). The help associated with this is of no use since LABS is visible to Unify and usable, but the patches are not (a few work, but the rest do not)."
General MIDI Assignment of Instrument to TTS-1?
in Cakewalk by BandLab
Posted
Therein lies much of the real challenge. Another point to keep in mind is that stem separation often defaults to five stems (some let you dig deeper). A "trick" here (especially if you want MIDI to drive a VSTi), is that the "audio quality" of that temporary stem can be destroyed for the sake of MIDI extraction. Example, aggressively removing harmonics, reverbs (high end), and inserting audio microscopes on fundamental frequencies. Audibly this now sounds like crap, but has very defined transients and frequencies for Melodyne to extract MIDI better (bake the changes into that temp stem so the CPU doesn't freak if you do an entire stem conversion). Even then you are going to need to edit the MIDI (velocities will be way off, but relative velocity might be good). For audio->midi conversion, aggressive EQ (always do this on a temp copy) can be your friend.