


Nigel Mackay
-
Posts
926 -
Joined
-
Last visited
Everything posted by Nigel Mackay
-
For an explanation of how one uses a reference track, watch this tutorial. It is about using Cakewalk's stock plugins to master, but it shows you the point of having a reference track and how make use of it.
-
As was said before: Put the CD in the PC's CD player. In Cakewalk go File -> Import Audio CD. Select the specific track you want. It gets imported into Cakewalk as an audio track. You now have a reference track. You listen to bits of the reference, listen to the bits of your mus, adjust EQ, compression, levels. Compare the two again. And you fiddle with your music until it sounds similar to the reference track.
-
Have a look at this. When you have something recorded, have a look at this list of tutorials.
-
It is not stereo as such. 2 inputs to the focusrite, 2 outputs. If you have say a guitar plugged in and it is on the left channel, set the track to record the left channel. If it is on the right channel, set the track to record the right channel. When it is recorded you can pan it. But you are recording mono tracks. If you plug in a mic and a guitar and sing and play at the same time, the mic goes on one track, the guitar on a separate track. Afterwards you can fiddle. Even if you were to plug in a "stereo" mic, you would still need to record 2 tracks, one left and one right. Afterwards, you can do whatever you want.
-

How on earth can I export a midi file ???
Nigel Mackay replied to Paul Bush's topic in Instruments & Effects
A MIDI Format 0 file is a MIDI Format 0 file and a MIDI Format 1 file is a MIDI Format 1 file. I doubt he is using something that can't open both. The whole point of your problem is: 1) When you export MID,I all the MIDI tracks get exported in the file. (When you import the file, each track gets loaded into its own track.) If you have bass and drums you can't choose to export only one of them. If you don't want to include the drum MIDI you must delete it before exporting. (Muting tracks, FX, etc is for mixing down to audio.) Deleting tracks temporarily is dicey, you might accidentally save with the track deleted, that is why I said save under another name first. 2) If there are ANY tracks that are not MIDI, Cakewalk will warn you and you will have the options a) cancel export b) export ONLY the MIDI tracks, ignoring everything else. So what you must do is Save with a different name. Delete everything except the keyboards MIDI track. Export as MIDI. -
How to get Cakewalk to see Kontakt
Nigel Mackay replied to Johnny-D VGM's topic in Instruments & Effects
It would be interesting to see what you get for the VST 64 location when you click on the little person and Preferences. Maybe somehow it has changed to a location you don't think of looking for. -
How on earth can I export a midi file ???
Nigel Mackay replied to Paul Bush's topic in Instruments & Effects
Save the project with another name. Delete everything you don't want. Export. -
How to get Cakewalk to see Kontakt
Nigel Mackay replied to Johnny-D VGM's topic in Instruments & Effects
Yes. Uninstall, start again and this time make sure you specify 64-bit. -
How to get Cakewalk to see Kontakt
Nigel Mackay replied to Johnny-D VGM's topic in Instruments & Effects
Watch this video -
Spitfire BBCSO Template for CbB
Nigel Mackay replied to Matthew Sorrels's topic in Instruments & Effects
If you put the keyswitches on their own track (a good idea so that you can use different orchestras if needs be) then you can create a DrumMap that changes the pitch of the note it outputs, so you can easily Make C2 output a C1, etc. You do need to create one for each instrument, because they get routed to a specific Synth. but Save as, Save as, Save as. -
I think what has happened is that the OP was using a version of Kontakt 5.1 A few days ago NI announced the release of 5.1 as a free trial. So the OP assumed it was an upgrade and installed it. And now that is the version he Cakewalk offers him.
-
How to get Cakewalk to see Kontakt
Nigel Mackay replied to Johnny-D VGM's topic in Instruments & Effects
Deleting the standalone won't achieve anything. The email lets you download the Native Access installer in a zip file. Which you ran. It installed Native Access. Run Native Access (which you did do the first time.) Select the free Kontakt player. Which you did before. This time, during the install process, make sure you select VST and VST3. Then when you run Cakewalk, do a VST Scan, it will be available. You can leave the Standalone selected. -
Unable to create instrument tracks from preassigned audio/midi track
Nigel Mackay replied to Mánibranðr Studios's question in Q&A
@Keith Dunwoody Don't know about Studio One, but in Cakewalk when you add Kontakt in the dialog you must select All audio outputs, and not leave it at the default of First. @Freyja Grimaude-Valens Check that the MIDI tracks are assigned to the new instances of Kontakt, and not still the original instance. -
How on earth can I export a midi file ???
Nigel Mackay replied to Paul Bush's topic in Instruments & Effects
File Save as midi file. If the project contains non-midi info Cakewalk will tell you and ask you if you want to save without the extra data. Say yes. -
How to get Cakewalk to see Kontakt
Nigel Mackay replied to Johnny-D VGM's topic in Instruments & Effects
When you ran the installer you obviously selected the Standalone version. That is what you see on your desktop. You can load instruments into it and play music with a MIDI controller. People use it for live performances. But when you run the installer you must also select to install VST and/or VST3. You can run the installer again, no problem. -
Hmm. Kontakt 5.1 was released in 2012. Not sure what that 5.1 Free Trial is about. You had a higher version and then downloaded and installed this version. Uninstall it. Maybe the previous version will still be there, otherwise you can just reinstall. The latest version of Kontakt 5 is 5.7. And update Cakewalk. ?
-
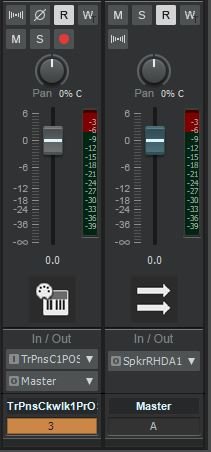
In your first post with screenshots: Track 3 is the instrument audio. The I dropdown must be changed to the SI Piano output, not your MIDI keyboard. In the MIDI track, track 2, you select RMT25V10 as Input. Output is the SI Piano. Track 3 is the instrument audio. The Input is the output of the SI Piano. (It should have been that automatically, but never mind.) The Ouput is Master. So, keyboard goes to MIDI track (2), MIDI track goes to instrument, instrument audio (3) goes to Master. Put the other way round: MIDI track (2): input is keyboard, output is instrument. Instrument audio track (3): input is output of instrument. output is master.
-
Arranger is a basically linear system for working with parts of a project. You can use it to arrange the sequence of verses, choruses, bridges, middle-eights. Once you have finished arranging you print. Matrix is meant for live performance. You initiate columns as and when you feel like it. You go with the flow.
-
I presume that GSM piano is TTS-1. You get sound, so that is encouraging. You have to be doing something wrong when you add an instrument. Do a screenshot of the track containing the instrument. A close up so we can see what it says. With that track selected open Inspector and do a closeup screenshot so we can see what it says. Here is what I get if I insert Cakewalk's True Pianos. The instrument track. Inspector. Track 3 shows Input, I, is TrPns.... Obviously True Pianos. And Output, O, is Master, the Master fader in the console. And Master Output, O, is going to my speakers. Open the Piano Roll View, click on the keyboard, you should get sound.

-
I see now that you talk about loaded samples. Search for Grace in YouTube and watch the demos.
-
Grace and TX16Wx are samplers. You need to load something (a patch/preset) into them to get sound. Grace comes with nothing. You need to download and run Grace Setup Factory Content. Did you do this? (You need to restart Cakewalk afterwards.) When testing Grace, did you select a patch from the left-hand pane?
-
Does the latest Bandlab software contain everything that Sonar Platinum had?
Nigel Mackay replied to Bevan's question in Q&A
Read my replay again - I edited it while you were replying. ? -
Does the latest Bandlab software contain everything that Sonar Platinum had?
Nigel Mackay replied to Bevan's question in Q&A
You need the old install media/disks. The legacy account is for licensing Platinum and the included effects. Bandlab Assistant is to install Cakewalk by Bandlab. 1) Use your Platinum disks/media to install Platinum. Use default locations. Select which instruments/effects you want to use in Cakewalk. Use your legacy account to authorise. 2) When finished, run Bandlab Assistant as administrator and install Cakewalk. Use default location. Cakewalk will now have access to everything that was in Platinum. -
exporting mp3 problem..... 07 file
Nigel Mackay replied to Paul Bush's topic in Instruments & Effects
File -> Export -> Audio. Files of type: MP3. Set Source Category to Entire Mix. Filename: Whatever. Click on Export. Specify mp3 BitRate, etc. Click Ok You get an mp3 file. -
Percussion has such a spiky waveform that -12dB peaks does look like a small waveform.

