msmcleod
-
Posts
6,958 -
Joined
-
Last visited
-
Days Won
36
Everything posted by msmcleod
-
There's two things in play with video files: the audio codec, and the video codec. VLC is pretty good at having most codecs included with it. Cakewalk on the other hand, uses Microsoft's API's to import the video, so the codecs must be available to WIndows in order for Cakewalk to use them. In saying that, if Media Player plays the files, it should work with Cakewalk as these are using the same API's. Maybe Cakewalk may be limited as to what video formats it understands. I'd recommend contacting support on this (support@cakewalk.com), providing them a link to your video file. They'll be able to tell you what's going on. It may be the case however, that you'll have to invest in a video format converter application so you can convert whatever videos you have into a format you know will always work. Of course you can always use this converter to convert it back to the video format you were originally given once you've finished in Cakewalk.
-
Another thing to check is that it's actually shutting down. Windows 10 by default actually does a hibernate instead of shutting down. This involves dumping the current memory contents to a file, so it can start where you left off when you start up again. If you've got a large amount in memory then this can take time. If restarting the PC is quicker than shutting down, it's a good indication that this is what's happening. To turn it off: https://www.pugetsystems.com/labs/support-software/How-to-disable-Sleep-Mode-or-Hibernation-793/
-
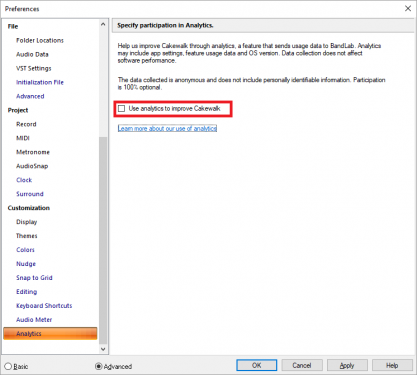
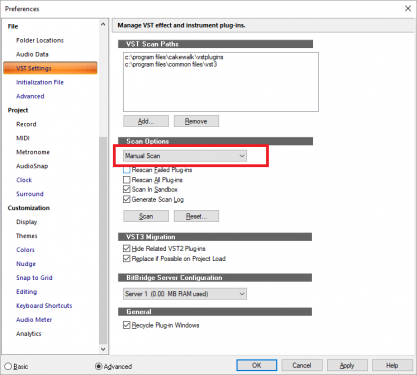
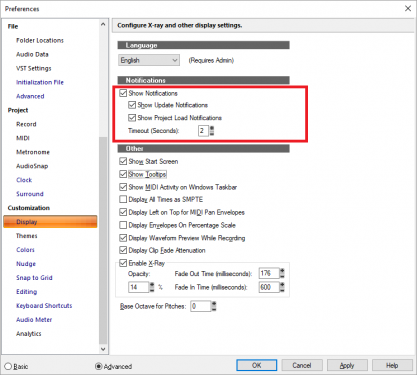
Normally I would say this points to a possible issue with either your audio or MIDI drivers. Sometimes these need re-installing after a Windows update. However, there's a few other things you could check within Preferences: 1. Make sure Cakewalk analytics is set to off by unchecking it. This service is switched off, so Cakewalk might be trying to connect to an unreachable target: 2. In VST Settings, make sure the plugin scan is set to Manual Scan, and to Scan in Sandbox. Sometimes Cakewalk can get stuck scanning a problem plugin. 3. For the time being, turn toast notifications off Additionally, make sure that any virus scanner or cloud storage utility has your Cakewalk files excluded from its scan. Once you've done that, come out of Cakewalk and delete TTSSEQ.INI and AUD.INI from %APPDATA%\Cakewalk\Cakewalk Core (Cakewalk will recreate these files the next time its opened). Then try running Cakewalk again. If its still happening, re-install your Audio interface drivers and MIDI drivers if you have any, and delete TTSSEQ.INI and AUD.INI again before running Cakewalk.
-
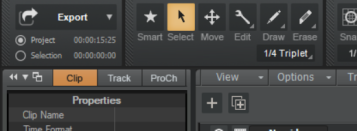
Looks like you've got the select tool selected - that will be why you can't add notes: You need to use either the smart, edit or draw tool.
-
To check your drive, right click on the drive letter, properties, then click on the Check button on the tools tab. If that passes, then it's most likely an install issue. Get in touch with support@cakewalk.com - they will more than likely be able to help.
-
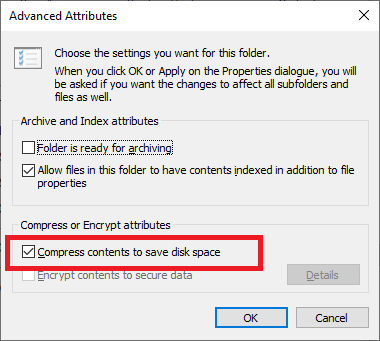
Right click->Properties on the folder, and click the Advanced button: If you're still seeing the ProChannel on other projects, and more importantly the ProChannel modules, then its more likely your project is corrupt. If you've had to do this more than once, I'd check and/or consider replacing your drive - it may be on it's way out... HDD's usually make strange noises before failing, but SSD's give very little warning.
-
Did you enable compression on your drive? If you did, this will be the issue. The files within the C:\Program Files\Cakewalk\Shared Utilities\Internal folder must be uncompressed for the ProChannel modules to show up (assuming you've installed Cakewalk to the default location).
-
I personally never really got on with V-Vocal at the time, but I do use Melodyne. I went through the whole "purist" phase, regarding practicing and playing it all for real, but practice takes time. Not everyone has the time to practice to the point they can do a full take perfectly. Tools like V-Vocal and Melodyne means I can get my ideas down quicker (and certainly in my case, before I forget them!) Here's a strange thing too... once I've done the recording and listened to it a few times, it's actually so much easier to play/sing it perfectly afterwards.
-
I use a Mackie BigKnob Passive for this purpose, so I can switch between my internal sound card when watching YouTube tutorials, and my Focusrite audio interface when using Cakewalk. On the rare occasions that I need to hear both, I just set Windows to use my Focusrite as its primary audio device.
-

Need help directing input and output drivers in Cakewalk
msmcleod replied to Kenny Burch's question in Q&A
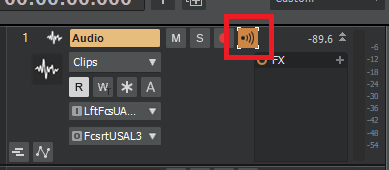
Yes, the output naming will follow the same pattern. To route a track's audio to a particular line out, set the output: You may however want to create a bus or aux track instead, and have the bus/aux output set to your physical outs instead. If you want to hear the input being routed to the output, make sure input echo is on: You probably only want this on when recording though.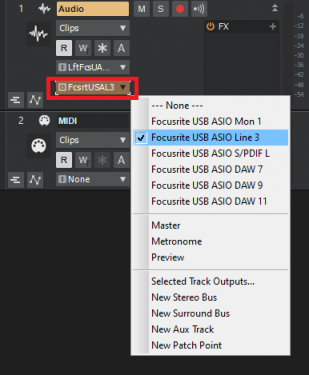
-
[CLOSED] Cakewalk 2019.07 Early Access 1
msmcleod replied to Jesse Jost's topic in Early Access Program
Interesting... I wonder then if ASIOLink doesn't actually stop/start Focusrite's driver when it receives a start/stop, or maybe it just does it in a slightly different way? Another thing, when playing starts normally again after previously motorboating, the end tail of whatever was meant to be playing before can be heard. So it's not flushing its buffer properly when it gets into this state. Of course this might just be a symptom of something obviously going wrong, but it might also point to the focusrite driver being especially fussy about the order or timing of calls. -
Need help directing input and output drivers in Cakewalk
msmcleod replied to Kenny Burch's question in Q&A
UMC1820 inputs Channel 1 = Left UMC1820 ASIO Driver In 1 Channel 2 = Right UMC1820 ASIO Driver In 1 Channel 3 = Left UMC1820 ASIO Driver In 3 Channel 4 = Right UMC1820 ASIO Driver In 3 Channel 5 = Left UMC1820 ASIO Driver In 5 Channel 6 = Right UMC1820 ASIO Driver In 5 Channel 7 = Left UMC1820 ASIO Driver In 7 Channel 8 = Right UMC1820 ASIO Driver In 7 ADA8200 inputs: Channel 1 = Left UMC ASIO Driver ADAT 1 Channel 2 = Right UMC ASIO Driver ADAT 1 Channel 3 = Left UMC ASIO Driver ADAT 3 Channel 4 = Right UMC ASIO Driver ADAT 3 Channel 5 = Left UMC ASIO Driver ADAT 5 Channel 6 = Right UMC ASIO Driver ADAT 5 Channel 7 = Left UMC ASIO Driver ADAT 7 Channel 8 = Right UMC ASIO Driver ADAT 7 These names are what the driver is presenting to Cakewalk. If they're confusing, enable the "Use friendly names to represent audio drivers" checkbox, and double click/edit the friendly name to what you want. -
CAL or Key control move now time to next midi note?
msmcleod replied to sadicus's topic in Cakewalk by BandLab
Iterating through MIDI notes is the mainstream of what CAL does. Normally you'd use the forEachEvent loop to go through MIDI events, however there's a gotcha in that you can't manipulate Markers or the now time within that loop.... so you'll need to get creative to get around that. You could probably nest a forEachEvent loop inside another loop, which breaks out every time it finds a note; create the marker, then run the loop again skipping the one's you've already seen. Also, if you want this to work across all tracks, it's gonna get complicated... but not impossible. -
Need help directing input and output drivers in Cakewalk
msmcleod replied to Kenny Burch's question in Q&A
You need to enable "Show Mono Outputs" within your device settings: With this checked, you'll now see Left, Right & Stereo for each stereo pair.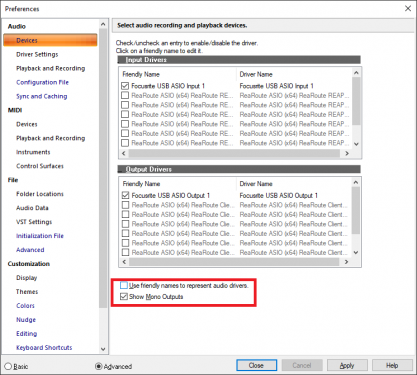
-
[ SOLVED ] - How to record MIDI arp realtime
msmcleod replied to sadicus's topic in Cakewalk by BandLab
As far as I know, the only thing that will save patterns into arp files is Project 5, which is sadly discontinued. -
This is currently being discussed in a couple of threads at the moment: There's two workarounds: 1. Increase your ASIO buffer; or 2. Try O'Deus ASIOLink instead of ASIO4ALL - this adds no extra latency:
-
I've found this too. Cakewalk is pretty quick at detecting a MIDI device being removed, but doesn't always pick up new MIDI devices being added. I had this yesterday when trying to sample an old MT-32 using my old laptop and swapping out various MIDI devices (to be fair, in this instance I was using Sonar 8.5... but I've had the same in CbB). As it stands the only reliable way of getting an updated list of MIDI devices is to restart Cakewalk. A "Refresh" button on the MIDI Devices preferences pages would be really helpful.
-
Probably less expensive than BandLab paying the bakers $10,000's over the next 6 months to develop one from scratch. Just use this: https://www.tx16wx.com/ - it's free for the basic version, and only €39 for the extra features should you need them.
-
Sforzando is free. AFAIK you need the full (paid) version of Kontakt to play your own SFZ files. Also, I've found Kontakt to be quite processor intensive compared to other players. This is fine if I'm already using Kontakt for other sounds, and just want to add another instrument. But it wouldn't be my go to player for a single track for this reason.
-
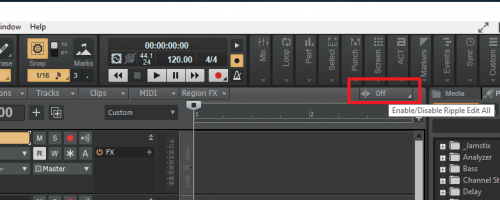
I think Chuck is right here. Check that ripple edit is set to off:
-
You need to use the Comp clip to drag to include the automation lanes, rather than selecting an individual clip:
-
For those interested in using CAL, here's a link to a comprehensive guide: http://members.ziggo.nl/t.valkenburgh/Cakewalk Application Language Programming Guide.pdf
-
Control Surface compatibility
msmcleod replied to Studio Brasil Producer's topic in Cakewalk by BandLab
If you're using the Behringer X-Touch, you should set it to Mackie Control mode and use the Mackie Control control surface, not ACT: You may also want to look into getting a lexan overlay for the x-touch, so that it matches the corresponding MCU lexan overlay for SONAR: https://store.birchwoodstudioandevents.com/Sonar-Overlay -
[CLOSED] Cakewalk 2019.07 Early Access 1
msmcleod replied to Jesse Jost's topic in Early Access Program
I've just spent the last hour messing around with various settings. One post on the Avid forum suggested it was Intel Turbo Boost causing it, but disabling it in the BIOS makes no difference for me. I can usually make this happen reliably by quickly stopping/starting the transport repeatedly. It'll happen around 1 out of 5 times doing this when my usual ASIO buffer setting of 64. When it's set to 32, I get it 2 out of 3 times. Obviously in normal use, it's a lot less frequent than this - I quite often use a buffer setting of 32 for recording piano, and I can go several hours with it happening only once or twice in normal use. However, I failed to get the motor-boating with a buffer of 128 or higher. So I think the answer is to use a larger ASIO buffer, and if necessary use the PDC button when tracking. If you really need to use a lower buffer, then just accept the buzz might come along now and again. [Edit] - It's worth mentioning I've only ever heard of this happening with the Scarlett interfaces. I certainly don't get this with any of my other interfaces.