msmcleod
-
Posts
6,905 -
Joined
-
Last visited
-
Days Won
35
Everything posted by msmcleod
-

Still experiencing buggy Ripple edit with Duplicate...
msmcleod replied to winkpain's topic in Cakewalk by BandLab
Duplicate Clips with Ripple on is fixed in the 2020.05 EA release, however it became clear when fixing this that ripple edit isn't fully supported for all cases in the PRV. I suspect that this might explain some of the oddities people are seeing. The best advice I can give for the meantime, is to make sure you do any ripple edits in the track view. Position locked clips are exactly that - their position is locked, so they don't move. I think you're expecting the lock to act more like an "anchor" rather than a lock... which Cakewalk doesn't currently do. -
I used to use a 23" 1080P monitor in my studio which is the smallest screen I could cope with for my ageing eyes. The 4K equivalent would be 4 x that, so a 46" monitor (not sure you can get one in that size). But anyhow, I tried sitting 3' away from a 40" TV and there was no way I could cope with being so close to such a large screen. I've since upgraded to a 27" 1080P monitor in the studio and it's perfect for me. I'd love to have another one next to it, but unfortunately I've not got the room
-
One of the other ways I translate my "old skool" ways to working in the box... I try to make a distinction between tracking, mixing and mastering. IMO it's far too easy/convenient to blur these when working with a DAW, when in fact I actually find it makes things more complicated as you move further along the process. If I've tracked an instrument by going straight through the DI, I'll then spend some time using a channel strip, compressor, EQ etc to get the sound I want for that instrument. This I always do in solo because at this point I'm essentially doing sound design. In the old days, I'd have done this before it went to tape (i.e. though preamps/console/outboard)... but now I can do it after I've recorded it by adding the "tracking" console emulation afterwards. Once the sound is what I want, I'll bounce it so all I've got is a clean track. I'll do that with all my tracks, so I've got a clean slate to work from for mixing. If I didn't do this, there would be possible confusion between which plugins are sound-design, and which plugins are for mixing - not to mention the extra CPU load. Then I mix... Once I've done my mix, I bounce to a stereo track and master ONLY on that stereo track.
-
Kontakt 6 Crashes Cakewalk and SONAR
msmcleod replied to William W. Saunders, Jr.'s topic in Cakewalk by BandLab
Occasionally Windows updates don't update properly. I found this with the most recent update, which was causing my system to occasionally BSOD on reboot. What I normally do is run a cmd window as admin and run a system file check: More info on what this does : https://answers.microsoft.com/en-us/windows/forum/windows_10-update/system-file-check-sfc-scan-and-repair-system-files/bc609315-da1f-4775-812c-695b60477a93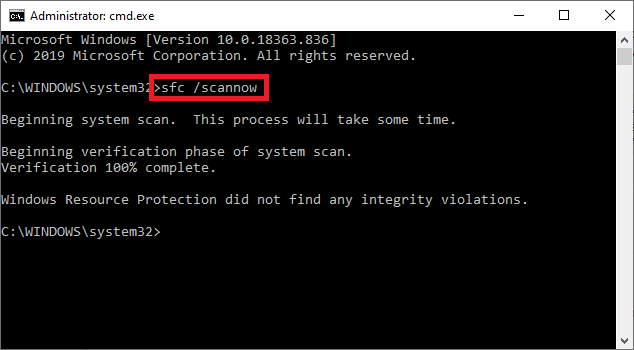
-
Re-installing CbB should be pretty painless - it doesn't alter any user settings. I quite often do it several times a day. The easiest way to do this would be to run the rollback installer, then install 2020.04 again via BandLab assistant. A link to the rollback installer is in this post:
-
Thinking about it, I can see why MAutoAlign would have issues with overheads. Even if you'd measured your mic positions so it was equal distance from the snare, the snare would be the ONLY instrument that would be in time with both mics. Every other drum/cymbal would reach the mics at different times. Any auto-alignment tool would struggle with that if they're all playing together. If it was say something like a bass amp mic + DI signal then MAutoAlign would work fine.
-
There should be absolutely no reason to run ASIO4ALL with the 18i20. ASIO4ALL is a "fake" ASIO driver for use with audio interfaces that don't have a native ASIO driver. The 18i20 has it's own ASIO driver specifically written for it. My recomendations: 1. Uninstall ASIO4ALL completely 2. Install the latest Focusrite Control 3.5.0 3. Switch to ASIO mode in Cakewalk
-
You need to upload animated gifs to an external website, and then use Insert other media->Insert Image from URL.
-
I think you're best approach is to keep trying with Focusrite. I'm surprised at your comment that they're not recommending using ASIO - was this directly from Focusrite themselves? They did have quite a few BSOD issues with their driver, which they fixed in a beta version ( you can see the beta releases at http://beta.focusrite.com ) . For the 1st gen at least, they combined the latest firmware, MixControl and 4.64.15 USB driver in that beta. The official release for the 1st gen includes the previous version (4.63.24.564) of the USB driver. However installing the official 1st gen 2i2 ASIO USB driver brings it up to the latest - so essentially the same as the beta. For the 3rd gen though, the drivers are different. You said in an earlier post, you're using the v2.14 driver- the latest for the 3rd gen should be Focusrite Control v3.5.0: https://customer.focusrite.com/en/support/downloads?brand=Focusrite&product_by_range=1359&download_type=software I'd recommend giving the v3.5.0 a go, and if this doesn't solve your issue use WASAPI in the meantime.
-
@Laszlo Mayer - what revision of the 18i20 are you using? I'm still on the 1st gen.
-
I've got to admit, I'm pretty old-school in my approach. When tracking, I try to record the sound exactly as I want it to be heard, which means recording it with compression + EQ etc already applied. The only exception to this is guitar, where I record both the dry and the effected signal. Vocals also tend to be recorded dry. With mixing, any edits are destructive. If I'm getting rid of bleed or rumbles in silence, I'll permanently remove it. Same with any pitch or timing correction. My reasoning being that if it sounded bad enough to need to be edited, then there's no way I'd want to keep the original... though if it's someone else's performance, I'll just keep a backup of the original files. In saying that, I'm much more likely to re-record a bad take than resort to editing. The end result is a much simpler session to work with, less plugins/automation, and much less strain on my CPU. With Cakewalk though, you can effectively do both by archiving / hiding the original tracks and work with copies.
-
"Duplicate" not honoring envelope and Ripple settings
msmcleod replied to winkpain's topic in Cakewalk by BandLab
The envelope issue has been fixed for the next release. The PRV issue will need further investigation. -
If you can't use ASIO use WASAPI. You'll get terrible latency with MME - this should only be used as a last resort. Then go into Preferences -> Audio -> Devices and make sure "Show Mono Outputs" is checked. Out of interest, what version of the ASIO driver are you using? I'm using v4.64.15 without issue.
-
Yes - the idea was to demonstrate using an external audio editor.... I obviously wouldn't use one for such a simple operation.
-
From what I can tell, the mute button does (it's a latching push-down / push-up ) , but the record doesn't (it's a momentary with a light). Having said that, the Tascam is probably the most tactile out there (unless you look at discontinued gear like the Yamaha MD-8) If you know an electronics wizard, maybe they could build a small sensor he could wear on his finger that would make a sound when it detected a light?
-
The big attraction to me is having access to these hardware synths in the box, with all the advantages of a cleaner signal chain, easier editing etc... and of course if I'm stuck in a hotel room with a laptop, it's fantastic. However, most of the synths I'd want are only included in the $19.99 per month subscription, which is way too much IMO. I'm gonna stick with sampling my hardware versions. On average it takes around 20 minutes per patch, but I normally spend an hour or two doing the prep and leave the automatic sampling/looping running overnight. The only downside is editing presets / re-sampling is a major pain... but not something I do often.
-
I've been considering the Tascam Model 24 myself, but my main gripe was that the audio is always sent to your DAW pre EQ. I'm a bit old school with my recording, and like to shape my sound before I record it. I also looked at the Soundcraft Signature 22 mtk. For around the same price, you get a better mixer (an extra mid band + [maybe?] better pre's) , but lose the record to SD option. However, like the Model 24, the output to USB is pre EQ. The best option I found was the Allen & Heath MixWizard WZ4 16:2 with their USB option. This has the best mixer out of all of them, and the option to go either pre or post EQ on the outputs (albeit annoyingly via a jumper on each channel which means taking the thing apart). However, given that the USB option needs to be installed by a technician, I guess the tech could set the jumpers as well at this point. Downsides: price with the USB option is about twice the cost of the Tascam / Soundcraft, and you've got 16 rather than 22 channels. [Edit] - one of the big pluses for the A&H is that it has individual outs on every channel. So you've always got the option of using another audio i/f if you don't opt for the USB option.
-
I find Acon's Acoustica Basic edition v6 a good free alternative to SoundForge. Unfortunately Acon has stopped doing the free version since v7, but you can still download the free v6 version here: http://acondigital.com/software/AcousticaBasic6_0_19us.exe As long as you've added it to the tools menu within Cakewalk (scook has a great tool for this), I find the integration fine:
-
For some crazy reason, some Kontakt instruments use CC #1 (modulation) for volume. If you've got reset controllers on stop checked, then this is correctly set to zero, which unfortunately sets the volume of these instruments to 0. IMO this is a really bad design decision on the part of the Kontakt instrument designers as the default value for CC#1 is 0, not 127. The workaround is to insert a MIDI CC#1 with a value of 127 at the beginning of your clip.
- 7 replies
-
- 2
-

-
- epic babies
- kontakt full
- (and 1 more)
-
Within the audio devices tab in preferences, you'll only ever see the odd channels - this is because Windows shows them as stereo pairs. In other words: 1 = Stereo Channel 1 (inputs 1 & 2) 3 = Stereo Channel 3 (inputs 3 & 4) 5 = Stereo Channel 5 (inputs 5 & 6) With "Show Mono Outputs" checked, although you won't see them on this page, when selecting an input or output on a track within the track view, you'll see something like the following: Left 1 <- this is MONO channel 1 Right 1 <- this is MONO channel 2 Stereo 1 <- this is channels 1 & 2 as a STEREO pair Left 3 <- this is MONO channel 3 Right 3 <- this is MONO channel 4 Stereo 3 <- this is channels 3 & 4 as a STEREO pair Left 5 <- this is MONO channel 5 Right 5 <- this is MONO channel 6 Stereo 5 <- this is channels 5 & 6 as a STEREO pair
-
Since 2019.09, control changes & bank select should work without issue. SysEx won't work at the moment tho.
-
Nothing like that I'm afraid. With the select tool, Left Click + drag is region select; Right Click + drag is lasso select. SHIFT + Space is different from SHIFT+L, as it sets the loop points, enables looping and starts playback all in one go. It's the closest thing to what you're looking for that's available at the moment.
-
I've actually got 3 - all in separate racks. They all power up fine. I use samples for convenience, especially for use on my laptop, but also because the sounds are actually cleaner. They don't suffer from the 15 to 16 bit aliasing that occurs on the real CM64 when the volume is increased.
-
Right, I see what you mean - in that case, SHIFT + Space .
-
I was exactly the same... except when my dad got a sound canvas, I much preferred the sounds of my CM-64 and was glad I didn't get one in the end! I still have the CM-64 and use the sounds regularly (albeit samples of it mainly nowadays).