msmcleod
-
Posts
6,958 -
Joined
-
Last visited
-
Days Won
36
Everything posted by msmcleod
-
 You need to change the clip Time Base to "absolute" then lock the clip position.
 -
Locking clips to HMSF location for film
msmcleod replied to Josh Wolfer's topic in Cakewalk by BandLab
You need to change the clip Time Base to "absolute" then lock the clip position. -
How can I piece together sections of 1000's of songs? How does Metallica do it?
msmcleod replied to Morris Band's question in Q&A
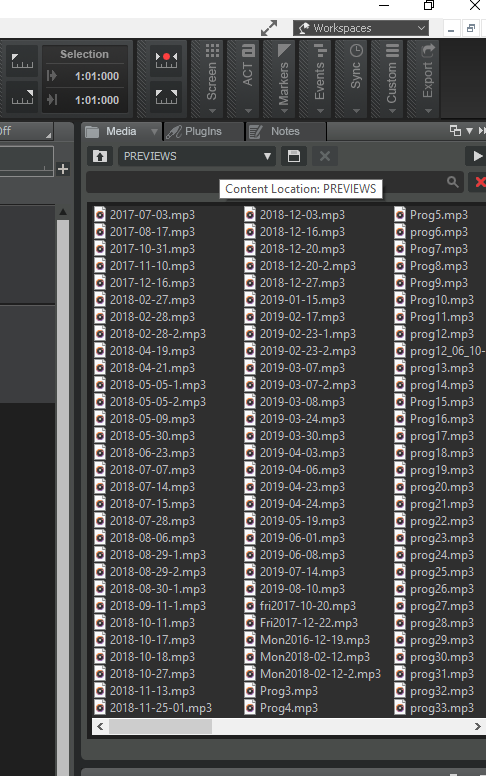
This is exactly how I work too. I've got well over 200 unfinished songs now - mostly 8 to 32 bar sections. What I've started doing is every time I save a project, I export it as an MP3 giving it the same name as my project. I copy the MP3 to a PREVIEWS folder, which I've added to the media browser. I don't bother with individual stems - just the whole export: When I'm stuck for a chorus for my verse (or vice versa), I go to the media browser and click through them so see if any might work. If they might, I'll drag the mp3 on to an audio track, cut it up / speed it up etc... if it sounds good, I'll open up the original project and copy the tracks over. For MIDI, it's easy enough to work with... audio I'll re-record if the key is wrong.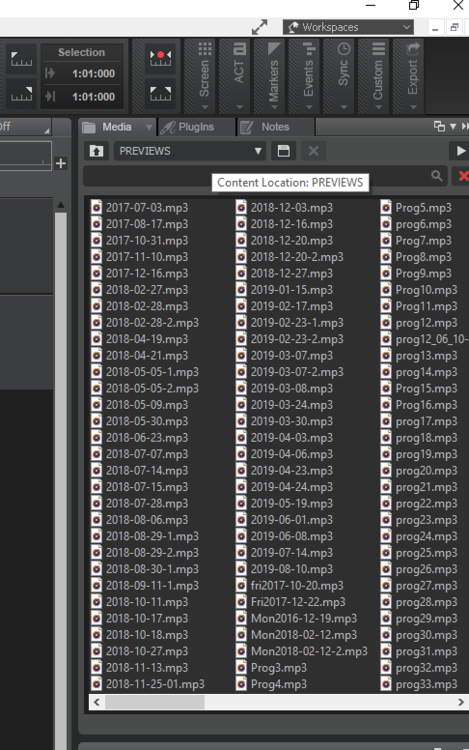
-
Split clips lock together on different lanes, help please!
msmcleod replied to Wolfcub's topic in Cakewalk by BandLab
When a split is across lanes, they always move together when they line up. The way I get around this: 1. Select the whole lane 2. Nudge it to the right 3. Move the split well out of the way 4. Nudge it back to the left 5. Adjust my split in the one lane -
And it's here....
-
FYI - the early access is now out with a keybinding to toggle between clip gain automation / clips:
-
The way I've got around this in the past, is to: 1. Create a new Cakewalk project based on the "Basic" template 2. Navigate to your .wrk file via Cakewalk's media browser 3. Drag the .wrk file to the clips view from the media browser. Save your new project.
-
If you're using a Realtek device, switch to WASAPI shared.
-
@Jim Fogle - when you same multi-channel outputs, do you mean audio outputs? The video I posted earlier in this thread shows how to do this for Omnisphere. Unfortunately the process is different for every VSTi, so you'll need to refer to the user guide for each VSTi. I'm sure I did a similar one for Kontakt at some point... I'll try to dig it out.
-
Cakewalk only does load balancing on VST effects... not on VSTi synths.
-
Omnisphere is 8 channel multi-timbral. The setup part in the Multi tab is to route each channel to a separate audio out, so each instrument track is (a) on it's own MIDI separate channel and (b) on its own separate audio track... but yeah, they're all going to the same omnisphere instance. Omnisphere (which the OP was querying about) is actually pretty good with cores... so one instance works well vs multiple instances.... Kontakt is the same, if it's set up properly. But as you say, you do lose the ability to individually freeze each track - it's none or all of them.
-
I'm guessing your workspace is set to "Basic" ? (see top right hand corner ) The Basic workspace hide's a lot of the more complex functionality. Set your workspace to "None" and you'll see everything... including the Event View.
-
The easiest way to do it is like this:
-
MIDI keyboard suddenly no longer works in CW
msmcleod replied to winkpain's topic in Cakewalk by BandLab
It could be, but it could also be your USB sleep settings. Make sure USB sleep is disabled for all your Audio & MIDI devices. It may be easier just to disable USB sleep altogether in your Windows power config. -
Feature: Partial clip gain via control shortcut + selection
msmcleod replied to Josh Wolfer's topic in Feedback Loop
I think we're getting our wires crossed here... So if your filter is currently set to CLIPS, you can use CTRL + drag to adjust the overall clip gain envelope if your mouse is on the lower part of the clip. If your filter is set to Clip Gain Automation, CTRL + click will work anywhere in the clip to adjust the overall gain. If your filter is set to Clip Gain Automation, you can make a selection by left click dragging along the bottom of the clip and drag from the very top of the clip (without any keyboard modifiers) to adjust only that selection. -
Feature: Partial clip gain via control shortcut + selection
msmcleod replied to Josh Wolfer's topic in Feedback Loop
CTRL + drag should work, but you need to be dragging from the lower half of the clip. The next release will have a key bindable shortcut for toggling between clip gain & clips, so watch out for the early access.... shouldn't be too much longer now. -
Is Combining MIDI Take Lanes Possible?
msmcleod replied to razor7music's topic in Cakewalk by BandLab
There's two ways of doing this: -
This ^^^
-
I normally click on the track number to select the whole track, then right click on the clip and "Bounce to clip(s)".
-
Best thing to do is send an email to: support@cakewalk.com
-
@Robert Bone - are you running a custom theme? This may be the issue if the theme is not up to date with 2020.05
-
Feature: Partial clip gain via control shortcut + selection
msmcleod replied to Josh Wolfer's topic in Feedback Loop
That's already been done for the next release... keep an eye out for the next early access release. -
From the File menu in Cakewalk... File->Import Audio CD Then pick your track.
-
Yep, @John Bradley is correct - reference tracks are just commercial tracks that sound like what you want your own mix to sound like... so just scour through your CD collection (if you still have those) and pick one or two that most closely match what you're trying to achieve.
-
The short answer is no, you can't do this at the moment. You could get around this by using some 3rd party "Synth Rack" type plugin that will host the plugins for you and make them appear as one.... so it is possible to say, use Cantable to host the synths along with a virtual MIDI / Audio cable (e.g. loopMidi or loopBe / VB Audio Cable). You'd lose a bunch of features like native parameter automation etc (unless you mapped CC MIDI values I guess). You could also get around this by sampling your VST synths and playing them in a single VST sampler. In both the above workarounds, you'd simply use a program change to change sounds... however you need to ask yourself whether it's worth the effort compared to just having another track. There's a third option I guess... create a third MIDI track which has LINKED copies of both the verse & chorus clips in it, and use that one for the staff view. You'd mute this for playback, but any edits you make in it would automatically apply to the original tracks due to the clips being linked.