-
Posts
139 -
Joined
-
Last visited
Everything posted by Dave G
-

Addictive Drums 2: How to simulate that "hollow" snare effect?
Dave G replied to Dave G's topic in Instruments & Effects
Thank you for all the responses! I appreciate the assistance on this from all who chimed in. As stated, AD2 already has several rock/pop kits which offer this snare sound to a point, but I guess I can start at any one of those kits, experiment and go from there... (If I could only figure out how to quote multiple users in one reply so I can answer everyone at once. LOL) -
Addictive Drums 2: How to simulate that "hollow" snare effect?
Dave G replied to Dave G's topic in Instruments & Effects
Thank you for the screenshot, this is very helpful! I didn't realize that, until now, clicking the button for each drum piece opens up a wealth of customizable functions for that drum piece. I tried adjusting some of these functions to achieve the effect I wanted, notably the Snare Buzz vs. Top-Bottom. I haven't gotten there yet. It'll take some more time and research. But this information is helpful. -
In Addictive Drums 2, I'm looking for a method to create that "hollow" snare drum effect in the likes of the rock and ska style of some bands. For reference, here are a few examples of popular songs with the drum track isolated: Blink 182 https://www.youtube.com/watch?v=VRIWzM-GoT8 The Mighty Mighty Bosstones https://www.youtube.com/watch?v=GfRB0Vqqkd0 No Doubt https://www.youtube.com/watch?v=NS7Z1eDIzAM https://www.youtube.com/watch?v=vAFTpbmp-dg Red Hot Chili Peppers https://www.youtube.com/watch?v=Gpr82ebF1gA Stone Temple Pilots https://www.youtube.com/watch?v=4BhFbKxF1Go https://www.youtube.com/watch?v=bhWf_5dSfL0 Per the above examples, you probably get the idea. I know that a few of my AD2 kits already have presets with that "hollow" style. Unfortunately, they don't quite match exactly the effect I'm looking for. Can anyone give me any pointers on how to tweak the snare drum using AD2's variety of mixing functions to make it sound more like those examples above? Thanks in advance!
-
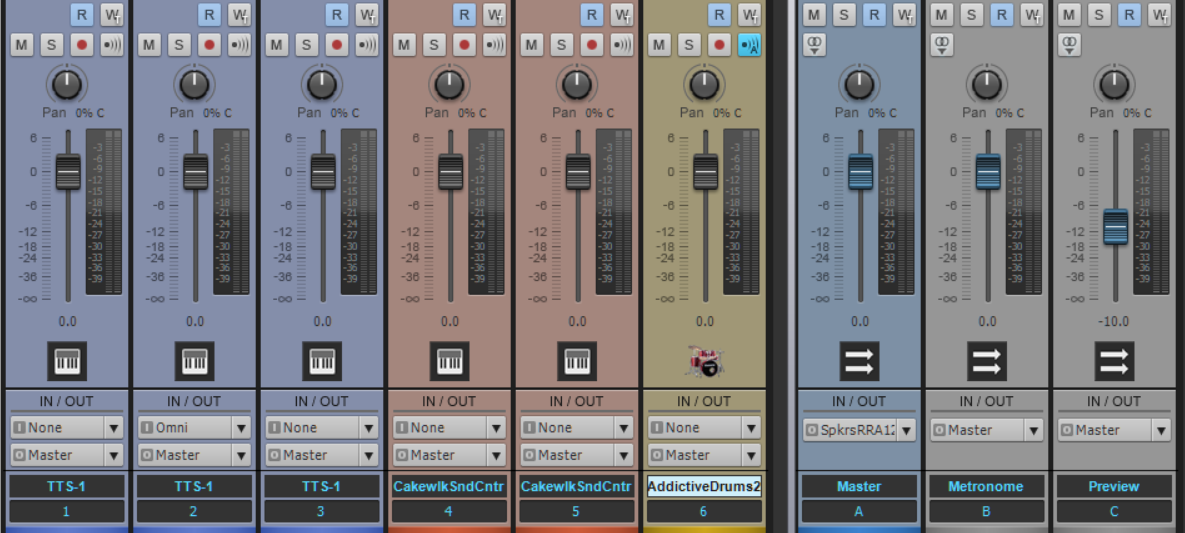
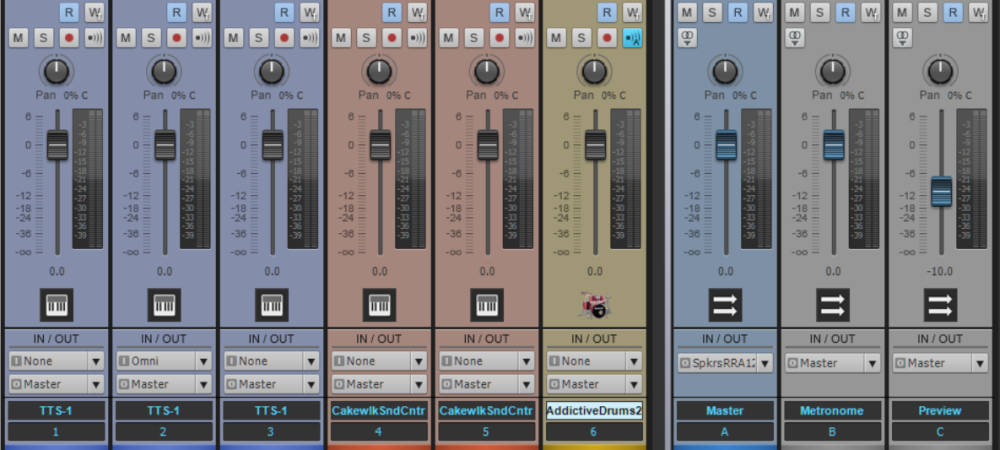
Thank you for your explanation. In reference to your first few paragraphs, I can safely say that this is a basic project with no modifications to output paths or anything unusual that I'm not familiar enough to mess with. Here's what my volume faders look like: ~ AD2: Every kit piece set to its individual volume level: Snare & Toms at 0db, HiHat and Flexis a few db less. Master -3 db on this particular kit (I don't know why.) ~ DAW console faders: Every instrument track default to 0db. ~ DAW note velocities: All default volume of 100 (out of max of 127) to begin with. Obviously, what I'm hearing is that the AD2 kit pieces' individual tracks combining to make Master Volume vs. the kit playing on one instrument track in the DAW -- the AD2 kit being slightly louder. So I feel there's no clarity/fidelity issue after all...just a basic difference in output volume. Especially in the fact that, when I increase the velocities in those notes in the DAW, it is much clearer. (It may also benefit me to have my ears cleaned. LOL.) I'll put this one to rest for now and experiment with proper mixing and volume control so I can understand better. Thanks for your help on this!

-
In sampling drum kits within Addictive Drums, I'm hearing a strange problem in regards to playback between the synth and the DAW itself. When I sample a drum kit in the AD2 synth browser, it's crisp and clear. But when I play the kit in the Piano Roll of the DAW, it sounds...well, "not as present". As if I don't know if the volume's too low or that the sample sounds like it's "in the next room". Just doesn't sound as present or "open". It's puzzling my mind and ears and I can't figure out how to regulate it. Of course, the AD2 mixer faders are all at their default positions and the faders in the DAW are what they are, represented in Console view. I don't know if there's an anomaly there or my imagination -- or it's only an imbalance in volume between the two and nothing more. Can anyone evaluate and help me identify the imbalance and understand regulating it there? Furthermore, when I mix that AD2 track into the DAW, whether to use the AD2 mixer or the DAW console mixer? Anyway, answers would be appreciated! Thank you in advance.
-
Some TTS-1 instruments suddenly sound different
Dave G replied to Dave G's topic in Instruments & Effects
Thank you for the response! As an experiment, I tried placing simple notes of these Patches into a new project. (I wasn't able to upload a sample WAV here, as the file size was exceeded.) I will test the CC events you suggested and follow up as needed. Thank you! -
By no particular recent event or action to my knowledge, a few of my TTS-1 instruments suddenly sound different. 1) The Distortion Guitar (patch 31-000) sounds muddy and inconsistent in tone while descending into the decay -- not as smooth as it should be. 2) The default drum kit Crash Cymbal 2 seems to be disrupted by the light "tick" of Ride Cymbal 2 shortly into the cymbal hit. (i.e. "Ckshhhhh!" is "Cksh-ts-hhhhhhhhh!") I still appreciate the TTS-1 library and strictly use it as a placeholder for instruments in a new project until I replace them with higher-quality VST's. These anomalies aren't central to one project. It's the TTS-1 engine itself. To make it more complicated, I don't know if they always sounded like this or I'm just now noticing it...or if my hearing is just really good. I don't know where to start diagnosing this. I don't want to have to go the trouble of reinstalling Cakewalk or even reformatting my hard drive to weed out the issue. Any ideas? Thanks in advance.
-
Opinion: Addictive Drums 2 "minimalist" drum map
Dave G replied to Dave G's topic in Instruments & Effects
Thank you for your extensive knowledge and wealth of information! This is pretty much what I've been looking for. After I posted this, I watched several YouTube videos of the hi-hat in action. Although I found some answers there on the mechanical aspect of the equipment, I also realize that it partially depends on the drummer's preference in setup and intended use. I know I could've visited a music equipment retailer and spent time at a drum kit to familiarize myself in a more real scenario, but that's far beyond means and necessity. If we may take this discussion back a few decades... When I first began composing MIDI music in the 90's, all I knew to work with was the General MIDI universal drum map. Although this drum map is laid out without rhyme or reason -- various drum piece articulations jumbled in no particular order -- I conformed with it and grew accustomed to it. But now with Addictive Drums, my options have become greater...and unfortunately, much more challenging and complicated. For somebody with OCD, it's a painstaking process to make decisions and commit to them. One being, of course, creating a custom drum map tailored to preference. In this case, I want to integrate every vital drum piece articulation but exclude any that I feel are redundant or unnecessary. Once this drum map is complete, it'll be the basis of all my projects and maybe I can finally get them off the ground. I'm overthinking and obsessing too much over the fact that I may not like it later. I guess that's why it's taking so long...I want it to be right. Anyway, I appreciate everything I've learned here. It just feels complicated assembling a custom AD2 drum map that's not too busy or difficult to work with. I'm not looking to create a commercial product...it's just a personal hobby I'm trying to remind myself to keep it simple. For now, my questions have been answered. Thanks for your help! -
Opinion: Addictive Drums 2 "minimalist" drum map
Dave G replied to Dave G's topic in Instruments & Effects
[Please pardon my reviving this topic so long after originally posting. I abandoned the project for a while, but still seek answers.] Thanks for all of your input! As a newbie/amateur, I have remaining questions on hi-hat articulations. These simply aren't elaborated on in the Addictive Drums 2 Manual PDF. Typically, I don't have a need to utilize every specific Hi-Hat articulation that AD2 offers. I'm looking to finalize my basic drum map that includes every articulation I'm likely to use. Before integrating my AD2 drum map into all my projects, I wish to familiarize myself with how these articulations work in a real-life scenario -- to tell them apart and understand how to utilize them properly on the PRV. The image attached is my updated drum map's "Hi-Hat" section (keys 53 - 59). Here are my observations; please comment accordingly: I assume that the hi-hat is open by default, not closed. Does the foot pedal typically push down to close the hi-hat, or to open it? I assume that "HH Open" is the default action of pushing the pedal to open the hi-hat. The four "HH Open A, B, C, and D" seem to all sound similar, just gradually a harder attack with each key. How does "HH Foot Splash" differ from "HH Open"? I assume that "HH Closed" is the articulation of hitting the bell, tip, or shaft while the hi-hat is closed. I've observed that each "HH Open" and "HH Foot Splash" are muted/choked by the "HH Closed" and "HH Foot Close" keys. Simply looking for explanations on exactly how these functions work. I worded these questions as clearly as I could. Any further insight and/or explanation is appreciated. Thank you again!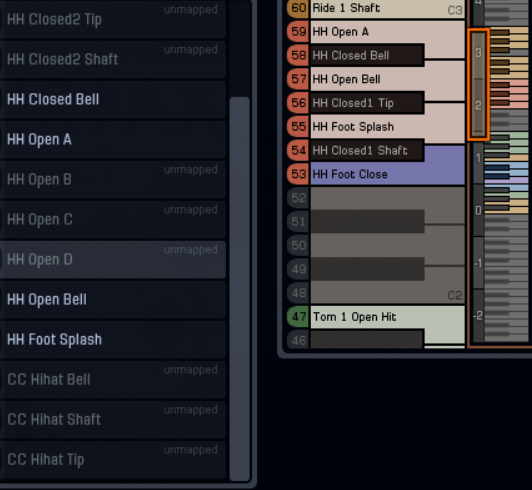
-
Thank you for your responses, everyone! ?
-
Awesome. Thanks for the information! Would you please elaborate on clip gain automation, and how that is done? EDIT: Now, experimenting with how to do this, I'm running into issues. MIDI CC #92 is listed as "Tremolo level", but it's technically undefined and doesn't do anything. I tried using an Expression controller, but Cakewalk doesn't allow me to draw a Sine pattern (or any of the other patterns below it) in the Controller Pane or Automation to create the effect. Then I noticed, in the Cakewalk 30th Anniversary FX Chain add-on, Tremolo is there and works perfectly. (However, I wouldn't mind finding other ways). Any other ideas, and what might I be missing? Thanks again!
-
As opposed to the modulation effect (where the audio rapidly fluctuates in pitch), how do I create that "fluttering" effect (where the audio rapidly fluctuates in volume, similar to vibrato)? Examples from which I'm trying to replicate the effect are: "Crimson and Clover" (guitar at 2:56 and vocals at 4:25) "Spinning Wheel" (vocal fade out at 1:15) Is there a process to this, or is it a simple vibrato controller? Please advise. Thanks in advance!
-
I concur. A few days ago, they indicated there was an issue with the download servers. They followed up this morning with the status of the issue. It's confirmed that all the aforementioned add-ons are now once again downloadable via the Cakewalk Command Center, and working properly. SOLVED. Thank you for your help, everyone!
-
I'm sorry, I believe I was misunderstood. The apps are all listed in Cakewalk Command Center. However, I'm unable to download them or obtain them anywhere. I'm kind of frustrated that I may never have these again. Mr. Craig Anderton, are you able to help with this at all -- a link or anything? Or suggestions from anyone are welcome and needed. Either way, I'll contact Cakewalk and see if they could help. Thanks!
-
It seems as though I'm missing the installer downloads for the Cakewalk 30th Anniversary collection. Even worse...I'm unable to obtain them via Cakewalk Command Center. (I have their serial numbers in my Cakewalk account, so I had them at some point.) The apps in question are: Drum Replacer Kicks, Modulator FX Chains, but most importantly, CA-X Amps! I hope these apps aren't gone for good. Is there anybody who might be able to come to the rescue and locate a source for me so I can get them back? Any help would be very much appreciated. Thanks in advance!
-
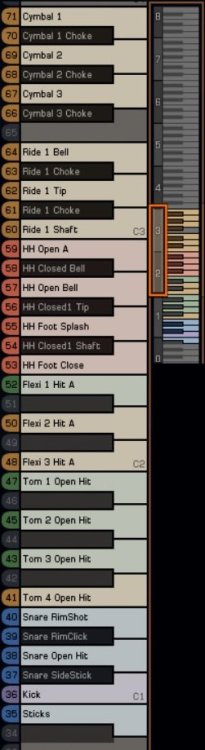
I'm enjoying Addictive Drums 2 so far! However, I'm overwhelmed by the default AD2 drum map. It's adequate but jumbled and more than I need. Before using the map on my projects, I'd like to create a custom map that has what I need but missing nothing useful. Surely, I want to avoid the risk of discovering I'm missing a drum articulation from my map later on down the road... I wish to use a simple, easy to navigate "minimalist" drum map for AD2. I'm simply seeking the most common and basic articulations of all the drum parts without any redundant and extra hits. I'm okay with the sticks, kick, snare, and four toms. I have three cymbal + choke combinations assigned. (I'm considering removing the ride + choke combinations, as I've never heard that used.) I think my biggest confusion is the several hi-hat articulations available...just too many and more than I'd like to have. So I'd like to minimize these articulations to the common basics. I feel sometimes my OCD for simplicity gets the best of me. Please let me know your thoughts, opinions, and suggestions on the above. Thank you! I've attached a screenshot of my current AD2 drum map so far. (I'm embarrassed to have to point out that this attachment isn't showing in Firefox.)
-
Thank you all for your insightful information! It's been a few days since I posted this, so I don't want you all to think that I've forgotten it. I appreciate the useful nuggets of information in the process of doing my work more efficiently.
-
Throughout my MIDI composition experience, I've noticed various ways to create simple effects like Reverb, Chorus, and Pan. For example: TTS-1 allows you to set these via dials in the synth. There are also VST plugin effects (i.e. Sonitus Reverb) that do this effectively. But of course, these simple effects can also be drawn in the PRV Controller Pane. My question is: Out of these different methods, what is the best (and most resource-friendly) way to integrate Reverb, Chorus, and Pan, and other effects that can be drawn in the Controller Pane? Synth-level, plugin-level, or controller-level? Bonus question: How do I decide whether to include these effects before/after I bounce to audio during the final mixing process? I just want to do it the right way. I hope I've explained this well enough. Thanks in advance.
-
Is it in any way possible to enable Portamento work in a Cakewalk Sound Center instrument track? I load a sustained instrument (i.e. synth lead) and slightly overlap the notes. Then I create MIDI events for CC #65 (Portamento On/Off), CC #5 (Portamento Time), and CC #84 (Amount of Portamento). This works in TTS-1 -- however, not in Cakewalk Sound Center. I'm not able to get the notes to slide as they should. Is this possible? Are there any "hidden options" to enable Portamento there? Any insight or pointers are appreciated! Thanks in advance.
-
TTS-1: One instance for many tracks vs. multiple TTS-1 tracks?
Dave G replied to Dave G's topic in Cakewalk by BandLab
Thank you for all of the advise and insight! I truly appreciate it. Even after doing this for quite a while (on/off), it's hard to know that my routine is efficient and know my way around, let alone having to second guess everything I do during the workflow. One can never be sure whether they're doing something right or could be doing it better. ☺️ -
Workspaces, screensets, templates, lenses...I sometimes get confused by all these functions, and wonder why there are so many! (shrug) Sometimes it feels like Cakewalk doesn't have proprietary names for some of its windows. Anyhow -- It's difficult to explain in a visual sense. But this is my current "Basic" project template & Lenses configuration (program auto-starts into this template): LENS #1: Console (Full-screen console view: 11 Strips + Master, Metronome, Preview strips) LENS #2: Track + PRV (Track window above, PRV (3" high) and Controller Pane (1.5" high) on bottom, collapsed Inspector and Browser -- Browser set in Instruments tab) LENS #3: PRV (full screen PRV, collapsed Browser, with collapsible quick-track selection on the right) TEMPLATE: ~ Custom set of Modules in menu ~ Default Draw Duration and Time Snap set to 1/16 (Last Touched disabled) ~ Nothing changed in [View v][Options v][Tracks v]... menu bar ~ Track window shows Track Control button set to [All] (auto-sets to [Lens], per above Lens #2) ~ PRV vertical gridlines on If anyone can recommend a more sensible way to do this that can be applied to new projects and existing projects, please do.
-
Doing this creates two new MIDI tracks: "Track #" and "Matrix Data Track". I'm afraid this isn't what I'm looking for... (shrug) Thank you, I will look into that. However, it seems as though, when I open one of those existing projects, the layout/settings I have in place for that particular project don't seem too different from my existing template. It may not be a necessary routine (after all, it's my OCD), but I will look at Track Templates just the same. I wasn't sure what word to use, so I chose "wrapper". Guess I was hungry for candy at the time. I guess I could take the manual route and copy individual tracks from the project into the blank template and do it that way. Thanks for all your responses!
-
I have several existing Cakewalk projects (.CWP) for which I'd like to have the same project template. As I understand, the project template serves as a "wrapper" for my projects. I just created a new project template which I really like. I'd like to use this for not only future projects but also the ones I've already started... Is there a way to "bind" my existing projects into the new template without any unnecessary hassle? I'd like them all to be the same. Thanks in advance!
-
TTS-1: One instance for many tracks vs. multiple TTS-1 tracks?
Dave G replied to Dave G's topic in Cakewalk by BandLab
Thank you all for your elaborate responses! ☺️ Honestly, I use TTS-1 as a temporary placeholder track for when I have a melody I want to put down in a hurry and expand on it later. I also have the Cakewalk Studio Instruments Suite, a large bundle of Digital Sound Factory packs (for Cakewalk Sound Center), SessionDrummer, and Addictive Drums. I don't plan on spending massive amounts of money on extra instrument packs, as an amateur musician doing this casually. For now, these are much more than what I need for the instruments available. I plan on eventually replacing my TTS-1 tracks with instruments from any of the above. -
I still like to use TTS-1 tracks in my projects, but I always take into consideration doing it properly. I used to use one instance of TTS-1 for multiple tracks for the sake of simplicity and consolidation. These days, I prefer one synth per instrument track for more control. What I would like to know is...your opinions? What are the pros/cons of using one TTS-1 instance for many (<16) instruments with an Audio Output vs. multiple TTS-1 tracks, one for each instrument track, but output to the Master Bus? Thanks in advance.