


CJ8073
-
Posts
20 -
Joined
-
Last visited
Posts posted by CJ8073
-
-
On 8/28/2023 at 7:25 PM, mettelus said:
The primary reason for normalizing audio to some standard is when using a universal FX chain (from a buss) you want the first compressor in that chain to see relatively the same signal (so the knee is consistent for each track). Many FX have thresholds to them, so that first compressor makes the rest of the FX chain yield a consistent output. You can (and often do) use another compressor/limiter/maximizer on the final result, but there is an audible difference between tracks that were processed properly and those that were not (i.e., if that first compressor did nothing because the knee wasn't triggered and affected the rest of the chain) and just had the volume raised at the end.
There is no right or wrong for what you are doing, and using a buss has the benefit that you can adjust only one processing chain rather than copying adjustments between tracks. That can be burdensome when the material you are working with is essentially the same anyway and you decide late in the game that you want to change settings. Max's advice on consistent levels is what makes that possible. With a consistent recording setup, you should be able to get away with normalizing a bounced track (once your edits are completed); I habitually will normalize to -3dB since I already set up compressors expecting that signal level, which makes tweaking them simpler.
Another trick you may not be aware of is Patch Points/Aux Tracks, which let you record the output of your chains to a new track (similar to exporting, but recorded to a new track). It can be quicker than exporting and you can drag/drop those tracks out of Cakewalk into a Windows folder. Depending on your workflow, this may or may not be beneficial, but something to keep in mind should you need it.
I would, honestly, really like really understanding everything you are explaining to me here. I mean this sincerely. I can, after almost a year of reading and researching understand a basic level of what you are saying, but there is still so much I'd like to learn. (I found the used book, Modern Recording Techniques, 7th Edition by David Miles Huber, that I have been reading. I am currently on Chapter 4, Microphones. I've loved learning from it so far!) So, when you say, "knee" are you referring to the strength of the compression? Or, the strength of the compression after the compression starts? I have listened to quite a few youtube videos about this and at first I thought ratio and knee were one in the same, but after doing more research and video watching, I think they are two different things. Ratio being the overall compression strength with knee being complementary to that in that it is how the compression strength takes affect once it starts compressing. Is that right? I don't really understand what this does sound-wise, but it's an interesting concept and I'd love to actually hear examples of what the knee does exactly.
Normalizing is when the volume of the overall track is raised/lowered without changing the dynamics of the waveform, correct? So, normalizing to -3dB just means taking the whole waveform and raising the output volume of that, right? However, gain is attenuating the highest part of a waveform at a certain threshold, thus changing the dynamic range of the sound? So, do you normalize first? Then compress afterwards? At which point can you EQ? and is EQ essentially compressing, but specific frequencies? I ask that because I do EQ out some boxy/muddy sound out of my recordings since I record in a small space. Not a lot but a little and isn't that doing the same thing as compressing but only for certain frequencies?
Yes, the patch points is what I was originally trying to understand! Because I had seen somewhere where someone was saying that you could run your tracks through a patch point instead of using a bus and I was thinking maybe that's what I should have set up for the "Voice" part of my setup instead of putting that on another bus. (Is it bus or buss? lol, I keep seeing it spelled differently) I wasn't sure what the benefits were for that! So, based on what you wrote - If I flow my tracks through a Voice patch point one at a time, can I see the new waveform that is created after all of the effects have taken place?
Thanks, again, for your help!
On 8/29/2023 at 10:58 AM, JohnnyV said:This is why I recommend the paid version of the You Lean meter. It is the only meter that allows instant results by drag and drop of audio (and video) files to the GUI. There is a free version that works in real time as well but the upgrade is only $50 Can. If your time is worth anything to you this is a very good investment. https://youlean.co/youlean-loudness-meter/
I think I already explained clearly my workflow so I won't elaborate. Key point is that if each track has been optimized and adjusted then there would be no need for buses or a separate export per track. It would all be done in way less time. Good workflows are ones that might take more prep work but save time in the long run. That prep work includes a proper recoding environment and set up and the right mike and equipment. If you tried a SM7B you might not need to do any editing. I used to own an AT 2020. It does not work at all for me for the reasons you just mentioned. Noisy.
Thank you, I will keep the youlean loudness meter in mind. I do have the free version. I will also keep the workflow that you presented in mind. I have been reading and re-reading this entire discussion post to learn from. I have not tried the SM7B microphone. Honestly, I don't think I am at the point to being able to try it because when I looked it up, it is quite above my budget. For now, I will have to find a way to make the AT2020 work. Thanks, though, and I will keep it in mind later when I have more money that I can spend on equipment.
=========================================
For those of you, who have been kind enough to help, would you mind if I posted a 45 second sample of the piece I have been recording? I have two samples; one is raw and the other processed. I am just wanting a couple opinions on quality and to know if my final piece sounds okay or if I should change something to make it better. I'm not worried about performance because that is something I am also still working on and right now my concern is more quality of sound, first. I'll post it if you guys don't mind. Thanks!
=========================================
-
I want to say thank you! so much to everyone for your very helpful and insightful replies!! I'm learning so much! I wanted to upload a screenshot of how I've got everything set up so you could see it all. Does it makes sense the way I've got it set up?
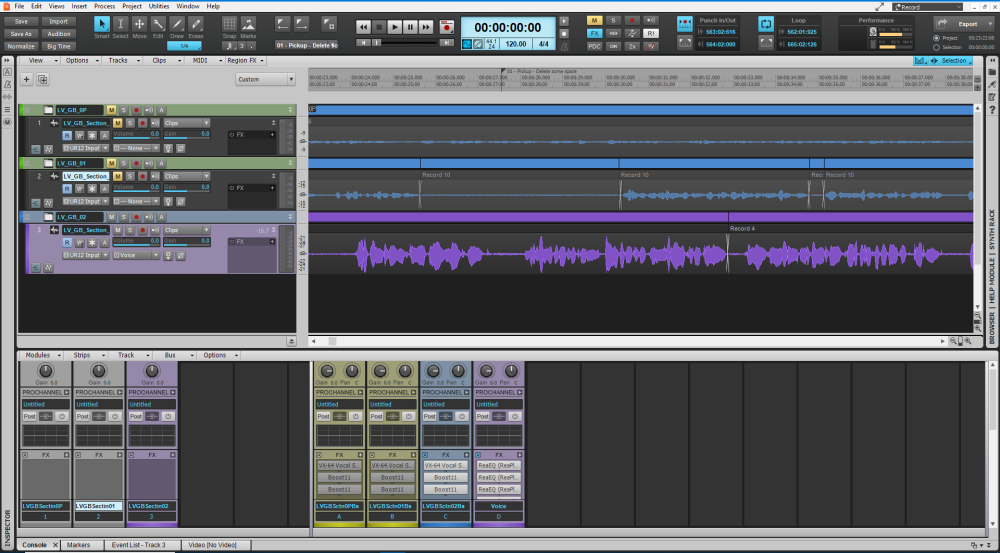
I might consider not using folders... I'm not sure, yet. I was also thinking about this:
On 8/26/2023 at 5:06 AM, Max Arwood said:There are several ways to level the different take. First, you should use the volume to adjust them as close as you can.
So, as you can see the way I've got things; I don't use any plugins on the individual tracks, I run them one at a time through the voice track (when I am exporting them) and then I set the voice bus to output through a corresponding bus for each track where I can tweak the volume at varying amounts a little here and there per track so the end result is that all of the tracks have roughly the same volume. However, based on the above suggestion from Max, it seems I am doing this a little backwards? Should I be using the volume control per track to even them out first? Then use only a single, final bus for the voice bus to run through in the end? One that I could just set and not have to touch? Or should I just be using a single final bus altogether and put all of the plugins on the one bus? I don't change anything on that Voice bus at all. (The reason why I don't put the plugins on any of the tracks individually is because that's too many plugins for me to have to keep track of, plus it seems a little redundant since I really wouldn't be changing the settings of any of them, and I I like to keep the actual recording completely untouched as far as initial sound is concerned)
When I export, I've been doing each track individually using the following output path: Track to voice bus to corresponding bus. But I feel like, if I can somehow only have to have a single final bus (or combination of the two Voice to Master buses, and get rid of all of the individual buses) then this would make the export "tracks through entire mix" make more sense? I think?
That's where I was thinking (after learning a little bit about patch points) that maybe I was supposed to be using a patch point for the voice plugins, instead?
So, again, to come back around, ultimately, in order to not have to use so many buses for each of the tracks, am I suppose to level out the volume using the individual volume on each of the tracks, first? This way there is only one master bus at the end to finish getting all of the sounds up to the final volume level required at the end? (I use the Boost11 to up the volume and limit to -3.5dB)
As far as editing:
On 8/26/2023 at 3:39 AM, Bristol_Jonesey said:You can prevent unwanted editing on a clip by right clicking it and select Clip Lock. You can lock the data, position or both
Okay, I will keep this in mind, then. I'm not sure if I'm going to keep using the folders or just use tracks, but I will definitely consider the idea of Clip Lock on my final tracks so I don't accidentally edit them. Thank you!
======================================
On 8/26/2023 at 10:18 AM, JohnnyV said:Narrative for audio books is not like music and the voice is all that is heard. There’s no music to mask imperfections. Its definitely a talent not to be underestimated.
My son in laws Dad has been going into a studio in Scottsdale AZ for years and doing this.
He said they only let him record for an hour because your voice gets tired quickly.Congratulations! to him! I think narrating audiobooks is fun so far. And even the editing has been such an interesting learning experience. I haven't done anything that pays, yet, I've only done Volunteer work, but I'd really like to turn it into something more, which is why I am trying very hard to get decent at this before diving in for a paying project. I want to make sure I have something to offer. If my narration isn't well received, I'd like to maybe edit audiobooks instead because, honestly, I just really love working in the DAW and editing the audio.
My environment and setup:
So, for the room I record in - lol, it's a tiny closet. It has a popcorn ceiling and carpet. I had an old eggshell twin mattress topper I cut into rectangles and attached to my wall in front of me, behind me and on the door of the closet next to me. I layered every wall and the door way with lightweight, different density throw blankets and then layered that with thick drapes that reach from the ceiling to almost the floor around every wall and the door. I layered an extra comforter on top of the carpet and a few more throws around the baseboards to block extra noise from my computer (it sits about two feet outside the door of my closet). So, it obviously won't block the neighbors lawn mower when he's mowing outside or an extremely loud car driving by, but acoustically, I think it does well. (My husband kindly helped me tacking all of this up)
The equipment I use is an AT2020 XLR microphone and the Steinburg UR12 audio interface with input gain set to the 8th little dot). I have my little tv stand/tray covered with fabric and my microphone is attached to that with a pop filter in front of it. I have it angled slightly towards my left cheek and slightly downward and I sit about 7/8 inches from it. (I noticed that I have a whistle "s" a bit, so, I read that if I make it slightly off axis and angled downward, it would help with that) To help me keep a relatively close volume level each time, I've been resting my arm on my chair and kind of getting into that position every time I step away and sit back down, whether it's needing to get up for a moment or until the next day. However, I still sometimes still struggle to get volume levels matched, so that's why I had implemented all of the individual buses, to balance out and raise volume levels using the Boost11 plugin. But I kept thinking I was doing something wrong by doing that.
I still get a little confused with the whole RMS vs LUFS thing and I've watched several videos. I finally found this plugin: dpMeter5, which I have been using on the final output bus to get a feel for the RMS value of a track before I export it. (I got tired of exporting a gazillion times and running the same file through a file tester to see if I was meeting the RMS requirement for ACX) That seems to work to get decent feel; however, I am thinking, if I a supposed to be leveling volume on individual tracks first, maybe I should be putting that little guy on each track to check RMS there first? Does that sound right?
Some of the plugins that have been mentioned, do they cost? I am trying to stick with free plugins at the moment because I really can't afford to invest in those just yet, so if any of you know of any other great free plugins that would be helpful, I appreciate the suggestions! (I was looking for a free mouth "de-click" plugin, but so far I can only find paid ones. Right now, I'm editing out any weird clicky noises manually ..... literally takes forever! haha, fun, but forever! (This probably has to do with better recording techniques, also, so I am trying to get better at that, too) So, if anyone has a suggestion for that, in particular, I'd love to know about it!)
Thanks! to all who have made it this far, I appreciate it. Honestly, I've been trying to tackle learning this on my own and you guys/gals here on the forum have been such a great help to me whenever I've had a question. I am very grateful to those of you who help and contribute to these forums because I have learned so much, even from reading others' posts! And to all who make Youtube videos! many thanks!
~Cori
-
On 8/25/2023 at 12:35 AM, Byron Dickens said:
No reason you can't start.
You are absolutely right! And one day I plan on learning how to play the piano and creating something. 😀
-
16 hours ago, JohnnyV said:
Yes you could definitely just hide finished tracks. It would be a choice between that and the folders, which ever seems easier.
And yes, the export Tracks Trough entire mix feature will do all tracks. It shows a confirmation list before you hit ok so you can make sure the correct tracks are selected.The Export dialogue is very powerful and there’s a lot of options like in how the track are named and if you want automation and track or bus effects added. I use the entire mix selection because it includes the master bus.
Thanks for your help. Am I over complicating things by using multiple buses, do you think? If so, how else should I deal with the volume issue when my Chapters might be slightly different between chapters? Eventually, I'd like to be able to narrate audiobooks for ACX and I know they have a specific dB range that final submissions have to be. In order for me to get each chapter close to each other in the end and within spec, I've had to tweak the limiter ever so slightly differently for each one. If I put all the plugins on a single master bus and run the tracks through the entire mix, I'm afraid the final volume levels will sound a little different between chapters. Is there anything else I could be doing better? Thanks again for any help!
-
1 hour ago, Byron Dickens said:
There's definitely a lot to be said for being comfortable with the tools you're working with.
Yes! I tried Audacity, but it was awful and I felt like every change was so permanent. (I learned a little about destructive vs non-destructive editing after that) I tried Cubase and it was so confusing to me. I found Cakewalk and since it was free I figured I'd give it a shot and it's been great so far!! Honestly, I wish I knew more about music because I feel like the music that can be put together with a DAW is pretty amazing.
-
2 hours ago, JohnnyV said:
To make my tutorials I first record all the narration so as to not babble. I suck at live recording of narration so I write a script and I read it from my second monitor. I would think my workflow would be exactly how I would do what you are doing. The only difference I can see is your tracks would be much longer. Mine are never more than 30 seconds.
I have a template with 30 Audio tracks. It is easy to add or subtract these.
I don't bother, but you can name each track.
After I record a track I listen and fix and edit mistakes. I then turn off record and Mute the track.
I move to the next track and set in record. And so on.I'm very careful to stay same distance from my mike and I always record at a safe level.
After I'm done I might top and tail the tracks with fade ins and fade outs to remove unwanted noises like breathing.
The master bus has a few compressors, limiters etc. to make sure the voice stays at the same level with a target peak level of -1.0 db.
That's it, no folders nothing complicated at all.
Then I export as "Tracks through entire mix" at 48/24. This creates a stem ( track) for each of the " Chapters"
Thank you, for your very helpful reply. I really appreciate it. And thank you for the videos, they are so helpful! So, if I don't use folders and I use only tracks, can I hide the finished tracks so that I don't accidently edit them while I'm working on an active track? When exporting tracks through entire mix, can you export all at once? I've been doing one track at a time.
Again, thank you, so much for your reply!
-
3 hours ago, Byron Dickens said:
Cakewalk is massively overkill for what you're doing but check out these tutorials:
Thank you for the recommendation. I am currently subscribed to this channel. I know cakewalk is massively overkill, but I tried both audacity and Cubase and I did not like either. Cakewalk feels like home and it was easiest for me to get comfortable with.
-
 1
1
-
-
Hi, Everyone, I have two quick questions:
1) Is a track that is placed in a folder and hid (entire folder and content) from view in both the track/console safe from inadvertent edits?
2) I am doing some volunteer audiobook narration; however, I would like to pursue this as a career at some point and I am trying to get things well organized inside of Cakewalk. Right now I have each section/chapter separated on individual tracks and placed in their corresponding folders. I have no plugins on any of those tracks. I set up a "Voice" stereo bus that I run each section/chapter through after I'm done editing that has some plugins on it. Very minimal - small, small EQ and a light de-esser. I also have set up a separate stereo bus for each track (named for each track as track name_bus) that also has some plugins on it - an expander and limiter. When I'm done for a track I export each one individually - so, like this - Track output ------> Voice bus ouput -------> Bus for associated track output (my headphones). (I do individual buses for each track because I find that sometimes my volume levels are ever-so-slightly different when I record a track for a section and I have to mess with the limiter to get the same volume levels for each track - I don't know if I am doing this right, but it has seemed to work to keep everything exporting at the same volume level and I don't want to have to write down and change the limiter every single time back and forth for each track.... am I making sense? I'm sorry if I am wording anything wrong). So, in the end, I only have switch out the outputs for whichever track I want to export. However, I recently came across something called a patch point and I am wondering if I should be sending all of my tracks to a patch point with the "Voice" plugins there instead of using the "Voice" bus that I set up? Is there a benefit to doing it that way and am I using the Stereo bus for "Voice" wrong? Lastly, overall, does this seem like a good setup (separating each section/chapter on a different track in folders)?
Thank you for any input and I'm sorry if I sound silly at all - I am still learning.
Sincerely,
Cori
-
Yay, I figured it out! Thank you, again, for the documentation. I do have another quick question, if I want to delete all muted clips, can I do that in one fell swoop? I tried right clicking and selecting "Delete muted clips" but it deletes all of the audio. How do I delete all of the muted clips in the take lanes at once? Thanks!
***Nevermind*** I figured it out, just turn off Ripple edit and it works perfectly!
-
1
-
-
Okay, fantastic, I will read that documentation! Thank you very much! I love working in Cakewalk and have learned so much!
-
1
-
-
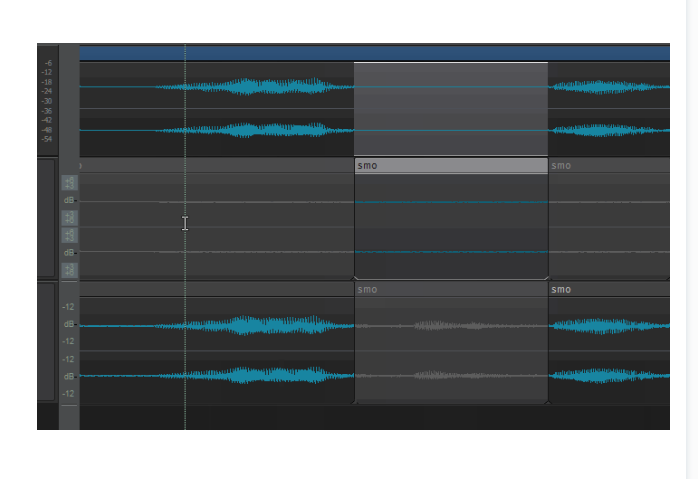
Here is a post link that I was referencing:
It's a post a couple entries down by Scook. The animated image that they included seems to do what I was trying to do, but I can't figure how how they got it to do this. It's like maybe I don't have some settings correct. As you can see, when they highlight the room tone, it becomes the "active" clip and the remaining take stays muted with the portion being replaced also being muted, also there are no cut lines where the selecting begins and ends; it's like it's all smooth and seamless. That was what I was going for, but can't figure out how. Thanks for you help, I do appreciate it!
-
Would this cause an overall volume increase, having that room tone underneath? I'm just curious. And, when I squish the takes back down, how do I get the room tone to not layer on top of the narration, but stay underneath it?
-
Hello, I have a quick question about how to get room tone into a narration. I saw a video for a different DAW how someone took room tone to replace some unwanted noise in their narration by layering tracks. I found a forum post about something similar using take lanes in Cakewalk. In the post, the user showed how they had two take lanes: one for the main work and another for room tone. They seemed to highlight over the room tone with the muting icon showing on the take lane and the room tone instantly replaced the unwanted portion in the main work without split lines and made it seem like a pretty smooth process. The user also told the original poster to keep the room tone track muted. I am attempting to try that as I think it may make some of my editing go much more quickly. However, I can't seem to do it properly as when I try I get split lines where I am attempting to highlight on the room tone track and when trying to keep the room tone take lane muted (because I don't want it coming in quietly behind the remaining portions of the main work), it keeps it muted when I squish the take lanes back down. If I unmute, I'm afraid there may be an overall volume increase because of the extra take in places I don't need it, plus it overlaps the main work and I can't see the narration track. I would delete portions where the actual words of the main work are being spoken, but then I worry that if I need to edit later because I missed something I won't have the same room tone sound to work with. I'm sorry if this is confusing, I am still very new to how this all works. Thank you, in advance, for any help.
*Edited: Added a screenshot - Below is a screen shot from the Cakewalk post that I was reading. As you can see the portion of room tone that had been selecting is showing as "active" and the rest remains muted and to goes into the top where the complete track is and the portion that's getting replaced goes muted. That is what I am trying to accomplish, but mine are splitting where I am selecting and the room tone take lane is staying muted. Thanks, again.
-
On 9/30/2022 at 3:22 AM, Max Arwood said:
I went to NAMN one year and went to a session by a famous mixer guy. He did the same thing you are doing, but he edited the volume of every single “s” . I would use the sissor tool, cut each side of the S’s. Do about 5 -10 at a time. Click on them from left one 1st end on the 1st one. This will put your cursor in the right position. CTRL-click them till you are at the 1st s. Then Ctrl-x. That cuts them from the track. Click the number label on the track where you want to move them. Ctrl-v. They are moved. No reason to group them. Place markers on chapters or save as ch1.cwp, ch2 .cwp etc and splice the chapters together when you are finished. Compression and Eq will work fine. If you decide to look into a deEsser you will probably still have some that need a little more editing. Clip gain is great for that. Both tracks should be outputted to a bus as someone mentioned before.
google free deEsser
SpitFish and Lisp are both good. You should also get the free Melda bundle if you don’t already have it
My favorite lower priced one is waves renaissance deEsser. Don’t pay more than $29 for it. Plugin Alliance also has one called SPL deEsser if you don’t like waves.
Thank you, for this reply! I really appreciate knowing that I am practicing something a professional would do to tame my "s". They are annoying for me to listen to when I check my recording for errors, I'd really hate for others to be annoyed by it.. lol. I've spent a long time trying to figure out how to fix them. I tried using the VX-64 Vocal Strip for De-essing, but I wasn't happy with the result, and felt like too many whistles still got through. Then I came across some reddit post that mentioned sidechaining and using a compressor, so that's how I got the idea for it. I started watching a ton of videos and reading lots of articles to figure out how to do it, properly. One thing I like about it, is that I feel like I can better fine tune it and have more control because I can get just the sounds I'm trying to tame and not others. It seems more precise. It's just time consuming, so doing a little at a time at the end of each day seemed more reasonable and more efficient. I can see most of my "s" visually, so I just put on some music or tv and zone out while isolating them all. Thank you for your suggestion about how to better split them without having to group. I'll try that! I'll also check out all of the de-essers everyone has suggested. I am really trying to make my audio sound professional, because eventually I'd like to narrate as a career and truthfully, I love the audio engineering and editing side to the whole process. Over the last six months or so I've learned so much. I wish I were more musically knowledgeable, because audio engineering music is fascinating to me. Thank you, again, for your reply to my post regarding grouping and the process I'm using to tame those pesky "s", it's very much appreciated.
-
1 hour ago, tecknot said:
Most likely a misfired key stroke. You can easily duplicate clips by highlighting them and pressing D. Just a guess.
Kind regards,
tecknot
Yes, that's probably what happened. My keyboard is sometimes on my lap when I am using shortcuts. If I am splitting a track into smaller pieces, and if I accidentally hit the ctrl key while selecting to split, will that produce copies of clips? lol, I think I am going to experiment and see what happens. Thanks
")
-
5 hours ago, David Baay said:
Per the documentation, creating a new group that includes existing and added clips is the expected behavior. You aren't actually creating multiple goups, just incrementing the group number every time you add to it.
https://www.cakewalk.com/Documentation?product=Cakewalk&language=3&help=Arranging.34.html
To add clips to an existing selection group
1. Click on any clip in the existing group.
All clips in the group are selected.
2. Hold down the CTRL key and click the clips that you want to add to the group.
3. Right-click any selected clip and choose Create selection group from selected clips from the pop-up menu.
All selected clips are placed in a new selection group.
Note: A clip may only belong to one selection group at a time. If any of the selected clips already belong to another clip group, they will be removed from the other group and placed in the new group.
P.S. If i were you, I'd definitely be looking for a free or low-cost De-esser!
Thank you for your help. I was following those instructions. After reading your post I think I was simply mistaking what the label number meant. I wish I could change the label, but I guess can't. I guess it wouldn't really matter, since it's just a count. Didn't think I grouped and regrouped 40 times, though .... lol. Still not sure how I made copies of the clips, though. Anyway, again, thank you for your help. I appreciated it.
-
4 hours ago, AndyB01 said:
Apologies if I've misunderstood the question but this might help.
If by 'clips' you mean tracks, the simplest way to 'group' these is to use a bus. Your tracks will - by default - all route on output to a master bus. Find this setting and create a new stereo bus and give this a name - create as many buses as you need and select the output bus for each track.
This way you can add effects on the bus to affect all tracks on the bus, rather than each single track. You can also colour the bus and it will colour all the tracks the same to help you navigate lots of tracks more easily.
If this is what you meant, I strongly recommend you look at Mike Enjo's videos on YouTube (his channel goes under the name of Creative Sauce). Especially look for the ones on using buses and sends - he explains it far better than I can.
Andy
P.s. Welcome to Bandlab and the forum - a little hint when posting - a few paragraphs go a long way to helping us digest longer posts.
Oh! I really love Creative Sauce's (Mike Enjo's) Youtube channel, it's where I have learned so much! Really, really great information. It's how I learned how to send my "s" track to the compressor on my main audio track to subdue those "sss". Thank you for your help. What I am meaning is not grouping multiple tracks, I meant clips within one track that I have split. So, like, I have one track and I've split all the "s" sounds so that each "s" sound is its own clip. Then I was trying to group those clips together so that I could move them from the main audio track to a separate audio track to deal with harshness of them by using some EQ. I did this successfully the first time, but it took a very long time to do in one fell swoop at then end of my recording. So, I was trying to do it a section at time as I finished a day's worth of work, so I didn't have to do it all at once at the end. The problem came when I noticed that the group label was "40". I thought I had inadvertantly made 40 groups and wondered how that had happened. I also noticed that I had somehow created copies of "s" clips on top of themselves... lol. Still don't know how that happened. So, I was trying to see where all these "groups" were and was trying to figure out how I had made so many duplicates so that I could avoid that. I was also trying to see if I could rename the label back to 02 or something, so it wasn't 40. Thank you, again, for your help, I do appreciate it. I'm sorry if I've been confusing.
-
Thank you. I'll will check out your suggestions; however, if I decide to continue with my isolating, grouping method, I'm curious if anyone would be able to help me with the grouping issue I am facing. Thanks!
-
Hello, I am new to Cakewalk and I need some help with the concept of grouping clips. I have been using cakewalk to record my volunteer audiobook chapters (I don't like audacity - I know, everyone says to use that one) and I really have been enjoying my experience with it so far. I love the interface and have learned so much since beginning using it. My problem is, I noticed that while recording, I whistle my "s". I have tried using a couple de-essers and I don't have the money to invest in an expensive pay version(s), so I have found the best way for me to deal with my annoying "s" is to isolate them, group them, move them to another track and then use send to a compressor and minimize them. I have successfully done this for one chapter. When I grouped my "s" sounds they formed a group labeled 01 and they all successfully grouped. When I selected one, they all got selected, which I liked because I could work with them as a whole. However, this takes forever to click every "s" sound in one fell swoop. So, I am trying to group as I go, so-to-speak. I figure if I record, edit and check in one session then that will cut down my edit time later. To deal with my "s" sounds, in the same session after I check my work to make sure all mistakes are taken care and my reading is good, I would like to isolate those "s" using the split feature to split before the "s" sound and after the "s" sound for each sound and then group those together for that day. When I come back the next day and get to isolated my new "s" sounds, I want to be able to add those to the previous day. Now, I tried this, but somewhere I screwed up and wound with with copies of "s" sounds on top of their same "s" sounds and when I create a group it makes like a label like 40. How did I wind up with 40 groups? I am so confused. How do I change it to say 02 for a label, if I want it to? And how do I successfully add each day's "s" without creating copies or new group labels? Every time I add the next day's, the group name changes. I'm sorry if this is confusing, but I'm so confused and I have tried researching what I'm doing wrong, but I can't for the life of me figure it out. All of my other Cakewalk complications I have managed to figure out just by painstakingly researching for myself. But, this, I am totally confused. Did I accidentally create craptons of groups when I was initially splitting my "s"? I have a lot of "s", I would imagine it would be way more than 40 if that were the case. Also, is there a place I can see all of the groups created so I can see what's going on? Lastly, I tried removing all my clips from the group and start over grouping just a couple together, but again my group label starts at like, 42 or another higher number... argh. Anway, thanks, ahead for any help. I really appreciate it.
A Good Structure Question - Audiobook Narration
in Cakewalk by BandLab
Posted
Mettelus - Okay, so basically, the knee is kind of where it looks either sharp or smooth at the bend area where the compressor kicks in. This, I'm sure, makes slight/large variances to different instruments/sounds. The larger the knee integer the smoother the bend, the smaller the integer the sharper the bend. As far as sound, I imagine this elongates or shortens the way the compressor kicks in, then. "we all have to learn at some point... (and more often doing)" ... lol, I think what I am going to do is try to find some musical instruments I can throw in Cakewalk and just mess around for fun, just to see what exactly everything does! I messed with some of the settings on my vocal file, but when I got to the knee I couldn't tell a whole lot. I think it's just that I'm not sure what to listen for. And perhaps for what I'm doing it doesn't matter much, but I find the whole thing so fascinating.. lol. So, for what you do, do you normalize, EQ, then compress? In that order? And from what you are saying, there seems to be a great deal to be said for preference and everything is subjective, since there is no right or wrong to a lot of it. As far as the patch point, I might just record something to mess around with and play around with that and see how it works and if it would work for me, I am very interested to learn about it.
Max -
I was a little confused about this.... what do you mean, "if you line up your tracks and rewind for the next take..."? I was trying to think of what you meant because it seems like something that would be useful since it had to do with editing, but I couldn't picture what you meant. I am always looking for ways to make my editing a little faster. I've tried recording then going back to listen to the whole thing, but this takes.... foorreevveerr. For my reading it keeps me in the moment a little better, but going back through takes forever. I don't have a dog clicker to mark as I go, so I make a little click noise myself for it, but it still takes so long to go through the whole thing, plus I seem to mess up more. So, I've what I've been doing recording a section, coming to a sort of pre-determined stopping point (usually at a dialogue change or between paragraphs) and editing a smaller portion as I go, this way by the end it's been mostly edited and going through it isn't as difficult. I take longer to record, but save a little time on editing. I've finally set up some better shortcut keys that have helped me to be faster, too, since now I don't have to keep looking down at my keyboard every couple of seconds.
I checked out both the WLM and the Jotter plugins that you have suggested. Oohh... I like them both! Okay, kinda shallow, I know, but I really like the UI scheme of the WLM, as well. I know they probably have features in them that are way above my level of necessity, but I do really like them! I like how simple the WLM seems to be to use. Now I gotta figure out the RMS - LUFS conversion, if there is one. I read and watched videos talking about both and I know that one has to do with Root Mean Square of the actual signal and one has to do with the perceived loudness.. I think. But, I need to learn more to understand better. As far as getting the plugins, for now I am going to bookmark these and as soon as I can afford a couple of these, I'm going to get them.
Speaking of plugins, JohnnyV -
I did not realize the YouLean that is for purchase will analyze the whole audio file at once. I would find this very useful, indeed! and I will also bookmark this for a later purchase. So, do you have to export the file first and then drag that into the YouLean meter? Or, does it analyze it within Cakewalk? YouLean meter (the free version) was one of the first meters I downloaded, but I had no idea what I was looking at back then. I still don't understand everything, but I'm learning. So many videos of ProTools showed people knowing exactly what their RMS value was within the software itself; I was looking for something like that for Cakewalk, but couldn't find anything. Like you said, every meter I found was a "live" meter and yes, I would have to run the whole track. I finally found dpMeter5 and instead of running through the whole file I just let it go for roughly 3-5 minutes in different places and kind of mentally average the RMS and most of the time, I've gotten a little better and predicting where it's going to wind up by doing it this way. (I've done this now on three tracks since having first started this discussion post and implementing some of the ideas that I have read on here) However, something that is more instant would be nice. As far as peaks, yeah, that would be nice too, to instantly see the peaks. When I listen to my audio after recording and while double checking for text errors, I also listen for evenness and whistliness/plosives that may come across uncomplimentary and I use the Clip Gain to correct it manually. I basically split around the offensive section, hold control and move up/down to fix the issue.
============================================================
So, below are my two files. The first is raw and the second is the final after processing. Just wanted to get some second opinions on quality. I know it's not professional, but for what I can do with my current knowledge, I can make necessary changes, if needed. Thanks!