


pulsewalk
-
Posts
214 -
Joined
-
Last visited
Everything posted by pulsewalk
-
 Yeah, tried that too. Didn't work
 -
Never mind! I found it! It's called "Exclusive Solo": https://gaga.cakewalk.com/Documentation?product=Cakewalk&language=3&help=Playback.16.html Although it was not solved in this Cakewalk forum: http://forum.cakewalk.com/Solo-one-Track-at-a-time-with-one-click-m311051.aspx ...which I first read
-
Is it possible to ONLY SOLO the track "in focus" (the track the solo button is pressed on) ONE CLICK? Lets say there's 10 tracks with different instruments/takes and you want to be able to listen through them in solo, one by one. Is there a method where you press solo on ANY of those 10 tracks, and ONLY that track is playing, while automatically muting/not soloing the rest of the tracks, with ONE CLICK? It is possible to do this with 2 tracks by grouping, but how do I do it with more than 2 tracks?
-
Feature request: Please FIX the "Insert Send"-menu.
pulsewalk replied to pulsewalk's topic in Feedback Loop
Great, the more the better. I've written about this earlier too, and might have even requested it like a year ago but I'm not really sure, I might have planned to request it but didn't. None the less, the more requests the better. I'll edit my initial post with another idea for this, to be able to "arm" an FX for sending. -
Yeah, I assumed that too! I've already posted it as a Feature request.. We'll see how it goes
-
Feature request: Please FIX the "Insert Send"-menu.
pulsewalk replied to pulsewalk's topic in Feedback Loop
Oh sorry! Maybe a moderator could move it? -
I can see there's a signal to a compressor I use for side chaining, and I've already disabled two sends, but it seems there are more sends giving the plugin a signal, which is weird enough as I've just recently added it and only added two sends to it. But anyway, is there a way to easily check where that Send signal is coming from? Or will I have to go track by track? 130+ tracks so it'll take some time. Also I'd like to be able to see this in other cases too, so a quick workaround would be great. Update: I found the culprit. There was something stuck with the In/Ext choice and the Audition button in Pro MB. A number of times back and forth with the choices by pressing the buttoms seems to have reset this "ghost send". However, the original questions remains in general. Like if there's a list of sends where one can see what goes where. Is there something like that? Or do one have to go track by track?
-
So, the "Insert Send" menu which can be accessed by right clicking on the track pane, is one very long list if you have lots of tracks and lots of FX. So every time you want to insert a send, you'll have to scroll through the entire list which is a slow and ineffective method, a pain really. Having to do this on a big project where you want to apply a lot of side chaining and you need to put sends on the tracks, is very time consuming in Cakewalk due to the described problem. Please add the following in future versions: Make the list several columns and/or put a slider on the side so one can just slide through the list quickly like a slider on a browser viewing a long webpage. A search field where you can quickly find the track/FX you want to assign the send to. EDIT: It would be cool if there would be a feature to be able to arm any FX or anything, to be able to assign a send to. So lets say you go to track 58, and arm FX number 4 in the list of FX. When armed, you just go to the track you want to make the send from, right click > Insert Send > Send to Armed and it would instantly find that armed FX. Then up pops the question "Do you want to make more sends to this armed FX?" If you click NO, then it is disarmed, if you click YES, then it stays armed so you can make more sends from other tracks as well. This would indeed make the process of assigning sends very much faster and less time consuming. Thank you!
-
Holding down the CTRL key while adjusting clip gain/volume on several/multiple clips does not result in the gain/volume being altered on the selected clips. Only the gain/volume on the clip that is adjusted will be adjusted accordingly. Please make the CTRL key usable on also clip gain adjustment for multiple clips. Thanks!
-
Holding CTRL key down while adjusting clip gain on several clips doesn't do anything. Only the clip you're adjusting will be affected. Holding CTRL key down when adjusting track volume on several selected tracks will work though. But this is not the case with clip gain and I don't know why. Holding CTRL key down should in my opinion work for several clips selected also. If nothing else I might ask for this as a feature request as it is quite logical to be able to do that.
-
It's a VSTi / audio project. But most of the audio comes from frozen VSTi tracks actually. It's not so easy to import the tracks in another project, because most tracks contains some degree of automation, even the frozen ones that are automated AFTER they've been frozen. That means they cannot be frozen again with the added automation... Of course, one can unfreeze and redo the freeze with the new automation, but I have no idea what FX VST's are new in the rack of each frozen track and what is old. ..so that means I can't be 100% sure what FX was on or off when it was first frozen etc. That would need to be tested for each track with comparisons.... between the old and new freeze and so on... I can't do this for 130+ tracks... Maybe if I had like 10 tracks, but that's not the case.
-
I can try, but I don't think it does. I actually accidentally just discovered, that in another version in the project, the audio engine is stopped at the same point, but that corruption cannot be reproduced on that same track. Yeah, Ozone Pro Imager was actually missing on that very track in that version, but I added it and made a freeze and the corruption still didn't happen. Even though the corruption is actually there some where even in that earlier project. But it's on another track I guess. It's moving around. ... I guess the whole project is corrupted. I hear clicks and pops (without audio engine being stopped all the time) here and there in the project. It's a real mess. It gives me so much work I will maybe not even be able to finish it there. Will probably have to bounce everything very carefully, and just move to another DAW to finish. This is not the first time my projects are corrupted this way. I'm using the latest version of Cakewalk by the way.
-
And also to @Wookiee I tried adjusting the BounceBufSizeMsec as you instructed, both to 10 and 20, but it didn't help so I put it back on 0 which was there by default for me. Update #2 I have 3 FX plugins on the track in question. 1. Simplon (enabled), 2. Pro-Q 3 (disabled) and 3. Ozone Pro Imager (enabled). What I discovered is that: if I disable Simplon, with Pro-Q 3 still being disabled but Ozone Pro Imager enabled, the corruption does not happen. If I let Simplon be enabled, Pro-Q 3 disabled OR enabled and Ozone Pro Imager disabled, the corruption does not happen. the corruption occurs if both Fabfilter Simplon and Ozone Pro Imager is both enabled. Fabfilter Pro-Q 3 doesn't matter whether it is enabled or disabled. the corruption occurs also if Simplon is disabled, but Pro Q 3 and Ozone Pro Imager is enabled. the corruption does NOT occur if Simplon and Pro Q 3 is enabled, but Ozone Pro Imager is disabled. This is a real mess, and I guess @Wookiee is correct about the project being corrupted in much deeper ways, since there's not really a crystal clear logic to what causes this, since neither Simplon or Ozone Pro Imager does cause the problem by themselves only, but they might or might not cause the problem when combined with other plugins. I've had projects seriously corrupted before, I mean REALLY seriously... total mess. The more you try to fix it, the worse it gets. It's NOT fixable, and the only thing you can do is to go back to earlier versions before the corruption even started. Now I feel I'm on my way to this... the corruption use to start small, with small stuff, to get worse with time, until the entire project is so corrupted that trashing it is the only thing left to do... it's almost like a virus, spreading beyond control no matter what you do. I've written about this before in the following thread:
-
Update: I cannot figure this out. 1. Copying the corrupted wave file (the one with the red circle) into a new project in Cakewalk will actually allow to play through the clip, with a click/pop where the corruption is. But the audio engine seems to stay stable in this new project! The audio engine is only killed at that spot in the original project file. 2. The above fact makes one think that it is the plugin itself that is causing the problem, not the waveform. But either disabling the plugin, turning of the FX plugin rack, or even deleting the Fabfilter Simplon entirely from the track, does not solve the issue with the audio engine dying when playing back the corrupt waveform in the original project! With other words, the corrupted waveform will play through in a new clean project file, with only a click/pop where the corruption is, not disturbing the audio engine. While playing the same file in the original project will NOT play through,... it will kill the audio engine, no matter if I disable or even delete the plugin that seem to be causing this. Kinda odd?
-
@David Baay & @Wookiee Indeed it was! It's Fabfilter Simplon. Disabling it took care of the problem! @Bristol_Jonesey Can't do that any more. Yesterday I could bounce tracks, even though the bouncing function gave me the wrong results. Today, I cannot bounce at all. I'm writing about exactly this in another thread right now. However, when I disable the FX plugin Fabfilter Simplon, this wave corruption will not happen.
-
[SOLVED] Bounce multiple tracks to 1 stereo track?
pulsewalk replied to Salvatore Sorice's topic in Instruments & Effects
@msmcleod an update. Creating a new clean project, adding some VSTi's freezing them and doing the same thing as above, indeed creates one bounce track only. It works fine!!! Going back to my other project with the many tracks, ...it still doesn't work. -
[SOLVED] Bounce multiple tracks to 1 stereo track?
pulsewalk replied to Salvatore Sorice's topic in Instruments & Effects
@msmcleod i give up. I've tried again, default settings as before, looks exactly like what you're doing in the video. This time it didn't bounce anything at all. I have no idea why. It seems very buggy. The display shows "Flushing 73 Plug-ins", then "Mixing down audio", then it seems to be done, but now there's not even generated a new track. Nothing is generated. Yesterday, at least I got 8 new generated tracks, even though it should've been only one. Not I get 0. This is when I chose <136> New Track I've also tried to chose an earlier, already existing, bounce track, to put it there. Same result. Nothing happens. Seems very buggy the whole thing. Always been for me. I'm running the latest and final version of CbB. -
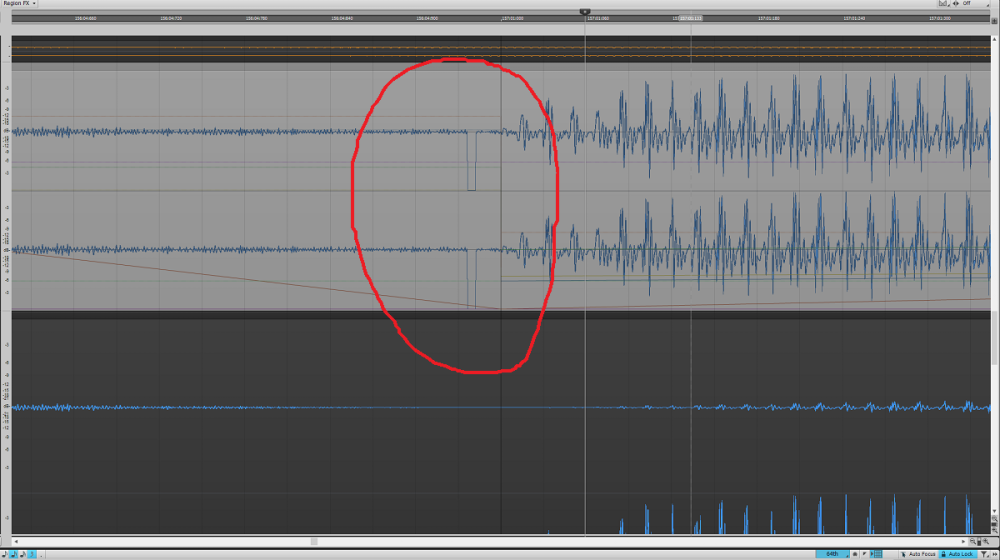
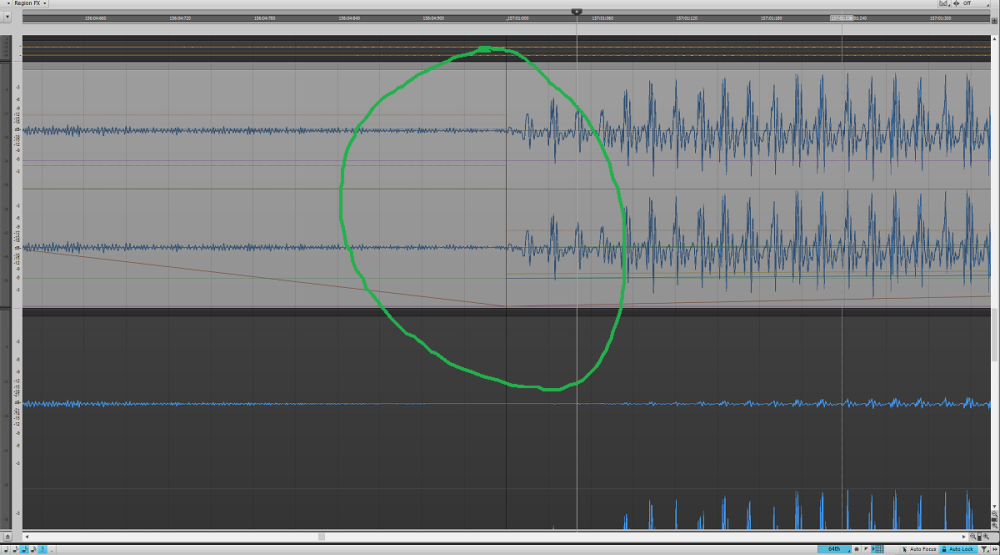
Alright, so I'm working on a project, trying to clean it up from like 150 tracks, so I can reduce to maybe a 100. So I'm freezing tracks to make it lighter on the CPU, trying to put smaller clips from several tracks and gather them on the same track and so forth, anything to reduce the number of tracks. And then suddenly I get to a point when I get a dropout every time I play past a certain point in the project! I just cannot understand what it is. The audio clicks and pops harshly, and playback is halted! Every single time I play it over a certain point. And then when I try to play the track, it just keeps clicking and popping no matter where I put the play cursor, no audio more than harsh clicks and pops. So then, I either I have to restart the whole thing, or if I'm lucky, I can change the buffer settings for my audio driver (so the settings are reset that way), press the panic button in Cakewalk, and with some luck I'm able to play again (works sometimes, but sometimes don't and I have to restart everything). But no matter what I do, I cannot play through a certain point in the project! It's just stops right there! I can play before that certain point, and I can play after it if I "jump over" it, but I can never play through it without the audio just going dead with clicks and pops. So I decide to go track by track and finally I find the track which causes the problem. It's just a simple audio file. The thing is, I even bounced it out to another track in case the source track was corrupted somehow, with no luck. Even the bounced track caused the audio to stop working in Cakewalk. Finally, I zoom in on the waveform and find the corruption in the attached image (circled with red). Can you see the waveform dipping like a huge square? I have no idea where that come from, but it was NOT there before. I was most certain it got there when I chose to freeze the track! So I've done some tests and this is what I came up with: It is the freezing that causes it. The original waveform, before freeze does NOT look like that! Look at the attached image, circled with green. If I unfreeze it, it goes back to normal, fully playable. If I freeze it again, the waveform gets corrupted again, not playable through the corrupted point. If unfrozen again, it both look fine and is fully playable. If I open the file in Wavelab, directly from Cakewalk, the error is shown in Wavelab too, BUT it plays just fine in Wavelab! If I save the corrupt file in Wavelab, it shows up just fine when I open it again (no corruption shown) and it plays fine in Winamp too. If I open up this same file in Cakewalk, it shows up fine again without corruption. With other words, saving it in Wavelab seem to automatically correct the problem. I might add, that this have happened to me lots of times before, and each time I almost pulled out all my hair because I could never find the culprit. Every time I had to revert to an earlier version to be able to work the project again, resulting in having to redo a lot of work. Now, I know better. So what is this and why is Cakewalk so very sensitive to this when Wavelab just ignores this corruption? And why is the freeze corrupting the waveform at all?
-
[SOLVED] Bounce multiple tracks to 1 stereo track?
pulsewalk replied to Salvatore Sorice's topic in Instruments & Effects
I've done exactly what you wrote, trying to bouncing 8 stereo tracks into 1 stereo track, but all I get is 8 bounced stereo tracks. It does not matter one bit if I select Source Category "Tracks" or "Entire Mix" or "Tracks Through Entire Mix"... it just wont bounce to one stereo track what ever I do. I tried to select the tracks I want to bounce. I tried to solo them, and so forth. I've read somewhere that all other tracks must be muted. I got around 150 tracks in this project, I do not want to lose the mute settings, so muting is not an option. Also, the correct tracks behind the "the chevron to the right of the sources" are correctly selected, but that does not matter. Still cannot succeed. Selected channel format is "Stereo". Why on earth can I not succeed to bouncing several tracks into one track in Cakewalk? What am I doing wrong? In my fantasy it should not be more difficult than to simply selecting the tracks one want to mixdown/bounce to one track, go to the bounce dialogue and chose to "Bounce to one track" under the "Destination" pull down list. Instead of selecting "Bounce to several tracks" or something like that. Are there some technical limitations to achieve this very basic feature? -
Yeah, that's one solution for sure. But if I need to split them, I guess I can't split them back to as they were.... so I guess that's what grouping is for.
-
Yeah, that's sidechaining a compressor. But I'd like volume ducking only, to an inverse signal peak, like in my video. Just as they do in FL Studio. I'm not sure if this is at all possible with Cakewalk?
-
I'm trying to select several clips and adjust their volume/gain, but only the clip I'm moving the red line on is actually adjusted. I also tried to put them in the same Selection Group, but that didn't do anything for this. How do I adjust the clip volume/gain for multiple selected clips at the same time? It would take a long time to go through many clips if I want to set them on the same volume. Of course, one can adjust the whole channel volume, but I would rather adjust the clip gain instead in this case.
-
Bit depth question, different from other
pulsewalk replied to Pathfinder's topic in Cakewalk by BandLab
Always work the projects in higher bit depths, 24bit minimum, for the larger headroom. 32 bit is preferred, or even 64-bit floating point if the DAW allow it. Do never lower the bit depth before mixing and mastering is finished. Once you dither the bit depth down, it will not matter if you bring it back to high bit depth, the information is already lost. Much like scaling down the resolution of an image, and scaling it back up again - the damage is already done. So keep working in high bit depth till you're done, do the mixing first, do the mastering first, and then, after you're finished, do a dither down to 44,1kHz / 16bit. -
So, I'm trying to use a method where the reverb signal ducks to an inverse signal peak, like in the following video. But I cannot find where to set such controllers so they're automatically adjusted to an inverse signal peak. Anyone know how to do this? (of course, I could just sidechain it in the ordinary way with a compressor, but this method gives a different sound):
-
How can I bend the automation like to make it curved? For sure, one can draw it quite smooth with many anchor points, but the automation line is created to be curved in some cases and I'd like to do that manually. Is that possible? And yes, it is possible to choose among some pre-defined curves. But is it possible to make manual curves like in Illustrator for vector graphics to name an example?


