

-
Posts
96 -
Joined
-
Last visited
Posts posted by Helios.G
-
-
9 minutes ago, Alan Bachman said:
I suppose it can be archived, but is the same think accomplished by simply clicking on it in the effects section, so it is clicked off?
Not sure. I'm going to try what Outrage suggested though, it makes more sense to me.
-
21 minutes ago, OutrageProductions said:
Yes. Then resave the template and compare load size & time.
Awesome. I'll try this out soon as I get in. I'll let you know if it works, thanks!
-
54 minutes ago, OutrageProductions said:
I have huge scoring templates with 120+ tracks with separate articulations and have the track/instrument Archived until I need it. That way the entire template loads quickly and with minimal RAM until I activate the track, at that point there may be a small wait while the samples load.
Oh, this sounds interesting, so I load up a vst in it's folder like normal, then just hit the A button?
-
1 hour ago, John Vere said:
I believe the way it works is if a VST instrument is in the project but not playing anything it is only using Memory not CPU. So most of us have enough memory these days that this is not an issue.
Huh, that's interesting. If that's right, then I shouldn't have any issues with this, I'll have to test it. Thanks.
-
Hey Guys/Bakers,
I'm still here building my custom production template and am almost done. I was wondering, is there a way to load up a vst instrument and have it on standby but not actually loaded in the session? For example, you can load a plugin chain and deactivate all fx until you want to use them. Is there a way of doing this with VSTi's?
EDIT: Hey guys, thanks for everyone chiming in and trying to help me, I tried all the methods described here, and they all helped, but I ended up going with setting up the vsti's I needed then playing a dummy midi note and freezing the track. I just felt that was easier and less hassle for my set up since I literally only use virtual instruments sporadically. Thanks again for trying to help me out.
-
11 hours ago, Dazzla said:
I messed up by recording vocals with the gain on high for 1 section of a song. Not that part of clipping. The other sections of the vocals are alright. What can I do to control the clipping for that section.
Ive tried to utilise tdr nova EQ with the threshold function on because I thought it would help in compressing the frequencies causing clipping. But it seems that the offending frequencies are widespread over the high end.
I know the right way if to re record the track but that bit an option now.
If it's a small section, best advice I can give is to go back and re-record that section. There are plugins that will use trickery to mitigate some of the damage, but in my experience they never quite sound natural. If it's a very short portion, like a one word, or a couple of words, and the project isn't going for commercial/major label release, then maybe just clip gain it down to match the other phrases in that section and call it a day.
-
4 hours ago, 57Gregy said:
I don't think so from 1 MIDI track.
Many drum soft synths have multiple audio outputs, but I don't think you can do that here. Try asking on the main Cakewalk forum or Instruments and Effects forum.
I usually have each drum on a different MIDI track.Hey Gregy, just an FYI, I figured out what was going on on my end here. You have to put the keyboard in DAWRec mode in it's settings for it to track out properly in cakewalk. You lose Arpeggio functionality, but it lets you hear only the track selected when highlighting different tracks as intended.
-
 1
1
-
-
4 minutes ago, 57Gregy said:
I don't think so from 1 MIDI track.
Many drum soft synths have multiple audio outputs, but I don't think you can do that here. Try asking on the main Cakewalk forum or Instruments and Effects forum.
I usually have each drum on a different MIDI track.Yeah, I figured as much, no problem, I'll just have to get creative with my routing then. No worries though, you saved me from a major headache today! Thank you
-
2 minutes ago, 57Gregy said:
No, set all inputs to None. Try that.
That worked! You're a lifesaver Gregy! One last question. I'm making my template so I can get to creating much faster, for each section I have a folder with a midi track and an audio track for bouncing down ideas later. So far I've only set up the bass folder, and ran into the routing issue with my second folder, drums, when I reached out to you. My question is, setting up bass with it's one instance is relatively easy. Is there a way that I can split the drum kits parts to different outputs, so like Kick, snare, toms, etc? From one midi instance?
-
7 minutes ago, 57Gregy said:
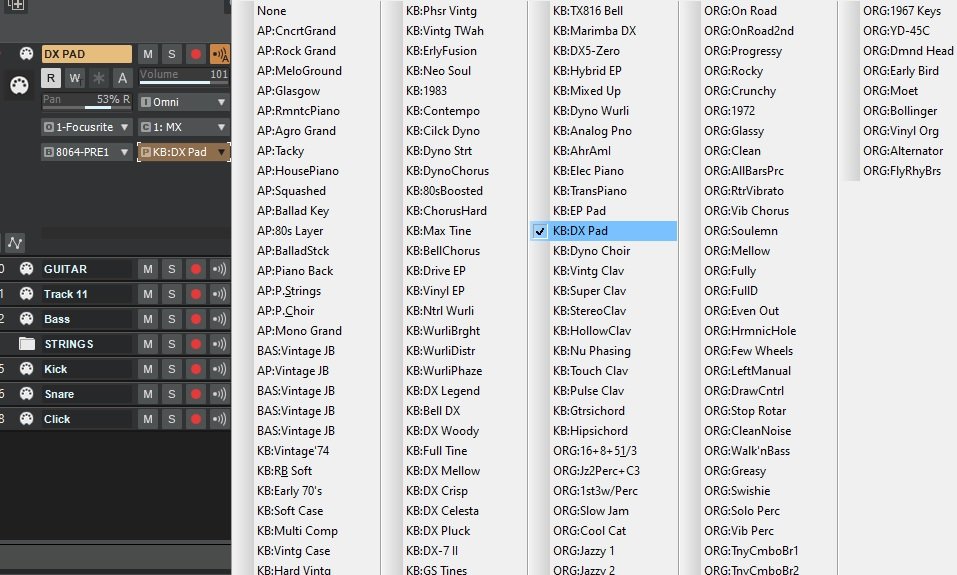
So, when you press a key on the MX 49, all of the tracks play with their chosen patches? Or the same patch as the track you're playing?
I don't know how that happens except if all the tracks are using the same instrument and channel. I always use different channels for each track. I don't recall going up to or past 16 MIDI tracks at a time through the MX, but it seems like using different banks would keep them from playing the same patch even if they were on the same channel. I would have to test that.
Also, make sure to turn off the inputs of all the tracks you're not playing through/recording on, especially if you use Omni mode.So if I understand you correctly setting each instance to midi omni would have them play their respective parts without triggering the same notes on each channel? I had it like that, so now I'm even more confused. I also tried to give each midi track it's own channel and that would result in silence in all but the 1st midi track. Thanks for getting back to me so quickly, I appreciate it.
-
On 11/24/2023 at 12:45 PM, 57Gregy said:
Download the instrument definition. Note where you downloaded it to.
Open Cakewalk by Bandlab, click 'P' for Preferences.
Go to MIDI>Instruments.
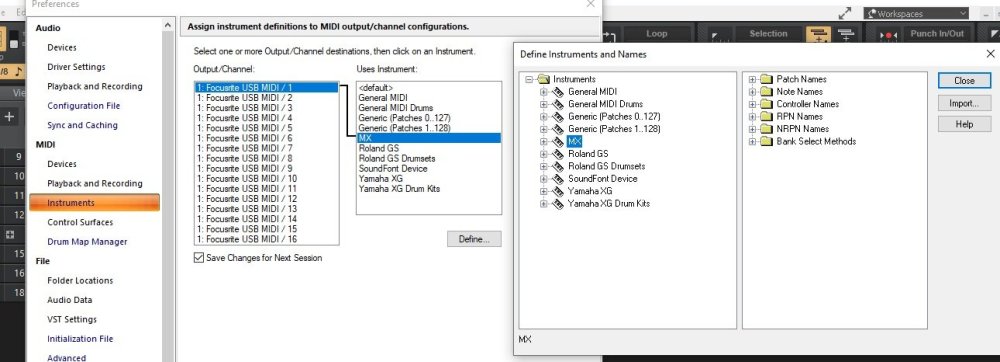
Hey 57Gregy, Sorry to bother you about this again but since you showed me how to do this, I sort of left it on the back burner. Today I was setting up a new production template ready to put your tips to good use when I realized I didn't know how to split the channels up so that each midi instance doesn't trigger the other. Would you mind walking me through how to separate channels so they trigger only the chosen instrument in the mx49? I tried using different channels in the drop down menu in cakewalks midi tracks, but all previous midi tracks would still play when I'd strike the keys. I'd really appreciate any direction here. Thanks!
-
1 minute ago, Klaus said:
After you've added your custom color to the first box in "Custom Color" via clicking the "Add to Custom Colors" button,
press the Tabulator key on your keyboard twice.
The first press will put the focus to the "Basic Color" palette, showing a black quadrat around one of the color boxes;
the next press will shift that quadrat to the "Custom Color" palette.
Now use the arrow keys on your keyboard to put the focus/quadrat to a different box where you want the next color added.
Thank you so much Klaus, that worked perfectly! To think I've been dealing with this for ages.
-
1
-
-
Hey everyone,
I'm building up my new production template and I came across a problem that's always bugged me but I sort of just dealt with it. When I create group busses and set up my preferred color palette, I'd like to save them in the boxes made for this, but it only allows me to save one color. The moment I try to add another color to my favorites, it overrides my last choice. How do you add more than one color in that section? Thanks.
-
1
-
-
17 minutes ago, anthony92800 said:
Thanks for letting me know, the version I was given was 2023.09.067.
Sorry about this happening to you. This is one of the main reasons why it's good practice to always disable any wifi before opening a session, cakewalk or otherwise.
-
Hey Everyone/Bakers,
I do a lot of vocal editing and production work. For years I've done this all pretty much exclusively in cakewalk (sonar back in the day). I've always had to color take lanes differently one by one manually, and I'd love for it to be automatically done, or at least have an option one can turn on or off for this to be done. Why? Because when you're comping a vocal, especially in heavy, very dense productions, it's useful to see visually which parts of the comp came from where. This is extremely helpful when going back for edits, or the ocasional "re-comp" when asked by a producer. Personally, I'd find it useful for double tracking, as I usually make doubles, and sometimes harmonies from the takes that weren't utilized in the final lead comp. Just my 2 cents, but I think this would be a cool feature to have.
-
1 hour ago, RICHARD HUTCHINS said:
Happy Xmas everyone,
I'd just like to thank every member who has over the year, taken their precious time out to answer my questions; most if not all of my queries were basic novice stuff, but the problems always stopped me moving on with my projects despite the solution being pretty simple. No one lost patience with my stupidity and many answers were comprehensive and educational.
So thanks every one, and particularly John Vere for his comprehensive answers and greats videos,; I seem to spend much of my life on hold to vast call centres run by corporations who really don't give a Rat's A**se about me or my problems, as long as they get my money.
But here on this forum, there's a different philosophy, and its very refreshing. And no, I haven't had a Christmas drink! ( Yet!)
All the best and thanks again.
Richie
Merry christmas.
-
1
-
-
Compressors have 2 basic functions. The 1st is to control/lessen dynamic range. So if you have a sound that has parts that are too loud, and parts that are too soft, you'd use a compressor to even out the level to a more manageable dynamic range (volume). The second basic function is to glue things together and make them more cohesive. Think bg vocal bus, drum bus or the master bus for example, where you'd use light compression to make everything gel a little. There's also a third, but this is a bit more subjective. Some compressors (think vintage, analogue type, and those modelled after them) have a certain tone/character that they give a sound when you run audio through them. In these cases you'd use these types of compressors for dynamic control AND the tone they'd give you. If you're a beginner, I'd focus on the 1st two basic functions, and worry about tone after you feel comfortable with that first. Good luck.
-
9 hours ago, Variorum said:
Don't forget you can select all channels on the left (Shift-Click) or multiple channels (Ctrl-Click) to speed things up 😁

Nice tip Variorum, thanks!
-
Thank you so much for posting this 57Gregy! This is really really helpful!
-
1
-
-
4 hours ago, 57Gregy said:
The ins. files will allow you to choose banks and patches of the instrument from within Cakewalk's MIDI pane. You won't have to select a thing on the keyboard (once it is set up right).
Oh, this is quite awesome! So how does one install this? I'm honestly floored I'd never heard of this, lol. Thanks for clearing some of this up for me btw
-
On 4/12/2021 at 7:27 PM, 57Gregy said:
Hey 57Gregy, forgive my ignorance, I have an mx49, what do these files do exactly? I've used mine to lay down midi and record directly from the synth itself inside cakewalk. Is there something I've been missing or doing wrong all this time?
-
14 minutes ago, Glenn Stanton said:
most pitch shifting plugins aren't great in low latency mode. i generally track without any plugins and try to use direct monitoring to avoid any latency effects in monitoring. and if someone needs a bit of reverb, i'll use the mixer built-in reverb... 🙂 then just adjust the recorded tracks by whatever the latency setting shows (e.g. if 5ms or 10ms, then shift things left 5-10ms) and done. i've found it just safer to get recordings without any possible glitching due to plugin overhead or even mysterious system occurrences 😉
I use plugins to monitor with Reverb, usually sonitus for these purposes. I set up two tracks, both with input monitoring on. I place sonitus with a room verb on at about 60% wet on the 1st track, and the 2nd track is dry. when the artist is recording, they hear themselves through the sonitus plug, because of the nature of reverb having some natural decay time, it doesn't sound off or unnatural to them, and I get the dry version for my purposes with the other track. I use this trick for a lot stuff. Takes some finagaling depending your system specs, but even for simple setups, this usually works great.
-
1
-
 1
1
-
-
6 hours ago, Lord Tim said:
Resolve doesn't do a lot of of MIDI and soft synths and routing that CbB allows you to do, unfortunately, so if you're serious about scoring to picture (as opposed to mixing to picture, which Resolve is more than capable of doing a professional job) then you'd need a dedicated DAW of some kind.
There are a few shortcomings with video in CbB at the moment that I've brought up with the devs and it's on their radar, but I doubt we'll see anything like that soon since the focus is on rolling out the final CbB and bringing the first Sonar online with the new UI, which is a massive job in itself. Hopefully we see some love in that area in the future though.
But yes, until then, Andres and Jimbo have excellent advice. It can certainly be done (I mixed short film about 2 or 3 weeks back, in fact) but you have to deal with the workarounds.
")
Yeah Tim, I think I conflated mixing to picture with scoring in this case. My bad.
-
I am not a professional arranger by any stretch, but for scoring Davinci Resolve is what I go to. It's got a daw built in, and it's editing features for video are pro level. Me personally, I'll never leave sonar/cakewalk, unless it dies again, but for video/film I don't touch it. Oh, also, davinci has a free version that is full functional, with the exception of some fancy effects plugins for video. Which in your scenario shouldn't be a problem. Just my 2 cents, good luck.
Sonar pop up screen
in Cakewalk by BandLab
Posted
Same, been waiting to see how many people this hit this morning.