


-
Posts
63 -
Joined
-
Last visited
Posts posted by Tim Elmore
-
-
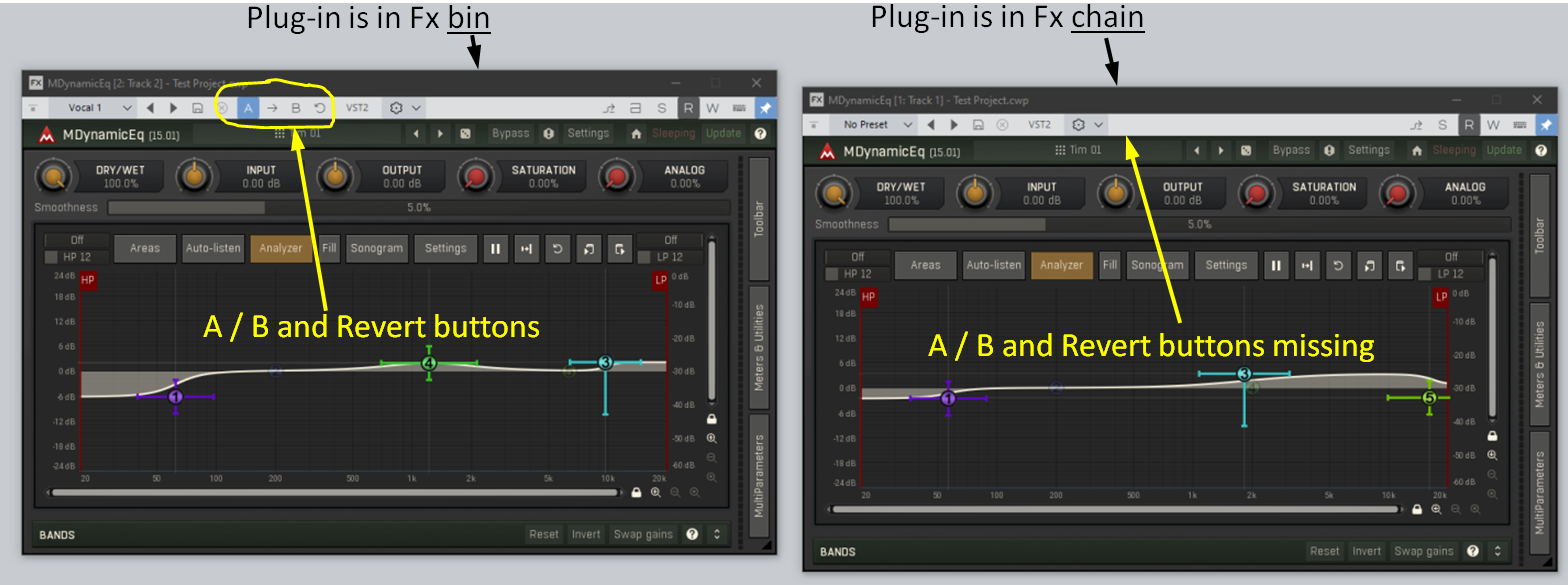
Sonar recently introduced the handy A/B Plug-in Settings feature. This lets the user toggle between two plug-in setups or revert to the original setup. Please make this feature consistent so it will apply to plug-ins that reside in an Fx chain, not just plug-ins in an Fx bin.
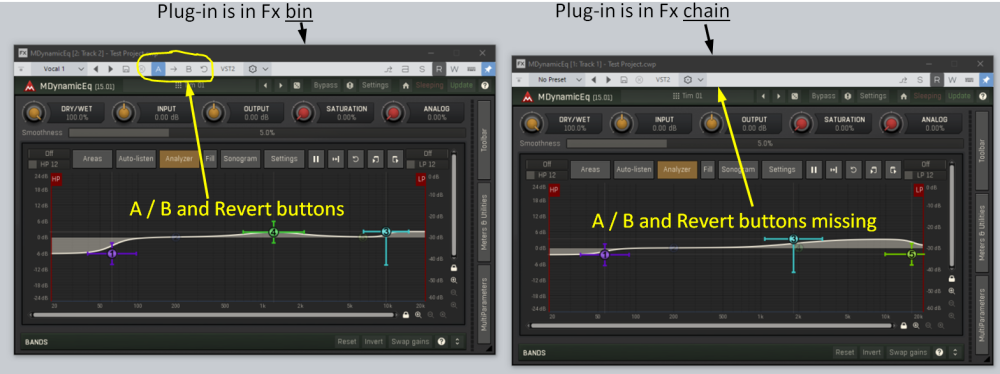
I often put an Fx chain in the Pro Channel so that I can put a third-party plug-in between two Pro Channel plug-ins. It would be really helpful to be able to use the A/B settings feature in these cases.
-
 1
1
-
-
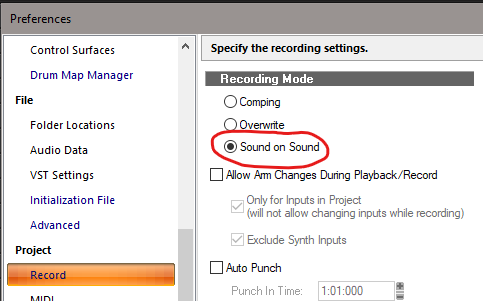
Regarding "pre-roll" recording, I handle it like this:
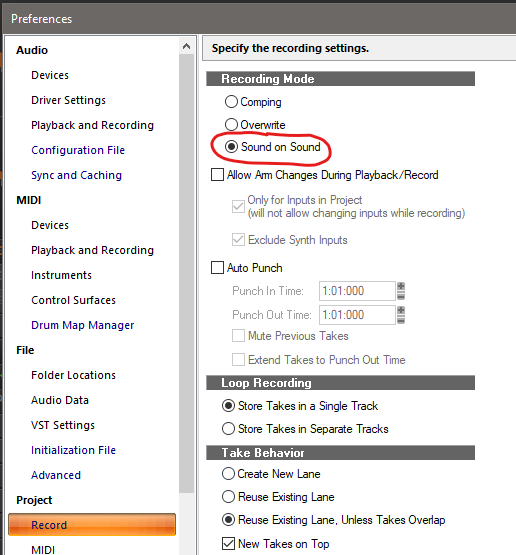
Leave the Recording Mode set to Sound on Sound:
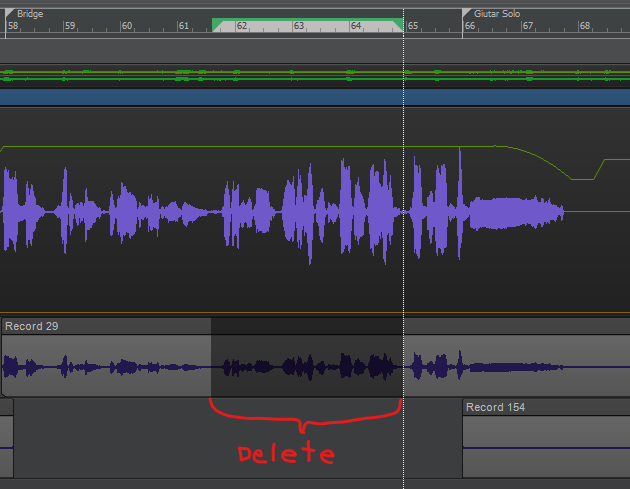
1. Instead of setting punch-in and punch-out points, just left drag the mouse cursor over the part of the track you want to redo. Then press <Delete> to erase that section.
2. Left click the mouse where you want to start rolling (this sets the Now Time). This can be earlier than the portion you deleted.
3. Hit Record. Recording will start immediately at Now Time. You will hear the undeleted part of the old recording, which does not get erased, but you will be recording alongside it.
4. Keep recording until finished and then stop the transport.
5. You will see the overlapping old and new clips in the Take Lanes display. Choose the best place to transition from the old to the new and edit the clip ends accordingly. You can even cross fade the two clips. This is how I get smooth transitions for instruments that tend to play continuously, such as piano.
Now that I am used to it, this is as easy as using punch points. Some people will prefer to stick with conventional punch points, but you might want to give this a try to see if it does what you want.
-
Temporarily changing the track color is a step backward in convenience compared with CbB, but at least it's a usable workaround for Sonar. It's certainly a better option than changing the entire theme whenever I need to edit clip gain. Thanks for the suggestion.
-
Thanks for the response. I have the "Display Clip Fade/Envelope Attenuation" option unchecked. That is why the waveform size is not displayed larger where the gain is boosted.
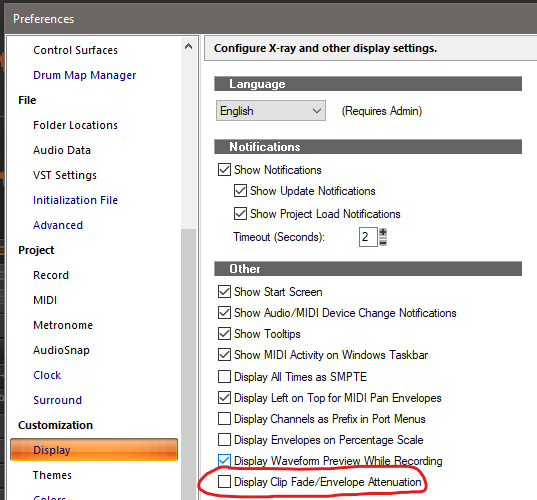
When the box is checked, the display behaves exactly as you described. I tend to adjust gain automation by ear instead of by the display, so I leave this box unchecked.
-
2
-
-
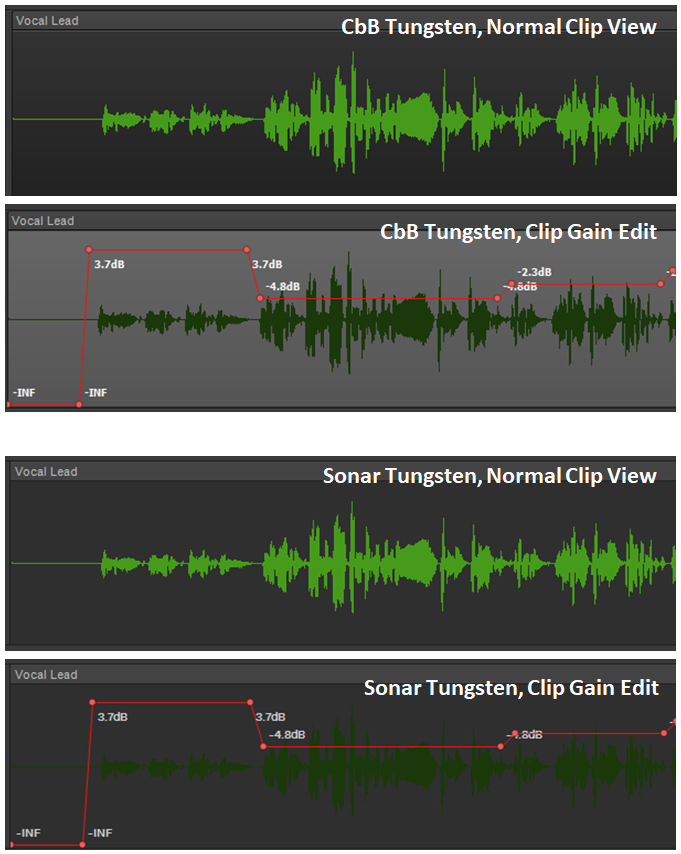
I am trying to do clip gain automation in Sonar while using the Tungsten theme. When the clip is displayed normally (not doing gain editing), the waveform shows up very well. However, when switched to Clip Gain Automation mode, the waveform background is dimmed to the point where the waveform virtually disappears. It's like editing blindfolded.
This is very different from CbB in Tungsten, where the waveform background turns to medium gray during clip gain editing, and the waveform is still clearly visible. Here is how CbB and Sonar compare:

In Sonar, this doesn't improve much at all if I switch to the themes Dark, Dark Gray, Mercury, Cosmic, Tungsten Classic, or Mercury Classic.
Is there any setting that will keep the clip waveform from virtually disappearing during clip gain editing? I have been looking for any settings that might affect track highlighting or clip highlighting, but haven't found anything.
-
1
-
-
For the experiment, I used 64 samples to make it easier to reach the breaking point with a simple test project. Normally I stay at 96 samples for both recording and mixing, and that works pretty well for the plug-ins I use. The latency is a tolerable 9.8ms, and by keeping it the same all the time, there is one less setting to keep track of when switching between recording and mixing.
Still, I wanted to explore the performance of Sonar. But my system sees negligible improvement while others are obviously enjoying much more impressive gains. I wonder if something about my configuration keeps Sonar from performing better than CbB.
-
After hearing about the performance improvements of Sonar, I decided to try it out for myself. My configuration is as follows.
Processor: Intel Core i7 4th generation at 3.4GHz with 16MB of RAM. It has 4 cores with two threads each.
Audio Interface: Roland Quad-Capture, running with native ASIO drivers.
ASIO buffer size: 64 samples.
Sonar version: 2024-09-MEM (Build 105, 64 bit). It is not activated, as I want to try it before buying a license.
The test project consists of 50 tracks. Each track has a pink noise clip and three instances of the TDR Nova compressor. No other plug-ins are used.
CbB results:
All 50 tracks active: CbB stops after a fraction of a second due to long dropouts.
49 tracks active (one track is archived): Playback has frequent drop-outs, but continues to play.
48 active tracks: Playback is steady.Sonar results:
All 50 tracks active: Sonar has frequent dropouts, but continues to play.
49 active tracks: Playback is steady.In this test, Sonar plays one more track than CbB, or about 2% more. Is this the expected amount of improvement for Sonar over CbB?
Could my processor or audio interface keep me from being able to take advantage of the Sonar performance improvements?
-
What types of transitions are you using for clip gain (Jump, Linear, Fast Curve, or Slow Curve)?
-
Have you tried adjusting the Fade On Start and Fade On Stop settings in Preferences?
Audio >> Playback and Recording >> Fade On Start
Audio >> Playback and Recording >> Fade On Stop

For my setup, 3 milliseconds works well.
-
Another way to access clip gain automation is to assign a keyboard shortcut. For example, I have "Toggle Track/Clip Gain" assigned to Alt+G. Now that I have done that, pressing Alt+G does the same thing as the three clicks the OP originally mentioned. Pressing Alt+G again returns back to regular clip editing. So there are multiple ways to get quickly into and out of clip gain editing. Pick whichever is most convenient for you.
-
2
-
-
7 hours ago, petemus said:
Had to check it out right away, so here's an exact sequence:
- Go to a bus in the Track View
- Select an automation envelope from the menu at the top of the bus pane so it becomes editable (the automation lanes are not open here)
- Click a plugin in the FX bin, leave the UI open or close it (the white focus brackets remain around the plugin label in the FX Bin)
- Select automation envelope nodes, either with the left or right mouse button
- Press Delete on the keyboard
- The plugin with the focus brackets is now gone from the FX Bin. If the envelope is not for that particular plugin, the nodes you thought you'd delete, remain. If the envelope was for the said plugin, the envelope goes with the plugin.
It's not an intermittent thing, happens every time with this sequence.
Seems to happen in the Track side as well, especially when you select envelope nodes by lassoing then with the right mouse button.
If I remove the focus from the plugins in the FX Bin prior to pressing Delete, the peration only deletes the nodes.
Unfortunately I tend to often open, say, a bus compressor UI and then start editing the threshold automation. Deleting any node with delete zaps the compresseor as well from the FX Bin, if I'm not careful. ?
I am running CbB 2024.02 (Build 098, 64 bit). I tried the sequence you listed and reproduced the issue.
In Track View, I added Sonitus EQ to the FX bin of a bus. I have some automation for Bus Input Gain, so I selected Bus Input Gain in the edit filter for the bus. I did not open the automation lane. I clicked the EQ plug-in to select it, and the brackets appeared around it, indicating that it was selected. Then I clicked a node in the automation. The node became highlighted, indicating that it was selected. I pressed the Delete key, and the EQ plug-in was deleted, but the node I selected in automation was not deleted, and was still selected. I pressed Delete a second time, and the node was deleted normally, and the EQ plug-in was still missing from the FX bin.
The same thing happened when I used an automation lane instead of setting the edit filter.
For me, this behavior happens only for buses in Track View, not for tracks in Track View.
-
1
-
To change the color of a clip, select the clip (left-click it) and then you can select the foreground and background color of the clip in the Inspector. If the Inspector isn't already open, the standard shortcut key is "I". In the Inspector, get access to the clip properties by clicking the Clip tab:

One way to do doubling in take lanes is to record with "Sound on Sound" selected (in Preferences >> Project >> Record). You can then record overlapping clips in separate take lanes within the same track. However, I prefer to record a double in a completely separate track because that provides independent adjustment of playback levels and other parameters (panning, effects, etc.).-
2
-
-
Unless you have changed the keyboard shortcuts, the space bar will start playback, not recording. The shortcuts work like this:
To record: Press R to start recording. Press space bar to stop and return to the starting point (what we call the "Now Time").
To play back: Press space bar to start playback. Press it again to stop playback.
To erase what you just recorded, you can do as Mark suggested and press CNTRL Z. You could set Overwrite mode and simply record over the original, but it will erase only the section you record over again.
-
1
-
-
One difference is that the Cakewalk PC2A (in Pro Channel) includes the R37 control to add gain reduction above 1kHz:
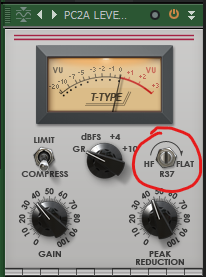
The Universal Audio LA2A plug-in appears to have the R37 control, but it is actually just part of the GUI image, not a settable control:
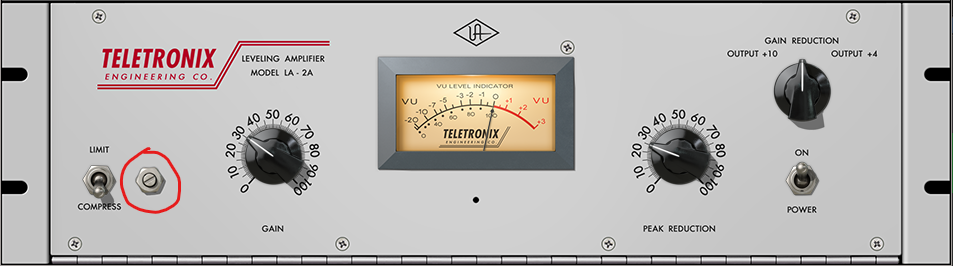
I haven't tested the LA2A yet to find out how their compression responds to higher frequencies.
-
For years, I have used this workaround:
1. Set the record mode to Sound on Sound:
2. Delete the portion of the clip you want to re-do by left-dragging the mouse across it, then press <DELETE>. Example in take lane view:
3. Click the mouse to set the Now time two or three measures before the deleted part, and start recording. You will hear the previous recording up to the part you deleted. During this time, anything you play will be recorded alongside the original. When you reach the deleted part, recording will continue, but you will not be distracted by the old recording. If you want, continue performing past the end of the deleted portion.
4. If you recorded anything during the two- or three-measure "pre-roll" (or after the end of the deleted section), the old and new clips will overlap. You can cross-fade these for a smooth transition.
For me, this is a little quicker than using the built-in punch-in feature, and allows me to record before the part I am re-doing, as in a pre-roll. I find it especially useful when "punching in" a piano part if the sound never completely pauses even for an instant. A careful cross-fade yields a seamless recording.
When cross-fading the overlapping clips, take lanes help a lot because they let me see the individual clips one above the other instead of superimposed.
-
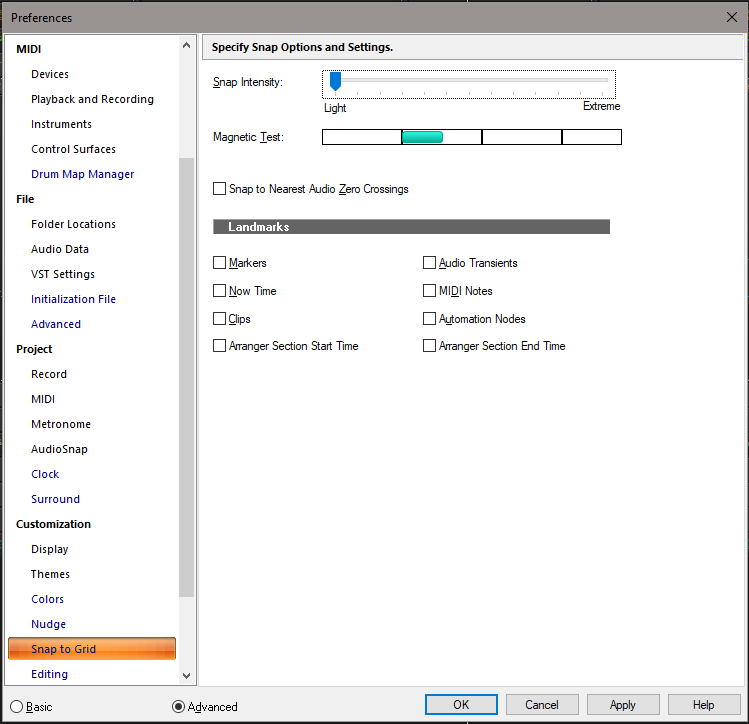
You may want to double-check your snap intensity setting in Preferences. If it accidentally got set to Light, as shown below, you wont have any detectable snap.
-
4 hours ago, sjoens said:
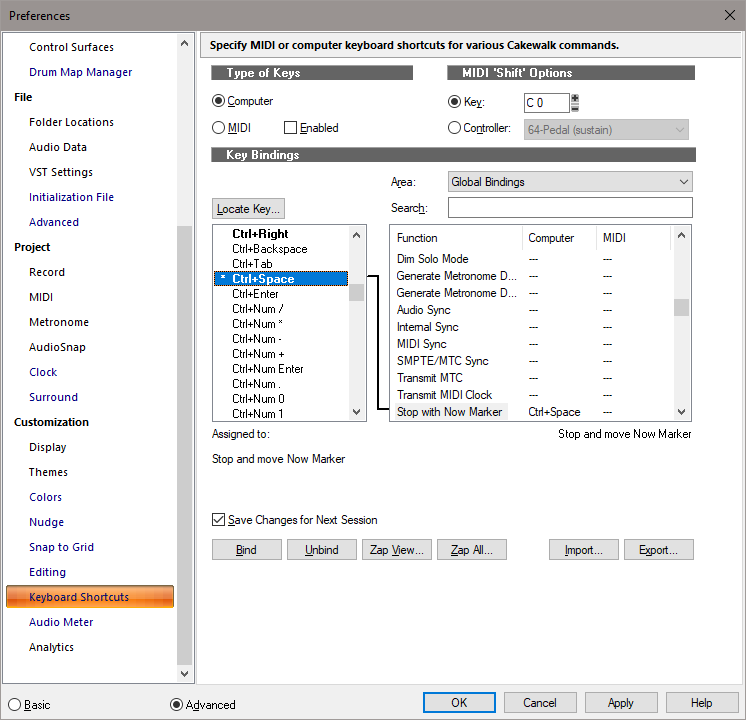
FWIW, Ctrl+Space is used to re-set the Now Time Marker when stopping transport. Preferences lists Ctrl+Space as "Stop with Now Marker" but not "Start" so I wonder if using it to start playback is simply ignoring the Ctrl key and only responding to the Space key. https://www.cakewalk.com/Documentation?product=Cakewalk&language=3&help=Playback.07.html
I think you're right. It makes no difference whether I start the transport using Space or Ctrl+Space. What matters is the key combination used for stopping.
It's interesting that, during the time Ctrl+Space didn't work, I verified that Ctrl+Space was assigned to "Stop with Now Marker." Then I went to Preferences >> Keyboard Shortcuts, clicked the Locate Key button, and pressed Ctrl+Space. There was no response. It was as though some Windows app was grabbing Ctrl+Space and it didn't reach Cakewalk.
Some time after that, the problem went away and Ctrl+Space now works as it should.
-
The default behavior is that pressing either Space or Ctrl+Space starts the transport. While the transport is running, pressing Space stops the transport and returns it to where it was when the transport was started. Pressing Ctrl+Space stops the transport and leaves the play position at the location where it was stopped.
Pressing Ctrl+w swaps the behavior of Space and Ctrl+Space. It looks like that is how you have it set. I sometimes set it like that myself, depending on what I am doing.
My problem was that pressing Ctrl-Space did nothing. It would not start or stop the transport at all. Now, after a few CbB restarts, it is back to normal again. I verified that I don't have any AutoHotKey or PowerToys shortcuts for Ctrl+Space. I might never find out why it temporarily stopped working. Right now, everything is fine again.
-
1
-
-
Until yesterday, when pressed Ctrl+Space, the transport would stop and move the Now marker to the location where I stopped. But now when I press Ctrl+Space, nothing happens. In Preferences, Ctrl+Space is bound to "Stop with Now Marker":
However, when the transport is running and I press Ctrl+Space, it doesn't stop. It keeps running. I checked to make sure the focus is on Track View and no dialog or message boxes are showing. Pressing the space bar by itself still stops the transport and returns to the original Now time, but there is no response to Ctrl+Space.
I am using CbB 2022.11 and have Workspaces set to None. What could I be overlooking?
-
To delete a phantom envelope, Shift+click on the envelope (to give it focus), then right-click the envelope and select "Delete Envelope" in the popup menu.
One way a phantom envelope can be created is if you draw an automation envelope for a plug-in and then delete the plug-in without deleting the automation envelope first. The envelope then becomes "orphaned" and shows up in the track view even though it no longer controls anything.
To see which envelopes are orphaned, open Automation Lanes. The valid automation envelopes will move to the Automation Lane, leaving behind the orphaned envelopes. I don't know of a way to delete them all at once. You may have to Shift-click and delete them one at a time. But you should be able to see them all.
-
2
-
 1
1
-
-
The response I received from Cakewalk Support suggested these two workarounds:
(1) Leave the Console docked (in the Multi-Dock).
(2) Disable Floating for the Console window.
For Option (1) to work, the Multi-Dock itself must be docked in the main Cakewalk window. But this prevents freedom to move and size the the console as desired.
Option (2) prevents the console from being freely moved and sized outside the Cakewalk main window.
I prefer the simple workaround outlined earlier:
1. Leave the Help module active (not closed).
2. If desired, dock the Help module in the Browser, out of the way.
3. If desired, hide the Browser, with the Help module still docked within it (press "b").
Plug-in panels will then remain on top of the console, even when the console has focus. The console can be still moved and sized completely as desired. It is an easy workaround, but not at all obvious.
I wrote back, mentioning that this has been frustrating to other users, and requested that either the problem be fixed or that the instructions be amended to reveal the above workaround that uses the Help module.
I hope this discussion has helped.
-
 1
1
-
-
Thanks Glenn. I created a task to export just the Master bus and it retains all my choices.
-
Presets save a lot of time, but a preset doesn't remember everything. For example, I usually have several busses for intermediate parts of the mix (vocals, drums, etc.). I have one master bus, and I only want to export from it. In the Export options, under "What To Export", I de-select all the busses except the master bus, and then export. I saved this setup as a preset, but I still have to de-select all the busses except the master bus every time I use Export. It would be really nice if the preset would remember everything, including which bus or busses I want exported.
-
1
-
-
Keni: Thanks for the reminder. I just now reported it to Cakewalk Support.
-
1
-
Sonar 2025.07 Feedback
in Cakewalk Sonar
Posted
Regarding the issue of plug-ins disappearing under the CV:
Open the Help module. The standard shortcut for this is "y". When the Help module is open, plug-ins that are displayed over CV will stay visible even after you click on CV.
If the Help module is fully closed (not just minimized), then clicking CV will put any plug-ins underneath CV (not visible). To keep them on top, the Help module must be open.
Since I don't want to have the Help module displayed all the time, I save screen space by docking it to the Browser, and then keep the Browser minimized when not needed. This keeps plug-ins visible even after clicking on CV. This costs a small bit of screen space where the Browser is shown as minimized, but it is the only workaround I have found.