-
Posts
87 -
Joined
-
Last visited
Everything posted by Tim Elmore
-
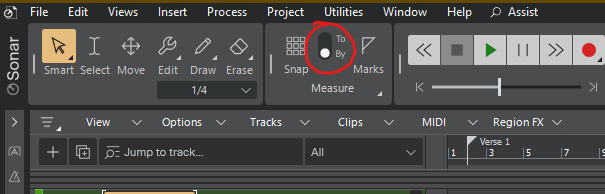
Switch the snap mode to "By" instead of "To": When the snap mode is "To", the clip will snap to align the left edge with the time grid, even if it wasn't aligned with the time grid to begin with. When set to "By", the clip will move in increments the size of the snap grid. For example, if you have the snap grid set to Measure and the snap mode is "To", the clip will move so that the left edge is aligned with a measure, which won't necessarily move it the distance of one measure. But if the snap mode is "By", then the clip will move forward or backward "by" exactly one measure at a time.
-

Incoming MIDI Data Displayed but Not Recorded
Tim Elmore replied to Tim Elmore's topic in Cakewalk Sonar
Thanks to everyone for your suggestions. Special thanks to David Baay, who posted the following on 11/11/2022 in the FAQ forum: --------------------------------------------------------------- Two possibilities: 1. You have inadvertently enabled punch-recording of a range later in the project. 2. CbB will show "confidence recording" of events arriving on other ports/channels than the one you've assigned as Input to the track so make sure the Input assignment is matching your controller. I consider this a bug. --------------------------------------------------------------- The second possibility he mentioned proved to be the culprit in my case. I had selected the wrong MIDI input. The data was displayed during recording even though it was not arriving through the selected MIDI channel ("confidence recording"). When I stopped the transport, the display showed what was actually recorded, which was nothing. Just now, I selected the correct MIDI channel and everything is working. -
Incoming MIDI Data Displayed but Not Recorded
Tim Elmore replied to Tim Elmore's topic in Cakewalk Sonar
Thanks for the suggestion. I checked the "Show Notes" option indicated in my screen shot above. I am now looking for the "Notes" option you mentioned, that allows one to record only CC data. Can you tell me exactly where to find it? BTW, I did reboot and try again with no luck. Also, the MIDI notes disappear from the Track View when I stop recording, just as they do in the PRV. -
Incoming MIDI Data Displayed but Not Recorded
Tim Elmore replied to Tim Elmore's topic in Cakewalk Sonar
In the "Notes" menu, "Show Notes" is selected. "Show Velocity on Selected Notes Only" (I think that is the one you meant) is not selected. The interesting thing is that the notes from the keyboard are displayed correctly while recording, but they disappear when the transport is stopped.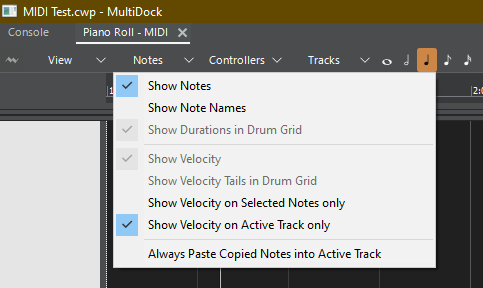
-
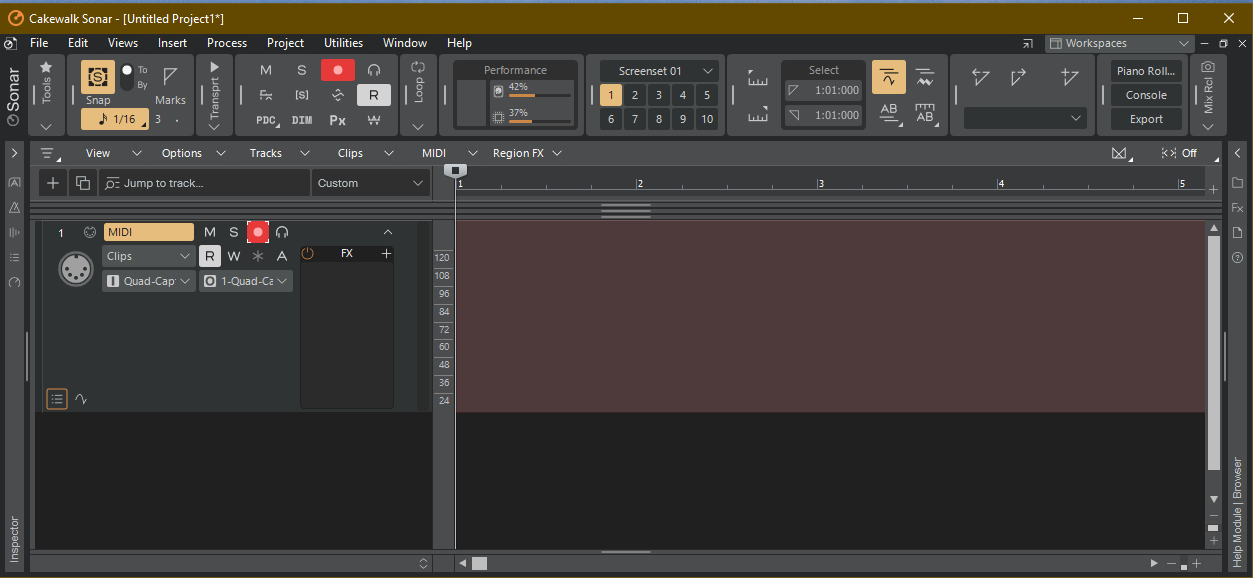
Sonar (paid version, 2025.09 Build 038) is showing MIDI data as I record, but the displayed data disappears when I press STOP. Here is a simple, one track project showing an attempt to record three MIDI notes. The data is displayed as the notes are played on the keyboard, but they disappear when I press the SPACE bar to stop recording. Video_001.MP4 Here is the Track View for the project (a single MIDI track): Here is the MIDI driver setup: The MIDI data must be successfully reaching Sonar because the PRV shows the incoming data as the notes are played on the keyboard. However, when I stop recording, the displayed MIDI notes disappear. This happens with old projects that were working properly the last time I used them, so this issue doesn't seem to be tied to a specific project. I just now made the above simplified project to illustrate the issue with as little complexity as possible. It seems as though the notes are recorded into memory, but are not written to the project file when recording is stopped. I verified that the Sonar project file is not write protected, and the HD still has over 500GB of free space. Is there any setting I may be overlooking that might prevent MIDI data from being written to the project?


-
September update has screwed everything up
Tim Elmore replied to Steve Moddelmog's topic in Cakewalk Sonar
Same problem here. After I installed the September update 2025.09 (build 025) this morning, I was able to run Sonar with a project, close Sonar, and then restart it later with no issue. However, I tried to start Sonar a few minutes ago and now have the same problem as shown above. My license is only about two months old. It was supposed to be for a one-year subscription. -
Unwanted Changes to Take Lane Order and Height
Tim Elmore replied to Tim Elmore's topic in Cakewalk Sonar
David: I tried your suggestion about creating a new Workspace in case my present one is corrupted in some way. The problem persisted. I think your first reply is spot on, where you suggested that my problem may be just another manifestation of the known issue where the visible elements of a project are not restored correctly. In one post about that issue, Noel suggested a workaround: Close the start screen right after opening Sonar, and then re-open the start screen. Projects should then load without the issue. I tried his suggestion and it solves the issue I was having. In another post, Noel said that the problem he was referring to will be fixed in the next update. I won't be surprised if it fixes my problem as well, since it appears to be the same basic issue. Thanks for pointing out the possibility about the related problem. That helped me find the workaround. I will see if the next update does indeed fix it. -
Unwanted Changes to Take Lane Order and Height
Tim Elmore replied to Tim Elmore's topic in Cakewalk Sonar
I set Workspaces back to my custom one, but unchecked all the "Load from Workspace" items: With my custom Workspace configured this way, the issue comes back. It is a mystery to me that a workspace having all items unchecked would affect take lane arrangements. The other part I don't understand is how this would happen only the first time a project is loaded after starting up Sonar. Does a Workspace affect only the first project loaded?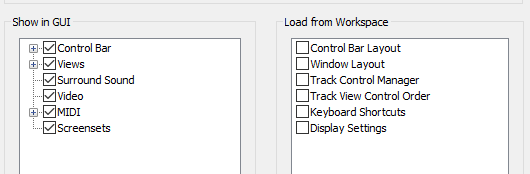
-
Unwanted Changes to Take Lane Order and Height
Tim Elmore replied to Tim Elmore's topic in Cakewalk Sonar
I tried changing Workspaces by setting it to None. The issue went away. Is this expected? -
Unwanted Changes to Take Lane Order and Height
Tim Elmore replied to Tim Elmore's topic in Cakewalk Sonar
I am using the paid Sonar, 2025.08. I use workspaces, but do not automatically apply them upon project load. Please try the attached project. It is just a single track containing test tones. Make sure to begin with Sonar not running, and then start it up. Load the project using the Sonar File menu, not by double-clicking the project file in Windows Explorer. After the project loads, note the order and size of the take lanes. Without saving, close the project, but leave Sonar running. Load the project again and compare the take lane arrangement with what you saw the first time. Take Lane Experiment.zip -
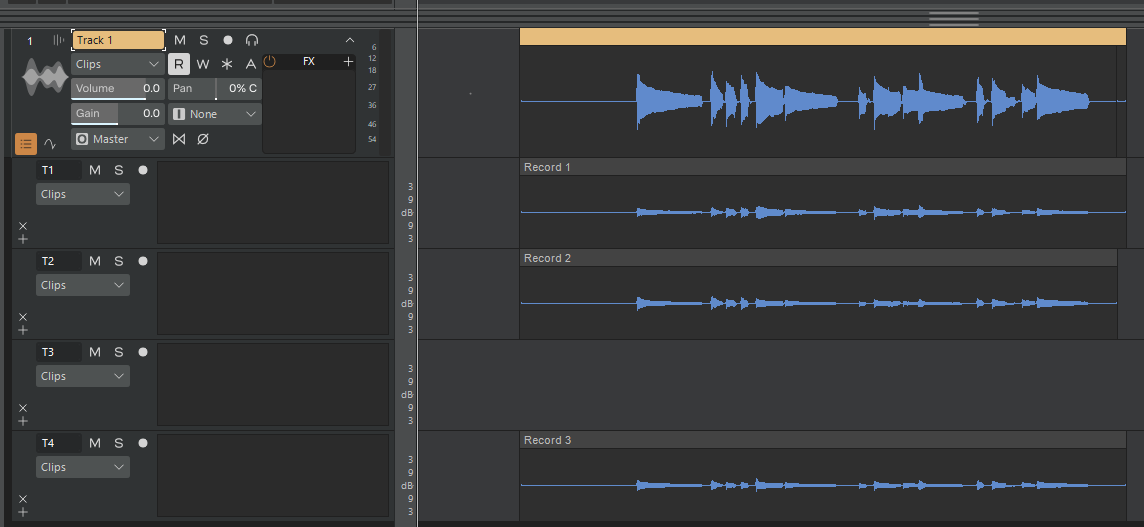
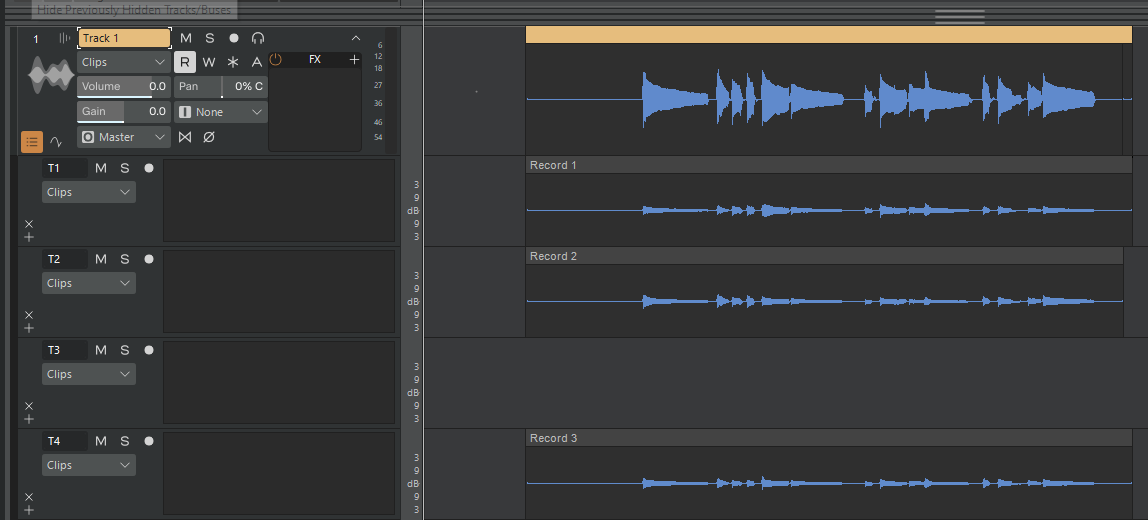
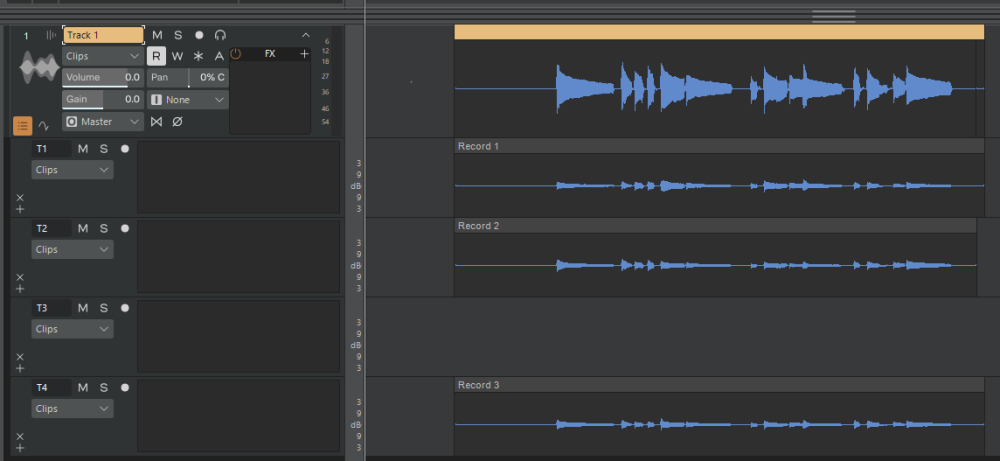
When Sonar loads a project, it sometimes changes the order in which take lanes are positioned, deletes empty lanes, changes lane height, and changes track height instead of leaving these properties the way they were when the project was saved. Here is a simple project having four take lanes on Track 1 (lane T3 is empty): With the lanes arranged as above, I saved the project and closed Sonar. Later, when I started up Sonar again and loaded the project, the track and lanes appeared like this: The lanes are in a different order. The empty lane (T3) has been deleted. The lane heights are smaller, and the track height is smaller. Without saving, I closed the project, but left Sonar running. I reopened the project. Everything was restored to its original, proper condition: All projects that are subsequently loaded have the tracks and take lanes properly arranged as I left them when they were saved. But if I close Sonar and launch it again, the issue recurs, but only the first time I load a project. This happens with all of my projects, so it doesn’t appear to be project-dependent. In summary, the rule is: After Sonar is started up, the first project loaded, and only the first project loaded, has the issue. As long as I leave Sonar open, all subsequently loaded projects have everything properly arranged. But if I close Sonar itself, the issue recurs the next time Sonar is launched. I first noticed this issue about two weeks ago, but I am not sure which Sonar version I was running. I hope this can be fixed soon. Meanwhile, the best workaround I found is: After starting up Sonar, open any project and immediately close it without saving it. From that point onward, Sonar will properly open that project or any other projects with tracks and lanes arranged as they should be.


-
Looking very closely at the existing knob, there is already a circle (actually an arc) all the way around the knob. It is orange in the region from zero to the current setting, and dark gray around the remaining part. The dark gray part of the arc is barely visible because it is almost exactly the same color as the face of the knob. If the dark gray part of the arc were simply changed to black, it would look like this: That would improve visibility without taking up space for an additional arc.
-
Audio clips and background / selection shades
Tim Elmore replied to Matt Rayner's topic in Cakewalk Sonar
The <alt>-click-drag also works in the last version of CbB, so it has apparently been around a while. I often do a click-drag (without the <alt> key) to select a segment, and then drag the selection to another location. If I make the selection and then press and hold down <ctrl>, I can drag-copy the selected part to somewhere else, and the original clip has no cut marks. There's a lot of flexibility. I hope they soon make the contrast consistent between selecting a whole clip and a partial clip. -
Audio clips and background / selection shades
Tim Elmore replied to Matt Rayner's topic in Cakewalk Sonar
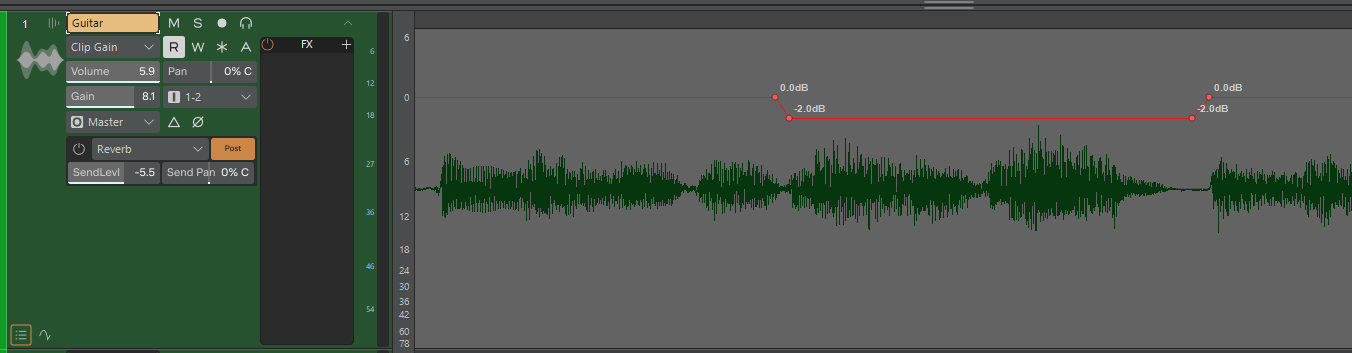
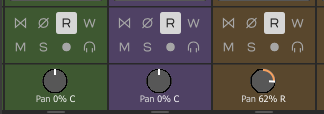
Another way to bump a small section down by 2dB is to edit the clip gain envelope like this: Would this be visually easier for you to work with?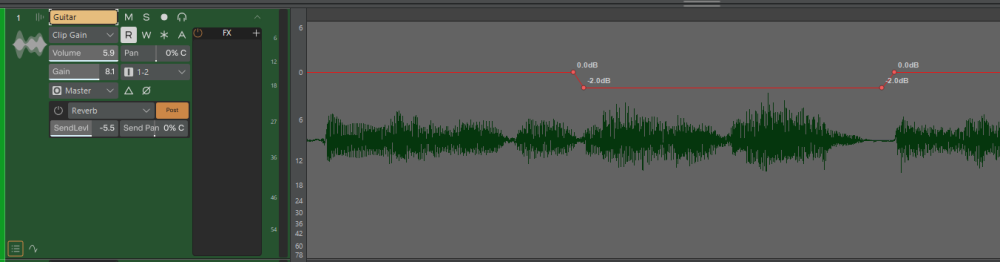
-
Undo causes Melodyne Region FX to close (and lose work)
Tim Elmore replied to Glenn Stanton's topic in Cakewalk Sonar
Melodyne will not receive keystrokes unless it has focus. No matter what you do, it won't see the Ctrl-Z keystroke, or any substitutes, unless you first click inside its window. Sonar will not allow you to unbind Ctrl+Z from its own Undo function. It is a dedicated keyboard shortcut. However, Melodyne will let you remap its Undo function. You could assign it to a keystroke that you don't have assigned in Sonar. Then, if you ever forget to give Melodyne focus before pressing your shortcut key for Undo, Sonar will ignore the keystroke, since it is not assigned in Sonar, and you won't lose your changes. Rather than go to that trouble, I just use Sonar's Redo function (Ctrl+R) whenever I inadvertently delete a Melodyne region. This restores the Melodyne region and all the editing that has been done. After hitting Ctrl+R, I click the Rx indicator in the edited clip in Sonar and choose "open editor." The Melodyne editor reopens and I resume editing where I left off. -
Undo causes Melodyne Region FX to close (and lose work)
Tim Elmore replied to Glenn Stanton's topic in Cakewalk Sonar
To verify your results, I created a Melodyne region, did some edits, and then switched to a different track. Then I clicked on the original track (that has the Melodyne region) and pressed Ctrl+Z. The Melodyne window closed and the edits were lost. This is the same result you experienced. After that, I tried it a little differently. After I returned to the original track, I clicked inside the Melodyne editor window before pressing Ctrl+Z. I pressed Ctrl+Z, and Melodyne undid its most recent edit. Melodyne remained open and the other edits were still in place. I pressed Ctrl+Z a few more times. After each press, another individual Melodyne edit was undone, until I had undone all the edits. I suspect that Sonar and Melodyne each maintain their own history lists. If that is the case, then it would work like this: 1. Sonar remembers only that it opened Melodyne, and does not track specific edits. 2. Melodyne maintains its own history of individual edit operations. 3. If you go to another Sonar track and then click on the original track (e.g. in Track View) instead of the actual Melodyne window, focus is still on Sonar. It will process a Ctrl+Z by undoing the last command in its history, which is "Open Melodyne." 4. If, however, you return to the original track and then click inside the Melodyne edit window, focus is then on Melodyne. From this point on, Melodyne (not Sonar) receives subsequent Ctrl+Z keypresses and applies them according to the edits in its own history. In the past, I have switched back and forth between tracks this way a number of times, with consistent results. On occasion, I have decided to discard my Melodyne edits, so I simply clicked in the edited track (outside the Melodyne window) and pressed Ctrl+Z to delete the Melodyne region. When you return to the original track (containing the Melodyne region), try clicking inside the Melodyne editor before pressing Ctrl+Z. -
Getting VST control panels to stay put on a second monitor
Tim Elmore replied to norfolkmastering's topic in Cakewalk Sonar
It also works if you dock the Console View in Multi-Dock and maximize Multi-Dock. I actually run it this way most of the time. My left-hand monitor always shows Track View, maximized. My right-hand monitor has Multi-Dock maximized and containing Console View and Piano Roll View. I can switch between full-size Console View and full-size PRV with a single click to the corresponding tab at the top of Multi-Dock. All the while, the plug-ins stay on top of Multi-Dock. So you can try it different ways to see what is most efficient for your workflow. I love it when software is this flexible. -
Getting VST control panels to stay put on a second monitor
Tim Elmore replied to norfolkmastering's topic in Cakewalk Sonar
Make sure you are running the latest version of Sonar (I am currently using 2025.08, build 004). Just a couple of updates ago, they fixed a problem where plug-in control panels didn't stay on top of the Console View. I have my displays set up the way you described: Left monitor: Track View (with waveforms) Right monitor: Console View, maximized. I often have plug-ins on top of the Console View, and now they stay on top, fully visible, no matter where I click the mouse. There is a setting in Preferences regarding this: + So verify that you are using the latest version and that the box is checked as shown above.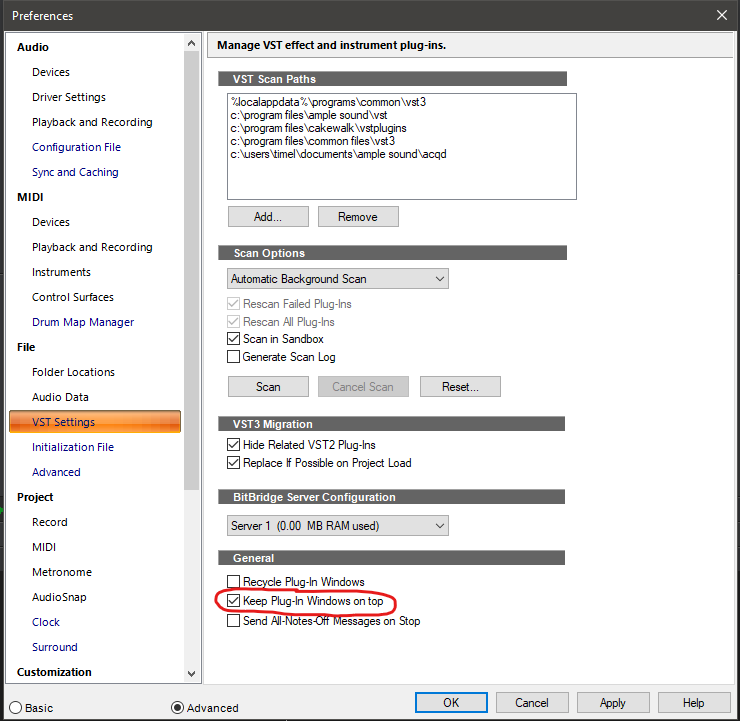
-
Jim, You might want to try this: 1. Select the Smart tool (press F5) if you haven't already. 2. Press and hold the <ctrl> key down. 3. Move the cursor just below the segment you want to move. The cursor will change to a cross-hair pattern. 3. While still holding the <ctrl> key down, press and hold the left mouse button and drag the segment up or down as in the video below. Automation Editing.MP4 Be careful to position the cursor below the line segment, but not too low. When you are in the right spot, the cursor will change as shown in the video above. This was easier in CbB because the cursor didn't jump when it changed to the cross-hair pattern. I described the difference in my recent post "Automation Envelope Cursor in Sonar vs. CbB." Maybe they will fix it soon. In the meantime, at least it works. It just takes some extra care to move the mouse to the right spot.
-
Automation Envelope Cursor in Sonar vs. CbB
Tim Elmore replied to Tim Elmore's topic in Cakewalk Sonar
It acts as though the graphic design of the new crosshair cursor is offset compared to the crosshair cursor in CbB. This would be consistent with the idea that it happened during the conversion to vector graphics. I hope it is as simple as that for them to fix. -
When editing envelopes, such as volume automation, the cursor behaves differently in Sonar from what it does in CbB. In the CbB video below, I am holding down the <ctrl> key while moving past the automation envelope. Notice how the cursor changes to crosshairs as I get near the envelope, and changes back after I get a short distance past the envelope. To move the automation segment, I simply position the crosshairs directly over the line and <ctrl>-drag it down. CbB Vol Automation.mp4 In the next video below, I do the same thing in Sonar. As I approach the automation line, the mouse position jumps downward and to the right as I move across the line, and then jumps again as I get past the line. To move the automation segment, I must carefully position the crosshairs below the line, but not too far, and then <ctrl>-drag it down. Sonar Vol Automation.mp4 In CbB, I have no trouble aiming and dragging the line position. In Sonar, it is easier to miss the aim, so I slow down and do it very carefully. In CbB, I could work faster, especially when there were a number of edits to make. I would appreciate it if the cursor behavior for automation editing in Sonar would be made to match that of CbB.
-
Yes, using presets is an excellent way to have a track use settings from another track. But sometimes it's really nice to be able to instantly copy settings from one plug-in to another. It seems odd that the drag-and-drop method works in CbB, but not in Sonar. I don't know if this feature was intentionally removed or if I might just have something set different in Preferences or the .ini file.
-
Until recently, I have enjoyed the ability to copy settings from one ProChannel plug-in to another, using the drag-and-drop method. Although this works in CbB, I have not been able to make it work in the new Sonar. In this video of CbB, I copy the settings from the PC2A module on the left to the PC2A on the right. Copying ProChannel Settings.mp4 This feature is documented in the on-line help here: https://taylor.cakewalk.com/Documentation?product=Cakewalk&language=3&help=NewFeatures.067.html The above video was made using CbB version 2024.12. I am currently using Sonar version 2025.07, and cannot get this feature to work. Has it been removed?
-
Regarding the issue of plug-ins disappearing under the CV: Open the Help module. The standard shortcut for this is "y". When the Help module is open, plug-ins that are displayed over CV will stay visible even after you click on CV. If the Help module is fully closed (not just minimized), then clicking CV will put any plug-ins underneath CV (not visible). To keep them on top, the Help module must be open. Since I don't want to have the Help module displayed all the time, I save screen space by docking it to the Browser, and then keep the Browser minimized when not needed. This keeps plug-ins visible even after clicking on CV. This costs a small bit of screen space where the Browser is shown as minimized, but it is the only workaround I have found.