-
Posts
244 -
Joined
-
Last visited
-
Days Won
8
Morten Saether last won the day on February 17 2024
Morten Saether had the most liked content!
Reputation
1,379 ExcellentAbout Morten Saether
Recent Profile Visitors
The recent visitors block is disabled and is not being shown to other users.
-
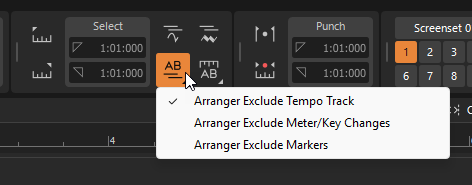
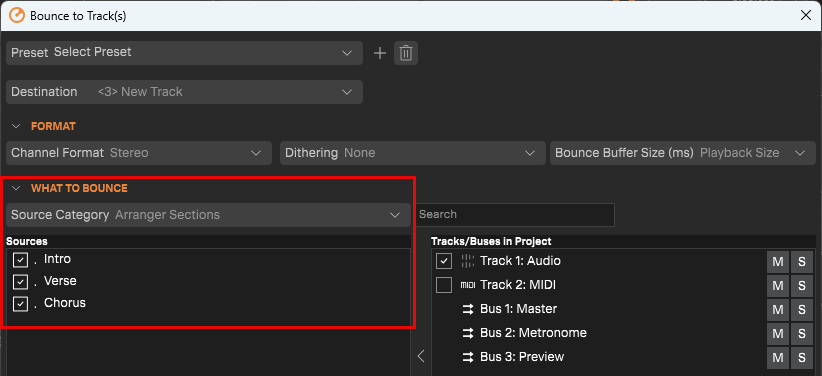
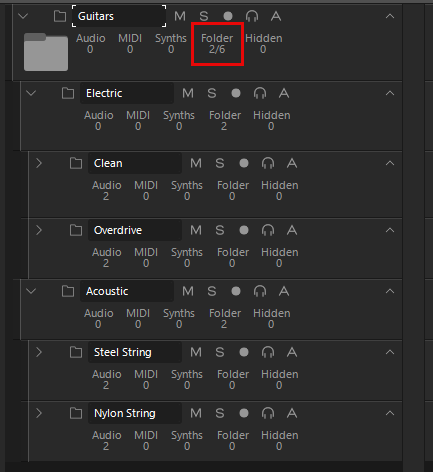
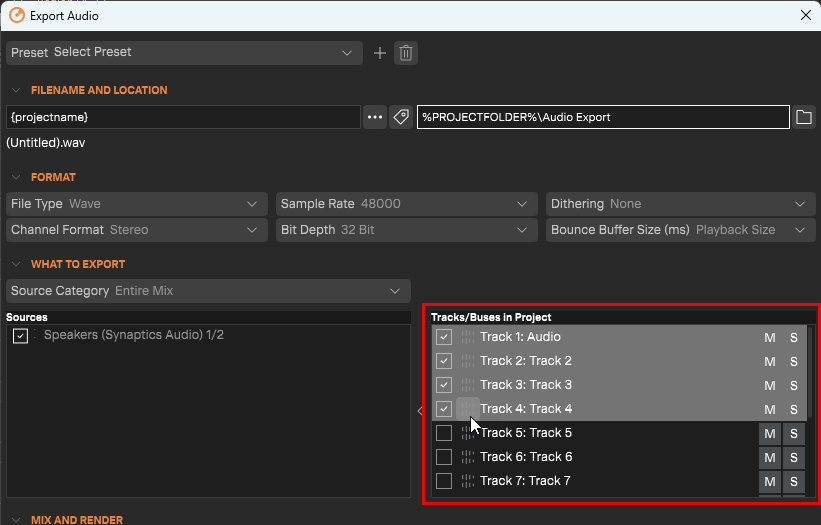
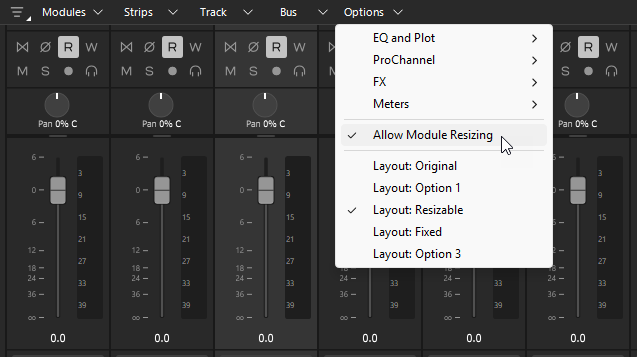
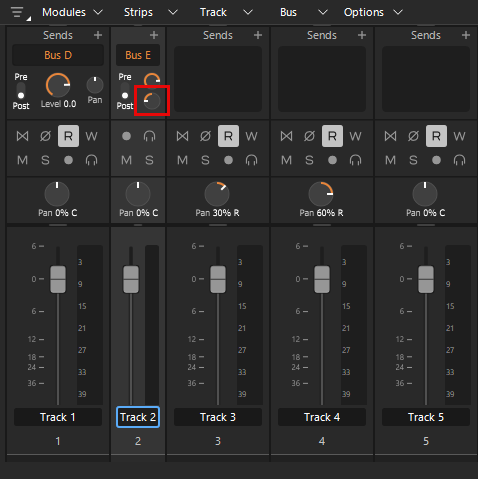
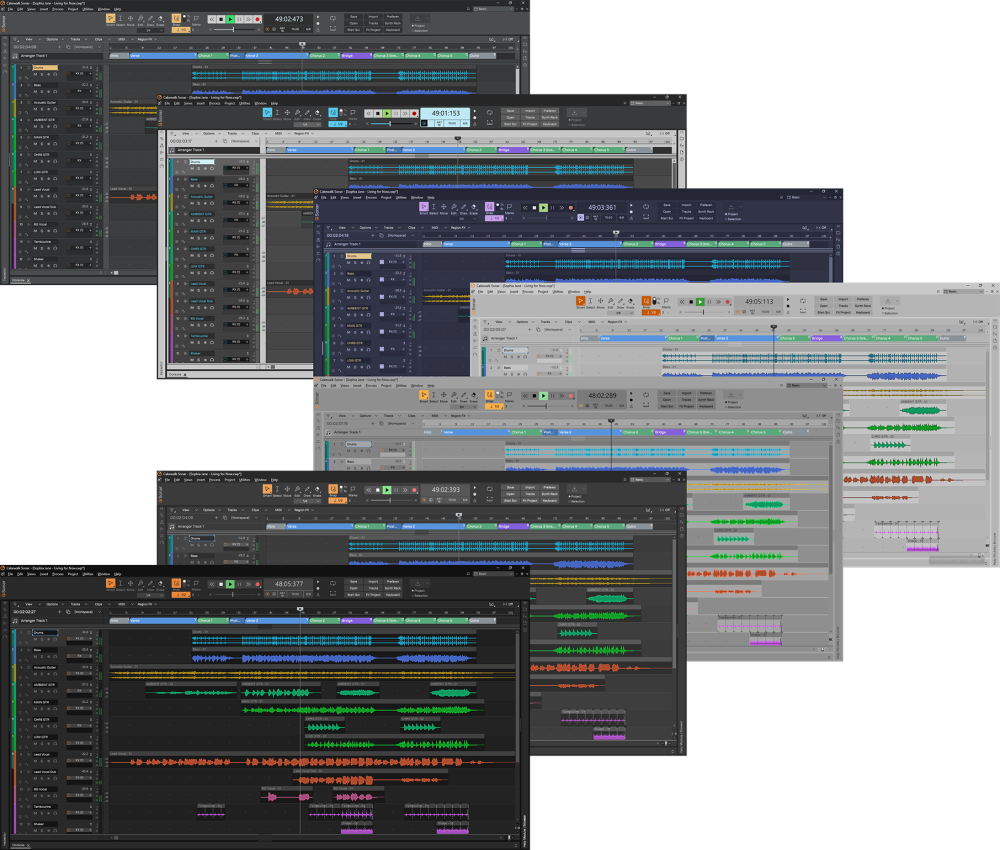
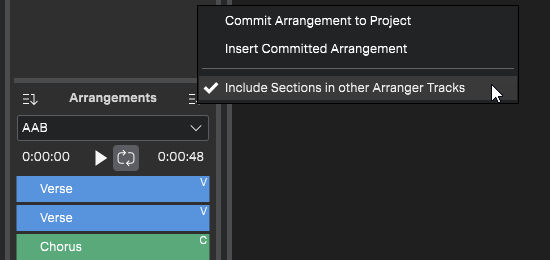
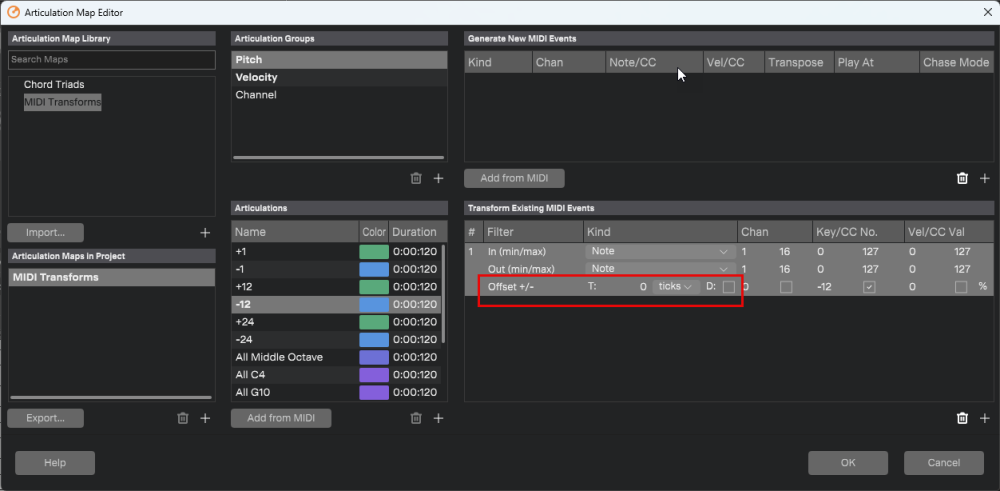
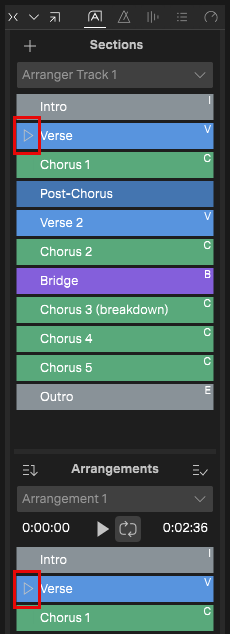
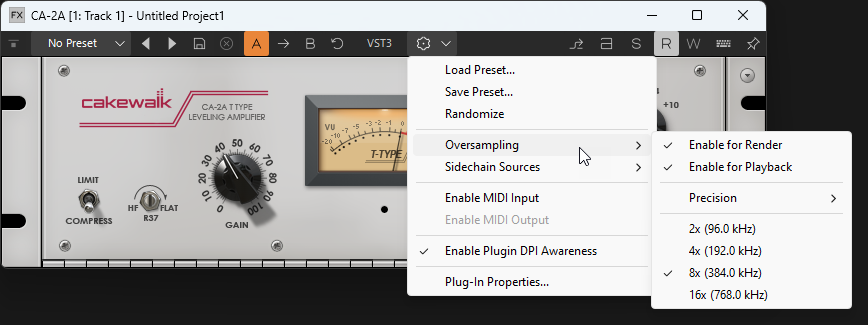
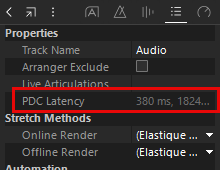
New in build 31.02.0.077 This Release addresses additional issues reported against the initial 2025.02 update: Fixed regression where MIDI Reverb and Chorus knobs do not work as expected Fixed Crash with Articulation Maps Fixed issue where Mackie Control XT surfaces were removed unexpectedly Fixed Crash previewing loops in Browser Resolved issue where controller handles draw unexpectedly after Now Time passes when the Controller Pane is collapsed in PRV New in build 31.02.0.074 Resolved Memory leak in Piano Roll View Fix for case where some users were unable to see text in ProChannel menus Resolved Resource leak in Console View that would cause application slow downs after manipulating controls. Improved handling of issues with Control Surface configuration files Added failsafe handling for persistence of Control Surface configuration files New in Sonar 2025.02 build 31.02.0.049: This release adds improvements to Bounce to Tracks, the ability to exclude markers and meter/keys from Arranger operations, includes subfolder count in top folder stats, an updated Light Gray color scheme, as well as usability enhancements and bug fixes for user reported issues. "Arranger Sections" is now a Source Category in Bounce to Track(s) "Arranger Sections" is now available as a Source Category in the Bounce to Track(s) dialog box. Only sections from the active Arranger track are listed, and the resulting clip names are derived from the section and the category source. Ability to exclude markers and meter/keys from Arranger operations In addition to individual tracks and the Tempo track, you can now also exclude markers and meter/key changes from Arranger operations. To prevent the tempo map, meter/key changes, or markers from being affected when editing Arranger sections, right-click or long press the Select Events with Sections button in the Control Bar’s Select module and select the desired options: Arranger Exclude Tempo Track. Prevent the tempo map from being affected when editing Arranger sections. Arranger Exclude Meter/Key Changes. Prevent meter/key changes from being affected when editing Arranger sections. Arranger Exclude Markers. Prevent markers from being affected when editing Arranger sections. Track Folder info panel shows subfolder count The track folder info panel shows how many tracks it contains. Because folders can contain multiple levels of subfolders, the total subfolder count is now shown if it is different from the immediate folder count: <immediate subfolders> / <total subfolders> "Allow Module Resizing" option in Console view/Inspector module Options menus You can now enable/disable module resizing in the Console view and inspector. When Allow Module Resizing is disabled, the drag handles are removed from the top of the Volume, Sends, and FX Rack modules. To disable module resizing in the Console view, click the Options menu and disable Allow Module Resizing. When disabled, the drag handles are removed from the top of he modules. To disable module resizing in the Track Inspector, click the Display control at the bottom of the Track Inspector, point to Module Options and disable Allow Module Resizing. Support for Smart Swipe behavior for tracks/busses in Export Audio dialog In the Export Audio dialog, you can now swipe (drag up/down) in the Tracks/Buses in Project list to quickly select/mute/solo multiple tracks/buses. Send Pan knobs are now shown in narrow strips Send Pan knobs are now shown in narrow Console view/inspector strips. Previously, only Send Level knobs were shown. Updated Light Gray color scheme The Light Gray color scheme has been completely redesigned. Misc. Updated localization Misc. color scheme refinements In FX Racks, newly inserted plugins are visible and scrolled into view Inspector/Console view track and bus strips now automatically scroll to newly inserted sends The max number of visible sends per track/bus has been increased from 10 to 100 Clamp sample rate to 44100-48000 when exporting to BandLab The Quick Start Screen now shows a CWZ icon when a project thumbnail is missing for CWZ files Fixed: Crash inserting Waves Curves Equator MONO Fixed: Crash restoring configuration Fixed: Opening project or OMF file containing track/bus names with formatting characters crashes Sonar Fixed: User crash when setting FX Chain preset from Console view Fixed: Console view Sends option say unlimited sends, but only display 10 Fixed: Cannot see Send Gain Level value within Console view Send clusters Fixed: Crash drawing Pitch Bend in Piano Roll view Fixed: Dragging Controller pane closed in Piano Roll view causes audio track to delete unexpectedly with Ripple Edit Fixed: Long track name display issue in Piano Roll view Tracks pane Fixed: Holding SHIFT prior to clicking notes in the Piano Roll view fails to select controllers when enabled Fixed: Shift Select using Select tool does not behave as expected in Piano Roll view Fixed: Unexpected resize of Controller pane in user project Fixed: MIDI side of Instrument track stuck muted in user project Fixed: Disconnecting an Instrument track causes track templates for other instruments to save incorrectly Fixed: Workspace is not applied after opening a MIDI file Fixed: Chorus/Reverb MIDI controls are created with an offset of +64 Fixed: Articulation "Full Chase" fails to chase CCs Fixed: Project shows time incorrectly in Play List Fixed: Staff view Track pane can fails to draw background correctly Fixed: Step Sequencer templates can become orphaned clips Fixed: PDC latency not reported correctly in Track Inspector Fixed: Surround panner draws incorrectly on Console view/Inspector track strip Fixed: Track Manager shows audio icon for nested folders Fixed: Clip automation preview is inaccurate to bounced audio Fixed: Undo of Copy and Assign Envelope fails to restore Edit Filter state Fixed: CPU Meter Options in Performance module only available if set to large size Fixed: CPU Meter Options menu has misaligned text on 4k Fixed: Unexpected meter/key change added to project after ripple editing Arranger sections Fixed: Incorrect handling of Meter/Key in Arranger move operation Fixed: Grouping On/Off for sends behaves unexpectedly Fixed: Quick Group Freeze Synth behaves inconsistently Fixed: Quick Grouping of Edit Filter is inconsistent with Instrument tracks Fixed: Group mute of Instrument tracks fails to dim Clips pane Fixed: Help Module "Learn More" button text is wrong color on mouse over in Light color scheme Fixed: Track View bus strip labels are the wrong color Fixed: Toast notification displays wrong border colors when signing in to activate Fixed: Fix for Track view Sends Look & Feel Fixed: ProChannel visual artifacts bug Fixed: Unexpected layout change on applying config profile Fixed: Autosave doesn't save after changing track mixer parameters Fixed: Splash screen appears on wrong monitor on high DPI multi-monitor systems Fixed: Right-click to lasso select doesn't change active item focus resulting in unexpected effects deletion Fixed: Snap to Landmarks inconsistent in user project Fixed: Preview in Media Browser plays at wrong speed after sample rate is changed in Preferences Fixed: Transport is unresponsive when zoomed in all the way in Track Fixed: Text in Big Time view looks pixelated opening on 1080p Fixed: Inspector advanced MIDI strip layout issues after vertically scrolling Fixed: [Regression] Regression: Console view no longer shows offset modified color indication Fixed: [Regression] Track Templates fail to preserve MIDI ports routed to plugins Fixed: [Regression] MIDI track on Split Instrument fails to show Frozen button state Fixed: [Regression] Tooltip for Console view/ProChannel Sends missing when making adjustments Fixed: [Regression] Preview at Host Tempo no longer working in Browser Fixed: [Regression] Browser GDI object leak when floating Fixed: [Regression] Text Edit Field Cursors are Center Justified Fixed: [Regression] Console View Maximum Sends value does not work Fixed: "Cannot Sign In" message not localized Fixed: Incorrect error displayed when importing an unsupported wave file Please give us feedback on this release. We hope you like it Sonar 2024 Overview
-
Hi all - please use this topic to post feedback specific to the Sonar 2025.02 release. Release-specific feedback is valuable to us, and consolidating it in a single topic is extremely helpful. We request that discussion in this thread be restricted to issues directly concerning this release, to make it easier for us to assist users. For other topics, kindly use the feature request section or create new posts. Off topic messages will be deleted. Thanks in advance! Sonar 2024 Overview
-
We're pleased to announce the release of Sonar 2025.02! This release adds improvements to Bounce to Tracks, the ability to exclude markers and meter/keys from Arranger operations, includes subfolder count in top folder stats, an updated Light Gray color scheme, as well as usability enhancements and bug fixes for user reported issues. Please note that in order to automatically keep your activation status up to date, Sonar will renew your activation status whenever a new version of the application is installed and run for the first time, and when you sign in to BandLab from within Sonar. If you have never signed in to BandLab from within Sonar, you will be prompted once to sign in. Thanks, The Bakers Please note: Cakewalk Sonar and Cakewalk Next are currently exclusively available via BandLab Membership. New in Sonar 2025.02 build 31.02.0.049: "Arranger Sections" is now a Source Category in Bounce to Track(s) "Arranger Sections" is now available as a Source Category in the Bounce to Track(s) dialog box. Only sections from the active Arranger track are listed, and the resulting clip names are derived from the section and the category source. Ability to exclude markers and meter/keys from Arranger operations In addition to individual tracks and the Tempo track, you can now also exclude markers and meter/key changes from Arranger operations. To prevent the tempo map, meter/key changes, or markers from being affected when editing Arranger sections, right-click or long press the Select Events with Sections button in the Control Bar’s Select module and select the desired options: Arranger Exclude Tempo Track. Prevent the tempo map from being affected when editing Arranger sections. Arranger Exclude Meter/Key Changes. Prevent meter/key changes from being affected when editing Arranger sections. Arranger Exclude Markers. Prevent markers from being affected when editing Arranger sections. Track Folder info panel shows subfolder count The track folder info panel shows how many tracks it contains. Because folders can contain multiple levels of subfolders, the total subfolder count is now shown if it is different from the immediate folder count: <immediate subfolders> / <total subfolders> "Allow Module Resizing" option in Console view/Inspector module Options menus You can now enable/disable module resizing in the Console view and inspector. When Allow Module Resizing is disabled, the drag handles are removed from the top of the Volume, Sends, and FX Rack modules. To disable module resizing in the Console view, click the Options menu and disable Allow Module Resizing. When disabled, the drag handles are removed from the top of he modules. To disable module resizing in the Track Inspector, click the Display control at the bottom of the Track Inspector, point to Module Options and disable Allow Module Resizing. Support for Smart Swipe behavior for tracks/busses in Export Audio dialog In the Export Audio dialog, you can now swipe (drag up/down) in the Tracks/Buses in Project list to quickly select/mute/solo multiple tracks/buses. Send Pan knobs are now shown in narrow strips Send Pan knobs are now shown in narrow Console view/inspector strips. Previously, only Send Level knobs were shown. Updated Light Gray color scheme The Light Gray color scheme has been completely redesigned. Misc. Updated localization Misc. color scheme refinements In FX Racks, newly inserted plugins are visible and scrolled into view Inspector/Console view track and bus strips now automatically scroll to newly inserted sends The max number of visible sends per track/bus has been increased from 10 to 100 Clamp sample rate to 44100-48000 when exporting to BandLab The Quick Start Screen now shows a CWZ icon when a project thumbnail is missing for CWZ files Fixed: Crash inserting Waves Curves Equator MONO Fixed: Crash restoring configuration Fixed: Opening project or OMF file containing track/bus names with formatting characters crashes Sonar Fixed: User crash when setting FX Chain preset from Console view Fixed: Console view Sends option say unlimited sends, but only display 10 Fixed: Cannot see Send Gain Level value within Console view Send clusters Fixed: Crash drawing Pitch Bend in Piano Roll view Fixed: Dragging Controller pane closed in Piano Roll view causes audio track to delete unexpectedly with Ripple Edit Fixed: Long track name display issue in Piano Roll view Tracks pane Fixed: Holding SHIFT prior to clicking notes in the Piano Roll view fails to select controllers when enabled Fixed: Shift Select using Select tool does not behave as expected in Piano Roll view Fixed: Unexpected resize of Controller pane in user project Fixed: MIDI side of Instrument track stuck muted in user project Fixed: Disconnecting an Instrument track causes track templates for other instruments to save incorrectly Fixed: Workspace is not applied after opening a MIDI file Fixed: Chorus/Reverb MIDI controls are created with an offset of +64 Fixed: Articulation "Full Chase" fails to chase CCs Fixed: Project shows time incorrectly in Play List Fixed: Staff view Track pane can fails to draw background correctly Fixed: Step Sequencer templates can become orphaned clips Fixed: PDC latency not reported correctly in Track Inspector Fixed: Surround panner draws incorrectly on Console view/Inspector track strip Fixed: Track Manager shows audio icon for nested folders Fixed: Clip automation preview is inaccurate to bounced audio Fixed: Undo of Copy and Assign Envelope fails to restore Edit Filter state Fixed: CPU Meter Options in Performance module only available if set to large size Fixed: CPU Meter Options menu has misaligned text on 4k Fixed: Unexpected meter/key change added to project after ripple editing Arranger sections Fixed: Incorrect handling of Meter/Key in Arranger move operation Fixed: Grouping On/Off for sends behaves unexpectedly Fixed: Quick Group Freeze Synth behaves inconsistently Fixed: Quick Grouping of Edit Filter is inconsistent with Instrument tracks Fixed: Group mute of Instrument tracks fails to dim Clips pane Fixed: Help Module "Learn More" button text is wrong color on mouse over in Light color scheme Fixed: Track View bus strip labels are the wrong color Fixed: Toast notification displays wrong border colors when signing in to activate Fixed: Fix for Track view Sends Look & Feel Fixed: ProChannel visual artifacts bug Fixed: Unexpected layout change on applying config profile Fixed: Autosave doesn't save after changing track mixer parameters Fixed: Splash screen appears on wrong monitor on high DPI multi-monitor systems Fixed: Right-click to lasso select doesn't change active item focus resulting in unexpected effects deletion Fixed: Snap to Landmarks inconsistent in user project Fixed: Preview in Media Browser plays at wrong speed after sample rate is changed in Preferences Fixed: Transport is unresponsive when zoomed in all the way in Track Fixed: Text in Big Time view looks pixelated opening on 1080p Fixed: Inspector advanced MIDI strip layout issues after vertically scrolling Fixed: [Regression] Regression: Console view no longer shows offset modified color indication Fixed: [Regression] Track Templates fail to preserve MIDI ports routed to plugins Fixed: [Regression] MIDI track on Split Instrument fails to show Frozen button state Fixed: [Regression] Tooltip for Console view/ProChannel Sends missing when making adjustments Fixed: [Regression] Preview at Host Tempo no longer working in Browser Fixed: [Regression] Browser GDI object leak when floating Fixed: [Regression] Text Edit Field Cursors are Center Justified Fixed: [Regression] Console View Maximum Sends value does not work Fixed: "Cannot Sign In" message not localized Fixed: Incorrect error displayed when importing an unsupported wave file Sonar 2024 Highlights User Interface: UI refresh DPI Awareness Track Manager enhancements Spectrum Analyzer display in Console view, Inspector and ProChannel Double-click to expand/collapse docked windows Additional snap landmarks Preview Bus enhancements New Features: Integrated sampler (XSampler) New Quick Start screen Project preview Project Start and End markers File formats: Cakewalk Interchange Format (CXF) Cakewalk ZIP Format (CWZ) Configuration backup/restore Automation: Automation smoothing when recording Specify the default automation curve type Offset mode enhancements MIDI: Live articulations Time offset for MIDI transform articulations Key Aftertouch editing in the Piano Roll view Controller pane Import and export tempo map to/from MIDI files Cakewalk Product Center Plugins: Overloud TH-U Cakewalk amp simulator ProChannel Concrete Limiter module VX-64 Vocal Strip A/B plugin settings Sidechaining enhancements Plugin oversampling enhancements Plugin delay compensation (PDC) UI enhancements Plug-in Load Balancing enhancements External Insert enhancements Plugin Browser drag and drop enhancements Quick access to plugin settings Friendly names for plugins are now shown in FX racks Audio processing load tooltips Usability and Workflow: Click Sonar logo in Control Bar to open Quick Start Screen Specify default synth for use in Add Track flyout menu Select all tracks/buses in a control group Create sends by dragging effects to channel strips Create tracks routed to aux tracks or patch points Preserve sections in other Arranger tracks when committing an arrangement Arranger Inspector displays a badge on sections that intersect with the Now Time In-app hang detection Key bindings to show/hide tracks Toast notification when a control surface is disabled on launch Deleting a tempo in the Tempo Inspector sets the focus to the next tempo in the list Press F2 to rename markers in the Markers view Meter scale for Instrument tracks changes to dB scale when frozen Remove crossfades Track Scale Zoom is now quick-groupable Double-click to reset sliders Export track/bus and project icons as PNG Process > Length dialog accepts fractional valuess Quick Grouping of Mute, Solo, and Archive buttons on track folders Updated docked Synth Rack and new bypass functionality In-app bug reporting Optimizations: Audio engine low latency optimizations for multi-core processors Performance optimizations for projects with many synths and effects Misc. optimizations Cakewalk by BandLab is now Cakewalk Sonar Cakewalk by BandLab has been rebranded as Cakewalk Sonar. As Cakewalk is once again a multiple product brand, it is important to differentiate between the brand and product names. The rebrand also better reflects Sonar's celebrated history and name recognition. Cakewalk Sonar will not overwrite an existing Cakewalk by BandLab installation. User Interface UI refresh Sonar has been completely refreshed with a clean new UI, but will still feel familiar to users of Cakewalk by BandLab. The UI refresh is an ongoing effort and will continue to be updated in future releases. Dark and Light color schemes Sonar includes several color themes, including Dark, Dark Gray, Light, Light Gray, Tungsten, Mercury, and Cosmic, which can be selected in Edit > Preferences > Customization - Display. Additional color themes will be added in the future. Note: Custom themes created with previous versions of SONAR or Cakewalk by BandLab are not compatible with Cakewalk Sonar. DPI Awareness Note: DPI Awareness is only available on Windows 10 build 1809 (October 2018) and above. Sonar version 2024.04 introduces support for DPI Awareness, which improves rendering and reduces blurriness, particularly for font rendering. DPI Awareness may sharpen graphics and make text easier to read. Improvements will be most noticeable when using large, high resolution displays (such as 4K) and with Windows display scaling set higher than 100%. (Tip: Right-click the image above and select Open link in new tab to view the image at 100% resolution) To enable/disable DPI Awareness: Go to Edit > Preferences > Customization - Display. Select Enable DPI Awareness. Restart Sonar. Per plugin DPI Awareness In addition to the global Enable DPI Awareness app setting, you can also enable/disable DPI Awareness on a per plug-in basis for VST plug-ins. DPI Awareness is enabled by default for all VST plug-ins and can be disabled on a case-by-case basis depending on whether the plug-ins are compatible with display scaling. For example, some older plug-ins may appear too small on large, high resolution monitors, in which case disabling DPI Awareness might be preferable. To enable/disable DPI Awareness for a VST plug-in: Open the VST plug-in's property page. Click the VST2/VST3 drop-down menu in the VST plug-in toolbar and select Enable Plugin DPI Awareness. Note: Display scaling is always disabled for DX plug-ins Plug-in scaling is stored globally for a plug-in, not per project Display Scale slider The Display Scale slider in Edit > Preferences > Customization - Display allows you to adjust the display scaling of Sonar independently from the global Windows display scale setting (Settings > Systems > Display). Select a custom scaling size between 75%–150%. Note: Low Display Scale values work better at higher DPI resolutions. For example, a low-resolution 1080p screen at 96 DPI, so a Display Scale value of 75% will result in a tiny UI that is potentially difficult to read. On the other hand, a 4K screen at 75% will also show a tiny UI, but may still be usable because it has 4x the number of pixels. Track Manager enhancements The Track Manager lets you configure which tracks are visible in the Track view and Console view, and you can create per-project presets to quickly show specific sets of tracks. Track Manager controls in Track view and Console view The Track Manager button in the Track view and Console view toggles between showing all tracks/buses () and hiding previously hidden tracks/buses (). The button is lit if at least one track is hidden. Track Manager menu The Track Manager menu provides various commands to manage track visibility and quickly save and recall per-project presets. To show the menu, long press or right-click the Track Manager button . The Track Manager menu contains the following commands: <list of presets>. Per project Track manager presets. Show All Tracks and Buses. Show all tracks and buses. Click the Track Manager button again to hide previously hidden tracks. Show Only >. Show only the selected track type: Audio Tracks. Only show audio tracks. MIDI Tracks. Only show MIDI tracks. Instrument Tracks. Only show Instrument tracks. Aux Tracks. Only show Aux tracks. Track Folders. Only show track folders. New Preset. Create a new preset for the currently visible tracks. Only available when at least one track is hidden and the Track Manager button is lit . Track Manager. Open the Track Manager, which lets you specify which tracks to display. Synchronize Track and Console views. Enable to show the same set of tracks and buses in the Track view and Console view. Disable to show different sets of tracks and buses in the Track view and Console view. Creating a Track Manager preset To create a Track Manager preset: Only show the tracks that you want to save as a preset. Do one of the following to hide any tracks that you don’t want to see: Right-click a track and select Hide Track Select the track(s) and press CTRL+H Long press or right-click the Track Manager button , then select New Preset to open the New Track Manager Preset dialog box. Type a descriptive name, then click OK. You can also create and load presets in the Track Manager dialog box. Selecting a Track Manager preset To select a Track Manager preset, long press or right-click the Track Manager button , then select the desired preset. Showing only specific track types To only show a specific track type (audio, MIDI, Instrument, Aux, or track folders), long press or right-click the Track Manager button , point to Show Only, then select the desired track type. Spectrum Analyzer display in Console view, Inspector and ProChannel The EQ plot in the Console view, Inspector, and ProChannel shows a real-time spectrum analyzer per track by default. To enable/disable the per-track/bus spectrum analyzer in the Console view, click the Console view Options menu and select EQ and Plot > Show Spectrum Analyzer. To enable/disable the spectrum analyzer in the Inspector, click the Inspector Display menu and select Module Options > EQ and Plot > Show Spectrum Analyzer. Double-click to expand/collapse docked windows You can double-click to expand docked windows (MultiDock, Inspector, and Browser), as outlined below: When the Inspector or Browser is docked and minimized, double-click to expand. For the MultiDock, double-click to toggle between expand and collapse. Additional snap landmarks The following items are now available as Snap to Grid landmarks: Arranger Section Start Time. Snap to the start of any Arranger section. Arranger Section End Time. Snap to the end of any Arranger section. Project Start Marker. Snap to the Project Start marker. Project End Marker. Snap to the Project End marker. To select the desired landmarks, right-click the Snap to Grid button to open the Preferences dialog box, then select the desired check boxes in the Landmarks section. Sonar will snap to landmarks on tracks/lanes that are currently visible in the Clips pane. Preview Bus enhancements The Preview Bus assignment is now a project-wide setting. Preview bus assignment can now be managed directly from the bus/mains/aux track context menus or directly from the main Project menu. An aux track can now be designated as a preview bus. If a bus that is assigned as a preview bus output is deleted, the preview bus will automatically be assigned to be the first hardware output. Preview bus changes can now be made dynamically while preview is underway. New Features Integrated sampler (XSampler) XSampler is a simple sampler that lets you import or record audio, perform basic processing, and play it like an instrument with up to 16 voices. Instantly convert a single audio file into a playable or triggable sound that can be played back at different pitches and speeds. There are many ways to get audio into XSampler: import audio from the file system, drag loops and one-shots from the Media Browser, drag audio clips (including partial clip selections) from any track. After audio has been added, you can loop, trim, crossfade, change playback behavior and modulation or filtering options to create interesting musical ideas. New Quick Start screen You can perform the following tasks from the Quick Start screen: Open a recent project Open an existing project Start a new project Create a new project from a template Open demo projects Preview projects Update the app Download and install optional content Project preview You can preview projects from the Quick Start screen’s Recent page if you have exported a designated preview file. The preview file may be any supported audio file type (Wave, BWF, MP3, FLAC, OGG, or WaveEX), and can be the entire project or a specific time range. To create a project preview file: Open an existing project. Ensure that the project has been saved at least once with the new version of Sonar in order to use required metadata. If you only want the preview to contain a specific time range, select the desired time range. Go to File > Export > Audio to open the Export Audio dialog box. Under File Type, select Wave, Broadcast Wave, MP3, FLAC, OGG, or WAVEX. Under Channel Format, select Stereo, Mono or Follow Source. Under Source Category, select Entire Mix. Under Mix and Render, select Include Project Preview to export a preview file. Click Export. The preview file is exported to the project’s \Audio folder. Note: The first export of a project will automatically create a preview file irrespective of the Include Project Preview option. To preview a recent project: Go to File > Quick Start Screen to open the Quick Start screen, then select Local Projects. Click the preview button on a project’s image. A preview button only appears if the project has a designated preview file. Project Start and End markers The Project Start and Project End markers define the playback range and the export range when exporting the entire project, and can also be used as Snap to Grid landmarks. By default, a project does not contain a Project Start or Project End marker. The project starts playback from measure 1 and ends after the last clip. If you want to start playback after measure 1, set the Project Start marker at the desired location. If you want playback to stop before the end of the last clip, set the Project End marker at the desired location. Once set, the Project Start and Project End markers appear in the time ruler, and can be dragged or deleted in the same way as regular text markers. To set the Project Start marker To set the Project Start marker, move the Now Time position to where you want the project to start, then do one of the following: Select Project > Set Project Start Marker to Now Time Right-click the time ruler and select Set Project Start Marker to Now Time The location of the Project Start marker is considered the beginning of the project. To set the Project End marker To set the Project End marker, move the Now Time position to where you want the project to end, then do one of the following: Select Project > Set Project End Marker to Now Time Right-click the time ruler and select Set Project End Marker to Now Time When the Project End marker is inserted, the Options > Stop at Project End option is also automatically enabled. Playback will only stop at the Project End marker if the Stop at Project End option is enabled. Tip: The Set Project Start Marker to Now Time and Set Project End Marker to Now Time menu commands are also available as key bindings. You can assign the key binding in Edit > Preferences > Customization - Keyboard Shortcuts (under Area: Global Bindings). Note: If a loop region exists beyond the Project End marker, the Project End marker is ignored in favor of the loop extents. Recording ignores the Project End marker. If recording stops after the Project End marker, the marker is moved to where recording stopped, or if comp/loop recording, to the end of the loop. The selection is clamped to the Project End marker when you open the Export Audio dialog box, unless the selection starts after the Project End marker. To jump to the Project Start marker To jump to the Project Start marker, do one of the following: Click the Go to Start (RTZ) button in the Control Bar’s Transport module to toggle between the Project Start marker and measure 1 Press CTRL+HOME to toggle between the Project Start marker and measure 1 Press W to toggle between the Project Start marker and measure 1 (or if a loop region is set, toggle between the Project Start marker and the loop start) Press G to open the Go dialog box, then press F5 to open the Markers dialog box and select <Project Start Marker> from the list To jump to the Project End marker To jump to the Project End marker, do one of the following: Click the Go to End button in the Control Bar’s Transport module to toggle between the Project End marker and the end of the project Press CTRL+END to toggle between the Project End marker and the end of the project Press G to open the Go dialog box, then press F5 to open the Markers dialog box and select <Project End Marker> from the list To delete the Project Start/End marker To delete the Project Start or Project End marker, do one of the following: Click the marker and hold the left mouse button down, then press the DELETE key Click the Project menu and point to Remove Project Marker, then select Remove Project Start Marker, Remove Project End Marker, or Remove Project Start/End Markers Right-click in the time ruler and point to Remove Project Marker, then select Remove Project Start Marker, Remove Project End Marker, or Remove Project Start/End Markers Note: If you drag the Project Start marker to the beginning of the project (measure 1), it will automatically be deleted. Cakewalk Interchange Format (CXF) The Cakewalk Interchange Format (CXF) is a Cakewalk cross platform inter-app project file format, used to exchange projects between Sonar and Next. CXF files exported from either application can be opened or imported in both apps. Note: CXF is a transitory format only used for exchange. It is not intended for archival storage or backing up since the format can change at any time. CXF supports a subset of project data used by Sonar and Next, so app-specific feature settings and view-specific states will not be restored. The following data will be exported and imported: Tracks Audio MIDI Instrument tracks Simple Instrument tracks (Sonar) Multi Instrument tracks (each track will represent a unique instance of the synth when opened) Split instrument tracks (not supported) Bus tracks (Next) Patchpoints (Sonar; converted to buses) Aux tracks (Sonar; limited support - treated like patch points and converted to buses) The aux track itself will not route to the patchpoint. Track data Audio/MIDI clips Overlapping clips or take lanes are flattened prior to export Clip effects are rendered into the clips prior to export Automation envelopes Track/Bus parameters Volume Pan Mute Solo Input Gain (Sonar only) Input Pan (Sonar only) Track/Bus routing Outputs Hardware outputs are not preserved since they are not cross platform. Any hardware outs are automatically assigned to the first hardware output. Sends to buses and patch points. Plugins in track and bus effects racks. On opening a CXF file, any missing plugins will be listed. Note: when moving a project between Windows and Mac any plugins used must be installed on both platforms in the same format to successfully load them. VST2 VST3 DX AU plugins (only available in Next Mac) DX plugins (only available in Sonar) ProChannel (not supported) FX Chains (not supported) Plugin settings are stored within the CXF and will be restored if the plugin is available. Instruments and instrument settings are stored within the CXF. Exporting a project in CXF format To export a project to Cakewalk Interchange Format, do one of the following: Go to File > Export > Cakewalk Interchange. Click the Export button in the Control Bar’s Export module and select Other > CXF (Cakewalk Interchange). CXF files have a .cxf file extension. When the export is complete, a notification appears with a link to open the export folder. Opening a project in CXF format To open a project in Cakewalk Interchange Format, do one of the following: Go to File > Open and choose Cakewalk Interchange as the file format. Drag a .cxf file to the Track view. Opening a CXF file creates a new project, which must then be saved in Sonar’s native project file format (.cwp). Importing a project in CXF format To import a project in Cakewalk Interchange Format into an existing Sonar project, drag a .cxf file to the track area. An imported CXF file merges its data into the existing project file. Cakewalk ZIP Format (CWZ) The new Cakewalk ZIP (.cwz) file format is intended for backing up projects, and is also useful for moving Sonar projects from one computer to another. Cakewalk ZIP is recommended over the older Cakewalk Bundle (CWB/BUN) format, because it does not compact the audio data, and therefore supports AudioSnap clips. The following items are saved in a CWZ file: Project file (.cwp) Project \Audio folder and any other referenced audio data Project \Audio Export folder, if present Project \MixScenes folder, (only if project contains any mix scenes) To save the current project as a Cakewalk ZIP (.cwz) file, go to File > Save As and select Cakewalk ZIP from the Save As Type drop-down list, then click the Save button. To open a CWZ file in Sonar, go to File > Open and navigate to the CWZ file. Note: A Cakewalk ZIP (.cwz) file is a regular ZIP file that can be extracted with any app that supports ZIP files. You can simply rename the .cwz file extension to .zip and manually unzip the file. To unzip a ZIP file in Windows, right-click the file and select Extract All. Configuration backup/restore You can save and load backups of your Sonar configuration settings. A configuration profile stores settings from various Sonar configuration files and Windows registry settings in a single JSON file. You can selectively choose which app settings to save or load from a configuration profile. Configuration profiles have many uses, including: Quickly switch Sonar to a different audio configuration or driver mode when using multiple audio interfaces Save hardware setup profiles for different workflows, such as tracking, mixing, live band recording, customizations for recording different band’s etc. Switch between different control surface configurations Save startup configurations and launch them via desktop shortcuts using the RestoreConfig command line flag Transfer app settings between Sonar installations on different computers Save a backup of a known good state (similar to system backup/restore) in windows Troubleshooting system related problems Note: Configuration profiles are not a replacement for templates, presets or Workspaces, but provide an additional degree of management for global system and hardware related settings of the app. Saving a configuration profile To save the current Sonar settings as a configuration profile: Go to Edit > Preferences > Customization - Backup/Restore Settings. Select the setting that you want to save: Audio Configuration. Save audio settings that are stored in Aud.ini. MIDI Configuration. Save MIDI settings that are stored in TTSSeq.ini. Control Surfaces Configuration. Save control surface settings that are stored in ctrlsurface.dat and ctrlsurface_UWP.dat. General Application Settings/Configuration. Save general app settings that are stored in Cakewalk.ini and the Windows registry. Keyboard Shortcuts. Save all assigned key bindings. [Optional] Type a description. Click Save to open the Save As dialog box. By default, configuration profiles are saved as JSON files with a .ccp file extension within %APPDATA%\Cakewalk\Sonar\Config Profiles. Type a file name, then click Save (the default file name is ConfigProfile_<current date>.ccp). Note: Sonar automatically saves the last known good config profile when exiting the app. Loading a configuration profile To load a configuration profile: Go to Edit > Preferences > Customization - Backup/Restore Settings. By default, Sonar will load all the settings that are stored in the configuration profile. If you want to selective only load specific settings, select Only apply the settings checked above on load, then select which settings to load: Audio Configuration. Load audio settings that are stored in Aud.ini. MIDI Configuration. Load MIDI settings that are stored in TTSSeq.ini. Control Surfaces Configuration. Load control surface settings that are stored in ctrlsurface.dat and ctrlsurface_UWP.dat. General Application Settings/Configuration. Load general app settings that are stored in Cakewalk.ini and the Windows registry. Keyboard Shortcuts. Load key bindings. Click Load to open the Open dialog box. Select the desired configuration profile, then click Open. Sonar prompts you to confirm that you want to load the configuration profile. Click Yes. Loading a configuration profile on app startup You can load a configuration profile on startup via a command line: Do one of the following to open the Command Prompt: Click the search box next to the Windows Start button, then type CMD and press ENTER. Press the Windows key () + R, then type CMD and press ENTER. Type the following: <Sonar install path>\Sonar.exe /RestoreConfig=<configuration file folder>\<name of configuration profile file> For example: "C:\Program Files\Cakewalk\Sonar\Sonar.exe" /RestoreConfig="%APPDATA%\Cakewalk\Sonar\Config Profiles\mysettings.ccp" Press ENTER. Sonar launches with the specified configuration profile. Creating a desktop shortcut with command line parameters You can add command line parameters to a desktop shortcut. This way you don’t have to manually type command line parameters each time you want to launch Sonar with a specific configuration profile. To add launch parameters to a desktop shortcut: Create a new desktop shortcut for each configuration profile (Tip: copy the default Sonar desktop shortcut), and give the shortcut a descriptive name. Right-click the shortcut and select Properties. In the Properties dialog box, click the Shortcut tab. In the Target text box (which already lists the location of the Sonar executable within quotation marks), place the cursor after the last quotation mark, then add a blank space followed by the command line parameters. For example: /RestoreConfig="%APPDATA%\Cakewalk\Sonar\Config Profiles\ConfigProfile_2023-02-28.ccp" The full Target text string should look something like this: "C:\Program Files\Cakewalk\Sonar\Sonar.exe" /RestoreConfig="%APPDATA%\Cakewalk\Sonar\Config Profiles\ConfigProfile_2024-02-28.ccp" Click OK to save the changes. You can now double-click the shortcut to start Sonar with the specified configuration profile. Automation smoothing when recording Automation smoothing now also applies to recording automation in real-time. You can specify how shape smoothing works when recording automation in real-time (and when using the Freehand tool on envelope shapes). To do so, click the Track view Options menu, point to Automation Smoothing, then select one of the following options: Smooth. Uses the existing fit-to-curve functionality. This is the default setting. As Drawn/Recorded (Linear). Joins the nodes up with linear shapes. As Drawn/Recorded (Jumps). Leaves the nodes as is, making them jump shapes. Specify the default automation curve type To specify the default automation curve type when drawing automation envelopes, click the Track view Options menu, point to Default Automation Curve, then select the desired curve type: Jump. A jump shape causes the envelope to make a ninety degree jump where the envelope reaches the second node. Sonar displays jumps with a dotted line, meaning that there is automation data at the nodes where the dotted line begins and ends, but not where the line itself is. Linear. Draw a straight line between the two nodes. Fast Curve. A fast curve draws a curve between the two nodes that changes value rapidly at first, but more slowly toward the end of the curve. Slow Curve. A slow curve draws a curve between the two nodes that changes value slowly at first, but more rapidly toward the end of the curve. Offset mode enhancements To make it easier to visualize if a track parameter has an offset applied, Sonar shows the parameter value in an amber color when Offset mode is not active . The parameter tooltip also shows the offset value. Live articulations When playing a MIDI controller in real-time, the per track Live Articulations setting allows you to apply any transform articulations that are active at the now time. Live articulations are echoed, but not recorded. To enable/disable live articulations on the focused MIDI track, do one of the following: In the Track Properties inspector, select Live Articulations. Tip: You can use quick grouping (hod down the CTRL key) to enable/disable the setting on all selected MIDI tracks. In the Piano Roll view, click the Live Articulations button . The button state applies to the focused track. Time offset for MIDI transform articulations MIDI Transform Articulations now support an optional offset value that will offset the start/end times for notes. The offset can be applied using either ticks or milliseconds. The Duration checkbox toggles whether notes should retain their original end points as drawn or offset with start times. Key Aftertouch editing in the Piano Roll view Controller pane Key/Polyphonic Aftertouch events can now be edited in the Piano Roll view Controller pane in addition to the Event List view. To add a Key Aftertouch lane in the Controller pane: Click the Add New Controller button in the bottom left corner of the Controller pane to open the MIDI Event Type dialog box. Under Type, select KeyAft. Under Value, select the note/key. You can now draw polyphonic aftertouch events that represent the pressure values for the selected note/key on the chosen MIDI channel. Key/Polyphonic Aftertouch can also be used in MIDI track / Synth track automation. Import and export tempo map to/from MIDI files To import a tempo map from a MIDI file, right-click the Tempo track and select Import Tempo Map from MIDI File. Import replaces the current tempo track with any tempos in the MIDI file. To export a project's tempo map to a MIDI file, right-click the Tempo track and select Export Tempo Map to MIDI File. Export saves the tempo track to a MIDI file, without saving any other tracks or events. Cakewalk Product Center Cakewalk Product Center allows you to download and install Cakewalk products from one central location. Simply sign in with your BandLab ID and password and begin installing your connected products. Stay up to date with the latest features and fixes. For more information and to download Cakewalk Product Center, see: Plugins Overloud TH-U Cakewalk amp simulator TH-U Cakewalk Edition by Overloud provides realistic guitar amp models from clean to crushing distortion. This special edition includes a curated collection of amplifier models, cabinet models, effects models and dozens of presets. Easily build or modify your own signal path. New since TH3 Cakewalk: Added Rig Player and Supercabinet You can now load user IRs even in regular cabinets instead of using one or both microphones Added Scenes support (A, B, C, D buttons on the interface) Added Fluid Convolution technology support (https://www.overloud.com/news/fluid-convolution-unveiled) Added Fluid IR technology (https://youtu.be/qLZ5rBCWW_k) Remastered Cabinets (improved the cabinet processing) Possibility to save and load settings for single effects (right click effect) Customizable initial chain (click Custom in the Settings panel) More parameters for cabinets (pan, mic angle) Note: TH-U Cakewalk is only usable in Sonar and Next. If you already own the full version of TH-U, installing the TH-U Cakewalk edition will not change your existing functionality. Overloud TH-U Cakewalk is fully backwards compatible with older TH3 and TH2 versions. TH3 is no longer distributed with Sonar. Projects or templates containing TH2 or TH3 will automatically load in TH-U if the old plugin is not available. Important: If you already have TH3 installed, you may not see any presets in TH-U. This will be addressed in a future update. The workaround for now is as follows: Close Sonar. In file explorer, navigate to the app data folder for Overloud TH-U (Go to %APPDATA%\Overloud). Delete the \TH-U folder. Start Sonar and insert TH-U in an FX Rack. This will regenerate the appdata folder and recreate it this time with the correct default presets. ProChannel Concrete Limiter module ProChannel Concrete Limiter is an audio processing module for the ProChannel channel strip. ProChannel Concrete Limiter is a transparent look-ahead brickwall peak limiter. It is designed to reduce peak levels without coloring the sound. The purpose of ProChannel Concrete Limiter is to increase loudness as much as possible while preventing the signal from exceeding the maximum output level. ProChannel Concrete Limiter reduces the volume of the loudest parts (limiting), while simultaneously increasing the volume of the quiet parts (boosting). ProChannel Concrete Limiter is typically used as the final processor on the ProChannel strip, of tracks and buses. VX-64 Vocal Strip VX-64 Vocal Strip is a multi-functional plug-in that combines a series of effects specifically optimized and streamlined for vocal processing. Combining compression, expansion, equalization, deessing, doubling, delay and tube saturation in one convenient plug-in, VX-64 Vocal Strip is designed to make it fast and easy to enhance any vocal track. VX-64 Vocal Strip features include: 5 professional quality effect modules, each with its own bypass toggle. All modules are specifically tuned for vocal processing. Advanced tube saturation modeling available on input, output and EQ modules. Deesser with switchable center frequency and threshold. Configurable effect chain routing. Smooth, zipperless automatable parameters. Library of presets. A/B plugin settings Use the A/B buttons to compare two different versions of a plugin's settings. Select either slot A or slot B and adjust the plugin settings, then toggle between the two slots. Adjustments made to the selected slot do not affect the other slot. You can copy settings from the selected slot to the other slot. This is useful if you want to slightly modify the current settings and compare with the original settings. To do so, click the Copy Settings to Slot A/B button / . To revert the selected slot to its initial settings, click the Revert Settings button . Typical workflow: Select slot A. Adjust the plugin settings as desired. Click the Copy Settings to Slot B button . Slots A and B are now identical. Adjust the setting of either slot A or B. Toggle between slots A and B to compare the two different settings. Note: Upon project save, the app persists the plugin’s current settings (A or B), but the button state itself is not persisted. Upon subsequent project open, the plugin will always initialize with slot A selected, and slot B will be identical to slot A. Sidechaining enhancements Both audio plugins in the FX rack as well as instruments in the Synth Rack now support sidechaining (when available by the plugin). When a sidechain source is selected, a sidechain send from the selected source is created in the mixer. Please note that many plugins and instruments only expose sidechain inputs in their VST3 versions. Sonar provides the following workflows for designating sidechain sends for instruments and effects that support sidechaining: Track header output menu presents instrument sidechain sends if available (preexisting UX) Plugin window toolbar Settings cog has a new "Sidechain Sources" menu item to assign source to a plugin or instrument sidechain input directly from the header Checking a source creates a send from the chosen source to the plugin's sidechain input Unchecking a source removes the send to the plugin sidechain The sidechain sources menu is not shown if the plugin or instrument is not sidechain capable. Plugin window toolbar has a button to open the Manage Sidechain Sources dialog box (located next to ACT learn button). This button will only be shown if the plugin or instrument is sidechain capable. Prochannel header has the same "Sidechain Sources" menu shown in the plugin settings cog. This will be shown for any prochannel modules that have sidechain capabilities. The Manage Sidechain Sources button will highlight to show when a plugin sidechain input has something connected to it. Manage Sidechain Sources dialog, from the Sidechain Sources menu or plugin window toolbar, shows a modal dialog that facilitates the sidechain send management across multiple sources types (i.e. track, aux, bus). Manage sidechain routing directly from the effects view toolbar You can assign sidechain connections to a plugin or instrument directly from the effect view toolbar, without having to return to the source track(s) in the Track view or Console view. To do so, do one of the following: Click the VST2/VST3 drop-down menu in the VST plug-in toolbar, point to Sidechain Sources, then select the desired input source. The Sidechain Sources submenu is only shown for plugins or instruments that have a sidechain available. Choosing a source creates a send from the chosen track/bus source to the instrument's sidechain input. Unchecking a checked menu item removes that send to the instrument sidechain. Note: Up to 25 sidechain sources are listed in the Sidechain Sources submenu. If more than 25 sources are available, only connected sources will be shown. To access all available sidechain sources, select Manage Sources to open the Manage Sidechain Sources dialog box. Click the Sidechain Sources button to open the Manage Sidechain Sources dialog box, which facilitates the sidechain send management across multiple sources types (i.e. track, aux, bus). The Sidechain Sources button is only shown for sidechain capable plugins or instruments. The Sidechain Sources button will highlight to show when a plugin sidechain input has something routed to it. Selecting a source creates a send from the chosen source to the plugin's sidechain input. Deselecting an item deletes the send. The Send Settings are applied to newly added sends and will also modify any existing sends if changes are made to the settings. The Follow Track Pan setting will be applied but only affects playback when a send is a Post Fader send. Show These Sources lets you filter which source types are displayed in the list. Any changes to send settings are applied to all items, not just to the currently shown items. Double-click the Send Level slider to reset to 0 dB, or click the slider, then press F2 to type a dB value. Note: Only sends can be added from the Manage Sidechain Sources dialog box, although Sonar also supports directly connecting a track or bus output to a sidechain, via the Track header output menu. Manage sidechain routing directly from ProChannel modules You can assign sidechain connections to a supported ProChannel modules (such as PC4K S-Type Bus Compressor) by right-clicking the module header and pointing to Sidechain Sources. Sidechaining for VST instruments in the Synth Rack Sonar has supported side-chaining for effects plugins, satisfying the traditional and primary use case for sidechaining. However, a growing number of VST instruments now support sidechaining, therefore support has been extended to support such instruments, in addition to effects. To specify the sidechain input for a VST instrument: Open the VST instrument's property page. Click the VST2/VST3 drop-down menu in the VST plug-in toolbar, point to Sidechain Sources, then select the desired input source: Choosing a source creates a send from the chosen track/bus source to the instrument's sidechain input Choosing a checked menu item removes that send to the instrument sidechain Support for instruments with a single aux input Sonar can now handle synths with a single aux input and expose it as a sidechain. Prevent sidechain routing from creating a feedback loop Sonar has logic to prevent feedback loops when creating sidechain connections. Plugin oversampling enhancements Earlier versions of Sonar had up to 2X oversampling for plugins. Sonar now includes support for plugin oversampling at higher oversampling ratios from 2x up to 16X. Additionally, oversampling is also available for plugins within FXChains. The oversampling ratio and precision can now be selected in the plugin options as below: Oversampling has been optimized to be CPU efficient and the precision can be selected via the Precision menu, Please note that depending on your project sample rate, oversampling at higher ratios can lead to very high sample rates, that may not be supported by all plugin's. Oversampling may also tax your CPU at very high sample rates. How to enable oversampling: To use oversampling, you must set it on a per plugin basis. Once you have enabled it for a plugin it is automatically enabled for all instances of that plugin in a project. Additionally, Oversampling is only activated when the Px button in the mix module is enabled. This button allows you to easily toggle oversampling on to A/B how it sounds in your project. You can check which plugin have oversampling active and the oversample rate by looking at the plugin tooltip as below. Plugin Oversampling Precision You can now specify the precision for plugin oversampling. Using a medium precision uses less CPU and for many uses has no perceptible effect on resampling audio quality. This should reduce CPU load when utilizing plugin oversampling. Precision defaults to Medium. FX Rack tooltip indicates if oversampling is enabled When hovering over a plugin name in an FX rack, the tooltip shows the current rate if oversampling is enabled. This allows you to quickly verify if a plugin is being oversampled. Improvements to phase accuracy Prior to Sonar, oversampling could introduce an uncompensated phase offset in the oversampled data of around 150 samples, which could lead to phase problems when playing back the oversampled track along with the rest of the project, unless the track data was manually offset. This issue has been corrected and oversampling is fully phase accurate now with no delay in processing. See the up-sampled click track below. Handle oversampling for FX Chains and ProChannel FX Chains Oversampling is now supported for plugins in FX Chains and ProChannel FX Chains. Misc. improvements The oversampling engine has been updated for greater accuracy and several issues have been addressed. Problems with bouncing oversampled plugins where the bounce settings differ from playback have been addressed. Plugin oversampling can now be enabled while effect and instrument sidechaining is in use. Note: Enabling oversampling during playback can put a high demand on your CPU. If you experience dropouts or other issues, use oversampling only on render. Plugin delay compensation (PDC) UI enhancements Some plugins use a look-ahead buffer mechanism, which results in a short delay being introduced to the output signal when the plugin is used in real-time. Sonar applies automatic plugin delay compensation (PDC) during recording and playback on tracks that have input echo enabled. This ensures that all tracks are aligned properly. The exact latency is calculated automatically, and is influenced by all plugins in a track’s signal path. Override PDC during playback, recording, or both The PDC Override button in the Control Bar’s Mix module allows you to override PDC, and thereby reduce latency caused by plugin delay compensation in the signal flow. It allows you to play in real time within projects containing look-ahead plugins. When the PDC override button is engaged, any PDC latency for input monitored tracks or instrument tracks is bypassed, and the input monitor signal is passed through in real time. This is useful for recording or input monitoring in real time. The PDC Override button has a new popup menu that allows you to selectively override PDC for playback, recording, or both. To do so, long press or right-click the button and select the desired options: Override during playback. If this option is disabled, PDC Override will not affect tracks with input echo during playback. Override while recording. If this option is disabled, PDC Override will not affect tracks with input echo during recording. Both are enabled by default. If both are disabled, PDC override is still in effect during idle input monitoring. The above modes are only active when the PDC Override button is engaged. PDC Latency displayed in Track Properties Inspector The Track Properties Inspector shows the max/net PDC latency for that track/bus signal path in milliseconds and samples, as a result of compensating for other delay present in the project. Note: The displayed PDC Latency value is static text that is calculated automatically during playback and only updates in the UI when playback is stopped. PDC latency tooltips Plugin, FX Rack, ProChannel strip and modules all display tooltips showing the plugin lookahead latency when present. Hover over the FX Rack header to show the PDC latency for the entire rack. Hover over the an effect to show the PDC latency for that effect. Plug-in Load Balancing enhancements Plug-in Load Balancing now uses significantly less load when running at low latency. Note: Plug-in load balancing will not lower CPU use as compared to load balancing being disabled, especially when running at lower latency. This is because load balancing uses smaller buffers than the audio engine buffer size. Configurable Thread Count and Buffer size Both the plug-in load balancing threads and buffer size are now configurable settings in Edit > Preferences > Audio - Configuration File. When PluginLoadBalancingThreadCount is set to 0, the number of threads is adaptively managed and is less than the number of processor threads. You may change the value to utilize fewer or more threads. MinPluginLoadBalancingBufferSamples defaults to 96 samples and is the size of the internal load balancing buffers. Setting the buffer size higher will use less CPU but may result in less load balancing. Please note that when the engine latency is less than twice MinPluginLoadBalancingBufferSamples, load balancing will be automatically disabled internally. Plug-in Load Balancing active indicator When Plug-In Load Balancing is enabled in Edit > Preferences > Audio - Playback and Recording and load balancing is active, the FX Rack header tooltip shows (PLB) next to the audio processing load. External Insert enhancements External inserts have been enhanced to add true mono output support, ProChannel integration, FXChain support, a new Send Mode allowing an arbitrary tap point from an FX Rack, Friendly naming, better track template support, as well as numerous optimizations and stability fixes. Mono Outputs support. The External Insert plugin now supports exclusive use of mono outputs for sends. Prior to this, using a mono output would utilize a full stereo pair and prevent other external insert plugins or tracks from using the unused channel. It is no longer necessary for Show Mono Outputs to be enabled in the Devices tab of the Preferences to use mono channels in the external insert. (Its preferable to set display mode to show mono outputs since otherwise track or bus output will always utilize a full stereo channel). Preferences > Audio - Devices > Show Mono Outputs defaults to checked for new installations of Sonar. This is the preferred display mode. New Routing Modes. The external insert can be used in 4 modes. See Routing Modes below for more details. Send/Return mode [New] Send mode Return mode Passthrough mode ProChannel The external insert can now be used directly inside the ProChannel by adding it into a ProChannel FX Chain. FX Chains Support (both Track and ProChannel FX chains) now fully support adding an external insert. FX Chain presets containing External Inserts can now be saved and loaded in a track FX Rack or a ProChannel FX Chain. Drag and drop of external insert or an FX Chain containing one from track FX Rack to the ProChannel creates a ProChannel FX Chain containing the external insert. Send and return port assignments for the external insert are exclusive and can only be used by a single instance of the plugin. This is enforced as follows: Track input and output menus will exclude any items that are in use by the external insert. External Inserts send and returns will exclude any items that are in use by tracks/buses or other external insert plugins. Loading FX Chain presets or track templates containing external inserts will result in the send and return being set to None if the ports are already in use. Loading a project when the hardware inputs or outputs are no longer available will reset the external insert send/return. The external insert references send and return ports by name. Changing the friendly name of a port will result in the send and return being set to None if it was using a different name earlier. Track templates now persist external Insert ports. Friendly names can be assigned to External Inserts. Several stability improvements and fixes to external insert infrastructure. External Insert Routing Modes. The external insert can be used in 4 modes Send/Return mode. This is the primary mode and is engaged when both the send and return ports are routed to hardware ports. In this mode the plugin echoes its send input to the main output. The external insert measures the net delay between the send and return and compensates for this delay, aligning the audio on playback. This is the only mode that is delay compensated. [New] Send Mode. This mode is engaged when only the send is routed to a hardware port and the return is unassigned. In this mode the plugin sends its input audio to the assigned hardware output, and additionally passes through the audio through the main out effectively acting as a splitter. This mode can be useful to create a signal flow tap point from any FX Rack location. No delay is applied in this mode. Return Mode. This mode is engaged when only the return is routed to a hardware port and the send is unassigned. In this mode the plugin receives input audio from assigned return port and echoes the audio to its output. This mode can be useful to create an FX Rack insert from an external audio device or synth, or to receive input from another external insert tap point in Send Mode. You cannot ping to measure delay in this mode, but a manual delay offset can be specified to compensate for any delays. Passthrough Mode. This mode is engaged when neither send nor return ports are assigned. Passthrough mode operates as if the plugin has been bypassed in the effects rack. All incoming audio to the plugin is echoed unmodified to its output. Plugin Browser drag and drop enhancements You can insert or replace synth, and convert regular audio and MIDI tracks to instrument tracks with the following drag and drop gestures: To insert a synth: In the Plugins Browser, select the Instruments tab , then drag a synth to a blank area in the Track pane or Clips pane. To convert an audio or MIDI track to a simple instrument track: In the Plugins Browser, select the Instruments tab , then drag a synth to an audio or MIDI track to convert the track to a simple instrument track. Note: Audio tracks will only be converted if empty. To replace a synth: To replace the synth in a simple instrument track with a different synth, drag a synth from the Plugin Browser to the existing instrument track. Quick access to plugin settings The plugin toolbar now has a Settings menu button that provides direct access to Enhanced DPI scaling and plugin upsampling settings. Friendly names for plugins are now shown in FX racks Friendly names for plugins (set in the Browser) are now displayed in FX racks. Note: This will apply to new instances of the plugin. Existing ones will still show the actual plugin name. New instances will show the friendly name. Audio processing load tooltips Similar to the Control Bar's Performance module tooltip, audio processing load is now shown on hover over several new hotspots, which allows you to check performance load for every element in the project, tracks, buses, plugins, instruments and FX Chains. Load measurements are only performed when the tooltip is visible. When hovering over an FX Rack header, the tooltip shows the current audio processing load and max load. This is useful as a troubleshooting tool because real-time effects have a big effect on CPU load. This tooltip is also shown in FX Chains. In the FX Rack, hovering over a plugin name shows the load for that plugin. In the FX Rack, hovering over an FX Chain shows the load for that FX Chain. In the FX Chain plugin, hovering over a plugin name shows the load for that plugin. In the Synth Rack, the Name field tooltip shows synth audio processing load. The track meter peak indicator tooltip shows total combined processing load for the track including FX Rack and ProChannel. The bus meter peak indicator tooltip shows total combined processing load for the bus including FX Rack and ProChannel. Usability and Workflow Click Sonar logo in Control Bar to open Quick Start Screen Clicking the Sonar logo in the Control Bar opens the Quick Start Screen. Specify default synth for use in Add Track flyout menu You can specify which synth should be the default in the Add Track flyout menu. The default synth can be assigned from the synth track context menus or from the Synth Rack menu. Select all tracks/buses in a control group When multiple controls have been added to the same control group (A-X), it can be useful to record automation for all controls by only moving one of the controls. In order for this to happen, you must first manually select all the tracks/buses with controls in that group, enable Automation Write for the selected tracks using quick grouping, then record the automation during playback. It may be difficult to remember which tracks/buses have controls in that group in order to select them, so the new Select Tracks/Buses in Group menu command on the control group context menu makes it easy to automatically select all tracks and buses that have controls that are a member of the current control’s group. Hold down the CTRL key while selecting the menu command will add to the existing selection (default is to replace the current selection). Create sends by dragging effects to channel strips You can create a send by simply dragging an effect to an audio track, instrument track, aux track, or bus. To do so, drag an effect from the Plug-in Browser to the Sends area of a channel strip in the Inspector or Console view. Doing so creates a pre fader send and a new bus that contains that effect. To create an aux track instead of a bus, hold down the ALT key while dragging the effect. To insert an effect in a track or bus Select the desired channel strip and show its Sends section in the Track Inspector or Console view In the Browser, click the PlugIns button to show the Plug-in Browser. Click the Audio FX button to show audio effects. Do one of the following: To create a send to a new bus. Drag the effect to the channel strip’s Sends section. To create a send to a new aux track. Hold down the ALT key and drag the effect to the channel strip’s Sends section. The Insert Send button shows a red outline when you drag an effect to the Sends section. Tip: You can use quick grouping to create sends on all selected tracks simultaneously. To do so, select the desired tracks, then hold down the CTRL key while dragging an effect to the Sends section on any selected track. Create tracks routed to aux tracks or patch points The Add Track menu now allows you to create tracks that are routed to a new aux track or patch point. Preserve sections in other Arranger tracks when committing an arrangement When committing an arrangement, the new Include Sections in other Arranger Tracks option allows you to also “arrange” and preserve sections in other Arranger tracks that aren’t part of the selected arrangement. Arranger Inspector displays a badge on sections that intersect with the Now Time To help you better identify which Arranger section(s) intersects with the Now Time, the Arranger Inspector displays a badge to the left of the section name. In-app hang detection Sonar can now detect hangs and save a minidump file, which allows you to easily submit minidump files to Cakewalk support for analysis. A minidump file records the state of a program as it is running, or at the moment of a crash or hang. By default, the app is considered hung if the UI is blocked for 30 seconds after which an “Application Unresponsive” message appears, asking you to abort or wait. If you choose to abort, a hang dump file is saved to the %AppData%\Cakewalk\Sonar\MiniDumps folder, and the standard error dialog box is shown along with a description of common error codes. The hang check timeout duration is configurable via a Cakewalk.ini variable named HungAppTimeoutSec. It defaults to a wait of 30 seconds. To adjust the hang check timeout duration, add the following variable in Cakewalk.ini (Edit > Preferences > File - Initialization File) : HungAppTimeoutSec=<seconds> (default=30) To disable hang checking, set the variable to HungAppTimeoutSec=0. Note: Sonar dynamically changes the hang timeout while loading projects by bumping up the hang detector timeout to up to 2 minutes. This prevents false positives when saving large project files. Once loading finishes, it restores it back to the default (30 seconds). Sending the dump file to Cakewalk for analysis: Once you have the dump file you can put it on a share like Dropbox, Google Drive etc. Next, log a problem report case with Cakewalk and include the link to the dump file. Note: Dump files may include personally identifiable data so please do not post links to them publicly in the forums or elsewhere to protect your privacy. Key bindings to show/hide tracks The following new assignable key bindings allow you to show/hide tracks in the Track view and Console view: Under Area: Track View: Toggle Show All/Hide Previously Hidden Tracks and Buses Synchronize Track and Console Views Under Area: Console View: Toggle Show All/Hide Previously Hidden Tracks and Buses Synchronize Track and Console Views You can assign the key bindings in Edit > Preferences > Customization - Keyboard Shortcuts. Toast notification when a control surface is disabled on launch Sonar now shows a notification if you start the app while a control surface is disconnected. Deleting a tempo in the Tempo Inspector sets the focus to the next tempo in the list When deleting a tempo in the Tempo Inspector, the focus is now set to the next tempo in the list. Press F2 to rename markers in the Markers view F2 now allows you to rename markers in the Markers view. Meter scale for Instrument tracks changes to dB scale when frozen The vertical splitter bar between the Clips pane and the Track pane shows a MIDI scale (vertical piano keys) for MIDI and Instrument tracks, and an audio dB scale for audio tracks. When an Instrument track is frozen, its vertical MIDI scale automatically changes to a dB scale, which is more appropriate for audio content. Remove crossfades To remove all crossfades in the current selection, click the Track view Clips menu and select Remove Selected Crossfades. Track Scale Zoom is now quick-groupable You can now zoom the waveform or MIDI notes in all selected tracks by holding down the CTRL key and dragging up/down in the track scale. Double-click to reset sliders Double-click to reset sliders in the following dialog boxes: Edit > Preferences Process > Transpose Process > Length Process > Fit to Time Export track/bus and project icons as PNG Export any assigned track/bus and project icon as a PNG file. To export a track/bus icon, right-click the icon and select Save Track/Bus Icon. To export the project icon, point to the project icon in the Notes Browser, then click the “...” button and select Save Image. Process > Length dialog accepts fractional values The Process > Length dialog now accepts fractional Percent values. Quick Grouping of Mute, Solo, and Archive buttons on track folders The Mute, Solo, and Archive buttons on track folders can now be controlled via quick grouping. Quick groups allow you to adjust identical controls across multiple tracks. Select the tracks you want to adjust, then hold down the CTRL key and adjust a control in any selected track. Sonar automatically adjusts the same control in all other selected tracks of the same type. Updated docked Synth Rack and new bypass functionality There are several improvements to the synth rack to allow managing large synth projects more efficiently. This allows you to quickly bypass and free memory and CPU resources allocated to synths, or create templates with bypassed synths and bring them online on demand. The docked version of the Synth Rack now shows a synth Bypass button. By default, the Bypass button unloads the synth when the instrument is bypassed, and also archives all related tracks to save CPU. The synth will be reloaded again and tracks unarchived when the synth is unbypassed. The preset picker has been removed from the docked Synth Rack to save space (the preset picker is shown when undocked or when docked in the MultiDock). This control is largely obsolete because most instruments handle preset management inside the synth UI. The Synth Rack menu and the synth strip context menus have been redesigned to show the relevant functions: Replace Synth is now available via the synth context menu. Bypass All Synths and Unbypass All Synths can be used to quickly bypass all instruments in the Synth Rack. Note that bypass/unbypass can take a while on projects with large numbers of synths if they are big. The progress is shown in the Control Bar Transport module. You may cancel a long bypass/unbypass operation by pressing the ESC key. Unload and Archive preferences can be set in the synth rack menu. In-app bug reporting Report bugs via the in-app Help > Report a Problem menu command. Microsoft GS Wavesynth device no longer available in any driver mode The Microsoft GS Wavesynth device is known to cause audio driver problems, and is therefore no longer available as a MIDI output in any driver mode. Previously it was only unavailable in WDM mode, but has now also been removed from MME and WASAPI Shared modes. Optimizations Audio engine low latency optimizations for multi-core processors The audio engine has been greatly optimized for playback and monitoring when running high plugin workloads at low latencies (less than 256 samples) on machines with high core counts (16 or more processor threads). Prior to this, running at low latencies could result in sub optimal multiprocessing load sharing and higher CPU load. Performance optimizations for projects with many synths and effects Sonar has been greatly optimized to handle high virtual instrument counts, managing the load more efficiently and using minimal CPU resources. In a real-world orchestral template with 250 Kontakt instances, the base template will now run efficiently at 128 samples with very few late buffers. In prior versions such a project would only run at 1024 samples or higher. General plugin performance in FX racks has been improved, allowing you to run workloads with high plugin counts more efficiently. Misc. optimizations Support for AMD threadrippers. Max CPU threads has been increased. Sonar now supports CPUs with up to 256 threads as supported by the AMD EPYC. Greatly improved plugin load balancing performance. Increased hang detection default timeout to 1 minute from 30 secs to prevent false positives with some instruments. Improved editing performance on projects with a large number of virtual instruments. Several optimizations have been made to improve performance when editing clips or MIDI in heavily loaded projects. The Now Time update frequency has been optimized to allow for smoother scrolling of the playhead marker during playback. Improved VU meter responsiveness. Optimizations to drawing efficiency in Console and Track view. Optimization for Intel processors to reduce CPU load when streaming silence with certain plug-ins that generate denormals. There are optimizations to playback start and seeking which reduce the latency before playback starts when starting the transport. Improved and faster Nudge performance. MIDI buffer size is now adaptively managed whenever delay compensated plugins are present in the project, without any need to raise the MIDI playback buffer size. Latest release notes are here.
-
RCA Records Nashville started following Morten Saether
-

Sonar Reference Guide PDF now available
Morten Saether replied to Morten Saether's topic in Cakewalk Sonar
The CbB reference guide PDF will still be available via this link, but not via the forum menu. -
We are pleased to announce the availability of the Cakewalk Sonar Reference Guide PDF. To view and download the PDF, click the Cakewalk forum menu and select Reference Guide PDF, or download the PDF directly from here.
- 7 replies
-
- 12
-

-

-
Hi all - please use this topic to post feedback specific to the Sonar 2024.12 release. Release-specific feedback is valuable to us, and consolidating it in a single topic is extremely helpful. We request that discussion in this thread be restricted to issues directly concerning this release, to make it easier for us to assist users. For other topics, kindly use the feature request section or create new posts. Off topic messages will be deleted. Thanks in advance! Sonar 2024 Overview
-
New in Sonar 2024.12 build 30.12.0.004: This release adds improvements to the Quick Start Screen, numerous optimizations as well as usability enhancements and bug fixes for user reported issues. Quick Start Screen improvements. Announcements panel added to Quick Start Screen (visible only when there are announcements). Sonar now correctly detects configurations with more than 64 CPU cores and will utilize all cores by default. The Control Bar's Performance module now shows total count and utilization of audio threads, which is indicative of how Sonar utilizes CPU processor cores. Sonar by default creates one thread per logical processor core for mixing and additional threads for plugin load balancing. Thread utilization depends on track/bus count and number of effects and buffer size, as well as other factors such as tracks archive. Help Module content added to VST Settings menu. Fixed: Potential Crash on closing projects containing synths in FX rack Fixed: Hang opening project containing Silencer and plugin load balancing enabled Fixed: Inserted ProChannel modules aren't heard until playback restarts Fixed: Drum Replacer not appearing hidden as VST FX Fixed: Crash setting input from external insert Fixed: Dragging audio clip to Browser crashes intermittently Fixed: Project load toast doesn't close after loading project Fixed: Crash on undo in user project Fixed: Start Screen opens unexpectedly when creating a new project from template Fixed: Signing in initially displays not activated despite successful license acquisition Fixed: Intermittent deadlock sending hardware MIDI Fixed: Opening Piano Roll view with selected tracks (or clips) should open with only the selected tracks Fixed: Access Violation crash on exit with DeviceChangeNotify Fixed: Crash when showing inline Piano Roll on track routed to a drum map Fixed: Sonar crashes when trying to process audio FX Fixed: Export to BandLab crashes when exporting with track regions and project mixdown included Fixed: Quick Start Screen preview for the online library plays incorrect project preview Fixed: Changing beat count in a Step Sequencer clip fails to update clip Fixed: [Regression] Half sized Inspector breaks when right-clicking MIDI track Please give us feedback on this release. We hope you like it Sonar 2024 Overview
-
We're pleased to announce the release of Sonar 2024.12! This release adds improvements to the Quick Start Screen, numerous optimizations as well as usability enhancements and bug fixes for user reported issues. Please note that in order to automatically keep your activation status up to date, Sonar will renew your activation status whenever a new version of the application is installed and run for the first time, and when you sign in to BandLab from within Sonar. If you have never signed in to BandLab from within Sonar, you will be prompted once to sign in. Thanks, The Bakers Please note: Cakewalk Sonar and Cakewalk Next are currently exclusively available via BandLab Membership. New in Sonar 2024.12 build 30.12.0.004: Quick Start Screen improvements. Announcements panel added to Quick Start Screen (visible only when there are announcements). Sonar now correctly detects configurations with more than 64 CPU cores and will utilize all cores by default. The Control Bar's Performance module now shows total count and utilization of audio threads, which is indicative of how Sonar utilizes CPU processor cores. Sonar by default creates one thread per logical processor core for mixing and additional threads for plugin load balancing. Thread utilization depends on track/bus count and number of effects and buffer size, as well as other factors such as tracks archive. Help Module content added to VST Settings menu. Fixed: Potential Crash on closing projects containing synths in FX rack Fixed: Hang opening project containing Silencer and plugin load balancing enabled Fixed: Inserted ProChannel modules aren't heard until playback restarts Fixed: Drum Replacer not appearing hidden as VST FX Fixed: Crash setting input from external insert Fixed: Dragging audio clip to Browser crashes intermittently Fixed: Project load toast doesn't close after loading project Fixed: Crash on undo in user project Fixed: Start Screen opens unexpectedly when creating a new project from template Fixed: Signing in initially displays not activated despite successful license acquisition Fixed: Intermittent deadlock sending hardware MIDI Fixed: Opening Piano Roll view with selected tracks (or clips) should open with only the selected tracks Fixed: Access Violation crash on exit with DeviceChangeNotify Fixed: Crash when showing inline Piano Roll on track routed to a drum map Fixed: Sonar crashes when trying to process audio FX Fixed: Export to BandLab crashes when exporting with track regions and project mixdown included Fixed: Quick Start Screen preview for the online library plays incorrect project preview Fixed: Changing beat count in a Step Sequencer clip fails to update clip Fixed: [Regression] Half sized Inspector breaks when right-clicking MIDI track Sonar 2024 Highlights User Interface: UI refresh DPI Awareness Track Manager enhancements Spectrum Analyzer display in Console view, Inspector and ProChannel Double-click to expand/collapse docked windows Additional snap landmarks Preview Bus enhancements New Features: Integrated sampler (XSampler) New Quick Start screen Project preview Project Start and End markers File formats: Cakewalk Interchange Format (CXF) Cakewalk ZIP Format (CWZ) Configuration backup/restore Automation: Automation smoothing when recording Specify the default automation curve type Offset mode enhancements MIDI: Live articulations Time offset for MIDI transform articulations Key Aftertouch editing in the Piano Roll view Controller pane Import and export tempo map to/from MIDI files Cakewalk Product Center Plugins: Overloud TH-U Cakewalk amp simulator ProChannel Concrete Limiter module VX-64 Vocal Strip A/B plugin settings Sidechaining enhancements Plugin oversampling enhancements Plugin delay compensation (PDC) UI enhancements Plug-in Load Balancing enhancements External Insert enhancements Plugin Browser drag and drop enhancements Quick access to plugin settings Friendly names for plugins are now shown in FX racks Audio processing load tooltips Usability and Workflow: Click Sonar logo in Control Bar to open Quick Start Screen Specify default synth for use in Add Track flyout menu Select all tracks/buses in a control group Create sends by dragging effects to channel strips Create tracks routed to aux tracks or patch points Preserve sections in other Arranger tracks when committing an arrangement Arranger Inspector displays a badge on sections that intersect with the Now Time In-app hang detection Key bindings to show/hide tracks Toast notification when a control surface is disabled on launch Deleting a tempo in the Tempo Inspector sets the focus to the next tempo in the list Press F2 to rename markers in the Markers view Meter scale for Instrument tracks changes to dB scale when frozen Remove crossfades Track Scale Zoom is now quick-groupable Double-click to reset sliders Export track/bus and project icons as PNG Process > Length dialog accepts fractional valuess Quick Grouping of Mute, Solo, and Archive buttons on track folders Updated docked Synth Rack and new bypass functionality In-app bug reporting Optimizations: Audio engine low latency optimizations for multi-core processors Performance optimizations for projects with many synths and effects Misc. optimizations Cakewalk by BandLab is now Cakewalk Sonar Cakewalk by BandLab has been rebranded as Cakewalk Sonar. As Cakewalk is once again a multiple product brand, it is important to differentiate between the brand and product names. The rebrand also better reflects Sonar's celebrated history and name recognition. Cakewalk Sonar will not overwrite an existing Cakewalk by BandLab installation. User Interface UI refresh Sonar has been completely refreshed with a clean new UI, but will still feel familiar to users of Cakewalk by BandLab. The UI refresh is an ongoing effort and will continue to be updated in future releases. Dark and Light color schemes Sonar includes several color themes, including Dark, Dark Gray, Light, Light Gray, Tungsten, Mercury, and Cosmic, which can be selected in Edit > Preferences > Customization - Display. Additional color themes will be added in the future. Note: Custom themes created with previous versions of SONAR or Cakewalk by BandLab are not compatible with Cakewalk Sonar. DPI Awareness Note: DPI Awareness is only available on Windows 10 build 1809 (October 2018) and above. Sonar version 2024.04 introduces support for DPI Awareness, which improves rendering and reduces blurriness, particularly for font rendering. DPI Awareness may sharpen graphics and make text easier to read. Improvements will be most noticeable when using large, high resolution displays (such as 4K) and with Windows display scaling set higher than 100%. (Tip: Right-click the image above and select Open link in new tab to view the image at 100% resolution) To enable/disable DPI Awareness: Go to Edit > Preferences > Customization - Display. Select Enable DPI Awareness. Restart Sonar. Per plugin DPI Awareness In addition to the global Enable DPI Awareness app setting, you can also enable/disable DPI Awareness on a per plug-in basis for VST plug-ins. DPI Awareness is enabled by default for all VST plug-ins and can be disabled on a case-by-case basis depending on whether the plug-ins are compatible with display scaling. For example, some older plug-ins may appear too small on large, high resolution monitors, in which case disabling DPI Awareness might be preferable. To enable/disable DPI Awareness for a VST plug-in: Open the VST plug-in's property page. Click the VST2/VST3 drop-down menu in the VST plug-in toolbar and select Enable Plugin DPI Awareness. Note: Display scaling is always disabled for DX plug-ins Plug-in scaling is stored globally for a plug-in, not per project Display Scale slider The Display Scale slider in Edit > Preferences > Customization - Display allows you to adjust the display scaling of Sonar independently from the global Windows display scale setting (Settings > Systems > Display). Select a custom scaling size between 75%–150%. Note: Low Display Scale values work better at higher DPI resolutions. For example, a low-resolution 1080p screen at 96 DPI, so a Display Scale value of 75% will result in a tiny UI that is potentially difficult to read. On the other hand, a 4K screen at 75% will also show a tiny UI, but may still be usable because it has 4x the number of pixels. Track Manager enhancements The Track Manager lets you configure which tracks are visible in the Track view and Console view, and you can create per-project presets to quickly show specific sets of tracks. Track Manager controls in Track view and Console view The Track Manager button in the Track view and Console view toggles between showing all tracks/buses () and hiding previously hidden tracks/buses (). The button is lit if at least one track is hidden. Track Manager menu The Track Manager menu provides various commands to manage track visibility and quickly save and recall per-project presets. To show the menu, long press or right-click the Track Manager button . The Track Manager menu contains the following commands: <list of presets>. Per project Track manager presets. Show All Tracks and Buses. Show all tracks and buses. Click the Track Manager button again to hide previously hidden tracks. Show Only >. Show only the selected track type: Audio Tracks. Only show audio tracks. MIDI Tracks. Only show MIDI tracks. Instrument Tracks. Only show Instrument tracks. Aux Tracks. Only show Aux tracks. Track Folders. Only show track folders. New Preset. Create a new preset for the currently visible tracks. Only available when at least one track is hidden and the Track Manager button is lit . Track Manager. Open the Track Manager, which lets you specify which tracks to display. Synchronize Track and Console views. Enable to show the same set of tracks and buses in the Track view and Console view. Disable to show different sets of tracks and buses in the Track view and Console view. Creating a Track Manager preset To create a Track Manager preset: Only show the tracks that you want to save as a preset. Do one of the following to hide any tracks that you don’t want to see: Right-click a track and select Hide Track Select the track(s) and press CTRL+H Long press or right-click the Track Manager button , then select New Preset to open the New Track Manager Preset dialog box. Type a descriptive name, then click OK. You can also create and load presets in the Track Manager dialog box. Selecting a Track Manager preset To select a Track Manager preset, long press or right-click the Track Manager button , then select the desired preset. Showing only specific track types To only show a specific track type (audio, MIDI, Instrument, Aux, or track folders), long press or right-click the Track Manager button , point to Show Only, then select the desired track type. Spectrum Analyzer display in Console view, Inspector and ProChannel The EQ plot in the Console view, Inspector, and ProChannel shows a real-time spectrum analyzer per track by default. To enable/disable the per-track/bus spectrum analyzer in the Console view, click the Console view Options menu and select EQ and Plot > Show Spectrum Analyzer. To enable/disable the spectrum analyzer in the Inspector, click the Inspector Display menu and select Module Options > EQ and Plot > Show Spectrum Analyzer. Double-click to expand/collapse docked windows You can double-click to expand docked windows (MultiDock, Inspector, and Browser), as outlined below: When the Inspector or Browser is docked and minimized, double-click to expand. For the MultiDock, double-click to toggle between expand and collapse. Additional snap landmarks The following items are now available as Snap to Grid landmarks: Arranger Section Start Time. Snap to the start of any Arranger section. Arranger Section End Time. Snap to the end of any Arranger section. Project Start Marker. Snap to the Project Start marker. Project End Marker. Snap to the Project End marker. To select the desired landmarks, right-click the Snap to Grid button to open the Preferences dialog box, then select the desired check boxes in the Landmarks section. Sonar will snap to landmarks on tracks/lanes that are currently visible in the Clips pane. Preview Bus enhancements The Preview Bus assignment is now a project-wide setting. Preview bus assignment can now be managed directly from the bus/mains/aux track context menus or directly from the main Project menu. An aux track can now be designated as a preview bus. If a bus that is assigned as a preview bus output is deleted, the preview bus will automatically be assigned to be the first hardware output. Preview bus changes can now be made dynamically while preview is underway. New Features Integrated sampler (XSampler) XSampler is a simple sampler that lets you import or record audio, perform basic processing, and play it like an instrument with up to 16 voices. Instantly convert a single audio file into a playable or triggable sound that can be played back at different pitches and speeds. There are many ways to get audio into XSampler: import audio from the file system, drag loops and one-shots from the Media Browser, drag audio clips (including partial clip selections) from any track. After audio has been added, you can loop, trim, crossfade, change playback behavior and modulation or filtering options to create interesting musical ideas. New Quick Start screen You can perform the following tasks from the Quick Start screen: Open a recent project Open an existing project Start a new project Create a new project from a template Open demo projects Preview projects Update the app Download and install optional content Project preview You can preview projects from the Quick Start screen’s Recent page if you have exported a designated preview file. The preview file may be any supported audio file type (Wave, BWF, MP3, FLAC, OGG, or WaveEX), and can be the entire project or a specific time range. To create a project preview file: Open an existing project. Ensure that the project has been saved at least once with the new version of Sonar in order to use required metadata. If you only want the preview to contain a specific time range, select the desired time range. Go to File > Export > Audio to open the Export Audio dialog box. Under File Type, select Wave, Broadcast Wave, MP3, FLAC, OGG, or WAVEX. Under Channel Format, select Stereo, Mono or Follow Source. Under Source Category, select Entire Mix. Under Mix and Render, select Include Project Preview to export a preview file. Click Export. The preview file is exported to the project’s \Audio folder. Note: The first export of a project will automatically create a preview file irrespective of the Include Project Preview option. To preview a recent project: Go to File > Quick Start Screen to open the Quick Start screen, then select Local Projects. Click the preview button on a project’s image. A preview button only appears if the project has a designated preview file. Project Start and End markers The Project Start and Project End markers define the playback range and the export range when exporting the entire project, and can also be used as Snap to Grid landmarks. By default, a project does not contain a Project Start or Project End marker. The project starts playback from measure 1 and ends after the last clip. If you want to start playback after measure 1, set the Project Start marker at the desired location. If you want playback to stop before the end of the last clip, set the Project End marker at the desired location. Once set, the Project Start and Project End markers appear in the time ruler, and can be dragged or deleted in the same way as regular text markers. To set the Project Start marker To set the Project Start marker, move the Now Time position to where you want the project to start, then do one of the following: Select Project > Set Project Start Marker to Now Time Right-click the time ruler and select Set Project Start Marker to Now Time The location of the Project Start marker is considered the beginning of the project. To set the Project End marker To set the Project End marker, move the Now Time position to where you want the project to end, then do one of the following: Select Project > Set Project End Marker to Now Time Right-click the time ruler and select Set Project End Marker to Now Time When the Project End marker is inserted, the Options > Stop at Project End option is also automatically enabled. Playback will only stop at the Project End marker if the Stop at Project End option is enabled. Tip: The Set Project Start Marker to Now Time and Set Project End Marker to Now Time menu commands are also available as key bindings. You can assign the key binding in Edit > Preferences > Customization - Keyboard Shortcuts (under Area: Global Bindings). Note: If a loop region exists beyond the Project End marker, the Project End marker is ignored in favor of the loop extents. Recording ignores the Project End marker. If recording stops after the Project End marker, the marker is moved to where recording stopped, or if comp/loop recording, to the end of the loop. The selection is clamped to the Project End marker when you open the Export Audio dialog box, unless the selection starts after the Project End marker. To jump to the Project Start marker To jump to the Project Start marker, do one of the following: Click the Go to Start (RTZ) button in the Control Bar’s Transport module to toggle between the Project Start marker and measure 1 Press CTRL+HOME to toggle between the Project Start marker and measure 1 Press W to toggle between the Project Start marker and measure 1 (or if a loop region is set, toggle between the Project Start marker and the loop start) Press G to open the Go dialog box, then press F5 to open the Markers dialog box and select <Project Start Marker> from the list To jump to the Project End marker To jump to the Project End marker, do one of the following: Click the Go to End button in the Control Bar’s Transport module to toggle between the Project End marker and the end of the project Press CTRL+END to toggle between the Project End marker and the end of the project Press G to open the Go dialog box, then press F5 to open the Markers dialog box and select <Project End Marker> from the list To delete the Project Start/End marker To delete the Project Start or Project End marker, do one of the following: Click the marker and hold the left mouse button down, then press the DELETE key Click the Project menu and point to Remove Project Marker, then select Remove Project Start Marker, Remove Project End Marker, or Remove Project Start/End Markers Right-click in the time ruler and point to Remove Project Marker, then select Remove Project Start Marker, Remove Project End Marker, or Remove Project Start/End Markers Note: If you drag the Project Start marker to the beginning of the project (measure 1), it will automatically be deleted. Cakewalk Interchange Format (CXF) The Cakewalk Interchange Format (CXF) is a Cakewalk cross platform inter-app project file format, used to exchange projects between Sonar and Next. CXF files exported from either application can be opened or imported in both apps. Note: CXF is a transitory format only used for exchange. It is not intended for archival storage or backing up since the format can change at any time. CXF supports a subset of project data used by Sonar and Next, so app-specific feature settings and view-specific states will not be restored. The following data will be exported and imported: Tracks Audio MIDI Instrument tracks Simple Instrument tracks (Sonar) Multi Instrument tracks (each track will represent a unique instance of the synth when opened) Split instrument tracks (not supported) Bus tracks (Next) Patchpoints (Sonar; converted to buses) Aux tracks (Sonar; limited support - treated like patch points and converted to buses) The aux track itself will not route to the patchpoint. Track data Audio/MIDI clips Overlapping clips or take lanes are flattened prior to export Clip effects are rendered into the clips prior to export Automation envelopes Track/Bus parameters Volume Pan Mute Solo Input Gain (Sonar only) Input Pan (Sonar only) Track/Bus routing Outputs Hardware outputs are not preserved since they are not cross platform. Any hardware outs are automatically assigned to the first hardware output. Sends to buses and patch points. Plugins in track and bus effects racks. On opening a CXF file, any missing plugins will be listed. Note: when moving a project between Windows and Mac any plugins used must be installed on both platforms in the same format to successfully load them. VST2 VST3 DX AU plugins (only available in Next Mac) DX plugins (only available in Sonar) ProChannel (not supported) FX Chains (not supported) Plugin settings are stored within the CXF and will be restored if the plugin is available. Instruments and instrument settings are stored within the CXF. Exporting a project in CXF format To export a project to Cakewalk Interchange Format, do one of the following: Go to File > Export > Cakewalk Interchange. Click the Export button in the Control Bar’s Export module and select Other > CXF (Cakewalk Interchange). CXF files have a .cxf file extension. When the export is complete, a notification appears with a link to open the export folder. Opening a project in CXF format To open a project in Cakewalk Interchange Format, do one of the following: Go to File > Open and choose Cakewalk Interchange as the file format. Drag a .cxf file to the Track view. Opening a CXF file creates a new project, which must then be saved in Sonar’s native project file format (.cwp). Importing a project in CXF format To import a project in Cakewalk Interchange Format into an existing Sonar project, drag a .cxf file to the track area. An imported CXF file merges its data into the existing project file. Cakewalk ZIP Format (CWZ) The new Cakewalk ZIP (.cwz) file format is intended for backing up projects, and is also useful for moving Sonar projects from one computer to another. Cakewalk ZIP is recommended over the older Cakewalk Bundle (CWB/BUN) format, because it does not compact the audio data, and therefore supports AudioSnap clips. The following items are saved in a CWZ file: Project file (.cwp) Project \Audio folder and any other referenced audio data Project \Audio Export folder, if present Project \MixScenes folder, (only if project contains any mix scenes) To save the current project as a Cakewalk ZIP (.cwz) file, go to File > Save As and select Cakewalk ZIP from the Save As Type drop-down list, then click the Save button. To open a CWZ file in Sonar, go to File > Open and navigate to the CWZ file. Note: A Cakewalk ZIP (.cwz) file is a regular ZIP file that can be extracted with any app that supports ZIP files. You can simply rename the .cwz file extension to .zip and manually unzip the file. To unzip a ZIP file in Windows, right-click the file and select Extract All. Configuration backup/restore You can save and load backups of your Sonar configuration settings. A configuration profile stores settings from various Sonar configuration files and Windows registry settings in a single JSON file. You can selectively choose which app settings to save or load from a configuration profile. Configuration profiles have many uses, including: Quickly switch Sonar to a different audio configuration or driver mode when using multiple audio interfaces Save hardware setup profiles for different workflows, such as tracking, mixing, live band recording, customizations for recording different band’s etc. Switch between different control surface configurations Save startup configurations and launch them via desktop shortcuts using the RestoreConfig command line flag Transfer app settings between Sonar installations on different computers Save a backup of a known good state (similar to system backup/restore) in windows Troubleshooting system related problems Note: Configuration profiles are not a replacement for templates, presets or Workspaces, but provide an additional degree of management for global system and hardware related settings of the app. Saving a configuration profile To save the current Sonar settings as a configuration profile: Go to Edit > Preferences > Customization - Backup/Restore Settings. Select the setting that you want to save: Audio Configuration. Save audio settings that are stored in Aud.ini. MIDI Configuration. Save MIDI settings that are stored in TTSSeq.ini. Control Surfaces Configuration. Save control surface settings that are stored in ctrlsurface.dat and ctrlsurface_UWP.dat. General Application Settings/Configuration. Save general app settings that are stored in Cakewalk.ini and the Windows registry. Keyboard Shortcuts. Save all assigned key bindings. [Optional] Type a description. Click Save to open the Save As dialog box. By default, configuration profiles are saved as JSON files with a .ccp file extension within %APPDATA%\Cakewalk\Sonar\Config Profiles. Type a file name, then click Save (the default file name is ConfigProfile_<current date>.ccp). Note: Sonar automatically saves the last known good config profile when exiting the app. Loading a configuration profile To load a configuration profile: Go to Edit > Preferences > Customization - Backup/Restore Settings. By default, Sonar will load all the settings that are stored in the configuration profile. If you want to selective only load specific settings, select Only apply the settings checked above on load, then select which settings to load: Audio Configuration. Load audio settings that are stored in Aud.ini. MIDI Configuration. Load MIDI settings that are stored in TTSSeq.ini. Control Surfaces Configuration. Load control surface settings that are stored in ctrlsurface.dat and ctrlsurface_UWP.dat. General Application Settings/Configuration. Load general app settings that are stored in Cakewalk.ini and the Windows registry. Keyboard Shortcuts. Load key bindings. Click Load to open the Open dialog box. Select the desired configuration profile, then click Open. Sonar prompts you to confirm that you want to load the configuration profile. Click Yes. Loading a configuration profile on app startup You can load a configuration profile on startup via a command line: Do one of the following to open the Command Prompt: Click the search box next to the Windows Start button, then type CMD and press ENTER. Press the Windows key () + R, then type CMD and press ENTER. Type the following: <Sonar install path>\Sonar.exe /RestoreConfig=<configuration file folder>\<name of configuration profile file> For example: "C:\Program Files\Cakewalk\Sonar\Sonar.exe" /RestoreConfig="%APPDATA%\Cakewalk\Sonar\Config Profiles\mysettings.ccp" Press ENTER. Sonar launches with the specified configuration profile. Creating a desktop shortcut with command line parameters You can add command line parameters to a desktop shortcut. This way you don’t have to manually type command line parameters each time you want to launch Sonar with a specific configuration profile. To add launch parameters to a desktop shortcut: Create a new desktop shortcut for each configuration profile (Tip: copy the default Sonar desktop shortcut), and give the shortcut a descriptive name. Right-click the shortcut and select Properties. In the Properties dialog box, click the Shortcut tab. In the Target text box (which already lists the location of the Sonar executable within quotation marks), place the cursor after the last quotation mark, then add a blank space followed by the command line parameters. For example: /RestoreConfig="%APPDATA%\Cakewalk\Sonar\Config Profiles\ConfigProfile_2023-02-28.ccp" The full Target text string should look something like this: "C:\Program Files\Cakewalk\Sonar\Sonar.exe" /RestoreConfig="%APPDATA%\Cakewalk\Sonar\Config Profiles\ConfigProfile_2024-02-28.ccp" Click OK to save the changes. You can now double-click the shortcut to start Sonar with the specified configuration profile. Automation smoothing when recording Automation smoothing now also applies to recording automation in real-time. You can specify how shape smoothing works when recording automation in real-time (and when using the Freehand tool on envelope shapes). To do so, click the Track view Options menu, point to Automation Smoothing, then select one of the following options: Smooth. Uses the existing fit-to-curve functionality. This is the default setting. As Drawn/Recorded (Linear). Joins the nodes up with linear shapes. As Drawn/Recorded (Jumps). Leaves the nodes as is, making them jump shapes. Specify the default automation curve type To specify the default automation curve type when drawing automation envelopes, click the Track view Options menu, point to Default Automation Curve, then select the desired curve type: Jump. A jump shape causes the envelope to make a ninety degree jump where the envelope reaches the second node. Sonar displays jumps with a dotted line, meaning that there is automation data at the nodes where the dotted line begins and ends, but not where the line itself is. Linear. Draw a straight line between the two nodes. Fast Curve. A fast curve draws a curve between the two nodes that changes value rapidly at first, but more slowly toward the end of the curve. Slow Curve. A slow curve draws a curve between the two nodes that changes value slowly at first, but more rapidly toward the end of the curve. Offset mode enhancements To make it easier to visualize if a track parameter has an offset applied, Sonar shows the parameter value in an amber color when Offset mode is not active . The parameter tooltip also shows the offset value. Live articulations When playing a MIDI controller in real-time, the per track Live Articulations setting allows you to apply any transform articulations that are active at the now time. Live articulations are echoed, but not recorded. To enable/disable live articulations on the focused MIDI track, do one of the following: In the Track Properties inspector, select Live Articulations. Tip: You can use quick grouping (hod down the CTRL key) to enable/disable the setting on all selected MIDI tracks. In the Piano Roll view, click the Live Articulations button . The button state applies to the focused track. Time offset for MIDI transform articulations MIDI Transform Articulations now support an optional offset value that will offset the start/end times for notes. The offset can be applied using either ticks or milliseconds. The Duration checkbox toggles whether notes should retain their original end points as drawn or offset with start times. Key Aftertouch editing in the Piano Roll view Controller pane Key/Polyphonic Aftertouch events can now be edited in the Piano Roll view Controller pane in addition to the Event List view. To add a Key Aftertouch lane in the Controller pane: Click the Add New Controller button in the bottom left corner of the Controller pane to open the MIDI Event Type dialog box. Under Type, select KeyAft. Under Value, select the note/key. You can now draw polyphonic aftertouch events that represent the pressure values for the selected note/key on the chosen MIDI channel. Key/Polyphonic Aftertouch can also be used in MIDI track / Synth track automation. Import and export tempo map to/from MIDI files To import a tempo map from a MIDI file, right-click the Tempo track and select Import Tempo Map from MIDI File. Import replaces the current tempo track with any tempos in the MIDI file. To export a project's tempo map to a MIDI file, right-click the Tempo track and select Export Tempo Map to MIDI File. Export saves the tempo track to a MIDI file, without saving any other tracks or events. Cakewalk Product Center Cakewalk Product Center allows you to download and install Cakewalk products from one central location. Simply sign in with your BandLab ID and password and begin installing your connected products. Stay up to date with the latest features and fixes. For more information and to download Cakewalk Product Center, see: Plugins Overloud TH-U Cakewalk amp simulator TH-U Cakewalk Edition by Overloud provides realistic guitar amp models from clean to crushing distortion. This special edition includes a curated collection of amplifier models, cabinet models, effects models and dozens of presets. Easily build or modify your own signal path. New since TH3 Cakewalk: Added Rig Player and Supercabinet You can now load user IRs even in regular cabinets instead of using one or both microphones Added Scenes support (A, B, C, D buttons on the interface) Added Fluid Convolution technology support (https://www.overloud.com/news/fluid-convolution-unveiled) Added Fluid IR technology (https://youtu.be/qLZ5rBCWW_k) Remastered Cabinets (improved the cabinet processing) Possibility to save and load settings for single effects (right click effect) Customizable initial chain (click Custom in the Settings panel) More parameters for cabinets (pan, mic angle) Note: TH-U Cakewalk is only usable in Sonar and Next. If you already own the full version of TH-U, installing the TH-U Cakewalk edition will not change your existing functionality. Overloud TH-U Cakewalk is fully backwards compatible with older TH3 and TH2 versions. TH3 is no longer distributed with Sonar. Projects or templates containing TH2 or TH3 will automatically load in TH-U if the old plugin is not available. Important: If you already have TH3 installed, you may not see any presets in TH-U. This will be addressed in a future update. The workaround for now is as follows: Close Sonar. In file explorer, navigate to the app data folder for Overloud TH-U (Go to %APPDATA%\Overloud). Delete the \TH-U folder. Start Sonar and insert TH-U in an FX Rack. This will regenerate the appdata folder and recreate it this time with the correct default presets. ProChannel Concrete Limiter module ProChannel Concrete Limiter is an audio processing module for the ProChannel channel strip. ProChannel Concrete Limiter is a transparent look-ahead brickwall peak limiter. It is designed to reduce peak levels without coloring the sound. The purpose of ProChannel Concrete Limiter is to increase loudness as much as possible while preventing the signal from exceeding the maximum output level. ProChannel Concrete Limiter reduces the volume of the loudest parts (limiting), while simultaneously increasing the volume of the quiet parts (boosting). ProChannel Concrete Limiter is typically used as the final processor on the ProChannel strip, of tracks and buses. VX-64 Vocal Strip VX-64 Vocal Strip is a multi-functional plug-in that combines a series of effects specifically optimized and streamlined for vocal processing. Combining compression, expansion, equalization, deessing, doubling, delay and tube saturation in one convenient plug-in, VX-64 Vocal Strip is designed to make it fast and easy to enhance any vocal track. VX-64 Vocal Strip features include: 5 professional quality effect modules, each with its own bypass toggle. All modules are specifically tuned for vocal processing. Advanced tube saturation modeling available on input, output and EQ modules. Deesser with switchable center frequency and threshold. Configurable effect chain routing. Smooth, zipperless automatable parameters. Library of presets. A/B plugin settings Use the A/B buttons to compare two different versions of a plugin's settings. Select either slot A or slot B and adjust the plugin settings, then toggle between the two slots. Adjustments made to the selected slot do not affect the other slot. You can copy settings from the selected slot to the other slot. This is useful if you want to slightly modify the current settings and compare with the original settings. To do so, click the Copy Settings to Slot A/B button / . To revert the selected slot to its initial settings, click the Revert Settings button . Typical workflow: Select slot A. Adjust the plugin settings as desired. Click the Copy Settings to Slot B button . Slots A and B are now identical. Adjust the setting of either slot A or B. Toggle between slots A and B to compare the two different settings. Note: Upon project save, the app persists the plugin’s current settings (A or B), but the button state itself is not persisted. Upon subsequent project open, the plugin will always initialize with slot A selected, and slot B will be identical to slot A. Sidechaining enhancements Both audio plugins in the FX rack as well as instruments in the Synth Rack now support sidechaining (when available by the plugin). When a sidechain source is selected, a sidechain send from the selected source is created in the mixer. Please note that many plugins and instruments only expose sidechain inputs in their VST3 versions. Sonar provides the following workflows for designating sidechain sends for instruments and effects that support sidechaining: Track header output menu presents instrument sidechain sends if available (preexisting UX) Plugin window toolbar Settings cog has a new "Sidechain Sources" menu item to assign source to a plugin or instrument sidechain input directly from the header Checking a source creates a send from the chosen source to the plugin's sidechain input Unchecking a source removes the send to the plugin sidechain The sidechain sources menu is not shown if the plugin or instrument is not sidechain capable. Plugin window toolbar has a button to open the Manage Sidechain Sources dialog box (located next to ACT learn button). This button will only be shown if the plugin or instrument is sidechain capable. Prochannel header has the same "Sidechain Sources" menu shown in the plugin settings cog. This will be shown for any prochannel modules that have sidechain capabilities. The Manage Sidechain Sources button will highlight to show when a plugin sidechain input has something connected to it. Manage Sidechain Sources dialog, from the Sidechain Sources menu or plugin window toolbar, shows a modal dialog that facilitates the sidechain send management across multiple sources types (i.e. track, aux, bus). Manage sidechain routing directly from the effects view toolbar You can assign sidechain connections to a plugin or instrument directly from the effect view toolbar, without having to return to the source track(s) in the Track view or Console view. To do so, do one of the following: Click the VST2/VST3 drop-down menu in the VST plug-in toolbar, point to Sidechain Sources, then select the desired input source. The Sidechain Sources submenu is only shown for plugins or instruments that have a sidechain available. Choosing a source creates a send from the chosen track/bus source to the instrument's sidechain input. Unchecking a checked menu item removes that send to the instrument sidechain. Note: Up to 25 sidechain sources are listed in the Sidechain Sources submenu. If more than 25 sources are available, only connected sources will be shown. To access all available sidechain sources, select Manage Sources to open the Manage Sidechain Sources dialog box. Click the Sidechain Sources button to open the Manage Sidechain Sources dialog box, which facilitates the sidechain send management across multiple sources types (i.e. track, aux, bus). The Sidechain Sources button is only shown for sidechain capable plugins or instruments. The Sidechain Sources button will highlight to show when a plugin sidechain input has something routed to it. Selecting a source creates a send from the chosen source to the plugin's sidechain input. Deselecting an item deletes the send. The Send Settings are applied to newly added sends and will also modify any existing sends if changes are made to the settings. The Follow Track Pan setting will be applied but only affects playback when a send is a Post Fader send. Show These Sources lets you filter which source types are displayed in the list. Any changes to send settings are applied to all items, not just to the currently shown items. Double-click the Send Level slider to reset to 0 dB, or click the slider, then press F2 to type a dB value. Note: Only sends can be added from the Manage Sidechain Sources dialog box, although Sonar also supports directly connecting a track or bus output to a sidechain, via the Track header output menu. Manage sidechain routing directly from ProChannel modules You can assign sidechain connections to a supported ProChannel modules (such as PC4K S-Type Bus Compressor) by right-clicking the module header and pointing to Sidechain Sources. Sidechaining for VST instruments in the Synth Rack Sonar has supported side-chaining for effects plugins, satisfying the traditional and primary use case for sidechaining. However, a growing number of VST instruments now support sidechaining, therefore support has been extended to support such instruments, in addition to effects. To specify the sidechain input for a VST instrument: Open the VST instrument's property page. Click the VST2/VST3 drop-down menu in the VST plug-in toolbar, point to Sidechain Sources, then select the desired input source: Choosing a source creates a send from the chosen track/bus source to the instrument's sidechain input Choosing a checked menu item removes that send to the instrument sidechain Support for instruments with a single aux input Sonar can now handle synths with a single aux input and expose it as a sidechain. Prevent sidechain routing from creating a feedback loop Sonar has logic to prevent feedback loops when creating sidechain connections. Plugin oversampling enhancements Earlier versions of Sonar had up to 2X oversampling for plugins. Sonar now includes support for plugin oversampling at higher oversampling ratios from 2x up to 16X. Additionally, oversampling is also available for plugins within FXChains. The oversampling ratio and precision can now be selected in the plugin options as below: Oversampling has been optimized to be CPU efficient and the precision can be selected via the Precision menu, Please note that depending on your project sample rate, oversampling at higher ratios can lead to very high sample rates, that may not be supported by all plugin's. Oversampling may also tax your CPU at very high sample rates. How to enable oversampling: To use oversampling, you must set it on a per plugin basis. Once you have enabled it for a plugin it is automatically enabled for all instances of that plugin in a project. Additionally, Oversampling is only activated when the Px button in the mix module is enabled. This button allows you to easily toggle oversampling on to A/B how it sounds in your project. You can check which plugin have oversampling active and the oversample rate by looking at the plugin tooltip as below. Plugin Oversampling Precision You can now specify the precision for plugin oversampling. Using a medium precision uses less CPU and for many uses has no perceptible effect on resampling audio quality. This should reduce CPU load when utilizing plugin oversampling. Precision defaults to Medium. FX Rack tooltip indicates if oversampling is enabled When hovering over a plugin name in an FX rack, the tooltip shows the current rate if oversampling is enabled. This allows you to quickly verify if a plugin is being oversampled. Improvements to phase accuracy Prior to Sonar, oversampling could introduce an uncompensated phase offset in the oversampled data of around 150 samples, which could lead to phase problems when playing back the oversampled track along with the rest of the project, unless the track data was manually offset. This issue has been corrected and oversampling is fully phase accurate now with no delay in processing. See the up-sampled click track below. Handle oversampling for FX Chains and ProChannel FX Chains Oversampling is now supported for plugins in FX Chains and ProChannel FX Chains. Misc. improvements The oversampling engine has been updated for greater accuracy and several issues have been addressed. Problems with bouncing oversampled plugins where the bounce settings differ from playback have been addressed. Plugin oversampling can now be enabled while effect and instrument sidechaining is in use. Note: Enabling oversampling during playback can put a high demand on your CPU. If you experience dropouts or other issues, use oversampling only on render. Plugin delay compensation (PDC) UI enhancements Some plugins use a look-ahead buffer mechanism, which results in a short delay being introduced to the output signal when the plugin is used in real-time. Sonar applies automatic plugin delay compensation (PDC) during recording and playback on tracks that have input echo enabled. This ensures that all tracks are aligned properly. The exact latency is calculated automatically, and is influenced by all plugins in a track’s signal path. Override PDC during playback, recording, or both The PDC Override button in the Control Bar’s Mix module allows you to override PDC, and thereby reduce latency caused by plugin delay compensation in the signal flow. It allows you to play in real time within projects containing look-ahead plugins. When the PDC override button is engaged, any PDC latency for input monitored tracks or instrument tracks is bypassed, and the input monitor signal is passed through in real time. This is useful for recording or input monitoring in real time. The PDC Override button has a new popup menu that allows you to selectively override PDC for playback, recording, or both. To do so, long press or right-click the button and select the desired options: Override during playback. If this option is disabled, PDC Override will not affect tracks with input echo during playback. Override while recording. If this option is disabled, PDC Override will not affect tracks with input echo during recording. Both are enabled by default. If both are disabled, PDC override is still in effect during idle input monitoring. The above modes are only active when the PDC Override button is engaged. PDC Latency displayed in Track Properties Inspector The Track Properties Inspector shows the max/net PDC latency for that track/bus signal path in milliseconds and samples, as a result of compensating for other delay present in the project. Note: The displayed PDC Latency value is static text that is calculated automatically during playback and only updates in the UI when playback is stopped. PDC latency tooltips Plugin, FX Rack, ProChannel strip and modules all display tooltips showing the plugin lookahead latency when present. Hover over the FX Rack header to show the PDC latency for the entire rack. Hover over the an effect to show the PDC latency for that effect. Plug-in Load Balancing enhancements Plug-in Load Balancing now uses significantly less load when running at low latency. Note: Plug-in load balancing will not lower CPU use as compared to load balancing being disabled, especially when running at lower latency. This is because load balancing uses smaller buffers than the audio engine buffer size. Configurable Thread Count and Buffer size Both the plug-in load balancing threads and buffer size are now configurable settings in Edit > Preferences > Audio - Configuration File. When PluginLoadBalancingThreadCount is set to 0, the number of threads is adaptively managed and is less than the number of processor threads. You may change the value to utilize fewer or more threads. MinPluginLoadBalancingBufferSamples defaults to 96 samples and is the size of the internal load balancing buffers. Setting the buffer size higher will use less CPU but may result in less load balancing. Please note that when the engine latency is less than twice MinPluginLoadBalancingBufferSamples, load balancing will be automatically disabled internally. Plug-in Load Balancing active indicator When Plug-In Load Balancing is enabled in Edit > Preferences > Audio - Playback and Recording and load balancing is active, the FX Rack header tooltip shows (PLB) next to the audio processing load. External Insert enhancements External inserts have been enhanced to add true mono output support, ProChannel integration, FXChain support, a new Send Mode allowing an arbitrary tap point from an FX Rack, Friendly naming, better track template support, as well as numerous optimizations and stability fixes. Mono Outputs support. The External Insert plugin now supports exclusive use of mono outputs for sends. Prior to this, using a mono output would utilize a full stereo pair and prevent other external insert plugins or tracks from using the unused channel. It is no longer necessary for Show Mono Outputs to be enabled in the Devices tab of the Preferences to use mono channels in the external insert. (Its preferable to set display mode to show mono outputs since otherwise track or bus output will always utilize a full stereo channel). Preferences > Audio - Devices > Show Mono Outputs defaults to checked for new installations of Sonar. This is the preferred display mode. New Routing Modes. The external insert can be used in 4 modes. See Routing Modes below for more details. Send/Return mode [New] Send mode Return mode Passthrough mode ProChannel The external insert can now be used directly inside the ProChannel by adding it into a ProChannel FX Chain. FX Chains Support (both Track and ProChannel FX chains) now fully support adding an external insert. FX Chain presets containing External Inserts can now be saved and loaded in a track FX Rack or a ProChannel FX Chain. Drag and drop of external insert or an FX Chain containing one from track FX Rack to the ProChannel creates a ProChannel FX Chain containing the external insert. Send and return port assignments for the external insert are exclusive and can only be used by a single instance of the plugin. This is enforced as follows: Track input and output menus will exclude any items that are in use by the external insert. External Inserts send and returns will exclude any items that are in use by tracks/buses or other external insert plugins. Loading FX Chain presets or track templates containing external inserts will result in the send and return being set to None if the ports are already in use. Loading a project when the hardware inputs or outputs are no longer available will reset the external insert send/return. The external insert references send and return ports by name. Changing the friendly name of a port will result in the send and return being set to None if it was using a different name earlier. Track templates now persist external Insert ports. Friendly names can be assigned to External Inserts. Several stability improvements and fixes to external insert infrastructure. External Insert Routing Modes. The external insert can be used in 4 modes Send/Return mode. This is the primary mode and is engaged when both the send and return ports are routed to hardware ports. In this mode the plugin echoes its send input to the main output. The external insert measures the net delay between the send and return and compensates for this delay, aligning the audio on playback. This is the only mode that is delay compensated. [New] Send Mode. This mode is engaged when only the send is routed to a hardware port and the return is unassigned. In this mode the plugin sends its input audio to the assigned hardware output, and additionally passes through the audio through the main out effectively acting as a splitter. This mode can be useful to create a signal flow tap point from any FX Rack location. No delay is applied in this mode. Return Mode. This mode is engaged when only the return is routed to a hardware port and the send is unassigned. In this mode the plugin receives input audio from assigned return port and echoes the audio to its output. This mode can be useful to create an FX Rack insert from an external audio device or synth, or to receive input from another external insert tap point in Send Mode. You cannot ping to measure delay in this mode, but a manual delay offset can be specified to compensate for any delays. Passthrough Mode. This mode is engaged when neither send nor return ports are assigned. Passthrough mode operates as if the plugin has been bypassed in the effects rack. All incoming audio to the plugin is echoed unmodified to its output. Plugin Browser drag and drop enhancements You can insert or replace synth, and convert regular audio and MIDI tracks to instrument tracks with the following drag and drop gestures: To insert a synth: In the Plugins Browser, select the Instruments tab , then drag a synth to a blank area in the Track pane or Clips pane. To convert an audio or MIDI track to a simple instrument track: In the Plugins Browser, select the Instruments tab , then drag a synth to an audio or MIDI track to convert the track to a simple instrument track. Note: Audio tracks will only be converted if empty. To replace a synth: To replace the synth in a simple instrument track with a different synth, drag a synth from the Plugin Browser to the existing instrument track. Quick access to plugin settings The plugin toolbar now has a Settings menu button that provides direct access to Enhanced DPI scaling and plugin upsampling settings. Friendly names for plugins are now shown in FX racks Friendly names for plugins (set in the Browser) are now displayed in FX racks. Note: This will apply to new instances of the plugin. Existing ones will still show the actual plugin name. New instances will show the friendly name. Audio processing load tooltips Similar to the Control Bar's Performance module tooltip, audio processing load is now shown on hover over several new hotspots, which allows you to check performance load for every element in the project, tracks, buses, plugins, instruments and FX Chains. Load measurements are only performed when the tooltip is visible. When hovering over an FX Rack header, the tooltip shows the current audio processing load and max load. This is useful as a troubleshooting tool because real-time effects have a big effect on CPU load. This tooltip is also shown in FX Chains. In the FX Rack, hovering over a plugin name shows the load for that plugin. In the FX Rack, hovering over an FX Chain shows the load for that FX Chain. In the FX Chain plugin, hovering over a plugin name shows the load for that plugin. In the Synth Rack, the Name field tooltip shows synth audio processing load. The track meter peak indicator tooltip shows total combined processing load for the track including FX Rack and ProChannel. The bus meter peak indicator tooltip shows total combined processing load for the bus including FX Rack and ProChannel. Usability and Workflow Click Sonar logo in Control Bar to open Quick Start Screen Clicking the Sonar logo in the Control Bar opens the Quick Start Screen. Specify default synth for use in Add Track flyout menu You can specify which synth should be the default in the Add Track flyout menu. The default synth can be assigned from the synth track context menus or from the Synth Rack menu. Select all tracks/buses in a control group When multiple controls have been added to the same control group (A-X), it can be useful to record automation for all controls by only moving one of the controls. In order for this to happen, you must first manually select all the tracks/buses with controls in that group, enable Automation Write for the selected tracks using quick grouping, then record the automation during playback. It may be difficult to remember which tracks/buses have controls in that group in order to select them, so the new Select Tracks/Buses in Group menu command on the control group context menu makes it easy to automatically select all tracks and buses that have controls that are a member of the current control’s group. Hold down the CTRL key while selecting the menu command will add to the existing selection (default is to replace the current selection). Create sends by dragging effects to channel strips You can create a send by simply dragging an effect to an audio track, instrument track, aux track, or bus. To do so, drag an effect from the Plug-in Browser to the Sends area of a channel strip in the Inspector or Console view. Doing so creates a pre fader send and a new bus that contains that effect. To create an aux track instead of a bus, hold down the ALT key while dragging the effect. To insert an effect in a track or bus Select the desired channel strip and show its Sends section in the Track Inspector or Console view In the Browser, click the PlugIns button to show the Plug-in Browser. Click the Audio FX button to show audio effects. Do one of the following: To create a send to a new bus. Drag the effect to the channel strip’s Sends section. To create a send to a new aux track. Hold down the ALT key and drag the effect to the channel strip’s Sends section. The Insert Send button shows a red outline when you drag an effect to the Sends section. Tip: You can use quick grouping to create sends on all selected tracks simultaneously. To do so, select the desired tracks, then hold down the CTRL key while dragging an effect to the Sends section on any selected track. Create tracks routed to aux tracks or patch points The Add Track menu now allows you to create tracks that are routed to a new aux track or patch point. Preserve sections in other Arranger tracks when committing an arrangement When committing an arrangement, the new Include Sections in other Arranger Tracks option allows you to also “arrange” and preserve sections in other Arranger tracks that aren’t part of the selected arrangement. Arranger Inspector displays a badge on sections that intersect with the Now Time To help you better identify which Arranger section(s) intersects with the Now Time, the Arranger Inspector displays a badge to the left of the section name. In-app hang detection Sonar can now detect hangs and save a minidump file, which allows you to easily submit minidump files to Cakewalk support for analysis. A minidump file records the state of a program as it is running, or at the moment of a crash or hang. By default, the app is considered hung if the UI is blocked for 30 seconds after which an “Application Unresponsive” message appears, asking you to abort or wait. If you choose to abort, a hang dump file is saved to the %AppData%\Cakewalk\Sonar\MiniDumps folder, and the standard error dialog box is shown along with a description of common error codes. The hang check timeout duration is configurable via a Cakewalk.ini variable named HungAppTimeoutSec. It defaults to a wait of 30 seconds. To adjust the hang check timeout duration, add the following variable in Cakewalk.ini (Edit > Preferences > File - Initialization File) : HungAppTimeoutSec=<seconds> (default=30) To disable hang checking, set the variable to HungAppTimeoutSec=0. Note: Sonar dynamically changes the hang timeout while loading projects by bumping up the hang detector timeout to up to 2 minutes. This prevents false positives when saving large project files. Once loading finishes, it restores it back to the default (30 seconds). Sending the dump file to Cakewalk for analysis: Once you have the dump file you can put it on a share like Dropbox, Google Drive etc. Next, log a problem report case with Cakewalk and include the link to the dump file. Note: Dump files may include personally identifiable data so please do not post links to them publicly in the forums or elsewhere to protect your privacy. Key bindings to show/hide tracks The following new assignable key bindings allow you to show/hide tracks in the Track view and Console view: Under Area: Track View: Toggle Show All/Hide Previously Hidden Tracks and Buses Synchronize Track and Console Views Under Area: Console View: Toggle Show All/Hide Previously Hidden Tracks and Buses Synchronize Track and Console Views You can assign the key bindings in Edit > Preferences > Customization - Keyboard Shortcuts. Toast notification when a control surface is disabled on launch Sonar now shows a notification if you start the app while a control surface is disconnected. Deleting a tempo in the Tempo Inspector sets the focus to the next tempo in the list When deleting a tempo in the Tempo Inspector, the focus is now set to the next tempo in the list. Press F2 to rename markers in the Markers view F2 now allows you to rename markers in the Markers view. Meter scale for Instrument tracks changes to dB scale when frozen The vertical splitter bar between the Clips pane and the Track pane shows a MIDI scale (vertical piano keys) for MIDI and Instrument tracks, and an audio dB scale for audio tracks. When an Instrument track is frozen, its vertical MIDI scale automatically changes to a dB scale, which is more appropriate for audio content. Remove crossfades To remove all crossfades in the current selection, click the Track view Clips menu and select Remove Selected Crossfades. Track Scale Zoom is now quick-groupable You can now zoom the waveform or MIDI notes in all selected tracks by holding down the CTRL key and dragging up/down in the track scale. Double-click to reset sliders Double-click to reset sliders in the following dialog boxes: Edit > Preferences Process > Transpose Process > Length Process > Fit to Time Export track/bus and project icons as PNG Export any assigned track/bus and project icon as a PNG file. To export a track/bus icon, right-click the icon and select Save Track/Bus Icon. To export the project icon, point to the project icon in the Notes Browser, then click the “...” button and select Save Image. Process > Length dialog accepts fractional values The Process > Length dialog now accepts fractional Percent values. Quick Grouping of Mute, Solo, and Archive buttons on track folders The Mute, Solo, and Archive buttons on track folders can now be controlled via quick grouping. Quick groups allow you to adjust identical controls across multiple tracks. Select the tracks you want to adjust, then hold down the CTRL key and adjust a control in any selected track. Sonar automatically adjusts the same control in all other selected tracks of the same type. Updated docked Synth Rack and new bypass functionality There are several improvements to the synth rack to allow managing large synth projects more efficiently. This allows you to quickly bypass and free memory and CPU resources allocated to synths, or create templates with bypassed synths and bring them online on demand. The docked version of the Synth Rack now shows a synth Bypass button. By default, the Bypass button unloads the synth when the instrument is bypassed, and also archives all related tracks to save CPU. The synth will be reloaded again and tracks unarchived when the synth is unbypassed. The preset picker has been removed from the docked Synth Rack to save space (the preset picker is shown when undocked or when docked in the MultiDock). This control is largely obsolete because most instruments handle preset management inside the synth UI. The Synth Rack menu and the synth strip context menus have been redesigned to show the relevant functions: Replace Synth is now available via the synth context menu. Bypass All Synths and Unbypass All Synths can be used to quickly bypass all instruments in the Synth Rack. Note that bypass/unbypass can take a while on projects with large numbers of synths if they are big. The progress is shown in the Control Bar Transport module. You may cancel a long bypass/unbypass operation by pressing the ESC key. Unload and Archive preferences can be set in the synth rack menu. In-app bug reporting Report bugs via the in-app Help > Report a Problem menu command. Microsoft GS Wavesynth device no longer available in any driver mode The Microsoft GS Wavesynth device is known to cause audio driver problems, and is therefore no longer available as a MIDI output in any driver mode. Previously it was only unavailable in WDM mode, but has now also been removed from MME and WASAPI Shared modes. Optimizations Audio engine low latency optimizations for multi-core processors The audio engine has been greatly optimized for playback and monitoring when running high plugin workloads at low latencies (less than 256 samples) on machines with high core counts (16 or more processor threads). Prior to this, running at low latencies could result in sub optimal multiprocessing load sharing and higher CPU load. Performance optimizations for projects with many synths and effects Sonar has been greatly optimized to handle high virtual instrument counts, managing the load more efficiently and using minimal CPU resources. In a real-world orchestral template with 250 Kontakt instances, the base template will now run efficiently at 128 samples with very few late buffers. In prior versions such a project would only run at 1024 samples or higher. General plugin performance in FX racks has been improved, allowing you to run workloads with high plugin counts more efficiently. Misc. optimizations Support for AMD threadrippers. Max CPU threads has been increased. Sonar now supports CPUs with up to 256 threads as supported by the AMD EPYC. Greatly improved plugin load balancing performance. Increased hang detection default timeout to 1 minute from 30 secs to prevent false positives with some instruments. Improved editing performance on projects with a large number of virtual instruments. Several optimizations have been made to improve performance when editing clips or MIDI in heavily loaded projects. The Now Time update frequency has been optimized to allow for smoother scrolling of the playhead marker during playback. Improved VU meter responsiveness. Optimizations to drawing efficiency in Console and Track view. Optimization for Intel processors to reduce CPU load when streaming silence with certain plug-ins that generate denormals. There are optimizations to playback start and seeking which reduce the latency before playback starts when starting the transport. Improved and faster Nudge performance. MIDI buffer size is now adaptively managed whenever delay compensated plugins are present in the project, without any need to raise the MIDI playback buffer size. Latest release notes are here.
-
A screenshot might be helpful (of both Sonar and CbB). Are you using the Tungsten or Tungsten Classic color scheme? Tungsten Classic has dark grid lines while Tungsten has light grid lines. As Noel mentioned, additional color customization is planned for the future.
-
We're pleased to announce the release of Sonar 2024.11! This release continues our quest to further improve and optimize the audio engine, which can greatly reduce the CPU load at very low latency and improve performance with large projects. It also includes other performance improvements, faster scrolling in console view, CPU core selection, and several new features like Console View and Track Inspector module resizing, Time+ parameter on MIDI tracks can be set in milliseconds or ticks, Control Bar module expand/collapse via double-click, improved device change notifications, improved application error handling and crash detection/recovery, improvements and optimizations for Mackie HUI control surfaces, a redesigned Light color scheme and more. Please note that in order to automatically keep your activation status up to date, Sonar will renew your activation status whenever a new version of the application is installed and run for the first time, and when you sign in to BandLab from within Sonar . If you have never signed in to BandLab from within Sonar , you will be prompted once to sign in. Thanks, The Bakers Please note: Cakewalk Sonar and Cakewalk Next are currently exclusively available via BandLab Membership. New in Sonar 2024.11 build 30.11.0.097: User Interface and Editing Console View and Track Inspector module resizing You can now resize the Volume, Sends, and FX Rack modules vertically by dragging the splitter bar handles located above the modules. Module sizes are persisted per project. When the Volume module is at its smallest size, the fader turns into a knob. To restore the default module size, double-click the drag handle. Time+ parameter on MIDI tracks can be set in milliseconds or ticks The The Time+ control on MIDI tracks allow you to apply an offset to the start time of the events in the track. You can now specify the Time+ offset value in milliseconds or ticks. To toggle between ticks and milliseconds, long press or right-click the Time+ control and select the desired format on the popup menu. When using milliseconds, a "ms" suffix is used. When using ticks, no suffix is used. The max values are as follows: Ticks: +/-61440 (equal to 16 measures in 4/4 time with 960 ticks per beat) Milliseconds: +/-1000ms Note: During playback, any event that would be negatively delayed before 1:01:000 will be clamped to 1:01:000. Control Bar module expand/collapse via double-click To expand/collapse a single Control Bar module, double-click the module. Updated Light color scheme The Light color scheme has been completely redesigned. Known issue: poor contrast with volume envelopes (you can manually change the envelope color in Edit > Preferences > Customization - Colors). This will be addressed in a future update. Improvements to grid line colors The contrast has been adjusted for vertical grid lines to make them more visible in dark and light color schemes. Optimizations Performance Improvements Further optimizations for VST processing to streamline time reporting to plugins. This can greatly reduce the CPU load at very low latency when running many plugins. In testing, high load projects that wouldn't play at 128 samples now play glitch free. Console view horizontal scrolling with many tracks and buses is greatly improved. Further optimizations for high track/plugin count projects Performance improvements for Aux Tracks routed from Synth outputs Performance improvements for audio effects CPU Core Selection With the ARM Snapdragon platform being commonly used for Surface devices and also several Intel Chipsets supporting e-cores, it has now become commonplace to have heterogeneous systems with efficiency cores and performance cores in use. Heterogeneous systems support a combination of e-cores and p-cores. p-cores are high power “performance” cores and e-cores are “efficiency” cores. p-cores generally run faster than e-cores at the expense of consuming more CPU power. While efficiency cores are cost effective and can improve general responsiveness of applications while consuming less power, at low latency this can create performance problems due to load imbalances when mixing and matching e-cores with p-cores. As such, it's better to deprioritize use of e-cores for low latency applications. There are two new configuration variables that allow Sonar more fine-grained control over these CPU resources. These variables can be referenced through Preferences | Audio configuration. Sonar will now favor p-cores over e-cores and first use p-cores when available. CoreSelectionMethod This aud.ini variable specifies how Sonar chooses preferred cores: 0 = No preference When this is selected, Sonar makes no attempt to specify which cores should be used for audio engine threads. 1 = Requests preferred core Specifies preferred per thread cores. This is the default option and is similar to the now deprecated "UseIdealProcessor" variable. Note that this request is only a hint and as a result the core assignment may be overridden by the operating system. 2 = Restrict to preferred core This is similar to 1, but it actually restricts operation of the engine threads to only run on the specified cores. In this case the OS will not change core assignment. Depending on your CPU this option may allow the engine to run more efficiently without the overhead of its threads being switched to other cores by Windows. This can lead to lower CPU use in general. ExcludeEfficiencyCores Setting this variable to True, instructs Sonar to aggressively exclude efficiency cores (e-cores) from audio processing and to only use p-cores. This can be beneficial since all cores will now have equal performance and as a result you may see better load balancing or better low latency performance. Note that if you have insufficient p-cores you may get worse performance by excluding e-cores completely. Usability and Workflow Improved device change notifications Sonar shows when devices are plugged/unplugged. This has been changed to a toast notification instead of a dialog to avoid blocking the user interface. Since these notifications originate from the OS, there is no way for Sonar to know whether a specific device applies to your setup. If you see notifications for devices which you don't use, you can now choose to ignore a specific device. Once you ignore a specific device, all plug/unplug notifications for that device will be ignored. You can use this to filter unnecessary notifications. Improved crash recovery When a crash is detected, Sonar now attempts to close any files that have been opened for recording, before terminating the application. This allows the wave files to be properly saved and terminated allowing you to reimport the files imported from the audio folder manually, in the event of a crash. Improved application error handling and crash detection Sonar has integrated error reporting and an Exception Severity setting. While exception severity values of 3 and higher can be useful to preemptively catch certain crashes, it was found that this could occasionally aggressively report crashes that are actually internally handled by the OS or certain plugins. As a result, Sonar defaults to a value of 1 (Unhandled errors). In this release, Sonar's error management has been greatly improved to resolve some stability issues and detect several more classes of errors by default, without the need to boost the ExceptionHandlingSeverity. The new mechanism should resolve issues where crashes could silently occur with Windows terminating the app without an error report or giving you a chance to save your work. Errors are now detected in the UI, as well as the engine and plugins in more cases. In all cases a crash dialog will be shown and a minidump and error log will be saved to the crash reports folder at %appdata%\Cakewalk\Sonar\MiniDumps. The crash dialog and error log format has also been improved to show more information for the new error types. Misc.: Control surface ports are excluded from Zero Controllers When Play Stops Improvements and optimizations for Mackie HUI control surface Improve the Fader resolution / responsiveness in HUI mode Fix send controls when using Novation LaunchKey MK4 in HUI mode Optimizations for engine worker threads to simplify error handling Optimizations for dragging multitrack MIDI data in the Piano Roll view; this is now orders of magnitude faster MIDI activity on taskbar is disabled by default (can be re-enabled if needed in Edit > Preferences > Customization - Display) Refreshed Sonitus:delay plugin, resolving stability issues Fixed: Sonitus:delay crashes Sonar at higher sample rates like 96K when delay time is high Fixed: When a crash occurs Sonar should close any wave files being recorded Fixed: Crash adding nodes in Tempo track Fixed: Null Pointer Crash after doing Clean Audio Folder Fixed: Sonar crashes when downloading an online project when app is not activated Fixed: Crash loading ProChannel preset with Spectral Analyzer Fixed: Crash opening project with Loop Construction View Fixed: Crash patching audio with Cherry Audio Voltage Modular Fixed: Sends context menu on Console view/inspector strips not using undoable send commands Fixed: After clicking hardware output in Console view, Inspector fails to focus correctly Fixed: Console view fails to display ProChannel Post FX State Correctly on project open Fixed: ALT clicking aux track number in Console view doesn't select all upstream tracks Fixed: EQ plot nodes are difficult to click on high DPI displays Fixed: Piano Roll view doesn't repaint when vertically scrolling with GPU acceleration enabled Fixed: Piano Roll view fails to draw correctly when scrolling with GPU Acceleration disabled Fixed: Crash when deleting a note in the Piano Roll view Fixed: Piano Roll view does not draw correctly while scrolling during playback with GPU accel enabled Fixed: CC events skipped when drag moving notes in Piano Roll view Fixed: Aim Assist not working in Piano Roll view Articulations lane Fixed: Lag dragging in Piano Roll view when both Drum pane and the Note pane are open Fixed: Unable to see notes while drawing in inline Piano Roll Fixed: Horizontal mouse zoom in Drum Grid causes controller lane to shrink Fixed: Chase MIDI does not send aftertouch in order Fixed: Dragging a MIDI clip out to export it stops the audio engine and never resumes it Fixed: Intermittent deadlock sending hardware MIDI Fixed: Attempting to Nudge a frozen Simple Instrument Track clip moves the MIDI clip instead of the audio clip Fixed: Cropped MIDI clip resizes unexpectedly after splitting note Fixed: Step Sequencer pattern presets pnly play first 4 beats Fixed: Step record moves playhead to wrong location Fixed: Step sequencer clips not working with track delay Fixed: Clip selection is inconsistent with tracks containing Articulation maps Fixed: Incorrect tool selected when using Crop tool and moving mouse to beginning of clip Fixed: Pasting grouped clips in lanes to a new project results in all clips put in the same group Fixed: Clip length changing after moving pitch of cropped note in user project Fixed: Newly inserted sends are shown in tracks but not buses Fixed: Track view incorrect track/bus height after adding send Fixed: Minimized track heights not persisted correctly on high DPI displays Fixed: Repeat of Insert Instrument Fails to add second instance correctly Fixed: Instruments fail to restart consistently in attached project after deleting from synth rack Fixed: Arranger selection incorrect when project start / end is less than section extents Fixed: Section Ripple Delete with auto-xfade deletes more than it should in user project Fixed: Ripple Edit All delete erroneously creates end marker Fixed: Project fails to stop with Stop At Project End in user project Fixed: Control surface send shows stereo port name when send is to mono output Fixed: HUI controller Send control is mapped incorrectly to PAN Fixed: Intermittent notification of dirty project from Start Screen preview Fixed: Device change notifications need improvement to be less intrusive and allow ignoring specific notifications Fixed: Time Ruler selection drawing issue Fixed: Meter peak doesn't follow color scheme Fixed: Export to BandLab incorrectly exports instrument tracks Fixed: Control Bar Sync module Audio Sync button menu closes after opening when module is collapsed Fixed: Don't change active track if you're lassoing with CTRL down and the existing active track is already in the selection Fixed: Unexpected noise/dropout when duplicating clips during playback Fixed: Tempo Track repainting far too often, causing issues with clips view updates during zoom/playback Fixed: Unable to focus track in Track view if control surface is set to Console view, and track is hidden in Console view Fixed: [Regression] Unable to quick group delete sends from Track view Bus pane Fixed: [Regression] When range splitting clips, selection is drawn incorrectly after trimming completes Fixed: [Regression] Fixed regression for recording with Allow Arm Changes During Playback/Record Fixed: [Regression] BFD3 groove preview outputs noise when transport is not rolling Fixed: [Regression] Asserts when opening ProChannel and ProChannel EQ spectrum analyzer doesn't refresh Fixed: [Regression] CTRL + LEFT button click/drag no longer adjusts clip gain Sonar 2024 Highlights User Interface: UI refresh DPI Awareness Track Manager enhancements Spectrum Analyzer display in Console view, Inspector and ProChannel Double-click to expand/collapse docked windows Additional snap landmarks Preview Bus enhancements New Features: Integrated sampler (XSampler) New Quick Start screen Project preview Project Start and End markers File formats: Cakewalk Interchange Format (CXF) Cakewalk ZIP Format (CWZ) Configuration backup/restore Automation: Automation smoothing when recording Specify the default automation curve type Offset mode enhancements MIDI: Live articulations Time offset for MIDI transform articulations Key Aftertouch editing in the Piano Roll view Controller pane Import and export tempo map to/from MIDI files Cakewalk Product Center Plugins: Overloud TH-U Cakewalk amp simulator ProChannel Concrete Limiter module VX-64 Vocal Strip A/B plugin settings Sidechaining enhancements Plugin oversampling enhancements Plugin delay compensation (PDC) UI enhancements Plug-in Load Balancing enhancements External Insert enhancements Plugin Browser drag and drop enhancements Quick access to plugin settings Friendly names for plugins are now shown in FX racks Audio processing load tooltips Usability and Workflow: Click Sonar logo in Control Bar to open Quick Start Screen Specify default synth for use in Add Track flyout menu Select all tracks/buses in a control group Create sends by dragging effects to channel strips Create tracks routed to aux tracks or patch points Preserve sections in other Arranger tracks when committing an arrangement Arranger Inspector displays a badge on sections that intersect with the Now Time In-app hang detection Key bindings to show/hide tracks Toast notification when a control surface is disabled on launch Deleting a tempo in the Tempo Inspector sets the focus to the next tempo in the list Press F2 to rename markers in the Markers view Meter scale for Instrument tracks changes to dB scale when frozen Remove crossfades Track Scale Zoom is now quick-groupable Double-click to reset sliders Export track/bus and project icons as PNG Process > Length dialog accepts fractional valuess Quick Grouping of Mute, Solo, and Archive buttons on track folders Updated docked Synth Rack and new bypass functionality In-app bug reporting Optimizations: Audio engine low latency optimizations for multi-core processors Performance optimizations for projects with many synths and effects Misc. optimizations Cakewalk by BandLab is now Cakewalk Sonar Cakewalk by BandLab has been rebranded as Cakewalk Sonar. As Cakewalk is once again a multiple product brand, it is important to differentiate between the brand and product names. The rebrand also better reflects Sonar's celebrated history and name recognition. Cakewalk Sonar will not overwrite an existing Cakewalk by BandLab installation. User Interface UI refresh Sonar has been completely refreshed with a clean new UI, but will still feel familiar to users of Cakewalk by BandLab. The UI refresh is an ongoing effort and will continue to be updated in future releases. Dark and Light color schemes Sonar includes several color themes, including Dark, Dark Gray, Light, Light Gray, Tungsten, Mercury, and Cosmic, which can be selected in Edit > Preferences > Customization - Display. Additional color themes will be added in the future. Note: Custom themes created with previous versions of SONAR or Cakewalk by BandLab are not compatible with Cakewalk Sonar. DPI Awareness Note: DPI Awareness is only available on Windows 10 build 1809 (October 2018) and above. Sonar version 2024.04 introduces support for DPI Awareness, which improves rendering and reduces blurriness, particularly for font rendering. DPI Awareness may sharpen graphics and make text easier to read. Improvements will be most noticeable when using large, high resolution displays (such as 4K) and with Windows display scaling set higher than 100%. (Tip: Right-click the image above and select Open link in new tab to view the image at 100% resolution) To enable/disable DPI Awareness: Go to Edit > Preferences > Customization - Display. Select Enable DPI Awareness. Restart Sonar. Per plugin DPI Awareness In addition to the global Enable DPI Awareness app setting, you can also enable/disable DPI Awareness on a per plug-in basis for VST plug-ins. DPI Awareness is enabled by default for all VST plug-ins and can be disabled on a case-by-case basis depending on whether the plug-ins are compatible with display scaling. For example, some older plug-ins may appear too small on large, high resolution monitors, in which case disabling DPI Awareness might be preferable. To enable/disable DPI Awareness for a VST plug-in: Open the VST plug-in's property page. Click the VST2/VST3 drop-down menu in the VST plug-in toolbar and select Enable Plugin DPI Awareness. Note: Display scaling is always disabled for DX plug-ins Plug-in scaling is stored globally for a plug-in, not per project Display Scale slider The Display Scale slider in Edit > Preferences > Customization - Display allows you to adjust the display scaling of Sonar independently from the global Windows display scale setting (Settings > Systems > Display). Select a custom scaling size between 75%–150%. Note: Low Display Scale values work better at higher DPI resolutions. For example, a low-resolution 1080p screen at 96 DPI, so a Display Scale value of 75% will result in a tiny UI that is potentially difficult to read. On the other hand, a 4K screen at 75% will also show a tiny UI, but may still be usable because it has 4x the number of pixels. Track Manager enhancements The Track Manager lets you configure which tracks are visible in the Track view and Console view, and you can create per-project presets to quickly show specific sets of tracks. Track Manager controls in Track view and Console view The Track Manager button in the Track view and Console view toggles between showing all tracks/buses () and hiding previously hidden tracks/buses (). The button is lit if at least one track is hidden. Track Manager menu The Track Manager menu provides various commands to manage track visibility and quickly save and recall per-project presets. To show the menu, long press or right-click the Track Manager button . The Track Manager menu contains the following commands: <list of presets>. Per project Track manager presets. Show All Tracks and Buses. Show all tracks and buses. Click the Track Manager button again to hide previously hidden tracks. Show Only >. Show only the selected track type: Audio Tracks. Only show audio tracks. MIDI Tracks. Only show MIDI tracks. Instrument Tracks. Only show Instrument tracks. Aux Tracks. Only show Aux tracks. Track Folders. Only show track folders. New Preset. Create a new preset for the currently visible tracks. Only available when at least one track is hidden and the Track Manager button is lit . Track Manager. Open the Track Manager, which lets you specify which tracks to display. Synchronize Track and Console views. Enable to show the same set of tracks and buses in the Track view and Console view. Disable to show different sets of tracks and buses in the Track view and Console view. Creating a Track Manager preset To create a Track Manager preset: Only show the tracks that you want to save as a preset. Do one of the following to hide any tracks that you don’t want to see: Right-click a track and select Hide Track Select the track(s) and press CTRL+H Long press or right-click the Track Manager button , then select New Preset to open the New Track Manager Preset dialog box. Type a descriptive name, then click OK. You can also create and load presets in the Track Manager dialog box. Selecting a Track Manager preset To select a Track Manager preset, long press or right-click the Track Manager button , then select the desired preset. Showing only specific track types To only show a specific track type (audio, MIDI, Instrument, Aux, or track folders), long press or right-click the Track Manager button , point to Show Only, then select the desired track type. Spectrum Analyzer display in Console view, Inspector and ProChannel The EQ plot in the Console view, Inspector, and ProChannel shows a real-time spectrum analyzer per track by default. To enable/disable the per-track/bus spectrum analyzer in the Console view, click the Console view Options menu and select EQ and Plot > Show Spectrum Analyzer. To enable/disable the spectrum analyzer in the Inspector, click the Inspector Display menu and select Module Options > EQ and Plot > Show Spectrum Analyzer. Double-click to expand/collapse docked windows You can double-click to expand docked windows (MultiDock, Inspector, and Browser), as outlined below: When the Inspector or Browser is docked and minimized, double-click to expand. For the MultiDock, double-click to toggle between expand and collapse. Additional snap landmarks The following items are now available as Snap to Grid landmarks: Arranger Section Start Time. Snap to the start of any Arranger section. Arranger Section End Time. Snap to the end of any Arranger section. Project Start Marker. Snap to the Project Start marker. Project End Marker. Snap to the Project End marker. To select the desired landmarks, right-click the Snap to Grid button to open the Preferences dialog box, then select the desired check boxes in the Landmarks section. Sonar will snap to landmarks on tracks/lanes that are currently visible in the Clips pane. Preview Bus enhancements The Preview Bus assignment is now a project-wide setting. Preview bus assignment can now be managed directly from the bus/mains/aux track context menus or directly from the main Project menu. An aux track can now be designated as a preview bus. If a bus that is assigned as a preview bus output is deleted, the preview bus will automatically be assigned to be the first hardware output. Preview bus changes can now be made dynamically while preview is underway. New Features Integrated sampler (XSampler) XSampler is a simple sampler that lets you import or record audio, perform basic processing, and play it like an instrument with up to 16 voices. Instantly convert a single audio file into a playable or triggable sound that can be played back at different pitches and speeds. There are many ways to get audio into XSampler: import audio from the file system, drag loops and one-shots from the Media Browser, drag audio clips (including partial clip selections) from any track. After audio has been added, you can loop, trim, crossfade, change playback behavior and modulation or filtering options to create interesting musical ideas. New Quick Start screen You can perform the following tasks from the Quick Start screen: Open a recent project Open an existing project Start a new project Create a new project from a template Open demo projects Preview projects Update the app Download and install optional content Project preview You can preview projects from the Quick Start screen’s Recent page if you have exported a designated preview file. The preview file may be any supported audio file type (Wave, BWF, MP3, FLAC, OGG, or WaveEX), and can be the entire project or a specific time range. To create a project preview file: Open an existing project. Ensure that the project has been saved at least once with the new version of Sonar in order to use required metadata. If you only want the preview to contain a specific time range, select the desired time range. Go to File > Export > Audio to open the Export Audio dialog box. Under File Type, select Wave, Broadcast Wave, MP3, FLAC, OGG, or WAVEX. Under Channel Format, select Stereo, Mono or Follow Source. Under Source Category, select Entire Mix. Under Mix and Render, select Include Project Preview to export a preview file. Click Export. The preview file is exported to the project’s \Audio folder. Note: The first export of a project will automatically create a preview file irrespective of the Include Project Preview option. To preview a recent project: Go to File > Quick Start Screen to open the Quick Start screen, then select Local Projects. Click the preview button on a project’s image. A preview button only appears if the project has a designated preview file. Project Start and End markers The Project Start and Project End markers define the playback range and the export range when exporting the entire project, and can also be used as Snap to Grid landmarks. By default, a project does not contain a Project Start or Project End marker. The project starts playback from measure 1 and ends after the last clip. If you want to start playback after measure 1, set the Project Start marker at the desired location. If you want playback to stop before the end of the last clip, set the Project End marker at the desired location. Once set, the Project Start and Project End markers appear in the time ruler, and can be dragged or deleted in the same way as regular text markers. To set the Project Start marker To set the Project Start marker, move the Now Time position to where you want the project to start, then do one of the following: Select Project > Set Project Start Marker to Now Time Right-click the time ruler and select Set Project Start Marker to Now Time The location of the Project Start marker is considered the beginning of the project. To set the Project End marker To set the Project End marker, move the Now Time position to where you want the project to end, then do one of the following: Select Project > Set Project End Marker to Now Time Right-click the time ruler and select Set Project End Marker to Now Time When the Project End marker is inserted, the Options > Stop at Project End option is also automatically enabled. Playback will only stop at the Project End marker if the Stop at Project End option is enabled. Tip: The Set Project Start Marker to Now Time and Set Project End Marker to Now Time menu commands are also available as key bindings. You can assign the key binding in Edit > Preferences > Customization - Keyboard Shortcuts (under Area: Global Bindings). Note: If a loop region exists beyond the Project End marker, the Project End marker is ignored in favor of the loop extents. Recording ignores the Project End marker. If recording stops after the Project End marker, the marker is moved to where recording stopped, or if comp/loop recording, to the end of the loop. The selection is clamped to the Project End marker when you open the Export Audio dialog box, unless the selection starts after the Project End marker. To jump to the Project Start marker To jump to the Project Start marker, do one of the following: Click the Go to Start (RTZ) button in the Control Bar’s Transport module to toggle between the Project Start marker and measure 1 Press CTRL+HOME to toggle between the Project Start marker and measure 1 Press W to toggle between the Project Start marker and measure 1 (or if a loop region is set, toggle between the Project Start marker and the loop start) Press G to open the Go dialog box, then press F5 to open the Markers dialog box and select <Project Start Marker> from the list To jump to the Project End marker To jump to the Project End marker, do one of the following: Click the Go to End button in the Control Bar’s Transport module to toggle between the Project End marker and the end of the project Press CTRL+END to toggle between the Project End marker and the end of the project Press G to open the Go dialog box, then press F5 to open the Markers dialog box and select <Project End Marker> from the list To delete the Project Start/End marker To delete the Project Start or Project End marker, do one of the following: Click the marker and hold the left mouse button down, then press the DELETE key Click the Project menu and point to Remove Project Marker, then select Remove Project Start Marker, Remove Project End Marker, or Remove Project Start/End Markers Right-click in the time ruler and point to Remove Project Marker, then select Remove Project Start Marker, Remove Project End Marker, or Remove Project Start/End Markers Note: If you drag the Project Start marker to the beginning of the project (measure 1), it will automatically be deleted. Cakewalk Interchange Format (CXF) The Cakewalk Interchange Format (CXF) is a Cakewalk cross platform inter-app project file format, used to exchange projects between Sonar and Next. CXF files exported from either application can be opened or imported in both apps. Note: CXF is a transitory format only used for exchange. It is not intended for archival storage or backing up since the format can change at any time. CXF supports a subset of project data used by Sonar and Next, so app-specific feature settings and view-specific states will not be restored. The following data will be exported and imported: Tracks Audio MIDI Instrument tracks Simple Instrument tracks (Sonar) Multi Instrument tracks (each track will represent a unique instance of the synth when opened) Split instrument tracks (not supported) Bus tracks (Next) Patchpoints (Sonar; converted to buses) Aux tracks (Sonar; limited support - treated like patch points and converted to buses) The aux track itself will not route to the patchpoint. Track data Audio/MIDI clips Overlapping clips or take lanes are flattened prior to export Clip effects are rendered into the clips prior to export Automation envelopes Track/Bus parameters Volume Pan Mute Solo Input Gain (Sonar only) Input Pan (Sonar only) Track/Bus routing Outputs Hardware outputs are not preserved since they are not cross platform. Any hardware outs are automatically assigned to the first hardware output. Sends to buses and patch points. Plugins in track and bus effects racks. On opening a CXF file, any missing plugins will be listed. Note: when moving a project between Windows and Mac any plugins used must be installed on both platforms in the same format to successfully load them. VST2 VST3 DX AU plugins (only available in Next Mac) DX plugins (only available in Sonar) ProChannel (not supported) FX Chains (not supported) Plugin settings are stored within the CXF and will be restored if the plugin is available. Instruments and instrument settings are stored within the CXF. Exporting a project in CXF format To export a project to Cakewalk Interchange Format, do one of the following: Go to File > Export > Cakewalk Interchange. Click the Export button in the Control Bar’s Export module and select Other > CXF (Cakewalk Interchange). CXF files have a .cxf file extension. When the export is complete, a notification appears with a link to open the export folder. Opening a project in CXF format To open a project in Cakewalk Interchange Format, do one of the following: Go to File > Open and choose Cakewalk Interchange as the file format. Drag a .cxf file to the Track view. Opening a CXF file creates a new project, which must then be saved in Sonar’s native project file format (.cwp). Importing a project in CXF format To import a project in Cakewalk Interchange Format into an existing Sonar project, drag a .cxf file to the track area. An imported CXF file merges its data into the existing project file. Cakewalk ZIP Format (CWZ) The new Cakewalk ZIP (.cwz) file format is intended for backing up projects, and is also useful for moving Sonar projects from one computer to another. Cakewalk ZIP is recommended over the older Cakewalk Bundle (CWB/BUN) format, because it does not compact the audio data, and therefore supports AudioSnap clips. The following items are saved in a CWZ file: Project file (.cwp) Project \Audio folder and any other referenced audio data Project \Audio Export folder, if present Project \MixScenes folder, (only if project contains any mix scenes) To save the current project as a Cakewalk ZIP (.cwz) file, go to File > Save As and select Cakewalk ZIP from the Save As Type drop-down list, then click the Save button. To open a CWZ file in Sonar, go to File > Open and navigate to the CWZ file. Note: A Cakewalk ZIP (.cwz) file is a regular ZIP file that can be extracted with any app that supports ZIP files. You can simply rename the .cwz file extension to .zip and manually unzip the file. To unzip a ZIP file in Windows, right-click the file and select Extract All. Configuration backup/restore You can save and load backups of your Sonar configuration settings. A configuration profile stores settings from various Sonar configuration files and Windows registry settings in a single JSON file. You can selectively choose which app settings to save or load from a configuration profile. Configuration profiles have many uses, including: Quickly switch Sonar to a different audio configuration or driver mode when using multiple audio interfaces Save hardware setup profiles for different workflows, such as tracking, mixing, live band recording, customizations for recording different band’s etc. Switch between different control surface configurations Save startup configurations and launch them via desktop shortcuts using the RestoreConfig command line flag Transfer app settings between Sonar installations on different computers Save a backup of a known good state (similar to system backup/restore) in windows Troubleshooting system related problems Note: Configuration profiles are not a replacement for templates, presets or Workspaces, but provide an additional degree of management for global system and hardware related settings of the app. Saving a configuration profile To save the current Sonar settings as a configuration profile: Go to Edit > Preferences > Customization - Backup/Restore Settings. Select the setting that you want to save: Audio Configuration. Save audio settings that are stored in Aud.ini. MIDI Configuration. Save MIDI settings that are stored in TTSSeq.ini. Control Surfaces Configuration. Save control surface settings that are stored in ctrlsurface.dat and ctrlsurface_UWP.dat. General Application Settings/Configuration. Save general app settings that are stored in Cakewalk.ini and the Windows registry. Keyboard Shortcuts. Save all assigned key bindings. [Optional] Type a description. Click Save to open the Save As dialog box. By default, configuration profiles are saved as JSON files with a .ccp file extension within %APPDATA%\Cakewalk\Sonar\Config Profiles. Type a file name, then click Save (the default file name is ConfigProfile_<current date>.ccp). Note: Sonar automatically saves the last known good config profile when exiting the app. Loading a configuration profile To load a configuration profile: Go to Edit > Preferences > Customization - Backup/Restore Settings. By default, Sonar will load all the settings that are stored in the configuration profile. If you want to selective only load specific settings, select Only apply the settings checked above on load, then select which settings to load: Audio Configuration. Load audio settings that are stored in Aud.ini. MIDI Configuration. Load MIDI settings that are stored in TTSSeq.ini. Control Surfaces Configuration. Load control surface settings that are stored in ctrlsurface.dat and ctrlsurface_UWP.dat. General Application Settings/Configuration. Load general app settings that are stored in Cakewalk.ini and the Windows registry. Keyboard Shortcuts. Load key bindings. Click Load to open the Open dialog box. Select the desired configuration profile, then click Open. Sonar prompts you to confirm that you want to load the configuration profile. Click Yes. Loading a configuration profile on app startup You can load a configuration profile on startup via a command line: Do one of the following to open the Command Prompt: Click the search box next to the Windows Start button, then type CMD and press ENTER. Press the Windows key () + R, then type CMD and press ENTER. Type the following: <Sonar install path>\Sonar.exe /RestoreConfig=<configuration file folder>\<name of configuration profile file> For example: "C:\Program Files\Cakewalk\Sonar\Sonar.exe" /RestoreConfig="%APPDATA%\Cakewalk\Sonar\Config Profiles\mysettings.ccp" Press ENTER. Sonar launches with the specified configuration profile. Creating a desktop shortcut with command line parameters You can add command line parameters to a desktop shortcut. This way you don’t have to manually type command line parameters each time you want to launch Sonar with a specific configuration profile. To add launch parameters to a desktop shortcut: Create a new desktop shortcut for each configuration profile (Tip: copy the default Sonar desktop shortcut), and give the shortcut a descriptive name. Right-click the shortcut and select Properties. In the Properties dialog box, click the Shortcut tab. In the Target text box (which already lists the location of the Sonar executable within quotation marks), place the cursor after the last quotation mark, then add a blank space followed by the command line parameters. For example: /RestoreConfig="%APPDATA%\Cakewalk\Sonar\Config Profiles\ConfigProfile_2023-02-28.ccp" The full Target text string should look something like this: "C:\Program Files\Cakewalk\Sonar\Sonar.exe" /RestoreConfig="%APPDATA%\Cakewalk\Sonar\Config Profiles\ConfigProfile_2024-02-28.ccp" Click OK to save the changes. You can now double-click the shortcut to start Sonar with the specified configuration profile. Automation smoothing when recording Automation smoothing now also applies to recording automation in real-time. You can specify how shape smoothing works when recording automation in real-time (and when using the Freehand tool on envelope shapes). To do so, click the Track view Options menu, point to Automation Smoothing, then select one of the following options: Smooth. Uses the existing fit-to-curve functionality. This is the default setting. As Drawn/Recorded (Linear). Joins the nodes up with linear shapes. As Drawn/Recorded (Jumps). Leaves the nodes as is, making them jump shapes. Specify the default automation curve type To specify the default automation curve type when drawing automation envelopes, click the Track view Options menu, point to Default Automation Curve, then select the desired curve type: Jump. A jump shape causes the envelope to make a ninety degree jump where the envelope reaches the second node. Sonar displays jumps with a dotted line, meaning that there is automation data at the nodes where the dotted line begins and ends, but not where the line itself is. Linear. Draw a straight line between the two nodes. Fast Curve. A fast curve draws a curve between the two nodes that changes value rapidly at first, but more slowly toward the end of the curve. Slow Curve. A slow curve draws a curve between the two nodes that changes value slowly at first, but more rapidly toward the end of the curve. Offset mode enhancements To make it easier to visualize if a track parameter has an offset applied, Sonar shows the parameter value in an amber color when Offset mode is not active . The parameter tooltip also shows the offset value. Live articulations When playing a MIDI controller in real-time, the per track Live Articulations setting allows you to apply any transform articulations that are active at the now time. Live articulations are echoed, but not recorded. To enable/disable live articulations on the focused MIDI track, do one of the following: In the Track Properties inspector, select Live Articulations. Tip: You can use quick grouping (hod down the CTRL key) to enable/disable the setting on all selected MIDI tracks. In the Piano Roll view, click the Live Articulations button . The button state applies to the focused track. Time offset for MIDI transform articulations MIDI Transform Articulations now support an optional offset value that will offset the start/end times for notes. The offset can be applied using either ticks or milliseconds. The Duration checkbox toggles whether notes should retain their original end points as drawn or offset with start times. Key Aftertouch editing in the Piano Roll view Controller pane Key/Polyphonic Aftertouch events can now be edited in the Piano Roll view Controller pane in addition to the Event List view. To add a Key Aftertouch lane in the Controller pane: Click the Add New Controller button in the bottom left corner of the Controller pane to open the MIDI Event Type dialog box. Under Type, select KeyAft. Under Value, select the note/key. You can now draw polyphonic aftertouch events that represent the pressure values for the selected note/key on the chosen MIDI channel. Key/Polyphonic Aftertouch can also be used in MIDI track / Synth track automation. Import and export tempo map to/from MIDI files To import a tempo map from a MIDI file, right-click the Tempo track and select Import Tempo Map from MIDI File. Import replaces the current tempo track with any tempos in the MIDI file. To export a project's tempo map to a MIDI file, right-click the Tempo track and select Export Tempo Map to MIDI File. Export saves the tempo track to a MIDI file, without saving any other tracks or events. Cakewalk Product Center Cakewalk Product Center allows you to download and install Cakewalk products from one central location. Simply sign in with your BandLab ID and password and begin installing your connected products. Stay up to date with the latest features and fixes. For more information and to download Cakewalk Product Center, see: Plugins Overloud TH-U Cakewalk amp simulator TH-U Cakewalk Edition by Overloud provides realistic guitar amp models from clean to crushing distortion. This special edition includes a curated collection of amplifier models, cabinet models, effects models and dozens of presets. Easily build or modify your own signal path. New since TH3 Cakewalk: Added Rig Player and Supercabinet You can now load user IRs even in regular cabinets instead of using one or both microphones Added Scenes support (A, B, C, D buttons on the interface) Added Fluid Convolution technology support (https://www.overloud.com/news/fluid-convolution-unveiled) Added Fluid IR technology (https://youtu.be/qLZ5rBCWW_k) Remastered Cabinets (improved the cabinet processing) Possibility to save and load settings for single effects (right click effect) Customizable initial chain (click Custom in the Settings panel) More parameters for cabinets (pan, mic angle) Note: TH-U Cakewalk is only usable in Sonar and Next. If you already own the full version of TH-U, installing the TH-U Cakewalk edition will not change your existing functionality. Overloud TH-U Cakewalk is fully backwards compatible with older TH3 and TH2 versions. TH3 is no longer distributed with Sonar. Projects or templates containing TH2 or TH3 will automatically load in TH-U if the old plugin is not available. Important: If you already have TH3 installed, you may not see any presets in TH-U. This will be addressed in a future update. The workaround for now is as follows: Close Sonar. In file explorer, navigate to the app data folder for Overloud TH-U (Go to %APPDATA%\Overloud). Delete the \TH-U folder. Start Sonar and insert TH-U in an FX Rack. This will regenerate the appdata folder and recreate it this time with the correct default presets. ProChannel Concrete Limiter module ProChannel Concrete Limiter is an audio processing module for the ProChannel channel strip. ProChannel Concrete Limiter is a transparent look-ahead brickwall peak limiter. It is designed to reduce peak levels without coloring the sound. The purpose of ProChannel Concrete Limiter is to increase loudness as much as possible while preventing the signal from exceeding the maximum output level. ProChannel Concrete Limiter reduces the volume of the loudest parts (limiting), while simultaneously increasing the volume of the quiet parts (boosting). ProChannel Concrete Limiter is typically used as the final processor on the ProChannel strip, of tracks and buses. VX-64 Vocal Strip VX-64 Vocal Strip is a multi-functional plug-in that combines a series of effects specifically optimized and streamlined for vocal processing. Combining compression, expansion, equalization, deessing, doubling, delay and tube saturation in one convenient plug-in, VX-64 Vocal Strip is designed to make it fast and easy to enhance any vocal track. VX-64 Vocal Strip features include: 5 professional quality effect modules, each with its own bypass toggle. All modules are specifically tuned for vocal processing. Advanced tube saturation modeling available on input, output and EQ modules. Deesser with switchable center frequency and threshold. Configurable effect chain routing. Smooth, zipperless automatable parameters. Library of presets. A/B plugin settings Use the A/B buttons to compare two different versions of a plugin's settings. Select either slot A or slot B and adjust the plugin settings, then toggle between the two slots. Adjustments made to the selected slot do not affect the other slot. You can copy settings from the selected slot to the other slot. This is useful if you want to slightly modify the current settings and compare with the original settings. To do so, click the Copy Settings to Slot A/B button / . To revert the selected slot to its initial settings, click the Revert Settings button . Typical workflow: Select slot A. Adjust the plugin settings as desired. Click the Copy Settings to Slot B button . Slots A and B are now identical. Adjust the setting of either slot A or B. Toggle between slots A and B to compare the two different settings. Note: Upon project save, the app persists the plugin’s current settings (A or B), but the button state itself is not persisted. Upon subsequent project open, the plugin will always initialize with slot A selected, and slot B will be identical to slot A. Sidechaining enhancements Both audio plugins in the FX rack as well as instruments in the Synth Rack now support sidechaining (when available by the plugin). When a sidechain source is selected, a sidechain send from the selected source is created in the mixer. Please note that many plugins and instruments only expose sidechain inputs in their VST3 versions. Sonar provides the following workflows for designating sidechain sends for instruments and effects that support sidechaining: Track header output menu presents instrument sidechain sends if available (preexisting UX) Plugin window toolbar Settings cog has a new "Sidechain Sources" menu item to assign source to a plugin or instrument sidechain input directly from the header Checking a source creates a send from the chosen source to the plugin's sidechain input Unchecking a source removes the send to the plugin sidechain The sidechain sources menu is not shown if the plugin or instrument is not sidechain capable. Plugin window toolbar has a button to open the Manage Sidechain Sources dialog box (located next to ACT learn button). This button will only be shown if the plugin or instrument is sidechain capable. Prochannel header has the same "Sidechain Sources" menu shown in the plugin settings cog. This will be shown for any prochannel modules that have sidechain capabilities. The Manage Sidechain Sources button will highlight to show when a plugin sidechain input has something connected to it. Manage Sidechain Sources dialog, from the Sidechain Sources menu or plugin window toolbar, shows a modal dialog that facilitates the sidechain send management across multiple sources types (i.e. track, aux, bus). Manage sidechain routing directly from the effects view toolbar You can assign sidechain connections to a plugin or instrument directly from the effect view toolbar, without having to return to the source track(s) in the Track view or Console view. To do so, do one of the following: Click the VST2/VST3 drop-down menu in the VST plug-in toolbar, point to Sidechain Sources, then select the desired input source. The Sidechain Sources submenu is only shown for plugins or instruments that have a sidechain available. Choosing a source creates a send from the chosen track/bus source to the instrument's sidechain input. Unchecking a checked menu item removes that send to the instrument sidechain. Note: Up to 25 sidechain sources are listed in the Sidechain Sources submenu. If more than 25 sources are available, only connected sources will be shown. To access all available sidechain sources, select Manage Sources to open the Manage Sidechain Sources dialog box. Click the Sidechain Sources button to open the Manage Sidechain Sources dialog box, which facilitates the sidechain send management across multiple sources types (i.e. track, aux, bus). The Sidechain Sources button is only shown for sidechain capable plugins or instruments. The Sidechain Sources button will highlight to show when a plugin sidechain input has something routed to it. Selecting a source creates a send from the chosen source to the plugin's sidechain input. Deselecting an item deletes the send. The Send Settings are applied to newly added sends and will also modify any existing sends if changes are made to the settings. The Follow Track Pan setting will be applied but only affects playback when a send is a Post Fader send. Show These Sources lets you filter which source types are displayed in the list. Any changes to send settings are applied to all items, not just to the currently shown items. Double-click the Send Level slider to reset to 0 dB, or click the slider, then press F2 to type a dB value. Note: Only sends can be added from the Manage Sidechain Sources dialog box, although Sonar also supports directly connecting a track or bus output to a sidechain, via the Track header output menu. Manage sidechain routing directly from ProChannel modules You can assign sidechain connections to a supported ProChannel modules (such as PC4K S-Type Bus Compressor) by right-clicking the module header and pointing to Sidechain Sources. Sidechaining for VST instruments in the Synth Rack Sonar has supported side-chaining for effects plugins, satisfying the traditional and primary use case for sidechaining. However, a growing number of VST instruments now support sidechaining, therefore support has been extended to support such instruments, in addition to effects. To specify the sidechain input for a VST instrument: Open the VST instrument's property page. Click the VST2/VST3 drop-down menu in the VST plug-in toolbar, point to Sidechain Sources, then select the desired input source: Choosing a source creates a send from the chosen track/bus source to the instrument's sidechain input Choosing a checked menu item removes that send to the instrument sidechain Support for instruments with a single aux input Sonar can now handle synths with a single aux input and expose it as a sidechain. Prevent sidechain routing from creating a feedback loop Sonar has logic to prevent feedback loops when creating sidechain connections. Plugin oversampling enhancements Earlier versions of Sonar had up to 2X oversampling for plugins. Sonar now includes support for plugin oversampling at higher oversampling ratios from 2x up to 16X. Additionally, oversampling is also available for plugins within FXChains. The oversampling ratio and precision can now be selected in the plugin options as below: Oversampling has been optimized to be CPU efficient and the precision can be selected via the Precision menu, Please note that depending on your project sample rate, oversampling at higher ratios can lead to very high sample rates, that may not be supported by all plugin's. Oversampling may also tax your CPU at very high sample rates. How to enable oversampling: To use oversampling, you must set it on a per plugin basis. Once you have enabled it for a plugin it is automatically enabled for all instances of that plugin in a project. Additionally, Oversampling is only activated when the Px button in the mix module is enabled. This button allows you to easily toggle oversampling on to A/B how it sounds in your project. You can check which plugin have oversampling active and the oversample rate by looking at the plugin tooltip as below. Plugin Oversampling Precision You can now specify the precision for plugin oversampling. Using a medium precision uses less CPU and for many uses has no perceptible effect on resampling audio quality. This should reduce CPU load when utilizing plugin oversampling. Precision defaults to Medium. FX Rack tooltip indicates if oversampling is enabled When hovering over a plugin name in an FX rack, the tooltip shows the current rate if oversampling is enabled. This allows you to quickly verify if a plugin is being oversampled. Improvements to phase accuracy Prior to Sonar, oversampling could introduce an uncompensated phase offset in the oversampled data of around 150 samples, which could lead to phase problems when playing back the oversampled track along with the rest of the project, unless the track data was manually offset. This issue has been corrected and oversampling is fully phase accurate now with no delay in processing. See the up-sampled click track below. Handle oversampling for FX Chains and ProChannel FX Chains Oversampling is now supported for plugins in FX Chains and ProChannel FX Chains. Misc. improvements The oversampling engine has been updated for greater accuracy and several issues have been addressed. Problems with bouncing oversampled plugins where the bounce settings differ from playback have been addressed. Plugin oversampling can now be enabled while effect and instrument sidechaining is in use. Note: Enabling oversampling during playback can put a high demand on your CPU. If you experience dropouts or other issues, use oversampling only on render. Plugin delay compensation (PDC) UI enhancements Some plugins use a look-ahead buffer mechanism, which results in a short delay being introduced to the output signal when the plugin is used in real-time. Sonar applies automatic plugin delay compensation (PDC) during recording and playback on tracks that have input echo enabled. This ensures that all tracks are aligned properly. The exact latency is calculated automatically, and is influenced by all plugins in a track’s signal path. Override PDC during playback, recording, or both The PDC Override button in the Control Bar’s Mix module allows you to override PDC, and thereby reduce latency caused by plugin delay compensation in the signal flow. It allows you to play in real time within projects containing look-ahead plugins. When the PDC override button is engaged, any PDC latency for input monitored tracks or instrument tracks is bypassed, and the input monitor signal is passed through in real time. This is useful for recording or input monitoring in real time. The PDC Override button has a new popup menu that allows you to selectively override PDC for playback, recording, or both. To do so, long press or right-click the button and select the desired options: Override during playback. If this option is disabled, PDC Override will not affect tracks with input echo during playback. Override while recording. If this option is disabled, PDC Override will not affect tracks with input echo during recording. Both are enabled by default. If both are disabled, PDC override is still in effect during idle input monitoring. The above modes are only active when the PDC Override button is engaged. PDC Latency displayed in Track Properties Inspector The Track Properties Inspector shows the max/net PDC latency for that track/bus signal path in milliseconds and samples, as a result of compensating for other delay present in the project. Note: The displayed PDC Latency value is static text that is calculated automatically during playback and only updates in the UI when playback is stopped. PDC latency tooltips Plugin, FX Rack, ProChannel strip and modules all display tooltips showing the plugin lookahead latency when present. Hover over the FX Rack header to show the PDC latency for the entire rack. Hover over the an effect to show the PDC latency for that effect. Plug-in Load Balancing enhancements Plug-in Load Balancing now uses significantly less load when running at low latency. Note: Plug-in load balancing will not lower CPU use as compared to load balancing being disabled, especially when running at lower latency. This is because load balancing uses smaller buffers than the audio engine buffer size. Configurable Thread Count and Buffer size Both the plug-in load balancing threads and buffer size are now configurable settings in Edit > Preferences > Audio - Configuration File. When PluginLoadBalancingThreadCount is set to 0, the number of threads is adaptively managed and is less than the number of processor threads. You may change the value to utilize fewer or more threads. MinPluginLoadBalancingBufferSamples defaults to 96 samples and is the size of the internal load balancing buffers. Setting the buffer size higher will use less CPU but may result in less load balancing. Please note that when the engine latency is less than twice MinPluginLoadBalancingBufferSamples, load balancing will be automatically disabled internally. Plug-in Load Balancing active indicator When Plug-In Load Balancing is enabled in Edit > Preferences > Audio - Playback and Recording and load balancing is active, the FX Rack header tooltip shows (PLB) next to the audio processing load. External Insert enhancements External inserts have been enhanced to add true mono output support, ProChannel integration, FXChain support, a new Send Mode allowing an arbitrary tap point from an FX Rack, Friendly naming, better track template support, as well as numerous optimizations and stability fixes. Mono Outputs support. The External Insert plugin now supports exclusive use of mono outputs for sends. Prior to this, using a mono output would utilize a full stereo pair and prevent other external insert plugins or tracks from using the unused channel. It is no longer necessary for Show Mono Outputs to be enabled in the Devices tab of the Preferences to use mono channels in the external insert. (Its preferable to set display mode to show mono outputs since otherwise track or bus output will always utilize a full stereo channel). Preferences > Audio - Devices > Show Mono Outputs defaults to checked for new installations of Sonar. This is the preferred display mode. New Routing Modes. The external insert can be used in 4 modes. See Routing Modes below for more details. Send/Return mode [New] Send mode Return mode Passthrough mode ProChannel The external insert can now be used directly inside the ProChannel by adding it into a ProChannel FX Chain. FX Chains Support (both Track and ProChannel FX chains) now fully support adding an external insert. FX Chain presets containing External Inserts can now be saved and loaded in a track FX Rack or a ProChannel FX Chain. Drag and drop of external insert or an FX Chain containing one from track FX Rack to the ProChannel creates a ProChannel FX Chain containing the external insert. Send and return port assignments for the external insert are exclusive and can only be used by a single instance of the plugin. This is enforced as follows: Track input and output menus will exclude any items that are in use by the external insert. External Inserts send and returns will exclude any items that are in use by tracks/buses or other external insert plugins. Loading FX Chain presets or track templates containing external inserts will result in the send and return being set to None if the ports are already in use. Loading a project when the hardware inputs or outputs are no longer available will reset the external insert send/return. The external insert references send and return ports by name. Changing the friendly name of a port will result in the send and return being set to None if it was using a different name earlier. Track templates now persist external Insert ports. Friendly names can be assigned to External Inserts. Several stability improvements and fixes to external insert infrastructure. External Insert Routing Modes. The external insert can be used in 4 modes Send/Return mode. This is the primary mode and is engaged when both the send and return ports are routed to hardware ports. In this mode the plugin echoes its send input to the main output. The external insert measures the net delay between the send and return and compensates for this delay, aligning the audio on playback. This is the only mode that is delay compensated. [New] Send Mode. This mode is engaged when only the send is routed to a hardware port and the return is unassigned. In this mode the plugin sends its input audio to the assigned hardware output, and additionally passes through the audio through the main out effectively acting as a splitter. This mode can be useful to create a signal flow tap point from any FX Rack location. No delay is applied in this mode. Return Mode. This mode is engaged when only the return is routed to a hardware port and the send is unassigned. In this mode the plugin receives input audio from assigned return port and echoes the audio to its output. This mode can be useful to create an FX Rack insert from an external audio device or synth, or to receive input from another external insert tap point in Send Mode. You cannot ping to measure delay in this mode, but a manual delay offset can be specified to compensate for any delays. Passthrough Mode. This mode is engaged when neither send nor return ports are assigned. Passthrough mode operates as if the plugin has been bypassed in the effects rack. All incoming audio to the plugin is echoed unmodified to its output. Plugin Browser drag and drop enhancements You can insert or replace synth, and convert regular audio and MIDI tracks to instrument tracks with the following drag and drop gestures: To insert a synth: In the Plugins Browser, select the Instruments tab , then drag a synth to a blank area in the Track pane or Clips pane. To convert an audio or MIDI track to a simple instrument track: In the Plugins Browser, select the Instruments tab , then drag a synth to an audio or MIDI track to convert the track to a simple instrument track. Note: Audio tracks will only be converted if empty. To replace a synth: To replace the synth in a simple instrument track with a different synth, drag a synth from the Plugin Browser to the existing instrument track. Quick access to plugin settings The plugin toolbar now has a Settings menu button that provides direct access to Enhanced DPI scaling and plugin upsampling settings. Friendly names for plugins are now shown in FX racks Friendly names for plugins (set in the Browser) are now displayed in FX racks. Note: This will apply to new instances of the plugin. Existing ones will still show the actual plugin name. New instances will show the friendly name. Audio processing load tooltips Similar to the Control Bar's Performance module tooltip, audio processing load is now shown on hover over several new hotspots, which allows you to check performance load for every element in the project, tracks, buses, plugins, instruments and FX Chains. Load measurements are only performed when the tooltip is visible. When hovering over an FX Rack header, the tooltip shows the current audio processing load and max load. This is useful as a troubleshooting tool because real-time effects have a big effect on CPU load. This tooltip is also shown in FX Chains. In the FX Rack, hovering over a plugin name shows the load for that plugin. In the FX Rack, hovering over an FX Chain shows the load for that FX Chain. In the FX Chain plugin, hovering over a plugin name shows the load for that plugin. In the Synth Rack, the Name field tooltip shows synth audio processing load. The track meter peak indicator tooltip shows total combined processing load for the track including FX Rack and ProChannel. The bus meter peak indicator tooltip shows total combined processing load for the bus including FX Rack and ProChannel. Usability and Workflow Click Sonar logo in Control Bar to open Quick Start Screen Clicking the Sonar logo in the Control Bar opens the Quick Start Screen. Specify default synth for use in Add Track flyout menu You can specify which synth should be the default in the Add Track flyout menu. The default synth can be assigned from the synth track context menus or from the Synth Rack menu. Select all tracks/buses in a control group When multiple controls have been added to the same control group (A-X), it can be useful to record automation for all controls by only moving one of the controls. In order for this to happen, you must first manually select all the tracks/buses with controls in that group, enable Automation Write for the selected tracks using quick grouping, then record the automation during playback. It may be difficult to remember which tracks/buses have controls in that group in order to select them, so the new Select Tracks/Buses in Group menu command on the control group context menu makes it easy to automatically select all tracks and buses that have controls that are a member of the current control’s group. Hold down the CTRL key while selecting the menu command will add to the existing selection (default is to replace the current selection). Create sends by dragging effects to channel strips You can create a send by simply dragging an effect to an audio track, instrument track, aux track, or bus. To do so, drag an effect from the Plug-in Browser to the Sends area of a channel strip in the Inspector or Console view. Doing so creates a pre fader send and a new bus that contains that effect. To create an aux track instead of a bus, hold down the ALT key while dragging the effect. To insert an effect in a track or bus Select the desired channel strip and show its Sends section in the Track Inspector or Console view In the Browser, click the PlugIns button to show the Plug-in Browser. Click the Audio FX button to show audio effects. Do one of the following: To create a send to a new bus. Drag the effect to the channel strip’s Sends section. To create a send to a new aux track. Hold down the ALT key and drag the effect to the channel strip’s Sends section. The Insert Send button shows a red outline when you drag an effect to the Sends section. Tip: You can use quick grouping to create sends on all selected tracks simultaneously. To do so, select the desired tracks, then hold down the CTRL key while dragging an effect to the Sends section on any selected track. Create tracks routed to aux tracks or patch points The Add Track menu now allows you to create tracks that are routed to a new aux track or patch point. Preserve sections in other Arranger tracks when committing an arrangement When committing an arrangement, the new Include Sections in other Arranger Tracks option allows you to also “arrange” and preserve sections in other Arranger tracks that aren’t part of the selected arrangement. Arranger Inspector displays a badge on sections that intersect with the Now Time To help you better identify which Arranger section(s) intersects with the Now Time, the Arranger Inspector displays a badge to the left of the section name. In-app hang detection Sonar can now detect hangs and save a minidump file, which allows you to easily submit minidump files to Cakewalk support for analysis. A minidump file records the state of a program as it is running, or at the moment of a crash or hang. By default, the app is considered hung if the UI is blocked for 30 seconds after which an “Application Unresponsive” message appears, asking you to abort or wait. If you choose to abort, a hang dump file is saved to the %AppData%\Cakewalk\Sonar\MiniDumps folder, and the standard error dialog box is shown along with a description of common error codes. The hang check timeout duration is configurable via a Cakewalk.ini variable named HungAppTimeoutSec. It defaults to a wait of 30 seconds. To adjust the hang check timeout duration, add the following variable in Cakewalk.ini (Edit > Preferences > File - Initialization File) : HungAppTimeoutSec=<seconds> (default=30) To disable hang checking, set the variable to HungAppTimeoutSec=0. Note: Sonar dynamically changes the hang timeout while loading projects by bumping up the hang detector timeout to up to 2 minutes. This prevents false positives when saving large project files. Once loading finishes, it restores it back to the default (30 seconds). Sending the dump file to Cakewalk for analysis: Once you have the dump file you can put it on a share like Dropbox, Google Drive etc. Next, log a problem report case with Cakewalk and include the link to the dump file. Note: Dump files may include personally identifiable data so please do not post links to them publicly in the forums or elsewhere to protect your privacy. Key bindings to show/hide tracks The following new assignable key bindings allow you to show/hide tracks in the Track view and Console view: Under Area: Track View: Toggle Show All/Hide Previously Hidden Tracks and Buses Synchronize Track and Console Views Under Area: Console View: Toggle Show All/Hide Previously Hidden Tracks and Buses Synchronize Track and Console Views You can assign the key bindings in Edit > Preferences > Customization - Keyboard Shortcuts. Toast notification when a control surface is disabled on launch Sonar now shows a notification if you start the app while a control surface is disconnected. Deleting a tempo in the Tempo Inspector sets the focus to the next tempo in the list When deleting a tempo in the Tempo Inspector, the focus is now set to the next tempo in the list. Press F2 to rename markers in the Markers view F2 now allows you to rename markers in the Markers view. Meter scale for Instrument tracks changes to dB scale when frozen The vertical splitter bar between the Clips pane and the Track pane shows a MIDI scale (vertical piano keys) for MIDI and Instrument tracks, and an audio dB scale for audio tracks. When an Instrument track is frozen, its vertical MIDI scale automatically changes to a dB scale, which is more appropriate for audio content. Remove crossfades To remove all crossfades in the current selection, click the Track view Clips menu and select Remove Selected Crossfades. Track Scale Zoom is now quick-groupable You can now zoom the waveform or MIDI notes in all selected tracks by holding down the CTRL key and dragging up/down in the track scale. Double-click to reset sliders Double-click to reset sliders in the following dialog boxes: Edit > Preferences Process > Transpose Process > Length Process > Fit to Time Export track/bus and project icons as PNG Export any assigned track/bus and project icon as a PNG file. To export a track/bus icon, right-click the icon and select Save Track/Bus Icon. To export the project icon, point to the project icon in the Notes Browser, then click the “...” button and select Save Image. Process > Length dialog accepts fractional values The Process > Length dialog now accepts fractional Percent values. Quick Grouping of Mute, Solo, and Archive buttons on track folders The Mute, Solo, and Archive buttons on track folders can now be controlled via quick grouping. Quick groups allow you to adjust identical controls across multiple tracks. Select the tracks you want to adjust, then hold down the CTRL key and adjust a control in any selected track. Sonar automatically adjusts the same control in all other selected tracks of the same type. Updated docked Synth Rack and new bypass functionality There are several improvements to the synth rack to allow managing large synth projects more efficiently. This allows you to quickly bypass and free memory and CPU resources allocated to synths, or create templates with bypassed synths and bring them online on demand. The docked version of the Synth Rack now shows a synth Bypass button. By default, the Bypass button unloads the synth when the instrument is bypassed, and also archives all related tracks to save CPU. The synth will be reloaded again and tracks unarchived when the synth is unbypassed. The preset picker has been removed from the docked Synth Rack to save space (the preset picker is shown when undocked or when docked in the MultiDock). This control is largely obsolete because most instruments handle preset management inside the synth UI. The Synth Rack menu and the synth strip context menus have been redesigned to show the relevant functions: Replace Synth is now available via the synth context menu. Bypass All Synths and Unbypass All Synths can be used to quickly bypass all instruments in the Synth Rack. Note that bypass/unbypass can take a while on projects with large numbers of synths if they are big. The progress is shown in the Control Bar Transport module. You may cancel a long bypass/unbypass operation by pressing the ESC key. Unload and Archive preferences can be set in the synth rack menu. In-app bug reporting Report bugs via the in-app Help > Report a Problem menu command. Microsoft GS Wavesynth device no longer available in any driver mode The Microsoft GS Wavesynth device is known to cause audio driver problems, and is therefore no longer available as a MIDI output in any driver mode. Previously it was only unavailable in WDM mode, but has now also been removed from MME and WASAPI Shared modes. Optimizations Audio engine low latency optimizations for multi-core processors The audio engine has been greatly optimized for playback and monitoring when running high plugin workloads at low latencies (less than 256 samples) on machines with high core counts (16 or more processor threads). Prior to this, running at low latencies could result in sub optimal multiprocessing load sharing and higher CPU load. Performance optimizations for projects with many synths and effects Sonar has been greatly optimized to handle high virtual instrument counts, managing the load more efficiently and using minimal CPU resources. In a real-world orchestral template with 250 Kontakt instances, the base template will now run efficiently at 128 samples with very few late buffers. In prior versions such a project would only run at 1024 samples or higher. General plugin performance in FX racks has been improved, allowing you to run workloads with high plugin counts more efficiently. Misc. optimizations Support for AMD threadrippers. Max CPU threads has been increased. Sonar now supports CPUs with up to 256 threads as supported by the AMD EPYC. Greatly improved plugin load balancing performance. Increased hang detection default timeout to 1 minute from 30 secs to prevent false positives with some instruments. Improved editing performance on projects with a large number of virtual instruments. Several optimizations have been made to improve performance when editing clips or MIDI in heavily loaded projects. The Now Time update frequency has been optimized to allow for smoother scrolling of the playhead marker during playback. Improved VU meter responsiveness. Optimizations to drawing efficiency in Console and Track view. Optimization for Intel processors to reduce CPU load when streaming silence with certain plug-ins that generate denormals. There are optimizations to playback start and seeking which reduce the latency before playback starts when starting the transport. Improved and faster Nudge performance. MIDI buffer size is now adaptively managed whenever delay compensated plugins are present in the project, without any need to raise the MIDI playback buffer size. Latest release notes are here.
-
Enissay Beats started following Morten Saether
-
New in Sonar 2024.11 build 30.11.0.097: This release continues our quest to further improve and optimize the audio engine, which can greatly reduce the CPU load at very low latency and improve performance with large projects. It also includes other performance improvements, faster scrolling in console view, CPU core selection, and several new features like Console View and Track Inspector module resizing, Time+ parameter on MIDI tracks can be set in milliseconds or ticks, Control Bar module expand/collapse via double-click, improved device change notifications, improved application error handling and crash detection/recovery, improvements and optimizations for Mackie HUI control surfaces, a redesigned Light color scheme and more. User Interface and Editing Console View and Track Inspector module resizing You can now resize the Volume, Sends, and FX Rack modules vertically by dragging the splitter bar handles located above the modules. Module sizes are persisted per project. When the Volume module is at its smallest size, the fader turns into a knob. To restore the default module size, double-click the drag handle. Time+ parameter on MIDI tracks can be set in milliseconds or ticks The The Time+ control on MIDI tracks allow you to apply an offset to the start time of the events in the track. You can now specify the Time+ offset value in milliseconds or ticks. To toggle between ticks and milliseconds, long press or right-click the Time+ control and select the desired format on the popup menu. When using milliseconds, a "ms" suffix is used. When using ticks, no suffix is used. The max values are as follows: Ticks: +/-61440 (equal to 16 measures in 4/4 time with 960 ticks per beat) Milliseconds: +/-1000ms Note: During playback, any event that would be negatively delayed before 1:01:000 will be clamped to 1:01:000. Control Bar module expand/collapse via double-click To expand/collapse a single Control Bar module, double-click the module. Updated Light color scheme The Light color scheme has been completely redesigned. Known issue: poor contrast with volume envelopes (you can manually change the envelope color in Edit > Preferences > Customization - Colors). This will be addressed in a future update. Improvements to grid line colors The contrast has been adjusted for grid lines to make them more visible in dark and light color schemes. Optimizations Performance Improvements Further optimizations for VST processing to streamline time reporting to plugins. This can greatly reduce the CPU load at very low latency when running many plugins. In testing, high load projects that wouldn't play at 128 samples now play glitch free. Console view horizontal scrolling with many tracks and buses is greatly improved. Further optimizations for high track/plugin count projects Performance improvements for Aux Tracks routed from Synth outputs Performance improvements for audio effects CPU Core Selection With the ARM Snapdragon platform being commonly used for Surface devices and also several Intel Chipsets supporting e-cores, it has now become commonplace to have heterogeneous systems with efficiency cores and performance cores in use. Heterogeneous systems support a combination of e-cores and p-cores. p-cores are high power “performance” cores and e-cores are “efficiency” cores. p-cores generally run faster than e-cores at the expense of consuming more CPU power. While efficiency cores are cost effective and can improve general responsiveness of applications while consuming less power, at low latency this can create performance problems due to load imbalances when mixing and matching e-cores with p-cores. As such, it's better to deprioritize use of e-cores for low latency applications. There are two new configuration variables that allow Sonar more fine-grained control over these CPU resources. These variables can be referenced through Preferences | Audio configuration. Sonar will now favor p-cores over e-cores and first use p-cores when available. CoreSelectionMethod This aud.ini variable specifies how Sonar chooses preferred cores: 0 = No preference When this is selected, Sonar makes no attempt to specify which cores should be used for audio engine threads. 1 = Requests preferred core Specifies preferred per thread cores. This is the default option and is similar to the now deprecated "UseIdealProcessor" variable. Note that this request is only a hint and as a result the core assignment may be overridden by the operating system. 2 = Restrict to preferred core This is similar to 1, but it actually restricts operation of the engine threads to only run on the specified cores. In this case the OS will not change core assignment. Depending on your CPU this option may allow the engine to run more efficiently without the overhead of its threads being switched to other cores by Windows. This can lead to lower CPU use in general. ExcludeEfficiencyCores Setting this variable to True, instructs Sonar to aggressively exclude efficiency cores (e-cores) from audio processing and to only use p-cores. This can be beneficial since all cores will now have equal performance and as a result you may see better load balancing or better low latency performance. Note that if you have insufficient p-cores you may get worse performance by excluding e-cores completely. Usability and Workflow Improved device change notifications Sonar shows when devices are plugged/unplugged. This has been changed to a toast notification instead of a dialog to avoid blocking the user interface. Since these notifications originate from the OS, there is no way for Sonar to know whether a specific device applies to your setup. If you see notifications for devices which you don't use, you can now choose to ignore a specific device. Once you ignore a specific device, all plug/unplug notifications for that device will be ignored. You can use this to filter unnecessary notifications. Improved crash recovery When a crash is detected, Sonar now attempts to close any files that have been opened for recording, before terminating the application. This allows the wave files to be properly saved and terminated allowing you to reimport the files imported from the audio folder manually, in the event of a crash. Improved application error handling and crash detection Sonar has integrated error reporting and an Exception Severity setting. While exception severity values of 3 and higher can be useful to preemptively catch certain crashes, it was found that this could occasionally aggressively report crashes that are actually internally handled by the OS or certain plugins. As a result, Sonar defaults to a value of 1 (Unhandled errors). In this release, Sonar's error management has been greatly improved to resolve some stability issues and detect several more classes of errors by default, without the need to boost the ExceptionHandlingSeverity. The new mechanism should resolve issues where crashes could silently occur with Windows terminating the app without an error report or giving you a chance to save your work. Errors are now detected in the UI, as well as the engine and plugins in more cases. In all cases a crash dialog will be shown and a minidump and error log will be saved to the crash reports folder at %appdata%\Cakewalk\Sonar\MiniDumps. The crash dialog and error log format has also been improved to show more information for the new error types. Misc.: Control surface ports are excluded from Zero Controllers When Play Stops Improvements and optimizations for Mackie HUI control surface Improve the Fader resolution / responsiveness in HUI mode Fix send controls when using Novation LaunchKey MK4 in HUI mode Optimizations for engine worker threads to simplify error handling Optimizations for dragging multitrack MIDI data in the Piano Roll view; this is now orders of magnitude faster MIDI activity on taskbar is disabled by default (can be re-enabled if needed in Edit > Preferences > Customization - Display) Refreshed Sonitus:delay plugin, resolving stability issues Fixed: Sonitus:delay crashes Sonar at higher sample rates like 96K when delay time is high Fixed: When a crash occurs Sonar should close any wave files being recorded Fixed: Crash adding nodes in Tempo track Fixed: Null Pointer Crash after doing Clean Audio Folder Fixed: Sonar crashes when downloading an online project when app is not activated Fixed: Crash loading ProChannel preset with Spectral Analyzer Fixed: Crash opening project with Loop Construction View Fixed: Crash patching audio with Cherry Audio Voltage Modular Fixed: Sends context menu on Console view/inspector strips not using undoable send commands Fixed: After clicking hardware output in Console view, Inspector fails to focus correctly Fixed: Console view fails to display ProChannel Post FX State Correctly on project open Fixed: ALT clicking aux track number in Console view doesn't select all upstream tracks Fixed: EQ plot nodes are difficult to click on high DPI displays Fixed: Piano Roll view doesn't repaint when vertically scrolling with GPU acceleration enabled Fixed: Piano Roll view fails to draw correctly when scrolling with GPU Acceleration disabled Fixed: Crash when deleting a note in the Piano Roll view Fixed: Piano Roll view does not draw correctly while scrolling during playback with GPU accel enabled Fixed: CC events skipped when drag moving notes in Piano Roll view Fixed: Aim Assist not working in Piano Roll view Articulations lane Fixed: Lag dragging in Piano Roll view when both Drum pane and the Note pane are open Fixed: Unable to see notes while drawing in inline Piano Roll Fixed: Horizontal mouse zoom in Drum Grid causes controller lane to shrink Fixed: Chase MIDI does not send aftertouch in order Fixed: Dragging a MIDI clip out to export it stops the audio engine and never resumes it Fixed: Intermittent deadlock sending hardware MIDI Fixed: Attempting to Nudge a frozen Simple Instrument Track clip moves the MIDI clip instead of the audio clip Fixed: Cropped MIDI clip resizes unexpectedly after splitting note Fixed: Step Sequencer pattern presets pnly play first 4 beats Fixed: Step record moves playhead to wrong location Fixed: Step sequencer clips not working with track delay Fixed: Clip selection is inconsistent with tracks containing Articulation maps Fixed: Incorrect tool selected when using Crop tool and moving mouse to beginning of clip Fixed: Pasting grouped clips in lanes to a new project results in all clips put in the same group Fixed: Clip length changing after moving pitch of cropped note in user project Fixed: Newly inserted sends are shown in tracks but not buses Fixed: Track view incorrect track/bus height after adding send Fixed: Minimized track heights not persisted correctly on high DPI displays Fixed: Repeat of Insert Instrument Fails to add second instance correctly Fixed: Instruments fail to restart consistently in attached project after deleting from synth rack Fixed: Arranger selection incorrect when project start / end is less than section extents Fixed: Section Ripple Delete with auto-xfade deletes more than it should in user project Fixed: Ripple Edit All delete erroneously creates end marker Fixed: Project fails to stop with Stop At Project End in user project Fixed: Control surface send shows stereo port name when send is to mono output Fixed: HUI controller Send control is mapped incorrectly to PAN Fixed: Intermittent notification of dirty project from Start Screen preview Fixed: Device change notifications need improvement to be less intrusive and allow ignoring specific notifications Fixed: Time Ruler selection drawing issue Fixed: Meter peak doesn't follow color scheme Fixed: Export to BandLab incorrectly exports instrument tracks Fixed: Control Bar Sync module Audio Sync button menu closes after opening when module is collapsed Fixed: Don't change active track if you're lassoing with CTRL down and the existing active track is already in the selection Fixed: Unexpected noise/dropout when duplicating clips during playback Fixed: Tempo Track repainting far too often, causing issues with clips view updates during zoom/playback Fixed: Unable to focus track in Track view if control surface is set to Console view, and track is hidden in Console view Fixed: [Regression] Unable to quick group delete sends from Track view Bus pane Fixed: [Regression] When range splitting clips, selection is drawn incorrectly after trimming completes Fixed: [Regression] Fixed regression for recording with Allow Arm Changes During Playback/Record Fixed: [Regression] BFD3 groove preview outputs noise when transport is not rolling Fixed: [Regression] Asserts when opening ProChannel and ProChannel EQ spectrum analyzer doesn't refresh Fixed: [Regression] CTRL + LEFT button click/drag no longer adjusts clip gain Please give us feedback on this release. We hope you like it Sonar 2024 Overview
-
Hi all - please use this topic to post feedback specific to the Sonar 2024.11 release. Release-specific feedback is valuable to us, and consolidating it in a single topic is extremely helpful. We request that discussion in this thread be restricted to issues directly concerning this release, to make it easier for us to assist users. For other topics, kindly use the feature request section or create new posts. Off topic messages will be deleted. Thanks in advance! Sonar 2024 Overview
-
We're pleased to announce the release of Sonar 2024! With this release, Cakewalk by BandLab has been rebranded as Cakewalk Sonar and has a refreshed UI as well as many new features and improvements. This release also includes support for DPI Awareness, a new integrated sampler, new plugins including the Overloud TH-U Cakewalk amp simulator, numerous audio engine enhancements and optimizations as well as usability enhancements and bug fixes for user reported issues. Please note that in order to automatically keep your activation status up to date, Sonar will renew your activation status whenever a new version of the application is installed and run for the first time, and when you sign in to BandLab from within Sonar . If you have never signed in to BandLab from within Sonar , you will be prompted once to sign in. Thanks, The Bakers Please note: Cakewalk Sonar and Cakewalk Next are currently exclusively available via BandLab Membership. New in Sonar 2024.09 build 30.09.0.105: In the prior Sonar release we made several performance improvements to the audio engine to improve CPU use and low latency performance. In this release we continue with the trend of optimizing Sonar with an additional focus on optimizing MIDI editing responsiveness and streaming, especially when dealing with large multitrack projects. Engine Optimizations Playback MIDI playback has been greatly optimized to reduce CPU load when playing dense MIDI data. This reduces the load when processing projects, allowing the engine to easily process data at even low MIDI buffer sizes. Synth playback has further optimizations to reduce CPU use in projects with many synth tracks. These improvements tackle problems leading to dropped notes in high load situations. Dynamic MIDI buffer size management In large projects, sonar will detect high load scenarios when processing MIDI and automatically detect the MIDI buffer size requirement for that session to avoid dropouts caused by MIDI buffer underruns. If high load is detected, Sonar displays a toast notification showing you the recommended buffer size. Choosing the recommended buffer size temporarily boosts it, allowing you to continue playback without any dropped notes. Note: This will not change the default MIDI buffer size in playback settings, but just changes it for that run session. You can see the result of this dynamic change in preferences, even though it won't be saved explicitly until the user changes the value manually. Project Load and Shutdown Reduced volume of message queueing during project load Mitigate problems caused by plugins that saturate windows with excess messages. This could cause other plugins to fail to show UI, or even interfere with Sonar loading its UI correctly when opening projects containing such plugins. Stop background meter activity while loading projects to free CPU bandwidth New Quick Exit Modes Exiting Sonar while a project is loaded can sometimes take longer than expected if the project contains a lot of virtual instruments or consumes a lot of memory. The most common reasons can be attributed to any of the following: Using large projects, typically with virtual instruments that load large sample libraries that take a while to release memory Audio drivers that are slow to un-initialize 3rd party plugin issues that prevent the app from shutting down properly Sonar now allows you to engage a Quick Exit mode that skips expensive shutdown processing when exiting the app, albeit far more safely than using Task Manager to kill the task. To use Quick Exit mode, hold down the CTRL or ALT modifier key when exiting the app. Note: The Quick Exit mode modifier keys only apply when exiting the app by clicking the app close button (x) or selecting the File > Exit menu command, and not when simply closing a project within the application. This is because individual projects must be closed normally to release memory resources. Quick Exit mode skips the normal project close process, bypassing manual memory release operations and other unnecessary functions, and instead defers to the operating system to reclaim memory. This allows the application to exit as fast as possible. Note: The primary benefit of Quick Exit mode is to improve the response time when exiting the application with large projects loaded. If Sonar exits quickly with your project, there is no benefit of using Quick Exit mode. There are three exit modes: Normal exit (default behavior with no modifier key): Always use normal exit if you don’t have problem with slow shutdown of the application. Closes the application and closes any open projects. Manually releases all consumed memory by the application and plugins. Releases audio and MIDI drivers. CTRL+Exit (faster than the normal application close) Closes the application, only performing essential app shutdown operations. Skips closing any loaded projects and releasing consumed memory resources, deferring the operating system to reclaim memory. The application is force closed using same mechanism as Windows Task Manager. Plugin DLLs are force unloaded. Global plugin resources, if any, may not be released. ALT+Exit Exits the application and additionally notifies DLLs to unload and release global resources, if any. Some plugin DLLs can hang with this method, so if you encounter this, do not use this exit mode. Similar to CTRL+Exit in other aspects. User Interface and Editing Optimizations to streamline handling of large multitrack projects. Many common editing and streaming operations have been finetuned to be orders of magnitude faster. Duplicating clips in synth projects has been greatly optimized Undo/redo operations for clip edits are much faster Splitting clips is much faster Track split is now much faster when articulations are present. The speed for archiving multiple tracks has been greatly improved by many orders of magnitude. Console view scrolling is improved. Optimized redundant redraws of track scale. Multitrack Piano Roll view drag drop optimizations Major improvements to drag and drop operation speed in Multitrack Piano Roll view when dealing with thousands of events. Prior to this change, dragging large multitrack note selections in the Piano Roll view to move to transpose was very slow and could even lock up with large amounts of notes. This operation is now thousands of times faster and has been tested with huge numbers of events in excess of 60K. The drop operation has also been sped up significantly. MIDI drawing optimizations New Enable GPU Acceleration option in Preferences > Customization - Display that allows the Piano Roll view to use GPU acceleration. This option is disabled by default. Note: Certain graphic cards may cause anomalies when GPU acceleration is enabled. General Optimizations: Further optimization for synth playback to reduce CPU use in projects with many synth tracks. Improvements to synth rendering to prevent race conditions leading to dropped notes in high load situations. Improvements to prevent plugins from flooding message queue when loading projects. Sync Synth Rack strips with current track Clicking on an Instrument track will now also focus the corresponding synth in the Synth Rack. This behavior can be toggled via the Synchronize Track and Synth Rack Views option in the Synth Rack menu. Delete all articulation events belonging to an articulation map, group or specific articulation ID You can now quickly delete specific articulations that are in use in a project, directly from the Articulation Map editor. To do so, right-click the desired articulation map, articulation group, or articulations and select Delete All Sections. The Delete All Sections context menu command is available in the outlined areas: Note: Currently articulation maps, articulation groups, and articulations that have sections in use are shown in bold within the Articulation Map Editor, so it’s easy to see which ones have sections that can/should be deleted. Command to "Select Associated Tracks/Buses" Track and bus strips have a new Select Associated Tracks/Buses context menu command that allows you to select all source tracks/buses that route to the track/bus. Tip: In addition to the new menu command, you can also hold down the ALT key and click on the track or bus number to select source tracks on bus strips and to show destination buses on track strips. Command to "Select Associated Instrument Tracks" via the Synth Rack To select all Instrument tracks that are associated with a specific synth, right-click the synth in the Synth Rack and select Select Associated Instrument Tracks. New "Left Click Sets Track Focus" global option The new Left Click Sets Track Focus global option (disabled by default) allows you to set the focused track by left-clicking in the Clips pane (such as when selecting clip or making a time selection). To enable/disable this behavior, click the Track view Options menu and select Click Behavior > Left Click Sets Track Focus. This option can be useful if you prefer clicking in the clips pane to set the focus track. Improved Toast Notifications Resolved some stability issues and race conditions with toast notifications that could cause toasts to stop working altogether under high load scenarios while loading a project and performing a VST scan at the same time. Toast Notifications are now flicker free. Improvements to handling of Expired Session notifications BandLab sign-in is required to activate Sonar. For security, even if you have previously signed in from the app, a sign-in cookie has a limited lifetime and can expire. When the sign-in expires, you will be required to re sign-in, whenever the activation lease needs to be renewed, or if you wish to use BandLab services to upload projects etc. Sonar now detects when a user sign in has expired and explicitly prompts you to sign-in when necessary, via a toast notification. This status is also shown in the Help menu, to help distinguish between a signed-out state vs an expired sign-in state. Note: When in an expired sign in state the application cannot auto activate itself. Misc.: Frozen or missing synths show note numbers instead of diatonic note names Pitch Changes in the Piano Roll view now preserve clip cropping VST scanner has been updated to correctly scan WavesShell for ARA plugins Improved project load notifications for projects containing multiple instrument instances Lasso selecting in the Clips pane sets track focus Fixed: Inconsistent TV track header control layout after showing hidden tracks Fixed: Crash triggering MIDI note from controller Fixed: [Regression] Lyrics disappear when typing in Lyrics view Fixed: [Regression] Editing track names clunky Fixed: [Regression] Dragged clips have no transparency Fixed: [Regression] Seeking now time while playing MIDI track leads to silence Fixed: [Regression] Lyrics view does not accept input Fixed: Crash CTRL-clicking the engine reset button Fixed: Crash When selecting tracks with effects Fixed: Drag / Drop changing pitch in Piano Roll view causing notes to move in time Fixed: Crash opening Help menu after sign out Fixed: User project crashes in Loop Construction view when loading in Sonar Fixed: Clip extents change when moving note pitches in Piano Roll view Fixed: Cannot use standard Windows shortcut keys for the app menu while Quick Start Screen is open Fixed: [Regression] Nudging MIDI vertically can remove controller events unexpectedly Fixed: [Regression] Unable to adjust velocity in drum grid / mute notes in Piano Roll view Fixed: Resolved several reports of operations leading to UI going unresponsive to mouse clicks. Fixed: [Regression] Console view bus strips fail to display selection properly Fixed: Browser folder pane too narrow on high DPI displays Fixed: Scroll Lock not working in Event List view Fixed: Transform Articulations should always chase, regardless of chase controller setting Fixed: Media Browser "Folders" visibility tick box does not persist with project Fixed: Note changes unexpectedly when dragging in Piano Roll view after clip crop in Track view Fixed: Drag moving notes in Piano Roll view from cropped clip unexpectedly restores original length Fixed: Crash when quick group freezing synths Fixed: Drag and Drop of images for track Icons targets wrong track when there are hidden tracks Fixed: [Regression] Swipe select / Quick Grouping not working in Console view bus pane Fixed: VocalSync UI appears and immediately closes after adding a Region FX to a clip Fixed: [Regression] Adjusting height of docked Help Module results in docking layout issue Fixed: [Regression] MIDI notes change position unexpectedly after nudging up/down Fixed: When multiple ARA plugins are found within a single VST3 shell all plugins in the shell are treated as ARA Fixed: Media Browser "Folders" visibility tick box does not persist with project Fixed: Undoing Delete of synth doesn't activate synth until playback Fixed: Scroll Lock not working in Event List view Fixed: Transform Articulations should always chase, regardless of chase controller setting Fixed: [Regression] Selection is truncated when opening File Export dialog Fixed: Focused track is not shown in track list after opening Piano Roll view Fixed: Help module flickers with white screen when changing tracks and can show wrong help text Fixed: Synth Rack automation menu appears in wrong place when view is scrolled Fixed: [Regression] Changing current track is very slow when the Synth Rack is open Fixed: Sonar projects MRU should be written after successfully opening project file Fixed: Crash exiting application after drag importing a project file Fixed: [Regression] Missing notes in frozen track Fixed: Scrolling Synth Rack results in incorrect tooltips Fixed: Clicking in Arranger track noticeably slow to move Now Time Fixed: Missing notes in track 83 of user project Fixed: Windows message queue is flooded during project load resulting in lost messages / bugs Fixed: Target box for 'Drag to create Send' is misaligned on scaled displays Fixed: Drag Add Send Highlight not centered Fixed: Duplicating MIDI clips with CTRL+D is very slow in heavy synth projects Fixed: Now Time stops scrolling in time ruler when cursor in Articulations lane Fixed: Aim Assist is laggy in Articulations lane Fixed: Unable to open Piano Roll view after loading a project Fixed: VST scan complete or project load complete messages could not be displayed in some cases with large projects Fixed: Deleting a MIDI clip or editing articulation maps removes solo exclusive state on all tracks Fixed: Icons in Synth Rack don't draw correctly when scrolling Fixed: Slow drag and drop in Piano Roll view when lots of notes are selected Fixed: [Regression] Export as Track of Single Track with non-wildcard name appends track name unexpectedly Fixed: Synth Rack Icon position / display issues Fixed: Project load toast notifications flicker excessively Fixed: Skipped notes in busy MIDI project Fixed: Hang closing project open toast notification window Fixed: User project has invalid hidden folder state Fixed: First MIDI note is skipped on playback when using 180 ms negative delay time offset for articulations Fixed: Piano Roll view Now Time flickers during playback Fixed: [Regression] Jump images in Tempo Inspector are not disappearing when mouse leaves Fixed: Synth icons draw incorrectly in Synth Rack when vertically scrolled Fixed: Moving an effect's position within the same FX bin orphans existing envelopes Fixed: Node nudge in Piano Roll view sometimes misses notes from selection Fixed: Poor Time Ruler mouse hit testing on high DPI displays Fixed: Changing Workspace causes Synth Rack solo state to lose sync Fixed: Synth rack scroll wheel immediately jumps to end of synth rack when scrolling Fixed: ALT-click track number would not select strips in Bus pane Fixed: Excessive track scale painting in Tracks view Fixed: Main menu is not accessible via ALT+first letter of the menu name immediately after creating a new project in Sonar Fixed: Splitting a clip in projects in high track count projects containing Articulation maps is very slow Fixed: Crash when using shelf tool in Tempo track Fixed: Toast notification can stop displaying after app launch after loading certain projects while a VST scan is underway Fixed: [Regression] Selecting a clip doesn't change the track select indicator Fixed: Transport play head and meter activity can stop with certain plugins in the project Fixed: Hang when doing Render Region FX with Auto Align 2 Fixed: Step Record dialog behaves incorrectly while dragging on a high DPI display Fixed: Bus dB scale text appears above bus pane Fixed: Now Time artifact left behind in Piano Roll view time ruler when playback stops Fixed: Now Time appears in wrong place after docking Control Bar at top/bottom. Fixed: Opening Piano Roll view with selected tracks (or clips) should open with only the selected tracks Fixed: Activation toast: Link to Help Center activation topic Fixed: Toast related crash when loading a project while a VST scan is run Sonar 2024 Highlights User Interface: UI refresh DPI Awareness Track Manager enhancements Spectrum Analyzer display in Console view, Inspector and ProChannel Double-click to expand/collapse docked windows Additional snap landmarks Preview Bus enhancements New Features: Integrated sampler (XSampler) New Quick Start screen Project preview Project Start and End markers File formats: Cakewalk Interchange Format (CXF) Cakewalk ZIP Format (CWZ) Configuration backup/restore Automation: Automation smoothing when recording Specify the default automation curve type Offset mode enhancements MIDI: Live articulations Time offset for MIDI transform articulations Key Aftertouch editing in the Piano Roll view Controller pane Import and export tempo map to/from MIDI files Cakewalk Product Center Plugins: Overloud TH-U Cakewalk amp simulator ProChannel Concrete Limiter module VX-64 Vocal Strip A/B plugin settings Sidechaining enhancements Plugin oversampling enhancements Plugin delay compensation (PDC) UI enhancements Plug-in Load Balancing enhancements External Insert enhancements Plugin Browser drag and drop enhancements Quick access to plugin settings Friendly names for plugins are now shown in FX racks Audio processing load tooltips Usability and Workflow: Click Sonar logo in Control Bar to open Quick Start Screen Specify default synth for use in Add Track flyout menu Select all tracks/buses in a control group Create sends by dragging effects to channel strips Create tracks routed to aux tracks or patch points Preserve sections in other Arranger tracks when committing an arrangement Arranger Inspector displays a badge on sections that intersect with the Now Time In-app hang detection Key bindings to show/hide tracks Toast notification when a control surface is disabled on launch Deleting a tempo in the Tempo Inspector sets the focus to the next tempo in the list Press F2 to rename markers in the Markers view Meter scale for Instrument tracks changes to dB scale when frozen Remove crossfades Track Scale Zoom is now quick-groupable Double-click to reset sliders Export track/bus and project icons as PNG Process > Length dialog accepts fractional valuess Quick Grouping of Mute, Solo, and Archive buttons on track folders Updated docked Synth Rack and new bypass functionality In-app bug reporting Optimizations: Audio engine low latency optimizations for multi-core processors Performance optimizations for projects with many synths and effects Misc. optimizations Cakewalk by BandLab is now Cakewalk Sonar Cakewalk by BandLab has been rebranded as Cakewalk Sonar. As Cakewalk is once again a multiple product brand, it is important to differentiate between the brand and product names. The rebrand also better reflects Sonar's celebrated history and name recognition. Cakewalk Sonar will not overwrite an existing Cakewalk by BandLab installation. User Interface UI refresh Sonar has been completely refreshed with a clean new UI, but will still feel familiar to users of Cakewalk by BandLab. The UI refresh is an ongoing effort and will continue to be updated in future releases. Dark and Light color schemes Sonar includes several color themes, including Dark, Dark Gray, Light, Light Gray, Tungsten, Mercury, and Cosmic, which can be selected in Edit > Preferences > Customization - Display. Additional color themes will be added in the future. Note: Custom themes created with previous versions of SONAR or Cakewalk by BandLab are not compatible with Cakewalk Sonar. DPI Awareness Note: DPI Awareness is only available on Windows 10 build 1809 (October 2018) and above. Sonar version 2024.04 introduces support for DPI Awareness, which improves rendering and reduces blurriness, particularly for font rendering. DPI Awareness may sharpen graphics and make text easier to read. Improvements will be most noticeable when using large, high resolution displays (such as 4K) and with Windows display scaling set higher than 100%. (Tip: Right-click the image above and select Open link in new tab to view the image at 100% resolution) To enable/disable DPI Awareness: Go to Edit > Preferences > Customization - Display. Select Enable DPI Awareness. Restart Sonar. Per plugin DPI Awareness In addition to the global Enable DPI Awareness app setting, you can also enable/disable DPI Awareness on a per plug-in basis for VST plug-ins. DPI Awareness is enabled by default for all VST plug-ins and can be disabled on a case-by-case basis depending on whether the plug-ins are compatible with display scaling. For example, some older plug-ins may appear too small on large, high resolution monitors, in which case disabling DPI Awareness might be preferable. To enable/disable DPI Awareness for a VST plug-in: Open the VST plug-in's property page. Click the VST2/VST3 drop-down menu in the VST plug-in toolbar and select Enable Plugin DPI Awareness. Note: Display scaling is always disabled for DX plug-ins Plug-in scaling is stored globally for a plug-in, not per project Display Scale slider The Display Scale slider in Edit > Preferences > Customization - Display allows you to adjust the display scaling of Sonar independently from the global Windows display scale setting (Settings > Systems > Display). Select a custom scaling size between 75%–150%. Note: Low Display Scale values work better at higher DPI resolutions. For example, a low-resolution 1080p screen at 96 DPI, so a Display Scale value of 75% will result in a tiny UI that is potentially difficult to read. On the other hand, a 4K screen at 75% will also show a tiny UI, but may still be usable because it has 4x the number of pixels. Track Manager enhancements The Track Manager lets you configure which tracks are visible in the Track view and Console view, and you can create per-project presets to quickly show specific sets of tracks. Track Manager controls in Track view and Console view The Track Manager button in the Track view and Console view toggles between showing all tracks/buses () and hiding previously hidden tracks/buses (). The button is lit if at least one track is hidden. Track Manager menu The Track Manager menu provides various commands to manage track visibility and quickly save and recall per-project presets. To show the menu, long press or right-click the Track Manager button . The Track Manager menu contains the following commands: <list of presets>. Per project Track manager presets. Show All Tracks and Buses. Show all tracks and buses. Click the Track Manager button again to hide previously hidden tracks. Show Only >. Show only the selected track type: Audio Tracks. Only show audio tracks. MIDI Tracks. Only show MIDI tracks. Instrument Tracks. Only show Instrument tracks. Aux Tracks. Only show Aux tracks. Track Folders. Only show track folders. New Preset. Create a new preset for the currently visible tracks. Only available when at least one track is hidden and the Track Manager button is lit . Track Manager. Open the Track Manager, which lets you specify which tracks to display. Synchronize Track and Console views. Enable to show the same set of tracks and buses in the Track view and Console view. Disable to show different sets of tracks and buses in the Track view and Console view. Creating a Track Manager preset To create a Track Manager preset: Only show the tracks that you want to save as a preset. Do one of the following to hide any tracks that you don’t want to see: Right-click a track and select Hide Track Select the track(s) and press CTRL+H Long press or right-click the Track Manager button , then select New Preset to open the New Track Manager Preset dialog box. Type a descriptive name, then click OK. You can also create and load presets in the Track Manager dialog box. Selecting a Track Manager preset To select a Track Manager preset, long press or right-click the Track Manager button , then select the desired preset. Showing only specific track types To only show a specific track type (audio, MIDI, Instrument, Aux, or track folders), long press or right-click the Track Manager button , point to Show Only, then select the desired track type. Spectrum Analyzer display in Console view, Inspector and ProChannel The EQ plot in the Console view, Inspector, and ProChannel shows a real-time spectrum analyzer per track by default. To enable/disable the per-track/bus spectrum analyzer in the Console view, click the Console view Options menu and select EQ and Plot > Show Spectrum Analyzer. To enable/disable the spectrum analyzer in the Inspector, click the Inspector Display menu and select Module Options > EQ and Plot > Show Spectrum Analyzer. Double-click to expand/collapse docked windows You can double-click to expand docked windows (MultiDock, Inspector, and Browser), as outlined below: When the Inspector or Browser is docked and minimized, double-click to expand. For the MultiDock, double-click to toggle between expand and collapse. Additional snap landmarks The following items are now available as Snap to Grid landmarks: Arranger Section Start Time. Snap to the start of any Arranger section. Arranger Section End Time. Snap to the end of any Arranger section. Project Start Marker. Snap to the Project Start marker. Project End Marker. Snap to the Project End marker. To select the desired landmarks, right-click the Snap to Grid button to open the Preferences dialog box, then select the desired check boxes in the Landmarks section. Sonar will snap to landmarks on tracks/lanes that are currently visible in the Clips pane. Preview Bus enhancements The Preview Bus assignment is now a project-wide setting. Preview bus assignment can now be managed directly from the bus/mains/aux track context menus or directly from the main Project menu. An aux track can now be designated as a preview bus. If a bus that is assigned as a preview bus output is deleted, the preview bus will automatically be assigned to be the first hardware output. Preview bus changes can now be made dynamically while preview is underway. New Features Integrated sampler (XSampler) XSampler is a simple sampler that lets you import or record audio, perform basic processing, and play it like an instrument with up to 16 voices. Instantly convert a single audio file into a playable or triggable sound that can be played back at different pitches and speeds. There are many ways to get audio into XSampler: import audio from the file system, drag loops and one-shots from the Media Browser, drag audio clips (including partial clip selections) from any track. After audio has been added, you can loop, trim, crossfade, change playback behavior and modulation or filtering options to create interesting musical ideas. New Quick Start screen You can perform the following tasks from the Quick Start screen: Open a recent project Open an existing project Start a new project Create a new project from a template Open demo projects Preview projects Update the app Download and install optional content Project preview You can preview projects from the Quick Start screen’s Recent page if you have exported a designated preview file. The preview file may be any supported audio file type (Wave, BWF, MP3, FLAC, OGG, or WaveEX), and can be the entire project or a specific time range. To create a project preview file: Open an existing project. Ensure that the project has been saved at least once with the new version of Sonar in order to use required metadata. If you only want the preview to contain a specific time range, select the desired time range. Go to File > Export > Audio to open the Export Audio dialog box. Under File Type, select Wave, Broadcast Wave, MP3, FLAC, OGG, or WAVEX. Under Channel Format, select Stereo, Mono or Follow Source. Under Source Category, select Entire Mix. Under Mix and Render, select Include Project Preview to export a preview file. Click Export. The preview file is exported to the project’s \Audio folder. Note: The first export of a project will automatically create a preview file irrespective of the Include Project Preview option. To preview a recent project: Go to File > Quick Start Screen to open the Quick Start screen, then select Local Projects. Click the preview button on a project’s image. A preview button only appears if the project has a designated preview file. Project Start and End markers The Project Start and Project End markers define the playback range and the export range when exporting the entire project, and can also be used as Snap to Grid landmarks. By default, a project does not contain a Project Start or Project End marker. The project starts playback from measure 1 and ends after the last clip. If you want to start playback after measure 1, set the Project Start marker at the desired location. If you want playback to stop before the end of the last clip, set the Project End marker at the desired location. Once set, the Project Start and Project End markers appear in the time ruler, and can be dragged or deleted in the same way as regular text markers. To set the Project Start marker To set the Project Start marker, move the Now Time position to where you want the project to start, then do one of the following: Select Project > Set Project Start Marker to Now Time Right-click the time ruler and select Set Project Start Marker to Now Time The location of the Project Start marker is considered the beginning of the project. To set the Project End marker To set the Project End marker, move the Now Time position to where you want the project to end, then do one of the following: Select Project > Set Project End Marker to Now Time Right-click the time ruler and select Set Project End Marker to Now Time When the Project End marker is inserted, the Options > Stop at Project End option is also automatically enabled. Playback will only stop at the Project End marker if the Stop at Project End option is enabled. Tip: The Set Project Start Marker to Now Time and Set Project End Marker to Now Time menu commands are also available as key bindings. You can assign the key binding in Edit > Preferences > Customization - Keyboard Shortcuts (under Area: Global Bindings). Note: If a loop region exists beyond the Project End marker, the Project End marker is ignored in favor of the loop extents. Recording ignores the Project End marker. If recording stops after the Project End marker, the marker is moved to where recording stopped, or if comp/loop recording, to the end of the loop. The selection is clamped to the Project End marker when you open the Export Audio dialog box, unless the selection starts after the Project End marker. To jump to the Project Start marker To jump to the Project Start marker, do one of the following: Click the Go to Start (RTZ) button in the Control Bar’s Transport module to toggle between the Project Start marker and measure 1 Press CTRL+HOME to toggle between the Project Start marker and measure 1 Press W to toggle between the Project Start marker and measure 1 (or if a loop region is set, toggle between the Project Start marker and the loop start) Press G to open the Go dialog box, then press F5 to open the Markers dialog box and select <Project Start Marker> from the list To jump to the Project End marker To jump to the Project End marker, do one of the following: Click the Go to End button in the Control Bar’s Transport module to toggle between the Project End marker and the end of the project Press CTRL+END to toggle between the Project End marker and the end of the project Press G to open the Go dialog box, then press F5 to open the Markers dialog box and select <Project End Marker> from the list To delete the Project Start/End marker To delete the Project Start or Project End marker, do one of the following: Click the marker and hold the left mouse button down, then press the DELETE key Click the Project menu and point to Remove Project Marker, then select Remove Project Start Marker, Remove Project End Marker, or Remove Project Start/End Markers Right-click in the time ruler and point to Remove Project Marker, then select Remove Project Start Marker, Remove Project End Marker, or Remove Project Start/End Markers Note: If you drag the Project Start marker to the beginning of the project (measure 1), it will automatically be deleted. Cakewalk Interchange Format (CXF) The Cakewalk Interchange Format (CXF) is a Cakewalk cross platform inter-app project file format, used to exchange projects between Sonar and Next. CXF files exported from either application can be opened or imported in both apps. Note: CXF is a transitory format only used for exchange. It is not intended for archival storage or backing up since the format can change at any time. CXF supports a subset of project data used by Sonar and Next, so app-specific feature settings and view-specific states will not be restored. The following data will be exported and imported: Tracks Audio MIDI Instrument tracks Simple Instrument tracks (Sonar) Multi Instrument tracks (each track will represent a unique instance of the synth when opened) Split instrument tracks (not supported) Bus tracks (Next) Patchpoints (Sonar; converted to buses) Aux tracks (Sonar; limited support - treated like patch points and converted to buses) The aux track itself will not route to the patchpoint. Track data Audio/MIDI clips Overlapping clips or take lanes are flattened prior to export Clip effects are rendered into the clips prior to export Automation envelopes Track/Bus parameters Volume Pan Mute Solo Input Gain (Sonar only) Input Pan (Sonar only) Track/Bus routing Outputs Hardware outputs are not preserved since they are not cross platform. Any hardware outs are automatically assigned to the first hardware output. Sends to buses and patch points. Plugins in track and bus effects racks. On opening a CXF file, any missing plugins will be listed. Note: when moving a project between Windows and Mac any plugins used must be installed on both platforms in the same format to successfully load them. VST2 VST3 DX AU plugins (only available in Next Mac) DX plugins (only available in Sonar) ProChannel (not supported) FX Chains (not supported) Plugin settings are stored within the CXF and will be restored if the plugin is available. Instruments and instrument settings are stored within the CXF. Exporting a project in CXF format To export a project to Cakewalk Interchange Format, do one of the following: Go to File > Export > Cakewalk Interchange. Click the Export button in the Control Bar’s Export module and select Other > CXF (Cakewalk Interchange). CXF files have a .cxf file extension. When the export is complete, a notification appears with a link to open the export folder. Opening a project in CXF format To open a project in Cakewalk Interchange Format, do one of the following: Go to File > Open and choose Cakewalk Interchange as the file format. Drag a .cxf file to the Track view. Opening a CXF file creates a new project, which must then be saved in Sonar’s native project file format (.cwp). Importing a project in CXF format To import a project in Cakewalk Interchange Format into an existing Sonar project, drag a .cxf file to the track area. An imported CXF file merges its data into the existing project file. Cakewalk ZIP Format (CWZ) The new Cakewalk ZIP (.cwz) file format is intended for backing up projects, and is also useful for moving Sonar projects from one computer to another. Cakewalk ZIP is recommended over the older Cakewalk Bundle (CWB/BUN) format, because it does not compact the audio data, and therefore supports AudioSnap clips. The following items are saved in a CWZ file: Project file (.cwp) Project \Audio folder and any other referenced audio data Project \Audio Export folder, if present Project \MixScenes folder, (only if project contains any mix scenes) To save the current project as a Cakewalk ZIP (.cwz) file, go to File > Save As and select Cakewalk ZIP from the Save As Type drop-down list, then click the Save button. To open a CWZ file in Sonar, go to File > Open and navigate to the CWZ file. Note: A Cakewalk ZIP (.cwz) file is a regular ZIP file that can be extracted with any app that supports ZIP files. You can simply rename the .cwz file extension to .zip and manually unzip the file. To unzip a ZIP file in Windows, right-click the file and select Extract All. Configuration backup/restore You can save and load backups of your Sonar configuration settings. A configuration profile stores settings from various Sonar configuration files and Windows registry settings in a single JSON file. You can selectively choose which app settings to save or load from a configuration profile. Configuration profiles have many uses, including: Quickly switch Sonar to a different audio configuration or driver mode when using multiple audio interfaces Save hardware setup profiles for different workflows, such as tracking, mixing, live band recording, customizations for recording different band’s etc. Switch between different control surface configurations Save startup configurations and launch them via desktop shortcuts using the RestoreConfig command line flag Transfer app settings between Sonar installations on different computers Save a backup of a known good state (similar to system backup/restore) in windows Troubleshooting system related problems Note: Configuration profiles are not a replacement for templates, presets or Workspaces, but provide an additional degree of management for global system and hardware related settings of the app. Saving a configuration profile To save the current Sonar settings as a configuration profile: Go to Edit > Preferences > Customization - Backup/Restore Settings. Select the setting that you want to save: Audio Configuration. Save audio settings that are stored in Aud.ini. MIDI Configuration. Save MIDI settings that are stored in TTSSeq.ini. Control Surfaces Configuration. Save control surface settings that are stored in ctrlsurface.dat and ctrlsurface_UWP.dat. General Application Settings/Configuration. Save general app settings that are stored in Cakewalk.ini and the Windows registry. Keyboard Shortcuts. Save all assigned key bindings. [Optional] Type a description. Click Save to open the Save As dialog box. By default, configuration profiles are saved as JSON files with a .ccp file extension within %APPDATA%\Cakewalk\Sonar\Config Profiles. Type a file name, then click Save (the default file name is ConfigProfile_<current date>.ccp). Note: Sonar automatically saves the last known good config profile when exiting the app. Loading a configuration profile To load a configuration profile: Go to Edit > Preferences > Customization - Backup/Restore Settings. By default, Sonar will load all the settings that are stored in the configuration profile. If you want to selective only load specific settings, select Only apply the settings checked above on load, then select which settings to load: Audio Configuration. Load audio settings that are stored in Aud.ini. MIDI Configuration. Load MIDI settings that are stored in TTSSeq.ini. Control Surfaces Configuration. Load control surface settings that are stored in ctrlsurface.dat and ctrlsurface_UWP.dat. General Application Settings/Configuration. Load general app settings that are stored in Cakewalk.ini and the Windows registry. Keyboard Shortcuts. Load key bindings. Click Load to open the Open dialog box. Select the desired configuration profile, then click Open. Sonar prompts you to confirm that you want to load the configuration profile. Click Yes. Loading a configuration profile on app startup You can load a configuration profile on startup via a command line: Do one of the following to open the Command Prompt: Click the search box next to the Windows Start button, then type CMD and press ENTER. Press the Windows key () + R, then type CMD and press ENTER. Type the following: <Sonar install path>\Sonar.exe /RestoreConfig=<configuration file folder>\<name of configuration profile file> For example: "C:\Program Files\Cakewalk\Sonar\Sonar.exe" /RestoreConfig="%APPDATA%\Cakewalk\Sonar\Config Profiles\mysettings.ccp" Press ENTER. Sonar launches with the specified configuration profile. Creating a desktop shortcut with command line parameters You can add command line parameters to a desktop shortcut. This way you don’t have to manually type command line parameters each time you want to launch Sonar with a specific configuration profile. To add launch parameters to a desktop shortcut: Create a new desktop shortcut for each configuration profile (Tip: copy the default Sonar desktop shortcut), and give the shortcut a descriptive name. Right-click the shortcut and select Properties. In the Properties dialog box, click the Shortcut tab. In the Target text box (which already lists the location of the Sonar executable within quotation marks), place the cursor after the last quotation mark, then add a blank space followed by the command line parameters. For example: /RestoreConfig="%APPDATA%\Cakewalk\Sonar\Config Profiles\ConfigProfile_2023-02-28.ccp" The full Target text string should look something like this: "C:\Program Files\Cakewalk\Sonar\Sonar.exe" /RestoreConfig="%APPDATA%\Cakewalk\Sonar\Config Profiles\ConfigProfile_2024-02-28.ccp" Click OK to save the changes. You can now double-click the shortcut to start Sonar with the specified configuration profile. Automation smoothing when recording Automation smoothing now also applies to recording automation in real-time. You can specify how shape smoothing works when recording automation in real-time (and when using the Freehand tool on envelope shapes). To do so, click the Track view Options menu, point to Automation Smoothing, then select one of the following options: Smooth. Uses the existing fit-to-curve functionality. This is the default setting. As Drawn/Recorded (Linear). Joins the nodes up with linear shapes. As Drawn/Recorded (Jumps). Leaves the nodes as is, making them jump shapes. Specify the default automation curve type To specify the default automation curve type when drawing automation envelopes, click the Track view Options menu, point to Default Automation Curve, then select the desired curve type: Jump. A jump shape causes the envelope to make a ninety degree jump where the envelope reaches the second node. Sonar displays jumps with a dotted line, meaning that there is automation data at the nodes where the dotted line begins and ends, but not where the line itself is. Linear. Draw a straight line between the two nodes. Fast Curve. A fast curve draws a curve between the two nodes that changes value rapidly at first, but more slowly toward the end of the curve. Slow Curve. A slow curve draws a curve between the two nodes that changes value slowly at first, but more rapidly toward the end of the curve. Offset mode enhancements To make it easier to visualize if a track parameter has an offset applied, Sonar shows the parameter value in an amber color when Offset mode is not active . The parameter tooltip also shows the offset value. Live articulations When playing a MIDI controller in real-time, the per track Live Articulations setting allows you to apply any transform articulations that are active at the now time. Live articulations are echoed, but not recorded. To enable/disable live articulations on the focused MIDI track, do one of the following: In the Track Properties inspector, select Live Articulations. Tip: You can use quick grouping (hod down the CTRL key) to enable/disable the setting on all selected MIDI tracks. In the Piano Roll view, click the Live Articulations button . The button state applies to the focused track. Time offset for MIDI transform articulations MIDI Transform Articulations now support an optional offset value that will offset the start/end times for notes. The offset can be applied using either ticks or milliseconds. The Duration checkbox toggles whether notes should retain their original end points as drawn or offset with start times. Key Aftertouch editing in the Piano Roll view Controller pane Key/Polyphonic Aftertouch events can now be edited in the Piano Roll view Controller pane in addition to the Event List view. To add a Key Aftertouch lane in the Controller pane: Click the Add New Controller button in the bottom left corner of the Controller pane to open the MIDI Event Type dialog box. Under Type, select KeyAft. Under Value, select the note/key. You can now draw polyphonic aftertouch events that represent the pressure values for the selected note/key on the chosen MIDI channel. Key/Polyphonic Aftertouch can also be used in MIDI track / Synth track automation. Import and export tempo map to/from MIDI files To import a tempo map from a MIDI file, right-click the Tempo track and select Import Tempo Map from MIDI File. Import replaces the current tempo track with any tempos in the MIDI file. To export a project's tempo map to a MIDI file, right-click the Tempo track and select Export Tempo Map to MIDI File. Export saves the tempo track to a MIDI file, without saving any other tracks or events. Cakewalk Product Center Cakewalk Product Center allows you to download and install Cakewalk products from one central location. Simply sign in with your BandLab ID and password and begin installing your connected products. Stay up to date with the latest features and fixes. For more information and to download Cakewalk Product Center, see: Plugins Overloud TH-U Cakewalk amp simulator TH-U Cakewalk Edition by Overloud provides realistic guitar amp models from clean to crushing distortion. This special edition includes a curated collection of amplifier models, cabinet models, effects models and dozens of presets. Easily build or modify your own signal path. New since TH3 Cakewalk: Added Rig Player and Supercabinet You can now load user IRs even in regular cabinets instead of using one or both microphones Added Scenes support (A, B, C, D buttons on the interface) Added Fluid Convolution technology support (https://www.overloud.com/news/fluid-convolution-unveiled) Added Fluid IR technology (https://youtu.be/qLZ5rBCWW_k) Remastered Cabinets (improved the cabinet processing) Possibility to save and load settings for single effects (right click effect) Customizable initial chain (click Custom in the Settings panel) More parameters for cabinets (pan, mic angle) Note: TH-U Cakewalk is only usable in Sonar and Next. If you already own the full version of TH-U, installing the TH-U Cakewalk edition will not change your existing functionality. Overloud TH-U Cakewalk is fully backwards compatible with older TH3 and TH2 versions. TH3 is no longer distributed with Sonar. Projects or templates containing TH2 or TH3 will automatically load in TH-U if the old plugin is not available. Important: If you already have TH3 installed, you may not see any presets in TH-U. This will be addressed in a future update. The workaround for now is as follows: Close Sonar. In file explorer, navigate to the app data folder for Overloud TH-U (Go to %APPDATA%\Overloud). Delete the \TH-U folder. Start Sonar and insert TH-U in an FX Rack. This will regenerate the appdata folder and recreate it this time with the correct default presets. ProChannel Concrete Limiter module ProChannel Concrete Limiter is an audio processing module for the ProChannel channel strip. ProChannel Concrete Limiter is a transparent look-ahead brickwall peak limiter. It is designed to reduce peak levels without coloring the sound. The purpose of ProChannel Concrete Limiter is to increase loudness as much as possible while preventing the signal from exceeding the maximum output level. ProChannel Concrete Limiter reduces the volume of the loudest parts (limiting), while simultaneously increasing the volume of the quiet parts (boosting). ProChannel Concrete Limiter is typically used as the final processor on the ProChannel strip, of tracks and buses. VX-64 Vocal Strip VX-64 Vocal Strip is a multi-functional plug-in that combines a series of effects specifically optimized and streamlined for vocal processing. Combining compression, expansion, equalization, deessing, doubling, delay and tube saturation in one convenient plug-in, VX-64 Vocal Strip is designed to make it fast and easy to enhance any vocal track. VX-64 Vocal Strip features include: 5 professional quality effect modules, each with its own bypass toggle. All modules are specifically tuned for vocal processing. Advanced tube saturation modeling available on input, output and EQ modules. Deesser with switchable center frequency and threshold. Configurable effect chain routing. Smooth, zipperless automatable parameters. Library of presets. A/B plugin settings Use the A/B buttons to compare two different versions of a plugin's settings. Select either slot A or slot B and adjust the plugin settings, then toggle between the two slots. Adjustments made to the selected slot do not affect the other slot. You can copy settings from the selected slot to the other slot. This is useful if you want to slightly modify the current settings and compare with the original settings. To do so, click the Copy Settings to Slot A/B button / . To revert the selected slot to its initial settings, click the Revert Settings button . Typical workflow: Select slot A. Adjust the plugin settings as desired. Click the Copy Settings to Slot B button . Slots A and B are now identical. Adjust the setting of either slot A or B. Toggle between slots A and B to compare the two different settings. Note: Upon project save, the app persists the plugin’s current settings (A or B), but the button state itself is not persisted. Upon subsequent project open, the plugin will always initialize with slot A selected, and slot B will be identical to slot A. Sidechaining enhancements Both audio plugins in the FX rack as well as instruments in the Synth Rack now support sidechaining (when available by the plugin). When a sidechain source is selected, a sidechain send from the selected source is created in the mixer. Please note that many plugins and instruments only expose sidechain inputs in their VST3 versions. Sonar provides the following workflows for designating sidechain sends for instruments and effects that support sidechaining: Track header output menu presents instrument sidechain sends if available (preexisting UX) Plugin window toolbar Settings cog has a new "Sidechain Sources" menu item to assign source to a plugin or instrument sidechain input directly from the header Checking a source creates a send from the chosen source to the plugin's sidechain input Unchecking a source removes the send to the plugin sidechain The sidechain sources menu is not shown if the plugin or instrument is not sidechain capable. Plugin window toolbar has a button to open the Manage Sidechain Sources dialog box (located next to ACT learn button). This button will only be shown if the plugin or instrument is sidechain capable. Prochannel header has the same "Sidechain Sources" menu shown in the plugin settings cog. This will be shown for any prochannel modules that have sidechain capabilities. The Manage Sidechain Sources button will highlight to show when a plugin sidechain input has something connected to it. Manage Sidechain Sources dialog, from the Sidechain Sources menu or plugin window toolbar, shows a modal dialog that facilitates the sidechain send management across multiple sources types (i.e. track, aux, bus). Manage sidechain routing directly from the effects view toolbar You can assign sidechain connections to a plugin or instrument directly from the effect view toolbar, without having to return to the source track(s) in the Track view or Console view. To do so, do one of the following: Click the VST2/VST3 drop-down menu in the VST plug-in toolbar, point to Sidechain Sources, then select the desired input source. The Sidechain Sources submenu is only shown for plugins or instruments that have a sidechain available. Choosing a source creates a send from the chosen track/bus source to the instrument's sidechain input. Unchecking a checked menu item removes that send to the instrument sidechain. Note: Up to 25 sidechain sources are listed in the Sidechain Sources submenu. If more than 25 sources are available, only connected sources will be shown. To access all available sidechain sources, select Manage Sources to open the Manage Sidechain Sources dialog box. Click the Sidechain Sources button to open the Manage Sidechain Sources dialog box, which facilitates the sidechain send management across multiple sources types (i.e. track, aux, bus). The Sidechain Sources button is only shown for sidechain capable plugins or instruments. The Sidechain Sources button will highlight to show when a plugin sidechain input has something routed to it. Selecting a source creates a send from the chosen source to the plugin's sidechain input. Deselecting an item deletes the send. The Send Settings are applied to newly added sends and will also modify any existing sends if changes are made to the settings. The Follow Track Pan setting will be applied but only affects playback when a send is a Post Fader send. Show These Sources lets you filter which source types are displayed in the list. Any changes to send settings are applied to all items, not just to the currently shown items. Double-click the Send Level slider to reset to 0 dB, or click the slider, then press F2 to type a dB value. Note: Only sends can be added from the Manage Sidechain Sources dialog box, although Sonar also supports directly connecting a track or bus output to a sidechain, via the Track header output menu. Manage sidechain routing directly from ProChannel modules You can assign sidechain connections to a supported ProChannel modules (such as PC4K S-Type Bus Compressor) by right-clicking the module header and pointing to Sidechain Sources. Sidechaining for VST instruments in the Synth Rack Sonar has supported side-chaining for effects plugins, satisfying the traditional and primary use case for sidechaining. However, a growing number of VST instruments now support sidechaining, therefore support has been extended to support such instruments, in addition to effects. To specify the sidechain input for a VST instrument: Open the VST instrument's property page. Click the VST2/VST3 drop-down menu in the VST plug-in toolbar, point to Sidechain Sources, then select the desired input source: Choosing a source creates a send from the chosen track/bus source to the instrument's sidechain input Choosing a checked menu item removes that send to the instrument sidechain Support for instruments with a single aux input Sonar can now handle synths with a single aux input and expose it as a sidechain. Prevent sidechain routing from creating a feedback loop Sonar has logic to prevent feedback loops when creating sidechain connections. Plugin oversampling enhancements Earlier versions of Sonar had up to 2X oversampling for plugins. Sonar now includes support for plugin oversampling at higher oversampling ratios from 2x up to 16X. Additionally, oversampling is also available for plugins within FXChains. The oversampling ratio and precision can now be selected in the plugin options as below: Oversampling has been optimized to be CPU efficient and the precision can be selected via the Precision menu, Please note that depending on your project sample rate, oversampling at higher ratios can lead to very high sample rates, that may not be supported by all plugin's. Oversampling may also tax your CPU at very high sample rates. How to enable oversampling: To use oversampling, you must set it on a per plugin basis. Once you have enabled it for a plugin it is automatically enabled for all instances of that plugin in a project. Additionally, Oversampling is only activated when the Px button in the mix module is enabled. This button allows you to easily toggle oversampling on to A/B how it sounds in your project. You can check which plugin have oversampling active and the oversample rate by looking at the plugin tooltip as below. Plugin Oversampling Precision You can now specify the precision for plugin oversampling. Using a medium precision uses less CPU and for many uses has no perceptible effect on resampling audio quality. This should reduce CPU load when utilizing plugin oversampling. Precision defaults to Medium. FX Rack tooltip indicates if oversampling is enabled When hovering over a plugin name in an FX rack, the tooltip shows the current rate if oversampling is enabled. This allows you to quickly verify if a plugin is being oversampled. Improvements to phase accuracy Prior to Sonar, oversampling could introduce an uncompensated phase offset in the oversampled data of around 150 samples, which could lead to phase problems when playing back the oversampled track along with the rest of the project, unless the track data was manually offset. This issue has been corrected and oversampling is fully phase accurate now with no delay in processing. See the up-sampled click track below. Handle oversampling for FX Chains and ProChannel FX Chains Oversampling is now supported for plugins in FX Chains and ProChannel FX Chains. Misc. improvements The oversampling engine has been updated for greater accuracy and several issues have been addressed. Problems with bouncing oversampled plugins where the bounce settings differ from playback have been addressed. Plugin oversampling can now be enabled while effect and instrument sidechaining is in use. Note: Enabling oversampling during playback can put a high demand on your CPU. If you experience dropouts or other issues, use oversampling only on render. Plugin delay compensation (PDC) UI enhancements Some plugins use a look-ahead buffer mechanism, which results in a short delay being introduced to the output signal when the plugin is used in real-time. Sonar applies automatic plugin delay compensation (PDC) during recording and playback on tracks that have input echo enabled. This ensures that all tracks are aligned properly. The exact latency is calculated automatically, and is influenced by all plugins in a track’s signal path. Override PDC during playback, recording, or both The PDC Override button in the Control Bar’s Mix module allows you to override PDC, and thereby reduce latency caused by plugin delay compensation in the signal flow. It allows you to play in real time within projects containing look-ahead plugins. When the PDC override button is engaged, any PDC latency for input monitored tracks or instrument tracks is bypassed, and the input monitor signal is passed through in real time. This is useful for recording or input monitoring in real time. The PDC Override button has a new popup menu that allows you to selectively override PDC for playback, recording, or both. To do so, long press or right-click the button and select the desired options: Override during playback. If this option is disabled, PDC Override will not affect tracks with input echo during playback. Override while recording. If this option is disabled, PDC Override will not affect tracks with input echo during recording. Both are enabled by default. If both are disabled, PDC override is still in effect during idle input monitoring. The above modes are only active when the PDC Override button is engaged. PDC Latency displayed in Track Properties Inspector The Track Properties Inspector shows the max/net PDC latency for that track/bus signal path in milliseconds and samples, as a result of compensating for other delay present in the project. Note: The displayed PDC Latency value is static text that is calculated automatically during playback and only updates in the UI when playback is stopped. PDC latency tooltips Plugin, FX Rack, ProChannel strip and modules all display tooltips showing the plugin lookahead latency when present. Hover over the FX Rack header to show the PDC latency for the entire rack. Hover over the an effect to show the PDC latency for that effect. Plug-in Load Balancing enhancements Plug-in Load Balancing now uses significantly less load when running at low latency. Note: Plug-in load balancing will not lower CPU use as compared to load balancing being disabled, especially when running at lower latency. This is because load balancing uses smaller buffers than the audio engine buffer size. Configurable Thread Count and Buffer size Both the plug-in load balancing threads and buffer size are now configurable settings in Edit > Preferences > Audio - Configuration File. When PluginLoadBalancingThreadCount is set to 0, the number of threads is adaptively managed and is less than the number of processor threads. You may change the value to utilize fewer or more threads. MinPluginLoadBalancingBufferSamples defaults to 96 samples and is the size of the internal load balancing buffers. Setting the buffer size higher will use less CPU but may result in less load balancing. Please note that when the engine latency is less than twice MinPluginLoadBalancingBufferSamples, load balancing will be automatically disabled internally. Plug-in Load Balancing active indicator When Plug-In Load Balancing is enabled in Edit > Preferences > Audio - Playback and Recording and load balancing is active, the FX Rack header tooltip shows (PLB) next to the audio processing load. External Insert enhancements External inserts have been enhanced to add true mono output support, ProChannel integration, FXChain support, a new Send Mode allowing an arbitrary tap point from an FX Rack, Friendly naming, better track template support, as well as numerous optimizations and stability fixes. Mono Outputs support. The External Insert plugin now supports exclusive use of mono outputs for sends. Prior to this, using a mono output would utilize a full stereo pair and prevent other external insert plugins or tracks from using the unused channel. It is no longer necessary for Show Mono Outputs to be enabled in the Devices tab of the Preferences to use mono channels in the external insert. (Its preferable to set display mode to show mono outputs since otherwise track or bus output will always utilize a full stereo channel). Preferences > Audio - Devices > Show Mono Outputs defaults to checked for new installations of Sonar. This is the preferred display mode. New Routing Modes. The external insert can be used in 4 modes. See Routing Modes below for more details. Send/Return mode [New] Send mode Return mode Passthrough mode ProChannel The external insert can now be used directly inside the ProChannel by adding it into a ProChannel FX Chain. FX Chains Support (both Track and ProChannel FX chains) now fully support adding an external insert. FX Chain presets containing External Inserts can now be saved and loaded in a track FX Rack or a ProChannel FX Chain. Drag and drop of external insert or an FX Chain containing one from track FX Rack to the ProChannel creates a ProChannel FX Chain containing the external insert. Send and return port assignments for the external insert are exclusive and can only be used by a single instance of the plugin. This is enforced as follows: Track input and output menus will exclude any items that are in use by the external insert. External Inserts send and returns will exclude any items that are in use by tracks/buses or other external insert plugins. Loading FX Chain presets or track templates containing external inserts will result in the send and return being set to None if the ports are already in use. Loading a project when the hardware inputs or outputs are no longer available will reset the external insert send/return. The external insert references send and return ports by name. Changing the friendly name of a port will result in the send and return being set to None if it was using a different name earlier. Track templates now persist external Insert ports. Friendly names can be assigned to External Inserts. Several stability improvements and fixes to external insert infrastructure. External Insert Routing Modes. The external insert can be used in 4 modes Send/Return mode. This is the primary mode and is engaged when both the send and return ports are routed to hardware ports. In this mode the plugin echoes its send input to the main output. The external insert measures the net delay between the send and return and compensates for this delay, aligning the audio on playback. This is the only mode that is delay compensated. [New] Send Mode. This mode is engaged when only the send is routed to a hardware port and the return is unassigned. In this mode the plugin sends its input audio to the assigned hardware output, and additionally passes through the audio through the main out effectively acting as a splitter. This mode can be useful to create a signal flow tap point from any FX Rack location. No delay is applied in this mode. Return Mode. This mode is engaged when only the return is routed to a hardware port and the send is unassigned. In this mode the plugin receives input audio from assigned return port and echoes the audio to its output. This mode can be useful to create an FX Rack insert from an external audio device or synth, or to receive input from another external insert tap point in Send Mode. You cannot ping to measure delay in this mode, but a manual delay offset can be specified to compensate for any delays. Passthrough Mode. This mode is engaged when neither send nor return ports are assigned. Passthrough mode operates as if the plugin has been bypassed in the effects rack. All incoming audio to the plugin is echoed unmodified to its output. Plugin Browser drag and drop enhancements You can insert or replace synth, and convert regular audio and MIDI tracks to instrument tracks with the following drag and drop gestures: To insert a synth: In the Plugins Browser, select the Instruments tab , then drag a synth to a blank area in the Track pane or Clips pane. To convert an audio or MIDI track to a simple instrument track: In the Plugins Browser, select the Instruments tab , then drag a synth to an audio or MIDI track to convert the track to a simple instrument track. Note: Audio tracks will only be converted if empty. To replace a synth: To replace the synth in a simple instrument track with a different synth, drag a synth from the Plugin Browser to the existing instrument track. Quick access to plugin settings The plugin toolbar now has a Settings menu button that provides direct access to Enhanced DPI scaling and plugin upsampling settings. Friendly names for plugins are now shown in FX racks Friendly names for plugins (set in the Browser) are now displayed in FX racks. Note: This will apply to new instances of the plugin. Existing ones will still show the actual plugin name. New instances will show the friendly name. Audio processing load tooltips Similar to the Control Bar's Performance module tooltip, audio processing load is now shown on hover over several new hotspots, which allows you to check performance load for every element in the project, tracks, buses, plugins, instruments and FX Chains. Load measurements are only performed when the tooltip is visible. When hovering over an FX Rack header, the tooltip shows the current audio processing load and max load. This is useful as a troubleshooting tool because real-time effects have a big effect on CPU load. This tooltip is also shown in FX Chains. In the FX Rack, hovering over a plugin name shows the load for that plugin. In the FX Rack, hovering over an FX Chain shows the load for that FX Chain. In the FX Chain plugin, hovering over a plugin name shows the load for that plugin. In the Synth Rack, the Name field tooltip shows synth audio processing load. The track meter peak indicator tooltip shows total combined processing load for the track including FX Rack and ProChannel. The bus meter peak indicator tooltip shows total combined processing load for the bus including FX Rack and ProChannel. Usability and Workflow Click Sonar logo in Control Bar to open Quick Start Screen Clicking the Sonar logo in the Control Bar opens the Quick Start Screen. Specify default synth for use in Add Track flyout menu You can specify which synth should be the default in the Add Track flyout menu. The default synth can be assigned from the synth track context menus or from the Synth Rack menu. Select all tracks/buses in a control group When multiple controls have been added to the same control group (A-X), it can be useful to record automation for all controls by only moving one of the controls. In order for this to happen, you must first manually select all the tracks/buses with controls in that group, enable Automation Write for the selected tracks using quick grouping, then record the automation during playback. It may be difficult to remember which tracks/buses have controls in that group in order to select them, so the new Select Tracks/Buses in Group menu command on the control group context menu makes it easy to automatically select all tracks and buses that have controls that are a member of the current control’s group. Hold down the CTRL key while selecting the menu command will add to the existing selection (default is to replace the current selection). Create sends by dragging effects to channel strips You can create a send by simply dragging an effect to an audio track, instrument track, aux track, or bus. To do so, drag an effect from the Plug-in Browser to the Sends area of a channel strip in the Inspector or Console view. Doing so creates a pre fader send and a new bus that contains that effect. To create an aux track instead of a bus, hold down the ALT key while dragging the effect. To insert an effect in a track or bus Select the desired channel strip and show its Sends section in the Track Inspector or Console view In the Browser, click the PlugIns button to show the Plug-in Browser. Click the Audio FX button to show audio effects. Do one of the following: To create a send to a new bus. Drag the effect to the channel strip’s Sends section. To create a send to a new aux track. Hold down the ALT key and drag the effect to the channel strip’s Sends section. The Insert Send button shows a red outline when you drag an effect to the Sends section. Tip: You can use quick grouping to create sends on all selected tracks simultaneously. To do so, select the desired tracks, then hold down the CTRL key while dragging an effect to the Sends section on any selected track. Create tracks routed to aux tracks or patch points The Add Track menu now allows you to create tracks that are routed to a new aux track or patch point. Preserve sections in other Arranger tracks when committing an arrangement When committing an arrangement, the new Include Sections in other Arranger Tracks option allows you to also “arrange” and preserve sections in other Arranger tracks that aren’t part of the selected arrangement. Arranger Inspector displays a badge on sections that intersect with the Now Time To help you better identify which Arranger section(s) intersects with the Now Time, the Arranger Inspector displays a badge to the left of the section name. In-app hang detection Sonar can now detect hangs and save a minidump file, which allows you to easily submit minidump files to Cakewalk support for analysis. A minidump file records the state of a program as it is running, or at the moment of a crash or hang. By default, the app is considered hung if the UI is blocked for 30 seconds after which an “Application Unresponsive” message appears, asking you to abort or wait. If you choose to abort, a hang dump file is saved to the %AppData%\Cakewalk\Sonar\MiniDumps folder, and the standard error dialog box is shown along with a description of common error codes. The hang check timeout duration is configurable via a Cakewalk.ini variable named HungAppTimeoutSec. It defaults to a wait of 30 seconds. To adjust the hang check timeout duration, add the following variable in Cakewalk.ini (Edit > Preferences > File - Initialization File) : HungAppTimeoutSec=<seconds> (default=30) To disable hang checking, set the variable to HungAppTimeoutSec=0. Note: Sonar dynamically changes the hang timeout while loading projects by bumping up the hang detector timeout to up to 2 minutes. This prevents false positives when saving large project files. Once loading finishes, it restores it back to the default (30 seconds). Sending the dump file to Cakewalk for analysis: Once you have the dump file you can put it on a share like Dropbox, Google Drive etc. Next, log a problem report case with Cakewalk and include the link to the dump file. Note: Dump files may include personally identifiable data so please do not post links to them publicly in the forums or elsewhere to protect your privacy. Key bindings to show/hide tracks The following new assignable key bindings allow you to show/hide tracks in the Track view and Console view: Under Area: Track View: Toggle Show All/Hide Previously Hidden Tracks and Buses Synchronize Track and Console Views Under Area: Console View: Toggle Show All/Hide Previously Hidden Tracks and Buses Synchronize Track and Console Views You can assign the key bindings in Edit > Preferences > Customization - Keyboard Shortcuts. Toast notification when a control surface is disabled on launch Sonar now shows a notification if you start the app while a control surface is disconnected. Deleting a tempo in the Tempo Inspector sets the focus to the next tempo in the list When deleting a tempo in the Tempo Inspector, the focus is now set to the next tempo in the list. Press F2 to rename markers in the Markers view F2 now allows you to rename markers in the Markers view. Meter scale for Instrument tracks changes to dB scale when frozen The vertical splitter bar between the Clips pane and the Track pane shows a MIDI scale (vertical piano keys) for MIDI and Instrument tracks, and an audio dB scale for audio tracks. When an Instrument track is frozen, its vertical MIDI scale automatically changes to a dB scale, which is more appropriate for audio content. Remove crossfades To remove all crossfades in the current selection, click the Track view Clips menu and select Remove Selected Crossfades. Track Scale Zoom is now quick-groupable You can now zoom the waveform or MIDI notes in all selected tracks by holding down the CTRL key and dragging up/down in the track scale. Double-click to reset sliders Double-click to reset sliders in the following dialog boxes: Edit > Preferences Process > Transpose Process > Length Process > Fit to Time Export track/bus and project icons as PNG Export any assigned track/bus and project icon as a PNG file. To export a track/bus icon, right-click the icon and select Save Track/Bus Icon. To export the project icon, point to the project icon in the Notes Browser, then click the “...” button and select Save Image. Process > Length dialog accepts fractional values The Process > Length dialog now accepts fractional Percent values. Quick Grouping of Mute, Solo, and Archive buttons on track folders The Mute, Solo, and Archive buttons on track folders can now be controlled via quick grouping. Quick groups allow you to adjust identical controls across multiple tracks. Select the tracks you want to adjust, then hold down the CTRL key and adjust a control in any selected track. Sonar automatically adjusts the same control in all other selected tracks of the same type. Updated docked Synth Rack and new bypass functionality There are several improvements to the synth rack to allow managing large synth projects more efficiently. This allows you to quickly bypass and free memory and CPU resources allocated to synths, or create templates with bypassed synths and bring them online on demand. The docked version of the Synth Rack now shows a synth Bypass button. By default, the Bypass button unloads the synth when the instrument is bypassed, and also archives all related tracks to save CPU. The synth will be reloaded again and tracks unarchived when the synth is unbypassed. The preset picker has been removed from the docked Synth Rack to save space (the preset picker is shown when undocked or when docked in the MultiDock). This control is largely obsolete because most instruments handle preset management inside the synth UI. The Synth Rack menu and the synth strip context menus have been redesigned to show the relevant functions: Replace Synth is now available via the synth context menu. Bypass All Synths and Unbypass All Synths can be used to quickly bypass all instruments in the Synth Rack. Note that bypass/unbypass can take a while on projects with large numbers of synths if they are big. The progress is shown in the Control Bar Transport module. You may cancel a long bypass/unbypass operation by pressing the ESC key. Unload and Archive preferences can be set in the synth rack menu. In-app bug reporting Report bugs via the in-app Help > Report a Problem menu command. Microsoft GS Wavesynth device no longer available in any driver mode The Microsoft GS Wavesynth device is known to cause audio driver problems, and is therefore no longer available as a MIDI output in any driver mode. Previously it was only unavailable in WDM mode, but has now also been removed from MME and WASAPI Shared modes. Optimizations Audio engine low latency optimizations for multi-core processors The audio engine has been greatly optimized for playback and monitoring when running high plugin workloads at low latencies (less than 256 samples) on machines with high core counts (16 or more processor threads). Prior to this, running at low latencies could result in sub optimal multiprocessing load sharing and higher CPU load. Performance optimizations for projects with many synths and effects Sonar has been greatly optimized to handle high virtual instrument counts, managing the load more efficiently and using minimal CPU resources. In a real-world orchestral template with 250 Kontakt instances, the base template will now run efficiently at 128 samples with very few late buffers. In prior versions such a project would only run at 1024 samples or higher. General plugin performance in FX racks has been improved, allowing you to run workloads with high plugin counts more efficiently. Misc. optimizations Support for AMD threadrippers. Max CPU threads has been increased. Sonar now supports CPUs with up to 256 threads as supported by the AMD EPYC. Greatly improved plugin load balancing performance. Increased hang detection default timeout to 1 minute from 30 secs to prevent false positives with some instruments. Improved editing performance on projects with a large number of virtual instruments. Several optimizations have been made to improve performance when editing clips or MIDI in heavily loaded projects. The Now Time update frequency has been optimized to allow for smoother scrolling of the playhead marker during playback. Improved VU meter responsiveness. Optimizations to drawing efficiency in Console and Track view. Optimization for Intel processors to reduce CPU load when streaming silence with certain plug-ins that generate denormals. There are optimizations to playback start and seeking which reduce the latency before playback starts when starting the transport. Improved and faster Nudge performance. MIDI buffer size is now adaptively managed whenever delay compensated plugins are present in the project, without any need to raise the MIDI playback buffer size. Latest release notes are here.
-
New in Sonar 2024.09 build 30.09.0.105: In the prior Sonar release we made several performance improvements to the audio engine to improve CPU use and low latency performance. In this release we continue with the trend of optimizing Sonar with an additional focus on optimizing MIDI editing responsiveness and streaming, especially when dealing with large multitrack projects. Engine Optimizations Playback MIDI playback has been greatly optimized to reduce CPU load when playing dense MIDI data. This reduces the load when processing projects, allowing the engine to easily process data at even low MIDI buffer sizes. Synth playback has further optimizations to reduce CPU use in projects with many synth tracks. These improvements tackle problems leading to dropped notes in high load situations. Dynamic MIDI buffer size management In large projects, sonar will detect high load scenarios when processing MIDI and automatically detect the MIDI buffer size requirement for that session to avoid dropouts caused by MIDI buffer underruns. If high load is detected, Sonar displays a toast notification showing you the recommended buffer size. Choosing the recommended buffer size temporarily boosts it, allowing you to continue playback without any dropped notes. Note: This will not change the default MIDI buffer size in playback settings, but just changes it for that run session. You can see the result of this dynamic change in preferences, even though it won't be saved explicitly until the user changes the value manually. Project Load and Shutdown Reduced volume of message queueing during project load Mitigate problems caused by plugins that saturate windows with excess messages. This could cause other plugins to fail to show UI, or even interfere with Sonar loading its UI correctly when opening projects containing such plugins. Stop background meter activity while loading projects to free CPU bandwidth New Quick Exit Modes Exiting Sonar while a project is loaded can sometimes take longer than expected if the project contains a lot of virtual instruments or consumes a lot of memory. The most common reasons can be attributed to any of the following: Using large projects, typically with virtual instruments that load large sample libraries that take a while to release memory Audio drivers that are slow to un-initialize 3rd party plugin issues that prevent the app from shutting down properly Sonar now allows you to engage a Quick Exit mode that skips expensive shutdown processing when exiting the app, albeit far more safely than using Task Manager to kill the task. To use Quick Exit mode, hold down the CTRL or ALT modifier key when exiting the app. Note: The Quick Exit mode modifier keys only apply when exiting the app by clicking the app close button (x) or selecting the File > Exit menu command, and not when simply closing a project within the application. This is because individual projects must be closed normally to release memory resources. Quick Exit mode skips the normal project close process, bypassing manual memory release operations and other unnecessary functions, and instead defers to the operating system to reclaim memory. This allows the application to exit as fast as possible. Note: The primary benefit of Quick Exit mode is to improve the response time when exiting the application with large projects loaded. If Sonar exits quickly with your project, there is no benefit of using Quick Exit mode. There are three exit modes: Normal exit (default behavior with no modifier key): Always use normal exit if you don’t have problem with slow shutdown of the application. Closes the application and closes any open projects. Manually releases all consumed memory by the application and plugins. Releases audio and MIDI drivers. CTRL+Exit (faster than the normal application close) Closes the application, only performing essential app shutdown operations. Skips closing any loaded projects and releasing consumed memory resources, deferring the operating system to reclaim memory. The application is force closed using same mechanism as Windows Task Manager. Plugin DLLs are force unloaded. Global plugin resources, if any, may not be released. ALT+Exit Exits the application and additionally notifies DLLs to unload and release global resources, if any. Some plugin DLLs can hang with this method, so if you encounter this, do not use this exit mode. Similar to CTRL+Exit in other aspects. User Interface and Editing Optimizations to streamline handling of large multitrack projects. Many common editing and streaming operations have been finetuned to be orders of magnitude faster. Duplicating clips in synth projects has been greatly optimized Undo/redo operations for clip edits are much faster Splitting clips is much faster Track split is now much faster when articulations are present. The speed for archiving multiple tracks has been greatly improved by many orders of magnitude. Console view scrolling is improved. Optimized redundant redraws of track scale. Multitrack Piano Roll view drag drop optimizations Major improvements to drag and drop operation speed in Multitrack Piano Roll view when dealing with thousands of events. Prior to this change, dragging large multitrack note selections in the Piano Roll view to move to transpose was very slow and could even lock up with large amounts of notes. This operation is now thousands of times faster and has been tested with huge numbers of events in excess of 60K. The drop operation has also been sped up significantly. MIDI drawing optimizations New Enable GPU Acceleration option in Preferences > Customization - Display that allows the Piano Roll view to use GPU acceleration. This option is disabled by default. Note: Certain graphic cards may cause anomalies when GPU acceleration is enabled. General Optimizations: Further optimization for synth playback to reduce CPU use in projects with many synth tracks. Improvements to synth rendering to prevent race conditions leading to dropped notes in high load situations. Improvements to prevent plugins from flooding message queue when loading projects. Added mitigation for plugins that cause lost application notifications leading to loss of play head and meter activity during playback Sync Synth Rack strips with current track Clicking on an Instrument track will now also focus the corresponding synth in the Synth Rack. This behavior can be toggled via the Synchronize Track and Synth Rack Views option in the Synth Rack menu. Delete all articulation events belonging to an articulation map, group or specific articulation ID You can now quickly delete specific articulations that are in use in a project, directly from the Articulation Map editor. To do so, right-click the desired articulation map, articulation group, or articulations and select Delete All Sections. The Delete All Sections context menu command is available in the outlined areas: Note: Currently articulation maps, articulation groups, and articulations that have sections in use are shown in bold within the Articulation Map Editor, so it’s easy to see which ones have sections that can/should be deleted. Command to "Select Associated Tracks/Buses" Track and bus strips have a new Select Associated Tracks/Buses context menu command that allows you to select all source tracks/buses that route to the track/bus. Tip: In addition to the new menu command, you can also hold down the ALT key and click on the track or bus number to select source tracks on bus strips and to show destination buses on track strips. Command to "Select Associated Instrument Tracks" via the Synth Rack To select all Instrument tracks that are associated with a specific synth, right-click the synth in the Synth Rack and select Select Associated Instrument Tracks. New "Left Click Sets Track Focus" global option The new Left Click Sets Track Focus global option (disabled by default) allows you to set the focused track by left-clicking in the Clips pane (such as when selecting clip or making a time selection). To enable/disable this behavior, click the Track view Options menu and select Click Behavior > Left Click Sets Track Focus. This option can be useful if you prefer clicking in the clips pane to set the focus track. Improved Toast Notifications Resolved some stability issues and race conditions with toast notifications that could cause toasts to stop working altogether under high load scenarios while loading a project and performing a VST scan at the same time. Toast Notifications are now flicker free. Improvements to handling of Expired Session notifications BandLab sign-in is required to activate Sonar. For security, even if you have previously signed in from the app, a sign-in cookie has a limited lifetime and can expire. When the sign-in expires, you will be required to re sign-in, whenever the activation lease needs to be renewed, or if you wish to use BandLab services to upload projects etc. Sonar now detects when a user sign in has expired and explicitly prompts you to sign-in when necessary, via a toast notification. This status is also shown in the Help menu, to help distinguish between a signed-out state vs an expired sign-in state. Note: When in an expired sign in state the application cannot auto activate itself. Misc.: Frozen or missing synths show note numbers instead of diatonic note names Pitch Changes in the Piano Roll view now preserve clip cropping VST scanner has been updated to correctly scan WavesShell for ARA plugins Improved project load notifications for projects containing multiple instrument instances Lasso selecting in the Clips pane sets track focus Fixed: Inconsistent TV track header control layout after showing hidden tracks Fixed: Crash triggering MIDI note from controller Fixed: [Regression] Lyrics disappear when typing in Lyrics view Fixed: [Regression] Editing track names clunky Fixed: [Regression] Dragged clips have no transparency Fixed: [Regression] Seeking now time while playing MIDI track leads to silence Fixed: [Regression] Lyrics view does not accept input Fixed: Crash CTRL-clicking the engine reset button Fixed: Crash When selecting tracks with effects Fixed: Drag / Drop changing pitch in Piano Roll view causing notes to move in time Fixed: Crash opening Help menu after sign out Fixed: User project crashes in Loop Construction view when loading in Sonar Fixed: Clip extents change when moving note pitches in Piano Roll view Fixed: Cannot use standard Windows shortcut keys for the app menu while Quick Start Screen is open Fixed: [Regression] Nudging MIDI vertically can remove controller events unexpectedly Fixed: [Regression] Unable to adjust velocity in drum grid / mute notes in Piano Roll view Fixed: Resolved several reports of operations leading to UI going unresponsive to mouse clicks. Fixed: [Regression] Console view bus strips fail to display selection properly Fixed: Browser folder pane too narrow on high DPI displays Fixed: Scroll Lock not working in Event List view Fixed: Transform Articulations should always chase, regardless of chase controller setting Fixed: Media Browser "Folders" visibility tick box does not persist with project Fixed: Note changes unexpectedly when dragging in Piano Roll view after clip crop in Track view Fixed: Drag moving notes in Piano Roll view from cropped clip unexpectedly restores original length Fixed: Crash when quick group freezing synths Fixed: Drag and Drop of images for track Icons targets wrong track when there are hidden tracks Fixed: [Regression] Swipe select / Quick Grouping not working in Console view bus pane Fixed: VocalSync UI appears and immediately closes after adding a Region FX to a clip Fixed: [Regression] Adjusting height of docked Help Module results in docking layout issue Fixed: [Regression] MIDI notes change position unexpectedly after nudging up/down Fixed: When multiple ARA plugins are found within a single VST3 shell all plugins in the shell are treated as ARA Fixed: Media Browser "Folders" visibility tick box does not persist with project Fixed: Undoing Delete of synth doesn't activate synth until playback Fixed: Scroll Lock not working in Event List view Fixed: Transform Articulations should always chase, regardless of chase controller setting Fixed: [Regression] Selection is truncated when opening File Export dialog Fixed: Focused track is not shown in track list after opening Piano Roll view Fixed: Help module flickers with white screen when changing tracks and can show wrong help text Fixed: Synth Rack automation menu appears in wrong place when view is scrolled Fixed: [Regression] Changing current track is very slow when the Synth Rack is open Fixed: Sonar projects MRU should be written after successfully opening project file Fixed: Crash exiting application after drag importing a project file Fixed: [Regression] Missing notes in frozen track Fixed: Scrolling Synth Rack results in incorrect tooltips Fixed: Clicking in Arranger track noticeably slow to move Now Time Fixed: Missing notes in track 83 of user project Fixed: Windows message queue is flooded during project load resulting in lost messages / bugs Fixed: Target box for 'Drag to create Send' is misaligned on scaled displays Fixed: Drag Add Send Highlight not centered Fixed: Duplicating MIDI clips with CTRL+D is very slow in heavy synth projects Fixed: Now Time stops scrolling in time ruler when cursor in Articulations lane Fixed: Aim Assist is laggy in Articulations lane Fixed: Unable to open Piano Roll view after loading a project Fixed: VST scan complete or project load complete messages could not be displayed in some cases with large projects Fixed: Deleting a MIDI clip or editing articulation maps removes solo exclusive state on all tracks Fixed: Icons in Synth Rack don't draw correctly when scrolling Fixed: Slow drag and drop in Piano Roll view when lots of notes are selected Fixed: [Regression] Export as Track of Single Track with non-wildcard name appends track name unexpectedly Fixed: Synth Rack Icon position / display issues Fixed: Project load toast notifications flicker excessively Fixed: Skipped notes in busy MIDI project Fixed: Hang closing project open toast notification window Fixed: User project has invalid hidden folder state Fixed: First MIDI note is skipped on playback when using 180 ms negative delay time offset for articulations Fixed: Piano Roll view Now Time flickers during playback Fixed: [Regression] Jump images in Tempo Inspector are not disappearing when mouse leaves Fixed: Synth icons draw incorrectly in Synth Rack when vertically scrolled Fixed: Moving an effect's position within the same FX bin orphans existing envelopes Fixed: Node nudge in Piano Roll view sometimes misses notes from selection Fixed: Poor Time Ruler mouse hit testing on high DPI displays Fixed: Changing Workspace causes Synth Rack solo state to lose sync Fixed: Synth rack scroll wheel immediately jumps to end of synth rack when scrolling Fixed: ALT-click track number would not select strips in Bus pane Fixed: Excessive track scale painting in Tracks view Fixed: Main menu is not accessible via ALT+first letter of the menu name immediately after creating a new project in Sonar Fixed: Splitting a clip in projects in high track count projects containing Articulation maps is very slow Fixed: Crash when using shelf tool in Tempo track Fixed: Toast notification can stop displaying after app launch after loading certain projects while a VST scan is underway Fixed: [Regression] Selecting a clip doesn't change the track select indicator Fixed: Transport play head and meter activity can stop with certain plugins in the project Fixed: Hang when doing Render Region FX with Auto Align 2 Fixed: Step Record dialog behaves incorrectly while dragging on a high DPI display Fixed: Bus dB scale text appears above bus pane Fixed: Now Time artifact left behind in Piano Roll view time ruler when playback stops Fixed: Now Time appears in wrong place after docking Control Bar at top/bottom. Fixed: Opening Piano Roll view with selected tracks (or clips) should open with only the selected tracks Fixed: Activation toast: Link to Help Center activation topic Fixed: Toast related crash when loading a project while a VST scan is run Please give us feedback on this release. We hope you like it Sonar 2024 Overview
-
Hi all - please use this topic to post feedback specific to the Sonar 2024.09 release. Release-specific feedback is valuable to us, and consolidating it in a single topic is extremely helpful. We request that discussion in this thread be restricted to issues directly concerning this release, to make it easier for us to assist users. For other topics, kindly use the feature request section or create new posts. Off topic messages will be deleted. Thanks in advance! Sonar 2024 Overview


