Roy Slough
-
Posts
157 -
Joined
-
Last visited
Everything posted by Roy Slough
-

Please help a Newbie with basic track clip editing, moving, copying etc.
Roy Slough replied to Roy Slough's question in Q&A
Dear John, Thank you for trying things out for me. My experience has been different, When I first installed Cakewalk (in March) the first thing I wanted to try was convert to midi but it didn't work, I got lots of dialogue boxes to select percussive, melodic etc. but no end result. It was because Melodyne hadn't activated the trial period, I say this because as soon as they correctly activated the trial everything worked!!! Now the trial has ended it seems to be back as before = I get dialogue boxes but no end result. Same with the tempo, ATM it looks like it's going to do it, but no end result. The technique of SM/BAN explained to me will work for tempo until I get a working Melodyne that I can afford to experiment with. So thanks to all who gave me that advice. In the meantime for vocal tuning I am trying out a couple of free plugins. However, so far these have proven to be in-line fx so it isn't easy to observe (with your eyes) what has been adjusted, also it is very easy to over apply and get "Cher" like vocal gymnastics which I don't want (or like much) So thanks again and I will wait for a bargain. As an aside how/why did you choose "Cactus" in your name. I have "Blue Cactus" because in the late 80's I set up my computer consultancy company and had to give it a name. I had a really good gif of a cactus for a logo which was slightly amusing and off beat (I had to remove the sleeping mexican below the cactus as this wasn't the impression I wanted to give) AND it would also work if my music career took off (Which it didn't). So that was my choice of "Cactus" -
Please help a Newbie with basic track clip editing, moving, copying etc.
Roy Slough replied to Roy Slough's question in Q&A
Dear John, Thanks, Can you point me to where Melodyne is under $50. Celemony want to charge me £99 (yes thats UK pounds!!!) for the essential Package. I have seen lots of upgrades cheaper but I don't have anything to upgrade. I even looked at buying an old version to upgrade it but it ended up near the same price. Apologies for being a cheapskate, I am even considering trying to postpone until Black Friday but thats in November...... LONG TIME TO WAIT. -
Please help a Newbie with basic track clip editing, moving, copying etc.
Roy Slough replied to Roy Slough's question in Q&A
Dear John, Yes that was very helpful and interesting. Do you know which version of melodyne is needed? I got 30 days free trial when I started using Cakewalk but that's finished now. This is only a hobby for me so I have to spend my money wisely. I was going to go for essential as I can always convert Audio to midi outside the DAW using one of the free online websites. However the timeline thing would also be useful as I am mainly working on mixing stems given to me by my singer (we were in a band 30 years ago). So IF assistant is needed for both Audio to midi & timeline stuff it might be worth the extra. I definitely do not need and cannot afford the whole studio melodyne suite. Thanks for the advice and my response may also help others understand that melodyne has different levels. Roy -
Please help a Newbie with basic track clip editing, moving, copying etc.
Roy Slough replied to Roy Slough's question in Q&A
It has been a while but I thought I would add some information for anyone else trying to match a tempo to imported material. The whole SM/BAN advice is still good and will help when aligning Bars and beats to a song - But I also discovered in the AudioSnap feature a set tempo from clip. This worked well for me (even though it calculated 62.5 when I thought it was 125) then I could use the SM/BAN technique to set the bars as I needed (This song had a couple of 2/4 and 3/4 bars ) . So AudioSnap is something to look at and play with also. - it worked for me....:-) -
Hi, The question is mostly in the title. With a limited budget I am trying to use free plugins and only purchase stuff I really need. So I am using either SI-Bass or Ample P Bass lite, many sections require a palm muted bass to drive the song, so I either use SI-Bass with a muted amp prg OR I am trying to use the Ample Sound P bass lite with the palm mute function - however nothing I do seems to work, so maybe it is not available in the Lite version. If I can't get the palm mute working I will have to use 2 different Si-Bass tracks = one with muted amp and another with a different prg. Can anyone direct me to where it shows which features are excluded from lite versions (I also am dabbling with the Ample sound Martin lite, so knowing about that too would help) Thanks (apologies for being tight with my expenditure) On that note I have been considering this Ample Guitar bundle https://www.etsy.com/uk/listing/1632840366/ample-sounds-mega-guitar-bundle-2023-for?gpla=1&gao=1&&utm_source=google&utm_medium=cpc&utm_campaign=shopping_uk_en_gb_a-books_movies_and_music-music-musical_instruments-stringed_instruments-guitars&utm_custom1=_k_CjwKCAjwgpCzBhBhEiwAOSQWQaLmreorrGHUVyBAZacxvwxe3p2AWtpxt1qJEqQepZlfeAPx6eDCLBoCdNAQAvD_BwE_k_&utm_content=go_12603393578_128415440868_508772827879_pla-316238738805_c__1632840366engb_102858184&utm_custom2=12603393578&gad_source=1&gclid=CjwKCAjwgpCzBhBhEiwAOSQWQaLmreorrGHUVyBAZacxvwxe3p2AWtpxt1qJEqQepZlfeAPx6eDCLBoCdNAQAvD_BwE Any advice - it seems to have 7 Bass and a dozen Guitars (also some ukelele etc. - not so interesting)
-
Thanks, When I get time I will look at Custom Module settings
-
Thanks sjoens, Nomalising in CbB worked for me and I will use this and re-Gain Stage low volume tracks. I had not found normalise in CbB so gave up thinking I was looking for something that was not there. When you confirmed it I searched harder and found it. Thanks again.
-
Thanks John & Pwal.... OK In future I will allow it to copy to project - then I will delete originals (these are big Wavs) There was no unseen peak - Audacity did raise the level significantly with noralisation then I exported back replacing the original - but this doesnot seem to reflect in CbB
-
Some of my audio wavs in this current project are extremely quiet. Even with full gain they barely hit 0db. I thought if I normalised the original wav it may fix it but alas not and I do not understand why, Can anyone help/advise? I was led to believe the Audio remained outside CbB This is my process. Import the stereo Audio wav as Mono and choose not to copy audio into project folder (why have an extra copy) Delete one of the resulting Audio tracks in the project - Even thought the wavs are stereo the instrument is mono Repeat until all tracks for song have been imported Check Clips are aligned musically Sort out the tempo with tempo mapping. Begin arranging, mixing etc.. This is when I found THIS song had very low audio levels. I used Audacity to normalise one of the Wavs outside of the project as a test but it does not have any effect (yet) on the track inside the project. So, I have been looking for some sort of re-import or re-analyse the audio to avoid starting again. Yes I could begin by normalising all audio and start again in CbB but I thought I would ask. It would also clear up my confusion as to why it didn't work and help me better understand CbB. Also. it would prepare me should I wish to perform some other process outside of CbB - there are many features in Audacity etc. not within CbB. Thank you
-
Ample Guitar MII Lite - Strumming mode
Roy Slough replied to Roy Slough's topic in Instruments & Effects
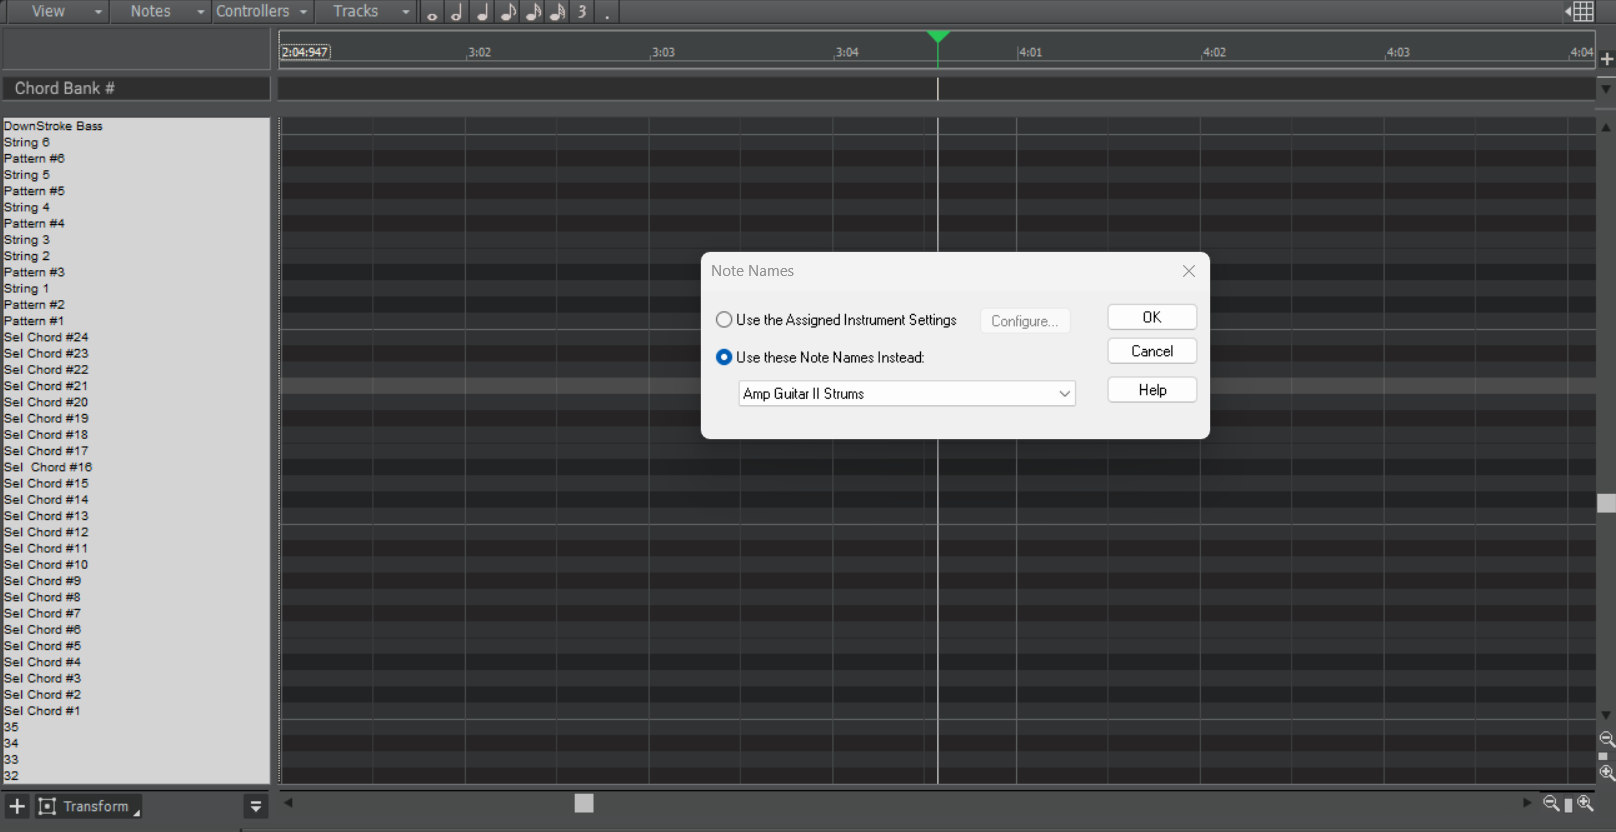
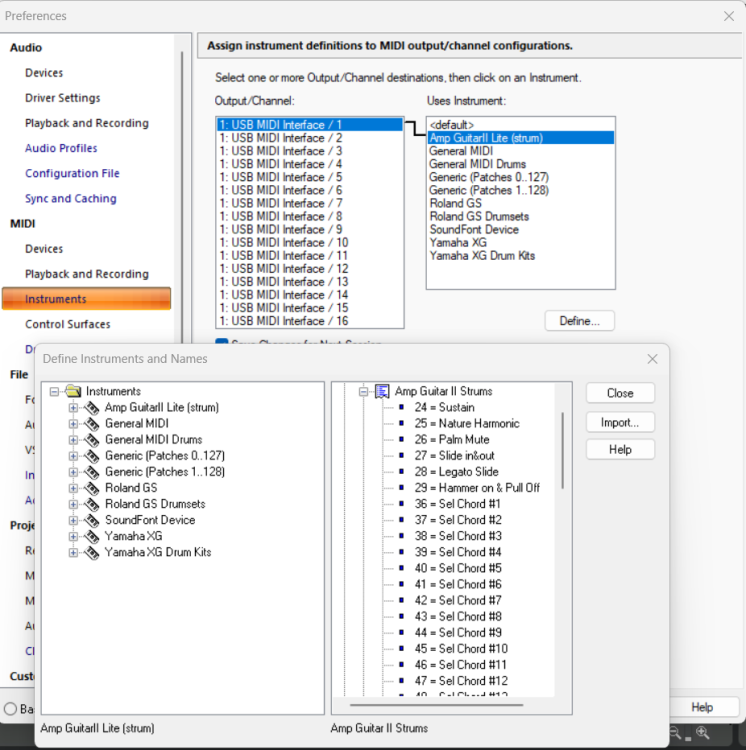
OK I found the best solution for me was to use note names. Right click on the piano roll beside the "Use the assigned Instrument Setting" is a configure button. Follow this and define a new instrument. Add a new instrument - Add note names then change from "Use the assigned Instrument Setting" to "use these note names instead" and select the new instrument note names. Then the piano roll appears as in the attached screenshot. I do not know where the new note names in the new instrument are stored so I cannot export them for anyone else - you'll need to create your own. (If anyone else wants it)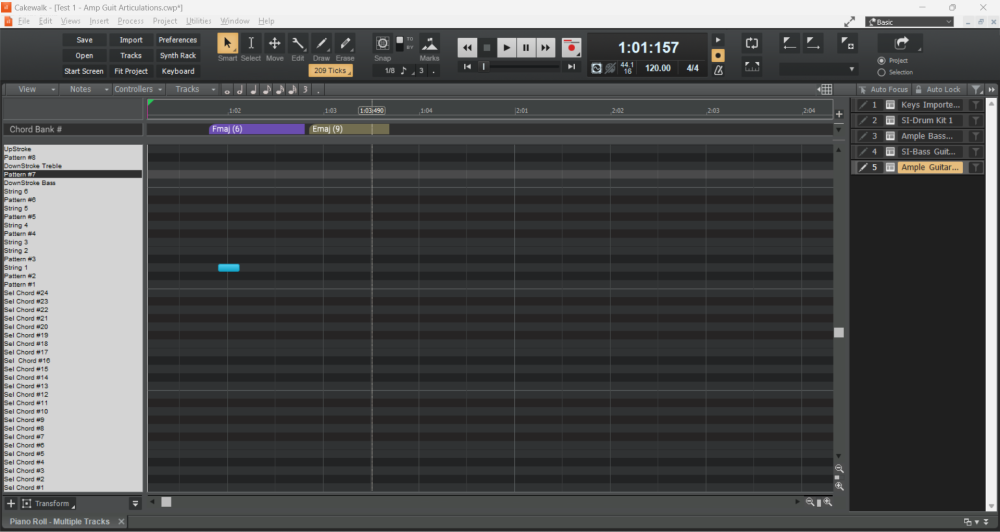

-
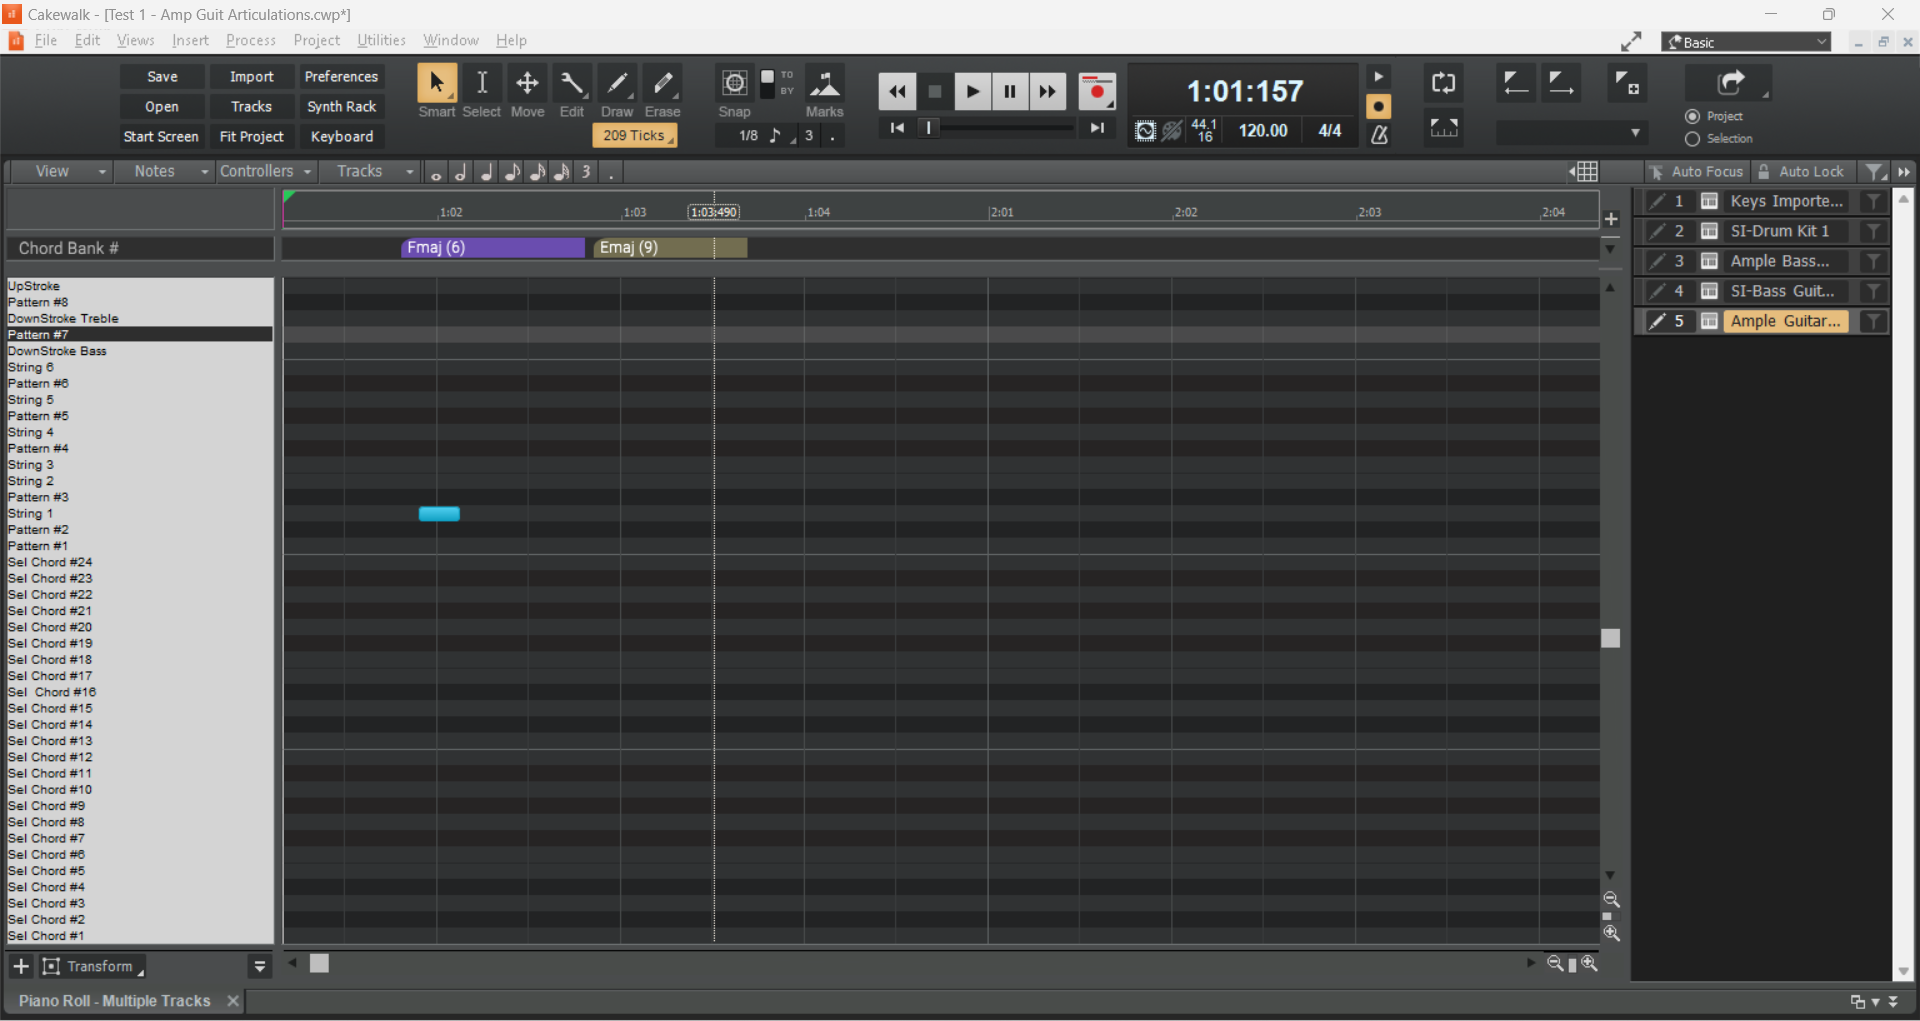
I have been experimenting with Ample Guitar MII Lite, because it is free and I can't play a real guitar (Bass player) I have discovered the strum mode and it enables me to do some things I thought I could never do E.G. Set a Chord then strum it in a variety of ways, pick notes on the string or even play a sequence (and there's a large library of choices Or make my own) However, the manual is a generic for All Ample sound guitars and the Key/Note to initiate things are different in the Lite (I attach a PDF of those that interest me) I have used an Articulation Map to set the chords and that is good visually as it shows the chords along the time line However placing notes to strum or play a sequence in the midi section is not helpful visually. When I use a drum map there is a drum pane above the Piano roll which shows the drum mapped to a specific note. I do not know how/why this works but it could be useful with the guitar to translate a note into what is played e.g. C6= DownStroke, D5 = E string (Actual note depends on chord selected) Now the Question....... Can I/Should I create a Drum Map to create this translation? Or will having multiple drum maps in a project confuse things? OR is there something else similar to a drum map which would show some text instead of notes? Thanks N.B Apologies the PDF is not yet correct nor complete (there is no note E# !!!!) I will amend and upload a new one when I have made changes
-
Thanks John, Unfortunately it isn't on the grid and I don't want it to be. I am trying to keep it loose - Think of The Small Faces in the 60's. Therefore when I return it is difficult to "see" if they have moved, but I doubt it - why would they? I have frozen the synth, moved the audio to where I want it and now it remains in place. So I will move on and remember this should I use Drum Pro 32 (but it isn't really my style. The only Audio I have recorded so far is a bass guitar through a USB interface (Behringer UM2) it didn't give me much trouble. What problems should I expect if/when I record some vocals (I am not a good singer and mostly I am re-mixing someone else's recordings)
-
I wanted to add some hand claps to a song, Found some decent sounding ones in the Drum Pro 32 drum synth (Drum Hip Hop 6) . So I used these. However, now they often seem to be delayed when I play the track. I have gone back into the midi several times and moved the notes around and they seem fine for a while then later they are wrong again. It really isn't much midi info = 2 notes played about 8 times in 8 bars of music. In this song I also have several other soft synths Si-Drums, si-Electric piano, Si-Electric bass, so I think I might becoming processor/memory over stretched - but I don't know. None of these others are having troubles only the Claps. I don't have an elaborate PC setup, It is just a laptop but I managed my previous track well, (Only Si-Drums in that) Cakewalk is set to WASAPI Shared not ASIO, this is because when I first installed Cakewalk WASAPI worked and ASIO didn't, but I did not investigate why because at that time as I wanted to get on with my first project to see if this DAW would suit (and it did) I am tempted to bounce the claps to an audio clip, delete the Drum Pro 32 and paste the audio where I need it - unless you can help me to A) identify what IS the problem & B) the best way to fix it Thanks
-
Automation on GSatPlus not working
Roy Slough replied to Roy Slough's topic in Instruments & Effects
Thanks, The mix knob works. I will experiment with the GPU version in due course. -
I am trying to use the GSatPlus plugin to provide saturation just on the chorus of the song. I have added it to the master bus. The track for the master bus shows the automation for the bypass switch. The master channel is set to read automation as is the plugin itself, but it does not switch the bypass. I have occasionally seen it switch the bypass on and off but not consistantly and not now I am watching it. It is very difficult to hear if it switches on and off as it is a subtle effect designed just to lift the chorus so I am relying on watching the UI. This is the NOGPU version as I do not have a soundcard (all work being done on a laptop) Any Advice thanks - If there is a GSatPlus forum I should use please also advise but I come here as I always get good advice.
-
Thanks I will give these a go
-
I am trying to add a SideChained gate from the kick to a rhythm guitar. currently it strums all the time and using a SideChained Gate gives it a different impact. However, I only want it gated at certain times but I cannot find an automated method of turning it on/off. Currently I am using the SonitusGate but the Bypass is not something available in automation, similarly I cannot automate the turning on/off of the FX nor on the send from the Kick. Is there a method to automate this OR another (free) Gate I can use which can be automated. The method I can currently considering is using the automated mute on the rhythm guitar but that is long and tedious OR I can cut and paste the sections I want into a separate "gated" track also long and tedious AND difficult to amend. N.B. there are other FX (or sends) I only want at certain times so knowing how to automate turning them on/off in general would be useful.
-
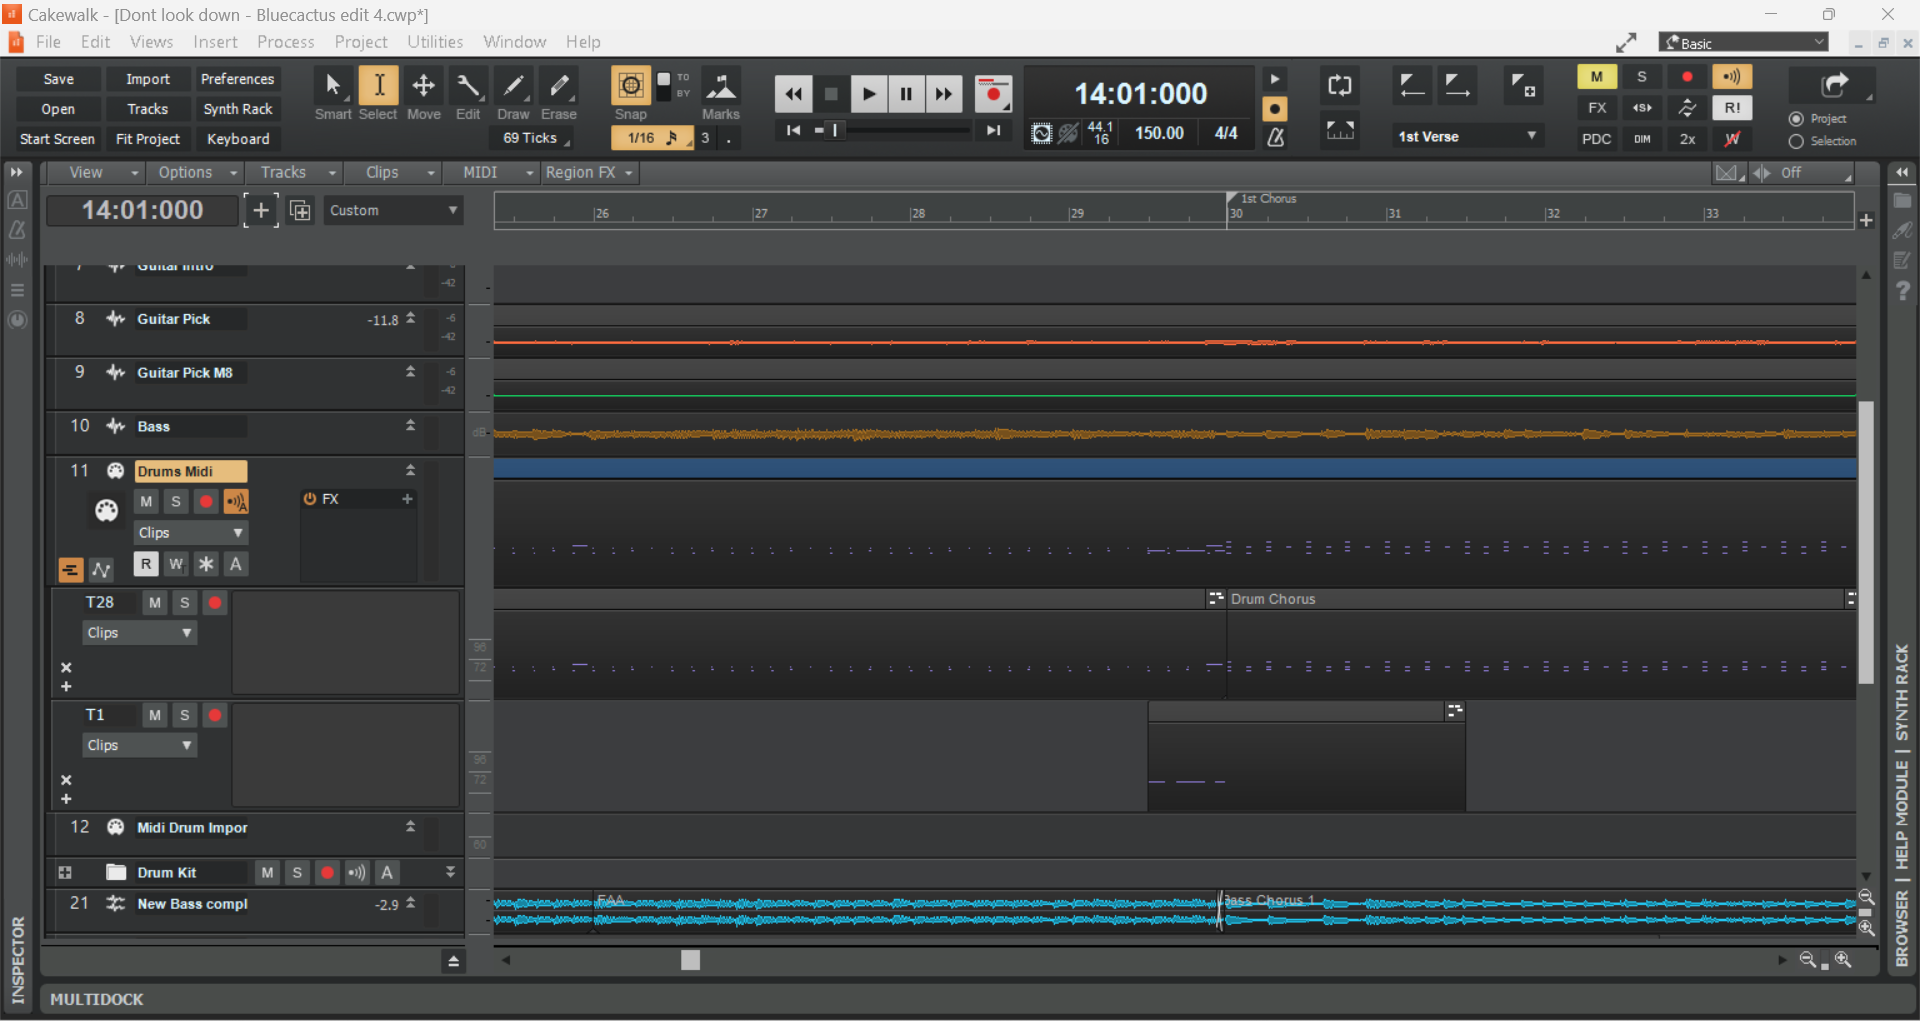
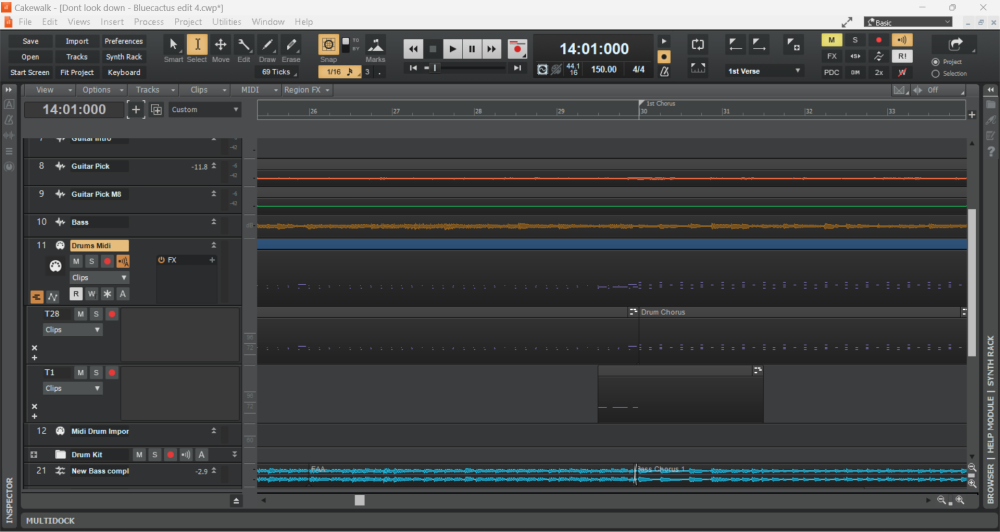
I am working through my drum midi track. I have the basic beat and am now adding fills and highlights. When I have completed this for the 1st verse I would like to name that clip and copy it for the second and third verse and use a similar process for the chorus. I know a real drummer probably would introduce further variations as the song progresses and maybe I will but just getting the structure complete would be great. So.... I have added a snare fill at the end of the first verse to bring in the chorus. When looking at the tracks I noticed a small section of the clip at the end of the verse which appeared separate and when I expanded to show the take tracks I noticed the snare fill was in a separate take clip. I had thought I was editing inside the "main clip" but it seems to appear as a "take" clip which runs from the verse just into the chorus (see screenshot) How do I deal with these separate Clips/takes? When I copy the drum verse I want to copy the snare fill as well. Then there may be further fills etc. I add, sometimes I may want to include these as part of the "main" clip but do I have the option of leaving these separate so I can choose to copy or exclude as desired. I have watched a video on track comping to choose sections of recordings in multiple takes, which has educated me in the concept of take lanes, but this concept does not apply here as I want all of the take lanes. Therefore does anyone have advice on dealing with take lanes processing midi information OR can direct me to a video which could educate me, Thanks
-
Thanks Guys, I will have to accept that I will need to re-do the work and will take more care before doing anything destructive.
-
Suggestions please on How to repeat chorus and fade
Roy Slough replied to Roy Slough's question in Q&A
Thanks David, This is good advice on how to achieve what I need. I had already "re-Arranged" earlier parts of the song (reducing the intro, Shortening the 1st chorus) But it was tricky and I had to try several times to get it right (no knowledge of Rippleing) So I will try your method when I have completed all the other tidying up, level matching, inclusion of effects and mixing. -
There is no auto-save but there are 4 versions configured. (None now available since last save)
-
I would like to repeat the final chorus (maybe 2 or 3 times) and Fade out. There are approx. 20 tracks in the mix Any suggestions on how best to achieve this would be useful. Obviously, I could just mix what I have and work on the result and repeat and fade that, but I thought there might be a better way? Thanks
-
Hello, While I was busy working on Bass clips I deleted what I thought was a redundant Drum Midi track. Now I have finished with Bass I have lost the chorus drum parts which were probably in the deleted Midi Drum Track (I had 2 or 3 to compare different drum patterns in various sections) I cannot find it in Undo, undo history Or Revert. Is there any chance it is still in some Cakewalk work folder where I could retrieve it. Obviously I could re-make it but it was a couple of hours work to make. Thanks
-
Please help a Newbie with basic track clip editing, moving, copying etc.
Roy Slough replied to Roy Slough's question in Q&A
Thank you David, By the time I read this I had already started again from the beginning, I have learnt so much that this is a far better organised project than before (and on beat). I still have the previous project so can refer back if necessary. Once again thanks for the offer. -
Please help a Newbie with basic track clip editing, moving, copying etc.
Roy Slough replied to Roy Slough's question in Q&A
I seem to be having difficulties..... I could find no way to drag/drop the .cwp into the new one, While I am in the browser window (where you can select which project to open) I cannot drag any project. If I open the new project, then open the start screen (which shows the select project screen) then those projects cannot be dragged into the new one. Therefore I must not be understanding the (from the Browser->Projects) instruction. If I have both projects side-by-side The tracks cannot be dragged, they can be copied and pasted but I have to select "new" for the destination, none of the track details such as effects are copied. Then I have to drag/move the clips in that track so that the first transient lines up with the beat (I started with drums) . when I then copy/paste the following tracks it becomes difficult to move the resultant clips to line up with the first, sometimes all the clips move, but sometimes only the first clip in a track moves, others remain where they were creating a small gap. I can see this if I have the entire track length in the window, but I need a close up on the start to align with the first track. OK, Enough of my whinging. I will begin again importing original audio, starting with the drums and ensuring the tempo matches. Then I will add the other audio ensuring they align before any splitting/editing of clips. I remain baffled as to why I cannot follow simple instructions OR my installation of CbB operates differently