Search the Community
Showing results for tags 'feature request'.
-
Then I would assign it to a keyboard shortcut and I would be in heaven! That would be a real time saver. Many times I want to repeat the last command - for example when I experiment with smthng, say transposing or reversing one clip and I hear that its good decision, then in order to repeat that command to another clip or bunch of clips I have to go through same process again which is again few clicks instead of one. Even toy like AudaCity had this feature and it was really handy. My little wish Cheers
-
Please consider adding a global MIDI option to shorten all midi notes by a few ticks so "note on" and "note off" don't have the same timestamp when the notes are connected. I believe Cubase has this. Those messages having the same timestamp is giving problems with Halion's Megatrig module (used in almost every patch) in the way that connected notes are simply won't sound.
-
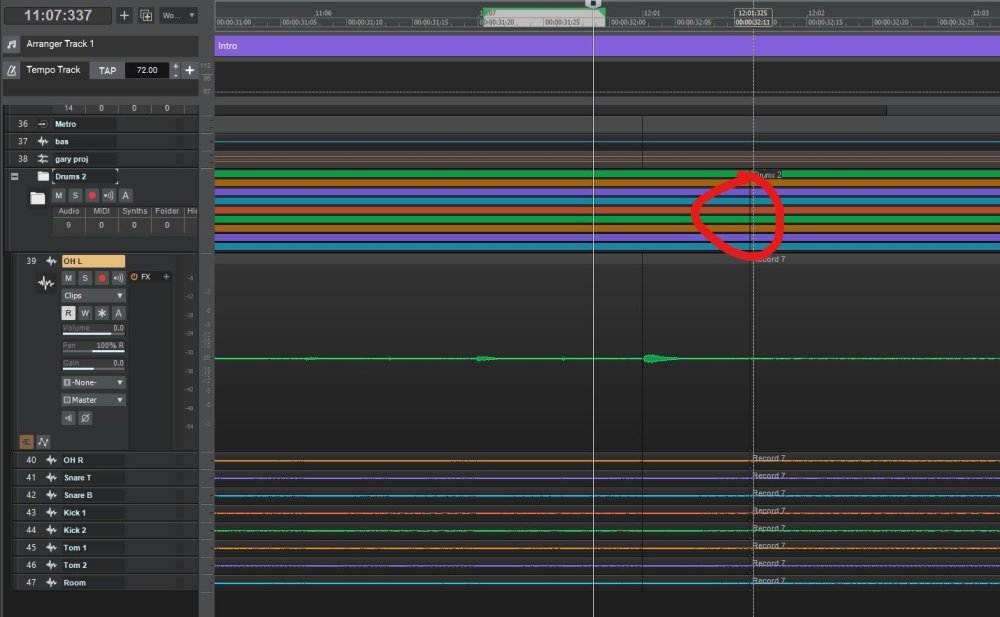
One specific example where this would come in handy for me is time/phase aligning multi-tracked drums. I might be shifting snare-top and bottom to match and then 'at the same time' be aligning the overheads to work with kick and snare. This means shifting back and forth several times between offsets which sound best. Here it would be great if one could for example undo the last (1,2,3-10) changes made on say the overheads. As these are usually stereo and put in a group it would be ideal if this type of undo would also keep track of changes made within grouped tracks. The undo protocol only allows chronological undo which to me sometimes is a pita. Anyone else experience this or is it just my peculiar workflow..
-
Request to truncate Marker names when they overlap each other. They currently run thru each other making them unreadable in some cases. One readable Marker is better than two unreadables, no?

-
Currently it only goes just over half way. Sometimes I like to have text near the end.
-
 Dear developers! It would be very interesting to know about plans to finalize the Matrix module! If it, this module, would be improved to the level of Cakewalk Project 5, it would be the best alternative to Bitwig and Ableton on the market!!! At the moment, for me personally, the module is useless. But it could become a very cool and very popular feature, which is in Bitwig and Logic. Let's support the idea to finalize the matrix (already written about it on the forum) and make it one of the features of the future Sonar! What do you think?
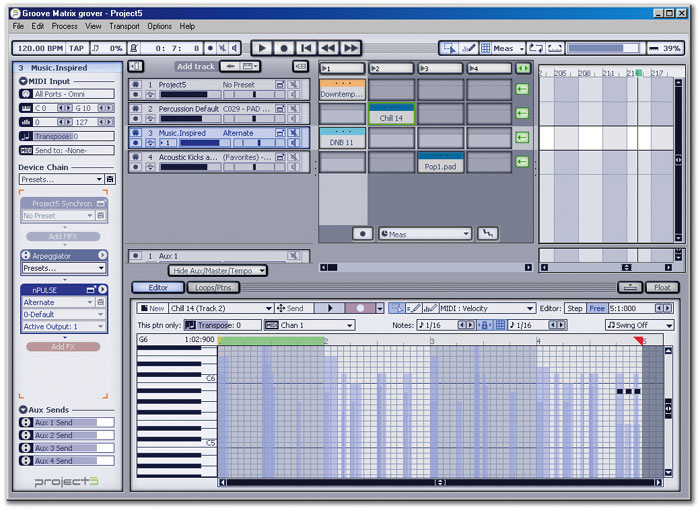
-
 This is an edited/updated version of the edited/updated post. The Feature Request now includes a function for normalizing exported audio files, too. This is an edited/updated version of the original post. The following 4 posts refer to the original one. Hi bakers! I would really like to see a feature to normalize clips to a certain RMS/LUFS-level in an easy and fast way so that you don't have to do it separately (read: tediously) with a third-party plug-in. It should be simple enough as it only needs a few parameters. Normalize to: X Normalize by: peak/RMS/LU/K-system/whatever If overs: Reduce gain/clip/limit/cry for help There could be some advanced options as well. Normalize to (RMS only): Average/peak Normalize to (LUFS only): Momentary/integral RMS time window (RMS only): (default: 700ms) Merge clips on same track? Keep separate/Merge together Apply clip trimming before normalizing? (default: Yes) Do I love Cakewalk? Yes/Indeed This way you could easily set up a project with a schnizzleton of clips with audio levels all over the place to a relatively smooth starting point in no time. Now you need to do this manually and I still don't understand why you have to do it in Sonar since it really is no difficult feat to program and I'm sure many of us would appreciate this. PS. If normalizing is NOT your thing, feel free to keep it to yourself. This thread is NOT called "Normalizing – good or bad".
 -
Hey Everyone/Bakers, I do a lot of vocal editing and production work. For years I've done this all pretty much exclusively in cakewalk (sonar back in the day). I've always had to color take lanes differently one by one manually, and I'd love for it to be automatically done, or at least have an option one can turn on or off for this to be done. Why? Because when you're comping a vocal, especially in heavy, very dense productions, it's useful to see visually which parts of the comp came from where. This is extremely helpful when going back for edits, or the ocasional "re-comp" when asked by a producer. Personally, I'd find it useful for double tracking, as I usually make doubles, and sometimes harmonies from the takes that weren't utilized in the final lead comp. Just my 2 cents, but I think this would be a cool feature to have.
-
It would be so very time-saving to be able to select a default preset for each and every VST plugin. The preset would then always be the default loading state when a specific plugin is instantiated. Please consider it for the new and flashy soon-to-be Sonar.
-
I quite recently discovered a very useful possibility of manipulating multiple clips in multiple tracks in a folder but what I miss there are all those little tools that are available when you edit clips in a single tracks i.e. crossfade tool, edge shifting tool etc - by holding down ctrl or shift. Shift+ alt works there which is great so I assume other tools could be there too. It would be very useful to have them here:
-
I see that stem separation is all the rage at the moment with RipX, Serato Sample, and especially with FL Studio upping the ante recently and implementing it directly into the DAW. In the comment section of a YouTube vid I was watching on the subject recently, I was surprised to see someone mention that Bandlab has stem separation also with the Splitter tool. I have never used Bandlab so I had no idea about this and just checked it out. It doesn't sound quite as clean as some of the others on the market right now but it's a start. I'm hoping they are planning to implement this in the upcoming release of Sonar. That could really turn some heads. I'm also an Ableton user, and people are quite upset about the omission of stem separation with the recent Ableton 12 announcement. It's probably the biggest complaint I keep seeing about it. Just a thought.
-
 Hi there, I have for a very long time wondered why it is necessary to "Bounce to clips" every time you record midi on top of another midi clip, as in most other DAWs (If not all) you have the option to just merge new recording into the same clip when you record on top of it and then the notes show up on the clip, instead of having multiple takes overlapping and having to mark all the clips and run the "Bounce to clips" function to get this effect? Is there some kind of setting I am not aware of, or is this the expected way of it to be working? Thank you in advance.
 -
 Many of you are aware that the External Inserts system is long overdue for a major overhaul. Here is my feature/bug fix wish list: 1. Support mono sends (so that both legs of a nominal stereo pair can be assigned separately) 2. Allow an insert send port to be assigned with no return port allocation. This would allow a pre FX send to be achieved. (At the moment it can be assigned and the send meter shows audio activity but the actual audio port doesn’t get fed with audio). 3. Continue support for an external insert returns to be assigned without the need for a corresponding send. I use these as effect returns. 4. Fully support external inserts within FX Chains and FX Chain presets. You have to use a workaround at the moment which is a pain to use. 5. Fix the bug which causes external insert port allocations sometimes to be set back to ‘None’ when a previously saved project is loaded. This happens even when the required audio ports are shown as available. Same problem with FX Chain presets which sometimes load with their previous port allocations lost. And when a port is not available then the system should allow alternative ports to be selected just like it does for sends. 6. Bring external inserts fully into the Cakewalk API. 7. Fix the API bug which incorrectly reports mono sends as stereo send names (yes that’s not an external insert send problem yet, but will be when mono sends are supported). The new Sonar should be a lot more user friendly for use folks using hybrid in/out of the box mixing.
 -
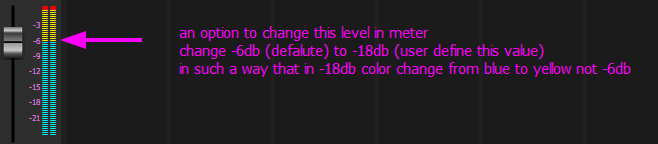
Hi Change audio meter color change level I want to use -18 as reference point to mix around it and -18 (or any number you want) give me a good headroom to mix without using limiter in master to prevent cliping like k-system meter but not 3 color just add option to modify this level and change -6 (default) to e.g -18
-
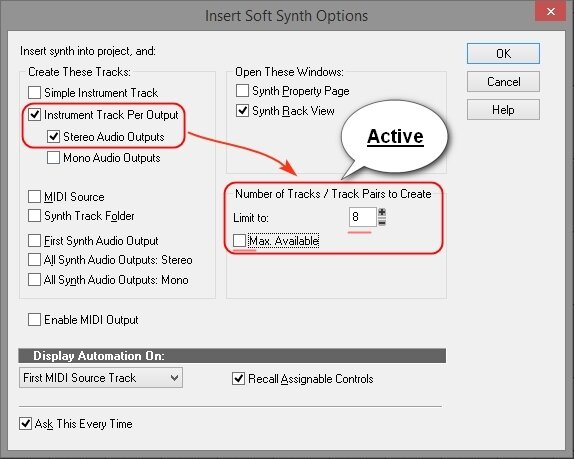
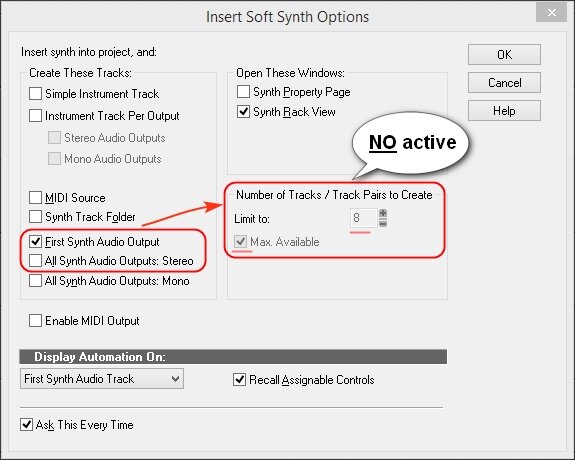
Hi! I have been using Cakewalk DAWs for many years, and have long dreamed - in the process of adding VST Instrument, to be able to select the exact number of audio output channels from VST Instr. It would be great to have the same option, which is already there - "Instrument track per output", but something like "Audio tracks per output" with the option to choose the number of channels. For now this option is available only for "Instrument track ..." At the moment I am condemned to select the option "All synth audio outputs", to have automatic routing of VSTI multi-output, and then eliminate the excess channels. For example, Kontakt creates 64 (!!!) audio tracks, of which 10 to 15 remain. This option could save a lot of time to do a simple operation of adding VST instruments, many users would be really happy I think!
-
 Holding down the CTRL key while adjusting clip gain/volume on several/multiple clips does not result in the gain/volume being altered on the selected clips. Only the gain/volume on the clip that is adjusted will be adjusted accordingly. Please make the CTRL key usable on also clip gain adjustment for multiple clips. Thanks!
 -
So, the "Insert Send" menu which can be accessed by right clicking on the track pane, is one very long list if you have lots of tracks and lots of FX. So every time you want to insert a send, you'll have to scroll through the entire list which is a slow and ineffective method, a pain really. Having to do this on a big project where you want to apply a lot of side chaining and you need to put sends on the tracks, is very time consuming in Cakewalk due to the described problem. Please add the following in future versions: Make the list several columns and/or put a slider on the side so one can just slide through the list quickly like a slider on a browser viewing a long webpage. A search field where you can quickly find the track/FX you want to assign the send to. EDIT: It would be cool if there would be a feature to be able to arm any FX or anything, to be able to assign a send to. So lets say you go to track 58, and arm FX number 4 in the list of FX. When armed, you just go to the track you want to make the send from, right click > Insert Send > Send to Armed and it would instantly find that armed FX. Then up pops the question "Do you want to make more sends to this armed FX?" If you click NO, then it is disarmed, if you click YES, then it stays armed so you can make more sends from other tracks as well. This would indeed make the process of assigning sends very much faster and less time consuming. Thank you!
-
as for the ending life project, can this be a one of the latest additions ? well, it's a mostly the same export functionality, but through a different .dll, that should be possible to change/update later any needed workaround you can add into their github project prob, this can be just a "transitions" .xml file for future updates or something https://www.kvraudio.com/news/bitwig-and-presonus-announce-dawproject-a-daw-agnostic-project-format-58830
-
would be nice to have a pre-roll record function, like studio one has. you can specify a number of beats/bars that will play before the playhead marker sets record so that you can hear the track(s) up to the record point... makes it easier to play along to the music for punch and rolling. basically, this is exactly the same as when a producer plays a track and manually punches you in while it plays, but enables to you to do it when you are tracking yourself.
-
 Hi everyone, in the past, a similar request has already been made, however I would like to propose it again with some variations as I think, a new feature like this on the PRV, if it will be implemented, could be very useful. Personally I found myself many times in the condition in which it would have been enormously useful for me to have a customization of this type of the notes pane in the PRV view. First of all to have a quick visual indication of the extension available to me for each VST instrument used in the various tracks, but not only, even an additional personalized text would have allowed me to insert useful additional "reminders" on the individual keys. This customization should be done per single track and not a global. In practice, a custom instrument definition can already be assigned to a single track through the appropriate menu. It would therefore also be a matter of adding an additional "custom text and colors" option to the menu already present. This option should open an edit window similar to that already in use for the articulations in which to be able to enter and save as a preset also, the personalized data. The keyboard notes names would obviously be fixed instead text1, text2 and color would be customizable. Text1 and Text 2 fields should be displayed in different areas of the piano keys and it should be possible to use them both or not to allow better management of the limited space available and to have maximum flexibility according to use (in some cases it would be visually more linear to use only the text1 field, in other cases only the text2, or a combinaltion of both,etc). I think an image can explain very simply what I mean so I insert one as an example. The possibility of entering the personalized data manually would also be relatively simple and fast so as not to require automatic retrieve from the VST instrument (for example I think kontakt note colors) which would probably create some more complications with VST data exchange . Also if we insert manually the data through CbB in this way, we can also insert the custom texts which are very important too. I hope my suggestion will be taken into consideration for a future release. Let me know what you think. For now I thank the developers once again for their work!
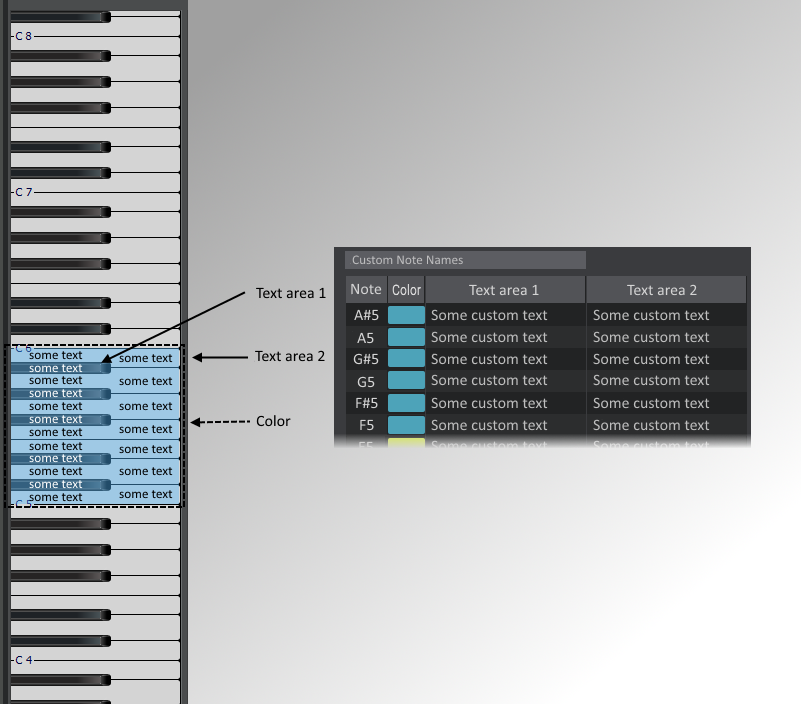
-
 Hi, everyone, I’m a relatively new Cakewalk user, switching from Reason. I love Cakewalk, the sound, the options, the features (I found the Pro Channel awesome), the graphic interface, the modularity, and the countless options. The sound of the embedded tools, to me, is light years ahead of my experience with Reason, and the modularity opens up a lot of versatility in terms of the sound you can achieve. I've found there are, however, a few workflow improvements that can be made, in my opinion, to make working in Cakewalk almost reflex, without having to think, and allow you to focus exclusively on the sound, instead of procedures and workarounds - things that you would intuitively do, but aren't available, things that can replace more complicated operations and looking through menus, mass inserts and adjustments of modules, replicating settings, etc. So I put together a list of suggestions, a few weeks ago. It's around 75 items, and it covers everything from glitches to appearance, but mainly workflow improvements. I'd like to see how many of you guys would like to see them implemented, too, and hope to see as many of them in future releases. I’ve grouped them into three categories, one about necessary fixes, which refer mainly to stability, the ability to remember settings, etc. The second one refers to improvements in the workflow, which could see a better, streamlined processes, some inspired from my experience with Reason, most just by working, and recording my go to reflexes or natural wishes. The third one is a list of personal wishes, that would make Cakewalk like a present box – kind of the cherry on top - and complete in every aspect, at least, to my personal subjective wishes. So here they go. Hope you find them desirable. Cheers and happy holidays! PS> Any idea that you think is useful, and you would like to see implemented, you can select individually and then click on the "quote selection" pop-up, to add in your reply. With enough support, maybe we can see them in the future. Improvements A. Instrument Tracks “Assign to track” option in the instrument/soft synth creation dialog, in the rack, which replace instrument in Instrument Tracks and convert MIDI track to Instrument track, if synth is assigned to a MIDI track. All the in/out associations and conversion of MIDI track to Instrument track be done automatically on “assigning to track”, or menu selection. Allow the Synth Rack and browser windows to be opened in the Console View (both docked and undocked mode). Drag and drop soft synth in the free space (Track and Console View) creates Instrument Track (plus right click insert option in the Console View). Drag and drop soft synth on track (other than in the FX box) (Track and Console View) replaces soft synth in Instrument Track. Drag and drop instrument/synth on MIDI track automatically converts to Instrument Track – in both Track and Console view. Open instruments/synths, in the Console View, on double click on the track icon, instead of opening the icon menu. To open the icon menu, right click. Being able to open instrument/soft synth in the Console view is very important during the mixing process, as there is often need to adjust parameters – output volume, reverb, EQ or compression adjustments in light of any PC adjustments and blending you need to do – for the instruments that allow internal FX options, etc. As of now you need you need a few clicks, and flipping through the windows, to do that. “Replace Synth” option in the Console view, on right click on the instrument icon of Track, same as in the Track View. B. Undo Make Undo operate for all actions performed in the DAW, including PC module/VST plugin parameter variations. C. MIDI Editing Workflow (Track View) Double click in free area writes default length note in PRV, just like now. Double click and drag writes variable length note, instead of single click and drag, like now. Select area/note in PRV with left click – instead of right click, which is counter intuitive. Same for automation nodes, etc. Double click on note deletes it, exactly the opposite of writing it, instead of right click, which is counter intuitive. Provides symmetrical and reflex write/delete, with the same operation. Right click on note/note selection opens up processing FX menu, with Transpose, Quantize, and other usual note editing options available directly in the menu. Quantize, Transpose, Time Stretch, and Velocity be available as direct options on the right-click-on-clip menu, instead of being found in the FX tree submenu, like know – that unnecessarily complicates access. The other, less usual FX stay in the sub tree menu, under “Other FX”. This simplifies access to the most usual operations. Double click on empty lane of Instrument/MIDI track, in Clip Mode, creates clip to default size. Double click and drag creates clip to drag size. Double click on title bar of clip opens PRV, in Notes mode, just as in Clip mode. Also consistent with the usual navigation behavior in all software, where double clicking on item opens it. Resize clip, Fade In/Fade Out available in Notes Mode, just as in Clip mode. This provides consistent behavior between Notes/Clip visualizations, and allows for quick access to PRV, without having to check or toggle the visualization in the track properties. Double click on wave clip opens Clip Editing View (Auto Zoom In), where you can micro cut, delete, move audio to grid, etc. Clicking on existing note in Piano Roll View (PRV) plays instrument note. Copying (CTRL+C) of clip automatically positions the cursor at the end of clip. Stretch/length note adjustment menu on right click menu, on note selection/clip. D. Audio & Track Management (Track View) Selecting track + DEL deletes track (with/without confirmation dialog), and not the last selected clips in track - change selection focus to track on track select (also see Console View DEL track). Selecting FX module + DEL deletes module (also see Console View DEL track). Audio clip copy and paste to take place in the track lane where mouse cursor was last clicked (clicking/cursor in a track lane automatically selects that track for pasting). Drag and drop (import) audio over MIDI track automatically opens Extract MIDI dialog. Moving cursor on upper ruler bar takes into account the current Snap To setting. Closing any open Region FX window reverts to the previous active View, not to automatically to the Console View, as it does now. Export Audio Clip option on right click menu – export directly “as is” without any processing. Adjust amplitude of audio clips with on-clip Volume knob (Audition style). E. Pro Channel Module Options, Mix Tracks (Console View) (Double) click on EQ graph window in Track to open full EQ window, not only in PC, like now. Eliminates unnecessary clicking and scrolling. Allow EQ window to be freely repositioned on the screen. CTRL + Mouse adjustment adjusts any parameter of any PC module (including menu choice for reverb types in REmatrix) across all tracks containing that module, without having to select any tracks. When you select specific tracks, the adjustment only applies to selected tracks. Right now, that option is only available for Power On/Power Off, and for selected tracks only. CTRL + Insert PC Module on a Pro Channel automatically inserts that module on all tracks. If specific tracks are selected, the insert is made on all selected tracks. Copy/Paste function for PC Modules across tracks. The pasted PC Module retains all the settings of the original, copied one. Patch/Setting copy/paste function for PC Modules across tracks. Same as above, but referring exclusively to copying settings from one module to the other. Drag and Drop PC Module from on track to another, same way as for FXs (again, consistent, intuitive behavior throughout). If the target track doesn’t contain the respective PC module, drop inserts PC Module, with the original settings. If the PC Module is already inserted, drag and drop on it copies the settings. Mass insert/changes settings of PC Modules: CTRL + Drag and Drop PC Module on any of the tracks of a selection automatically inserts/changes settings of the corresponding PC Module on all selected tracks. Mass duplicate FX modules: CTRL + Drag and Drop FX plugin on any track of a selection automatically inserts that FX plugin on all selected tracks (same as above). Mass track reroute (Select tracks + select route menu option in any of the selected tracks) (implemented). Track focus change when clicking on track, instead of only on the track number, like now. Makes it easier and faster to select, without having to think where to click. "Duplicate Track" option in the Console View, in the right click menu, same as in the Track View. Moving/reordering tracks by click (in any area without commands, including icon area) and drop, in Console view, without pressing ALT, like now. That seems unnecessary. The exact same way it now happens in the Track View, where ALT is not needed - have the exact procedure for the same thing, across the different views, for consistent behavior. That complicates things unnecessarily, and makes you need to remember different procedures for the exact thing, instead of just being immersed, and performing tasks on reflex. Selecting track/FX plugin/PC Module + DEL deletes track/FX plugin/PC Module (with/without confirmation dialog). Right now, when you select a track/FX module, and press DEL, in Console View, it deletes any previously selected audio/note clips in the Sequencer, which is strange. In Console View, make the Module Menu available as a graphic section with toggle buttons (maybe on the docking bar) for opening or collapsing any of the sections of the Console (for instance “Sends”, and any other module existing in the Module Menu), instead of opening/collapsing it from the View menu. New Open Bus Section toggle button to fully expand the Master/Buses section of the Console View, to the right, to full view (taking into account their current visualization settings – collapsed, PC open, etc.) the same the PC/Properties section does, to the left; then resume previous position on reclick of toggle button. Stereo/Mono toggle button on Instrument tracks, same as on Audio tracks. It could work by enforcing mono/stereo mode on source VSTs, same as the check option available in the VST Properties/shell (implemented). Solo override Mute – on Soloing a muted track, play solo track(s) as if it/they weren’t muted. Allow renaming of FX modules. F. Song Playing/Navigation On activating Play In Loop, Punch In Recording, etc., automatically use current selection to, without having to additionally click on "set selection to", first. That seems unnecessary. Allow cursor to play outside the loop, even with "Loop" button on, after stop and replay, if you set it to a position outside the loop, and only play within the loop if placed anywhere inside it. Allow the Now Slider in the Control Bar to readjust cursor position while playing. On “Stop Rewind Marker To Now Position” selected in Track View/Options, Stop button leaves cursor in current playing position. Pressing stop again moves cursor to Now position. Repeated Stop button pressing toggles between the two. This way that setting can be eliminated altogether. Pressing Stop once leaves cursor where in current position. Pressing Stop twice goes to Now position. Simple to use. Both options are available at all times without setting modifications, and the behavior keeps consistent on all projects. Allow navigator to be repositioned at the bottom of screen, above the control bar, in track view. Allow to make that default for all projects, and also remember position automatically for each project. Moving VSTs into different categories, in the browser, by drag and drop into folder, same as in Windows Explorer. Aim Assist for position cursor on Time Ruler be placed above/under the Time Ruler, without hindering viewing of cursor on the ruler. Mouse Scroll wheel moves slider on both scroll bars (vertical and horizontal scrolling), on placing cursor over them - in all Workspaces. G. Saving Saving project automatically resets autosave counters to zero. No need for autosave to kick in only seconds after the project has been manually saved. Disable automatic autosave after each undo. Let autosave work according to the setting in preferences without additional interventions. Unnecessary autosave takes time and interrupts flow. H. Appearance Add transparency slider for background (native theme) colors, in the track color change dialog (and only for the colored track areas). This will allow track colors to be less affected by the native theme (dark/light/etc.) and display closer to their natural hue (implemented). Allow marker/song sections in the Track View, which can be selected as blocks/chunks, to be assigned individual colors - will affect the background of the section, and not the clip colors - this will help easily visualizing song sections in one glance. Necessary fixes I. Crashing Fixing crashing on VST conflicts – why not just isolate the conflicting VST, and close it, instead of letting it crash the DAW (with maybe an explicit message as to what the problem is). I get crashes when clicking on the stereo/mono toggle button on the Master fader, when I try to reorder tracks in the Track View, when I bulk adjust PC modules pots in the Console view, and in all kinds or random situations. It’s either VSTs that crash the program, or even PC modules. That’s a big issue. J. Remember Project settings (these are on my machine, I don't know if everybody has them, it might vary from one person to the next) Fixing irregular behavior where the Control bar setup is not remembered, on project open. Fixing irregular behavior where mass variation of the REmatrix across several selected tracks (CTRL + mouse adjustment) during playback causes the knobs to be varied by different amounts. Fixing irregular behavior where VSTs that use crosstalk among tracks reset their settings to the default values, under various circumstances. Remember the open/collapsed status of one knob plugin windows, in the Pro Channel of Instrument tracks, on project open (Console View). They always start up as open, on project reload, and need to be reclosed individually, which is really annoying. Remember the order of the Browser, Synth Rack and Help windows, in the right side dock, which always resets on project re-open. Remember the Track View>MIDI/Show Velocity in MIDI clips visualization setting for projects. Remember the Track View>VIEW/Auto Track Zoom setting for projects. Remember the PRV controller pane parameter choice. K. Drivers Recognize 24 bit ASIO drivers, instead of 16 bit, on some soundcards (for instance SB Audigy series). On engine dropouts, don’t stop playing, reset the engine, and keep playing (implemented in the 2019.11 release). Allow projects to work with no MIDI out selection in Preferences/Drivers, or provide a "No MIDI out" check option, instead of allowing the lack of selection of a midi out to cause all synths loaded to automatically be assigned as midi out destination for all midi tracks, which causes the project to behave erratically. Awesome L. Add the SSL 4K channel compressor (complete with Autogain and Peak attack mode, just as the original – I know this may be too much to ask, but those features are magical in the SSL channel compressor - autogain basically tells you what the best compression setting is, and the peak mode allows for tracks to be sent back in the mix without audibly impacting the attack), as third Pro Channel compressor option. Add the CA-2A compressor to the Pro Channel, and as insert FX. I think Cakewalk's is one of the best emulations in the business (have it as a free RE in Reason) (implemented with PC2A, in 2021.04). New Wow/Flutter knob in the Tape Emulator. Maybe review the high/mid-high freq softening in the Tape Emulator. Separate one knob modules in the Pro Channels for Harshness, separate for guitars, and Drums/vocals. The general one available now, is a great idea, and I love it, and use it, but it’s kind of in the middle. HP + LP filters added to the REMatrix Solo, on the wet signal, and integrated within the PC interface. Pro Channel modules available as insert FXs. Fully programmable shortcuts, without limitations (implemented).
- 165 replies
-
- 8
-

-

-

-

-
- feedback
- improvements
- (and 5 more)
-
 I've been playing with trying to replicate some techniques Dan Worrall has shown in his videos and managed to successfully do his emphasis and de-emphasis EQ one as shown in this video: While the thing works fine using one FX Rack module and and mapping the controls to the controller knob, using it becomes a bit hard without opening both Sonitus EQ instances as the only values the FX rack display are percentages and it seems like you can't change that or at least I couldn't find anything about it in the documentation. So, I wonder if it would be possible to have the option to either have the FX rack controls mirror the information displayed by the plugins or to determine the type of data their tool tips display, as you have ProChannel modules with knobs that can do that.
 -
I've been learning to love the way Cakewalk looks, but still there are some things that I would love to see implemented: * The option to change the default coloring scheme from black background/colored waveform to colored background/black waveform. * Waveform outline color available to change in preferences/colors, or waveform outline changed automatically to black if the coloring scheme is changed as in the first request. * An additional option in View/Display/ Vertical grid lines: Behind waveform but in front of media background, so we can see the grid lines but not as strong and intrusive as when they are in front of the waveform or the midi notes. Right now there are basically two options for the grid lines in Track view: Too visible, or not visible at all. I want the grid lines just to be visible enough. Thanks for reading.
-
We have the Loop feature where we can select a time range in the ruler or simply selecting a clip to set the markers to loop between when the track is played. What we are missing though, is an "Exclude section"-feature, where we could select a portion/section of a track that we would like to "jump over" during play, just to exclude that part. Maybe we want to hear how the track sounds without those 8 bars, etc. Just select the time (or the clip(s) we want to exclude, and press the "Exclude" button, that's it. A portion of the track is prepared with markers (just like when we select a portion/section to loop), and when we play the track the "exclude-part" of the track is simply jumped over without pause or glitches or anything. This would be a very handy feature!
-
I would like to have access to add plug-ins to the input channel strips. Allowing the use of VST’s similar to outboard hardware.