


Robert Bone
-
Posts
1,273 -
Joined
-
Last visited
Posts posted by Robert Bone
-
-
On 12/30/2020 at 8:20 AM, Bruno de Souza Lino said:
As a side note, if you happen to save your track setup as a track preset with a drum map to go with it, that drum map is not loaded when you load your track preset. It just adds a new empty DM entry that you have to reload your preset.
Can you (or someone) please explain this? I don't quite understand.
Thanks, Bob Bone
-
UPDATE - Resolved, by correcting the Output Port data - from Microsoft Wavetable, to the proper instance of Kontakt, then saving the corrected drum map.
I discovered that CbB Drum Map Manager had changed all Output Port assignments from the specified Kontakt instance, to the Microsoft Wavetable. I have zero ideas why, at the moment.
I updated those assignments back to the Kontakt instance, and resaved the drum map, and all is well. I will try to dig into this some more, and open a support ticket, when time permits.
Bob Bone
Howdy - I have been a user of NI Komplete, and Kontakt, for many many years, and am suddenly experiencing a perplexing issue, with a 1 second lag in hearing audio from triggering notes on any of my MIDI controllers, using the Studio Drummer library, in a separate Kontakt instance, where I have a single one of the Studio Drummer factory instruments loaded into the Kontakt instance.
1) This project has 3 Kontakt instances, with one instance for a New York Grand Piano instrument, the 2nd instance having a Kontakt Factory Library string ensemble instrument, and the 3rd Kontakt instance having a single Studio Drummer Library instrument loaded into this Kontakt instance.
2) I have no detectable lag when using my MIDI controllers to trigger notes for either the 1st or 2nd Kontakt instances, and if I use the 3rd Kontakt instance's virtual keyboard to trigger any of the Studio Drummer kit pieces, using my mouse, there is also no detectable lag. It is only this 3rd Kontakt instance, with the Studio Drummer instrument, that I get a lag of around 1 second, when I use either of my two MIDI controllers to trigger drum kit pieces for the 3rd Kontakt instance. This makes ZERO sense, as to what could be causing this issue.
3) My computer specs are:
Dell Alienware 17 R5 laptop
16GB of memory
Two 2TB M.2 NVME hard drives, and a 3rd hard drive that is a 2TB solid-state drive.
Intel i7 CPU
4) My ASIO Buffer Size is set to 128 samples, for my audio interface, which happens to be my Behringer XR-18 digital mixer, using a USB connection to the laptop.
5) The Studio Drummer Library resides on one of the NVME hard drives, which is where all of my sample libraries are stored. This NVME drive has no other files/folders on it, other than sample libraries from Native Instruments Komplete 12 Ultimate.
6) I am using a drum map for this Studio Drummer instrument, in a Track Template I have used for around 4 years now, with no prior issues. The instrument is routing each kit piece to its own audio track(s), with most of the tracks being mono, and the snare (stereo - top mono and bottom mono), and prior to yesterday, everything has worked with no issues, including no problems with lag.
I have done some searching, using Google and in this forum, for anyone else having this kind of issue, with no seccess in finding this issue reported anywhere.
I am all ears for any suggestions as to what I can do to resolve this issue. I will be continuing to dig into it, to try to figure it out, and if I come up with anything to fix this, I will update this thread, to avoid anyone needlessly investing time into helping on a problem that is resolved. In about 2 cups of coffee, I will try running the stand-alone version of Kontakt, outside of CbB, to see if the issue exists within Kontakt itself. I will also try starting a new CbB project, with only one Kontakt instance, with the Studio Drummer instrument loaded, starting with only 1 stereo audio track, and of course a MIDI track, so as not to use a drum map, and to be as plain a project as possible, so as to just test triggering notes from my MIDI controllers. If that is successful in resolving the lag, I will then try starting a new project with only the tracks and single Kontakt instance of the Studio Drummer instrument - using the Project Template I had built with the drum map and the separate audio outputs and multiple audio tracks - but nothing else in the project, and again test triggering notes from my MIDI controllers. I will also test the above using a VST3 Kontakt instance, and again with a VST2 instance, in case that has anything to do with the issues.
A very sad Bob Bone - who is trying to record a brand new song.
")
-
What is your ASIO Buffer Size set to, when this is happening?
Additionally, does your project playback without glitches, if you temporarily Bypass Effects, by clicking on the FX button on the right side of the Transport module (where the Now Time Marker is displayed, as well as where the playback controls are shown). Once you test this, you can click on the FX button again, to re-engage all of your effects.
Bob Bone
-
EVERYBODY, please take a chill pill. If folks can just let any perceived slight or insult go, and move on, we can all get back to trying to help each other.
Besides being a musician, and a moderator/host, I used to play basketball, and had a blast playing in 15 different countries. I mention that because that experience exposed my to all kinds of different cultures and languages. Every country I visited had unique phrases, and ways of speaking, and them trying to communicate with me in English, or my trying to talk with a referee who didn't speak English, in such a way that I didn't get thrown out of a game, happened with enough regularity that I felt humbled quite frequently.
From what I have read in this thread, someone who is not a native English speaker happened to word a post in a manner perceived as insulting, kicking off the comments resulting in a warning, and some ongoing feelings of being slighted.
The non-English speaking member has repeatedly indicated that he had no intent to say anything insulting.
That needs to be the end of the back and forth in this matter. There was no intent to ruffle anybody's feathers, and that poster has repeatedly apologized for not having a better grasp of phrasing things in English.
Let's please let this all go, and please accept the aplogies, and move on.
Bob Bone
-
 2
2
-
-
On 8/2/2022 at 5:38 PM, C.J. Yarborough said:
Thank you all so kindly for trying to help a fella out! Turns out...I had to set that input for GetGoodDrums to "Omni," and to get my MIDI drums to trigger the expected sounds of the kit, I had to use the "GM" preset instead of the "Invasion" preset (which was the default for some reason) for proper drum-mapping.
So all said...THANK YOU ALL! I am elated right now and feel like an idiot at the same time for not even knowing how to navigate the GUI well enough to investigate things on my own. But, teamwork made the dream work.
Cheers all!
You are AHEAD of the curve, by turning to the community for assistance. LOTS of good helpful folks here. Here is a secret - most of us here have learned too many things the hard way. The trick is to remember the lessons learned from making mistakes, so that you hopefully don't repeat them, too many times.
Bob Bone
-
Check the recorded MIDI events, to see what MIDI channel is present in the drum events. Then, make sure the MIDI channel lines up with the MIDI channel with the loaded Kontakt MIDI channel, and on the MIDI track. Do you have audio tracks set to get their input from the output of the Kontakt instance that has the drums?
Bob Bone
-
 1
1
-
-
2 hours ago, John Vere said:
I saw that too and totally agree.
Recording is done in steps. Bed Tracks, Overdubs, Editing, Mixing and THEN mastering. Adding Mastering Effects while you are still in the first 2 and even 3rd stages is not recommended. But of course we often have to return to Overdubbing stage to fix stuff or add a better idea as we progress, So therefore the Global Effects By Pass toggle is your best friend. Not only for Midi delay, but keeping Audio tracks in sync.
Sometimes your song will actually sound better all of a sudden when you do this. ⁉️
Exactly - certain types of effects are designed to only be used during mixing/mastering, because they require a large ASIO Buffer Size, to do their processing. Lots of times, you can often see this mentioned in a given plugin's product description, where you might see it described for mixing/mastering, and/or sometimes the descriptions will mention the use of "Look-Ahead" processing, which is a big clue that the plugin needs a large buffer size specified.
If you use such plugins, like a convolution reverb, during recording (tracking), you will almost have trouble getting what you are recording to line up with existing tracks, because of the latency caused by the effect plugin.
I have mentioned this before, in a few responses to earlier posts, but until someone runs into the issue, it may not have been something one realizes, in the moment.
You pretty much want to keep away from any plugins that require large ASIO Buffer Size settings, when recording, or when coming back to edit/overdub or record new tracks. If you have thought yourself done with the recording phase, of a given project, and had to go back to either overdub or record additional tracks, and have already inserted and tweaked latency-inducing plugins, you have some choices, on dealing with that successfully:
1) Bypass all effects, by clicking on the FX button, to the right of the Transport Module, at the top of the window in Track View, just to the right of center, until you finish recording, then click FX again, to toggle the effects processing back on. By bypassing all effects, you can track with an ASIO Buffer Size down to 128 samples, or lower, depending on your interface , and such.
2) Click the power button on any effect that requires a large buffer size, to turn that/those effect(s) off while you do the edits or new recording, and power them back on, and enlarge the buffer size again, to return to mixing/mastering.
3) In addition to choosing either of the above options, you can also insert similar effects to the ones you had bypassed or powered off, that give you reasonable likeness to the ones that aren't processing, just using similar effects that do not require a large buffer size. Then, after completing your edits or new recording, you can remove those temporarily inserted effects, and engage all effects again, or power up the ones you had temporarily powered off, and reset the buffer size to a large value again, to return to mixing/mastering.
Forever, you will switch between a fairly small buffer size, for tracking/recording, and a large buffer size for mixing/mastering. I record at 128 samples, or lower, when using my better interface, while I mix/master with a buffer size of 2048 samples. Works like a champ.
Bob Bone
-
1
-
1
-
-
18 hours ago, Dana Elston said:
Thank you for that sir. I had not heard of this before. I really appreciate this info!
I rather poorly worded my earlier comments on how to set the ASIO Buffer Size, so let me try again:
1) When recording, set the ASIO Buffer Size to 128 or less
2) When mixing/mastering, set the ASIO Buffer Size to 1024 or 2048 *
* When you find out, in mixing, that you have to go back and do some additional recording, you will want to set the ASIO Buffer Size back down to 128 or less, HOWEVER, there is a potential challenge when you do that. IF you have inserted any effects plugins that are designed to work with large ASIO Buffer Sizes, then trying to record with a small buffer size may cause audio issues. You can temporarily turn off individual effects that require large buffers to work, such as those plugins that use Linear Phase processing, or ones that use "look-ahead" processing (convolution reverb effects, for example), and then turn them back on when you are done with the additional recording and ready to resume mixing/mastering. You can also temporarily bypass ALL effects, by clicking on the FX button (to the right of the Transport Module). Clicking the FX button will bypass all effects, and clicking it again, after completing the additional recording, will engage all plugins again. A third option would be to temporarily turn off the effects that require a large buffer size for their processing, and if needed, insert some kind of similar effect(s) to the ones you turned off, then delete them when done with the additional recording.
Sorry for any confusion at all, with the above explanation, or my earlier one.
Best of luck to you having smooth recording sessions - if you have any additional questions abou this, I will keep an eye for for them, and will respond as quickly as I can.
Bob Bone
-
1
-
-
7 hours ago, Dana Elston said:
I just stated using SSL EQ and SSL Comp. These two plugins are creating distortion as well. Odd thing is, I used these on a different Cakewalk project just yesterday with no issues using these two plugins. But on this newest project bada bing...there it is. I just exported the track to give an sample of what I'm hearing. The exported track does not have the distortion on it. Odd.
I'm running Windows 10
Cakewalk By Bandlab 2021.12 (Build 102, 64 bit)
**** Note: Well I experimented after posting this. I changed my buffer size and it cleared up the issue.
Glad you got it sorted out. I always record with my ASIO Buffer Size set to 128 samples, or 64 samples, or 32 samples. Then, when I have finished tracking/recording, and move on to mixing/mastering, I always up my ASIO Buffer Size to either 1024 or 2048 samples, depending on which of my audio interfaces I am using.
Mixing/Mastering is not adversely affected by the latency incurred from the larger buffer size(S) I set it to, for mixing/mastering, and there are multiple plugins that use Linear Phase or "Look-Ahead Processing", where having a large ASIO Buffer Size gives those more 'robust' plugins enough 'room' (buffer size) to properly do their processing.
Pretty much until the end of time, you will do best by recording with an ASIO Buffer Size of 128 or less, and then when mixing/mastering, set the ASIO Buffer size to a large value, and if additional recording needs to occur, you will change the buffer size up to either 1024 or 2048. It is simply part of the regular processing , generally speaking, to switch between small and large buffers.
Bob Bone
-
1
-
-
And, here is the screenshot I just took, showing my Test Post, Ignore post on the current forum home page, from a handful of minutes ago, so I am a bit confused, about old/new forum posting:
-
I have been largely absent in participation for quite a while, due to some ongoing issues with high blood pressure. It has really knocked me silly, and I am left gasping for breath, just walking 20 feet, to either the kitchen or the bathroom, and I just have not felt up to doing much of anything.
I have been taking blood pressure medicine for several years now, and I am finally starting to see blood pressure spikes these days, so I am just starting to feel up to returning to working on playing and recording.
I had no idea I had managed to post to the old forum, I see my post in the current forums, and just posted a test post response, which shows up in the current forums as:
Am I missing something here, besides being gone for FAR too long?
Bob Bone
-
Test post - ignore
Bob Bone
-
11 hours ago, Roger Jeynes said:
This works, but be careful: there's long-standing but very intermittent problem when Cakewalk occasionally misses the timing on the count in, so starts recording early. If and when it happens (after 2 years we still haven't been able to isolate the circumstances), the new track will be out of sync by the length of the count-in (so if 4 beats at 120bpm, it will be 2 seconds out). If you do get this problem, do please call it out: it will make the handful of people who experience this problem feel less isolated.
Will do. I have not experienced that issue, as of yet, and almost always start projects with 2 measures of sampled drum stick hits, to serve as my project count-in, so the projects usually start at measure 3, though if there are pickup notes occurring in measure 2, I am still good to go, because I have left myself 2 full measures of count-in stick hits.
When doing punch recording in the middle of a project, I set the punch points, then position the Now Marker some distance ahead enough of the punch point, to get the timing and feel in my head - if I am in some sort of quiet section, I may add some measures of click track of sampled drum stick hits, on the same dummy MIDI track I use for my initial drum click measures from the beginning of my projects. I just mute that dummy drum click track as desired, deselect it during export/render of the project, and use a marker I set at measure 3 when setting the From and To points for exporting, so I don't export the 2-measure count-in drum hits.
Bob Bone
-
14 hours ago, msmcleod said:
@Andres Medina - It never occurred to me to leave the recording checkbox unchecked! Good thinking!
I happened to know this one, but I learn something about using Cakewalk every single day, and it has been going on 30+ years (mid/late 1980's or so, when it was DOS program Cakewalk, released by Twelve Tone Systems). Good thing we have a helpful bunch of folks in these forums - we are all in pursuit of trying to record the sounds pinging around in our heads, and between us all, we manage to row in the same direction on a pretty regular basis. Wahoo!
Bob Bone
-
1
-
-
Ah - the limiter might well do the trick, along with the gain plug-in - I will give it a shot - THANKS to you, and to John
Bob Bone
-
1
-
-
2 minutes ago, scook said:
Blue Cat's free gain plug-ins can do plus or minus 60 dB
OK - but I am unsure how to properly apply it, to counter the fade out from the unmodified audio.
Prior to the fade beginning, the audio peak is -0.4 db and of course it fades to zero at the end.
How would I best do this? I have that plug-in, and use it frequently, but have never tried to do this particular kind of thing with it.
-
5 minutes ago, John Vere said:
Goodness Bob that's a new one even for me ⁉️ and a challenge.
I would think that all you need to do is draw a volume envelope going up but I do believe there's a limitation on how much gain you'll get which I just checked and its only +6db from 0. So the CD track is already maxed out. A solution to this would be to apply gain to the whole song and reduce it down to a level that gives you enough headroom. This might be like -25db. Once you've leveled out the ending you could then normalize the track back to something like -1.0 db
Other idea I might try is splitting it into a zillion chunks and applying Gain to each chunk to get them all the same level.. I would not want that task!
Yeah - I would have thought this would be a simple concept - reversing an existing fade out, but had not really thought about the mechanics when I told my friend I could knock this out for him.
I have just never run across my own need to attempt this before.
I thought about the zillion chunks approach, but do not know how I would do it in a way to keep it smooth - obviously the more chunks the smoother, but it still seems like that would be a rather jagged uneven result.
I am hoping someone can jump in with a good way to do this, as my friend has his own time commitments for using the modified track, after I finish the edits. He is ready to record a bass video, playing over the track, and wants to get it recorded and uploaded to YouTube as soon as possible.
Bob Bone
-
Howdy - my pain meds are making me a bit foggy, so apologies for being a bit dense today.
I have a friend who plays bass, and he wants to add his own playing over the fade out section of a commercial audio track from a CD.
I have imported the audio into Cakewalk, and moved to the end of the track, to a spot just before the fade out begins.
I need to know how to add automation to counter the fade out that is on the track, so that the track volume remains at the same level as it was prior to them starting and doing the fade out.
The track shows a peak of -0.4 db prior to the fade out, and a short while later it is at -1.7 db, then -2.0 db, etc... until the track ends.
I have only ever done fade outs, where I add either a straight line or a curved line, to fade out tracks, and am not sure how to add whatever automation I need, to counter/reverse the fading that is baked into the audio track from the CD.
I am racing the clock to finish this, because my friend only has a limited window this afternoon, in about 2 hours, to come by and pick up a CD with the modified track, so if anyone can guide me, rapidly, I SURELY will appreciate the help.
Bob Bone
-
1 hour ago, David Baay said:
Plugin Load Balancing is not always guaranteed to improve overall performance, especially when the distribution of load across cores is already good without it. I generally leave it off as I don't often use that many FX plugins in a single bin (or in a whole project for that matter), and most of my load comes from VST instruments which can't be load-balanced. The documentation provides guidelines for when it can be helpful and when it might not:
https://www.cakewalk.com/Documentation?product=Cakewalk&language=3&help=AudioPerformance.14.html
What audio interface are you using, and what Driver Mode are you using in Cakewalk? (ASIO? ) Please also detail the nature of your project - how many tracks, how many soft synths, which ones, how many effects plugins, the nature of them (such as convultion reverb, linear phase, etc.).
And, just for a test - what happens to render time when you temporarily first Bypass All Audio Effects processing? (just click on the FX button to the right of the metronome icon, and it will toggle Off/On the bypassing of all audio effects - once your test is complete, clicking again on the FX button will engage all audio effects again). Some effects require huge ASIO Buffer Size settings, and some are just CPU hogs - some soft synths are also CPU hogs.
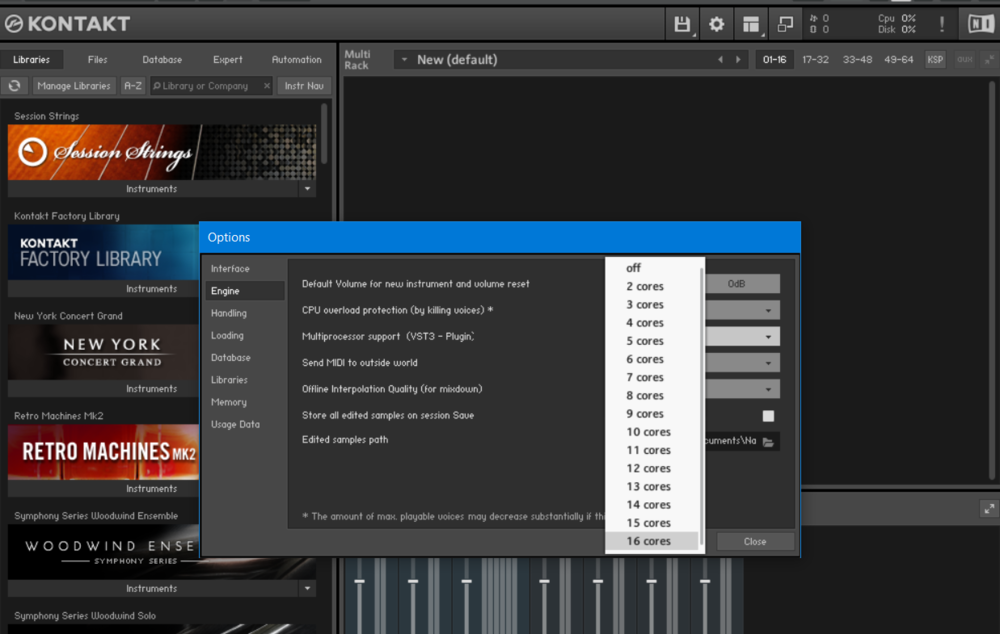
Also, some plugins, like Native Instruments Kontakt, Battery 4, and I believe some other plugins of theirs, have settings where I could enter how many cores I have in my CPU, and those plugins distribute processing among the available cores, per the values I entered for the cores my CPU has. Here is a screenshot of the settings for this, in Kontakt. (The parameter is the 'Multiprocessor Support', etc., under Engine:
-
On 10/6/2021 at 8:10 PM, MB77 said:
UPDATE: I fixed it. I tried to add a new track by clicking "VST3" And "Native Instruments" and it worked.
Quite happy that you were able to 'fix it', though I do not for the life of me understand the original issue, or the 'fix'. (I understand you moved a folder, and that things started behaving strangely, for Kontakt, and that you did something with VST3 and Native Instruments, and now things are working again, however that does not make sense to me. (It doesn't have to make sense to me, as you seem to be happy with how things are once again working, I am just expressing my confusion with the details of the original issue, and the details of whatever fix you applied).
Bob Bone
-
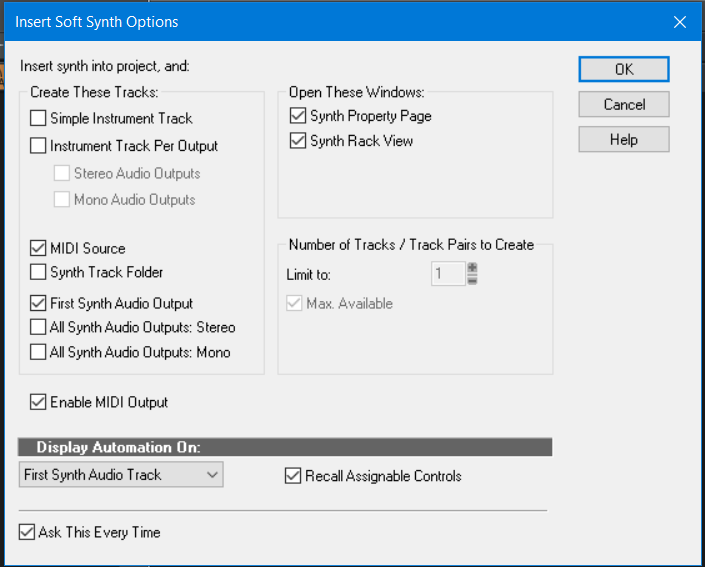
I just started a new project, then clicked on Insert > Soft Synth > Sampler > Kontakt, with the following Insert Soft Synth Options dialog box options, and it worked perfectly, inserting a stereo audio track, a MIDI track, assigned to Kontakt, an instance of Kontakt into the Synth Rack, and opened up the Kontakt user interface - and once I understand what your steps were with the Cakewalk folder, I will try to duplicate your steps and see what happens on my system:
-
I am not understanding what you meant, by "removed my Cakewalk folder into documents", or when you said you "removed it back".
Can you please explain the above? I will try to help you figure out what happened, once I understand exactly what you did, before Kontakt began behaving strangely.
Bob Bone
-
If you find that temporarily bypassing all effects makes a noticable difference with latency, that means that one or more of the effects loaded into the project, are introducing enough latency to produce noticable lag between playing a note and hearing it. (the FX button on the right of the Transport Module, acts like a toggle, to have all effects either engaged or bypassed).
There are some types of effects that are meant for mixing, rather than use in tracking/recording. Linear-Phase effects, which were noted in an earlier post above, and also convolution reverb effects are both notorious for this.
A couple of quick and dirty workarounds are to either: Bypass the effects until done with recording and moving on to mixing, or temporarily swap out the effect(s) that need larger buffer sizes to process properly (convolution reverb and linear-phase types), with less resource hungry equivalent effects (different reverb plugin or non linear phase effect), until done with tracking, and then swap the other effects back in, where you can mix with a giant ASIO Buffer Size without needing to worry about the lag in playback, because you are no longer trying to play notes when the lag is present.
I hope the above makes sense, and that it helps.
Bob Bone
-
1
-
-
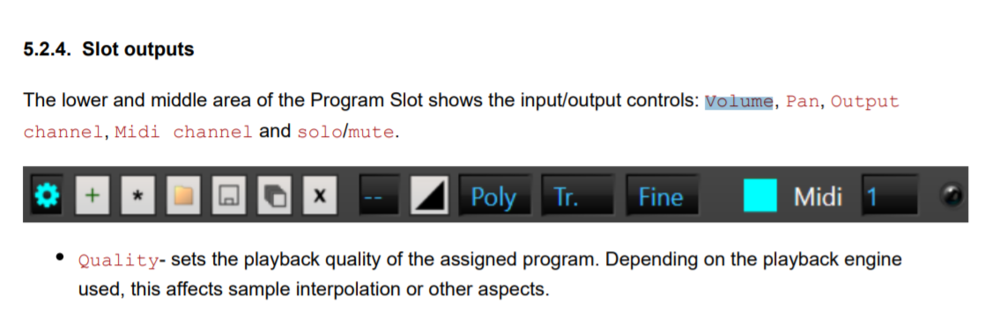
It looks like each program 'slot' has a volume control. I just searched the manual for 'Master' and came up empty.
I will keep looking for it, and will post back, should I find it. Also, I suppose you could turn down the Cakewalk MIDI track volume fader, instead of the audio track volume fader.
Here is a screen shot of a page from the manual, describing 'Volume' for a loaded program:


Perplexing Drum Map Manager Output Port Data Issue (RESOLVED)
in Cakewalk by BandLab
Posted
UPDATE - here is the details on the resolution:
I found the following, from a thread from a couple years ago, in two posts in the thread, from Scook. Altering the Output Ports to the correct Kontakt instance, from what CbB had changed to Microsoft Wavetable, and saving the drum map, worked like a charm.
I also recreated both the Project Template with the Track Template, from the corrected drum map, and now those both work just fine now, as well.
If I know a new project will have drums, chances are I will be using a project template that has everything already set up with all the audio tracks, Kontakt instance, or AD2, all the buses, and each audio track properly gain staged to -18 dBfs, so whether the drum sounds are coming from AD2 or Kontakt, that instance will always be the very first synth in the synth rack, so it should then never get its drum map Output Port data changed, because all additional synths will be loaded below that first AD2 or Kontakt instance.
SO, I think I am all good now, although it is 2:48 in the wee hours, so no guarantee that I am not dreaming all of this.
Here is the info from the old thread, with Scook's posted replies to similar drum map Output Port issues:
"The Out Port assignments of a drum map are set using the existing output routing for the MIDI track. If there is no routing, the DAW makes the assignment, if possible, to insure the data does somewhere. The same thing happens if a routing becomes invalid (ex. the synth in the Out Port assignments is deleted).
Fortunately, should the assignment need changing, it can be done with a few keystrokes
SHIFT+select the range of mappings to change
CTRL+SHIFT+click the drop down to reassign the selected ports
Or, after adding the new synth
delete the old drum map,
make sure the track is routed to the new synth then
add a new drum map.
It does not matter if adding a track template or adding the drum map to an existing project or project template. The Out Port assignments are all made following the same rule.
Out Ports in a drum map are dynamically assigned to the track based on the MIDI output it is replacing.
If there is no prior MIDI output assignment or the Out Port assignments become invalid, the DAW adjusts them so that the data has somewhere to go.
IOW, the design requires a valid Out Port assignment, if possible, in drum maps used by a project.
This is similar to the dynamic assignment of Omni when input echo is enabled on tracks that have no input assignment."
Bob Bone