


msmcleod
-
Posts
6,917 -
Joined
-
Last visited
-
Days Won
36
Everything posted by msmcleod
-
FYI, driver modes in order of preference (best first): ASIO, WASAPI (Exclusive), WASAPI (Shared), WDM, MME ASIO & WASAPI should give similar performance depending on your audio interface. In general external audio interfaces that have a dedicated ASIO driver will perform better with ASIO. On board sound devices (especially laptops) will perform better with WASAPI. Exclusive performs slightly better than shared, but in exclusive mode, only one program can use the device at a time. WDM might be your only choice for older devices if ASIO is not an option, or if you're not using Windows 10. MME performs the worst.
-

Unable to watching youtube tutorials with WDM
msmcleod replied to Eric Swardt's topic in Cakewalk by BandLab
The answer is, it depends. If it's switching from ASIO to WDM, I just copy in windows explorer. If I'm switching from my Focusrite to my Yamaha mLAN setup, this involves more stuff so I've got a batch file to do it (with a shortcut to it on the desktop). This also involves a reboot, so quitting Cakewalk is the least of my concerns. Cakewalk reads AUD.INI at startup, so yes, you do have to quit Cakewalk each time. To be honest though, for what you're doing you shouldn't need to quit Cakewalk. Changing to WDM should be fine within Cakewalk. Swapping driver modes constantly back and forth between WDM & ASIO can mess up AUD.INI though, so once you're finished with WDM, quit Cakewalk and copy your "clean" ASIO AUD.INI back. -
A few things to try: See if you can reproduce in a fresh project - try to use the same drum kit or program you used before. If you can't reproduce, then maybe your original project has somehow become corrupt, otherwise it points to an issue with SI Drums. If it's an SI Drums issue, try uninstalling the SI Instrument Suite, and re-installing from the BandLab assistant. If its a corrupt project issue, there's a number of ways you could proceed (each with pro's and con's), but probably the easiest is: CTRL + A to select all tracks, then right click on one of the tracks (not the one that is crashing!) and save it as a track template Make sure you've got "Allow only one project open at a time" unchecked within Preferences->Advanced, and create a new project so you've now got both your old project and the new project open. Insert the track template you created the new project. Select all the tracks in your old project, then go to Insert->Copy Special and all the options you want copied across. Then on the new project, click on the first track created when inserting the track template, and paste. If this doesn't work, the best advice I can give is to contact support@cakewalk.com.
-
I've noticed this too - I think this behaviour only happens in Comp mode. I guess the idea is to make sure that the clips in all lanes are lined up, so that you're dealing with equally sized clips when comping. This doesn't happen with say Sound on Sound with mute previous takes (not a suggestion... just a comparison ?)
-
Can you expand a bit on the steps you took up to the point it crashes? In other words, is it when you insert the SI-Drum Kit, or had you already insert it into a track ? Had you loaded any kit or program into SI Drum Kit before it crashed?
-
AFAIK BandLab still has a 6 minute limit for uploading songs, and obviously you can't master it until you've uploaded it: https://help.bandlab.com/hc/en-us/articles/115002945433-How-long-are-my-tracks-allowed-to-go-on-for-
-
I've given it a go. To my ears, it's kind of on par with LANDR or www.curioza.com 's AAMS (but without the tweakability) Whether it's good enough.... well I guess that's subjective! There is of course the 6 min limit however.
-
None of the other old Cakewalk products are available for purchase at the moment, however Meng has indicated that some of them will probably be re-released in the future: E.g. see comment #10 on this post on the old forum: http://forum.cakewalk.com/Cakewalk-by-BandLab-free-but-will-next-updateversion-cost-us-SONAR-userscustomers-m3744438.aspx I'm sure there was a more comprehensive post somewhere, but I can't find it...
-
New updates don't allow sinewave automation anymore
msmcleod replied to Mathew Valente's topic in Cakewalk by BandLab
If I follow the steps in your video, I get the same result. However, as long as you stay within the clip automation lane area, the sine wave drawing seems to be fine. It only gets "random" when you move the mouse cursor outwith the automation lane, however as soon as you move back into the lane (and release the left click / reapply left button again), it reverts back to being a sine wave. Maybe this behaviour is intentional, but I guess the fix for this would be to limit anything outwith the automation lane to either max value (for above) or min value (for below). -
Unable to watching youtube tutorials with WDM
msmcleod replied to Eric Swardt's topic in Cakewalk by BandLab
I do the same as John, but I've also got other sound devices I use and switch between. What I do is keep different copies of AUD.INI, which I copy to %APPDATA%\Cakewalk\Cakewalk Core\ whenever I switch sound devices (and before I startup Cakewalk). So in essence, each AUD.INI is a different audio setup "profile". Using this method seems to stop Cakewalk getting confused when I change my setup. You can reset everything by deleting AUD.INI from %APPDATA%\Cakewalk\Cakewalk Core\ , and let Cakewalk re-create it. You'll need to set your buffer size, sample rates etc again, but it'll be a clean copy. Then make a backup copy of it. Whenever anything goes weird, you can just copy your backup AUD.INI back to %APPDATA%\Cakewalk\Cakewalk Core\ -
WIth some clever midi editing you *might* be able to get around this by inserting a pitchbend = 0 and new note-on, on exactly the same beat/tick, then continue pitch bending using the new note. Just rinse & repeat until you get where you need to bend to. It all depends on whether a triggering new note on significantly changes the effect or not.
-
I'm at work at the moment, so it'll need to wait until I get back home - probably in around 10 hours. I'll PM you when I get back home.
-
This sounds like a plugin that isn't authorised. IK Multimedia plugins typically do this.
-
What I tend to do with frozen tracks is: Freeze the track Copy (CTRL + SHIFT + drag) the frozen audio to another audio track Unfreeze the original track, and archive it (press the "A" button) This gives you maximum flexibility as: You can do what you like with your frozen copy without affecting anything else You can unarchive the original, change things and re-freeze all without affecting your frozen copy While archived, the original takes up no CPU and very little RAM (i.e. effects aren't loaded, if the VST had samples on it, they aren't loaded etc)
-
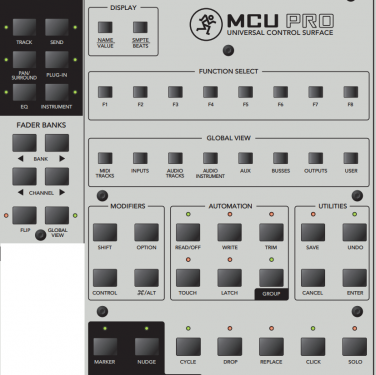
The Mackie Control Universal, and the Mackie MCU Pro both come with a set of overlays for different DAW's which re-label the buttons to better map to the functions available on each DAW. One of these is an overlay for SONAR/Cakewalk, which is what the MackieControl DLL expects the buttons to be mapped to. Any MCU compatible control surface that has a SONAR mode will map their buttons to this configuration. With no overlay, the buttons are as follows: The SONAR/Cakewalk overlay looks like this: So as you can see, the CLICK button on the standard button configuration is the same as LOOP ON/OFF on the SONAR overlay. This is why the "Metro" button on the KeyLab controls looping. Automation read looks like it's mapped the same, but there's no equivalent for automation write. "In" and "Out" also have no Cakewalk equivalents. There's no way of configuring the button mapping at present. To do so would require a fair amount of work, and would make setting a control surface up even more complicated than it already is. Although its possible to have presets for various control surfaces, given I don't have all of them, it's not something I'd want to commit to code without actually testing it. In the meantime, you could try setting the KeyLab to ProTools mode and changing the protocol to HUI within the MMcL MackieControl dialog. I can't guarantee that all the buttons will work (as mentioned earlier - not all of them have Cakewalk equivalents in the MackieControl DLL), but they may more closely match the buttons on the KeyLab.

-
Have you select the "Basic" lens by accident? Basic Lens: "None" Lens: You can change lens in the top right hand corner:
-
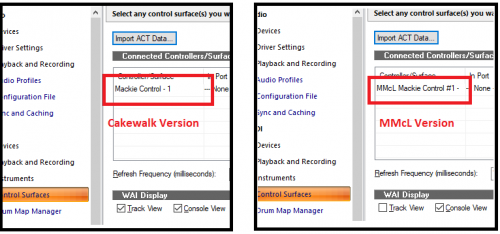
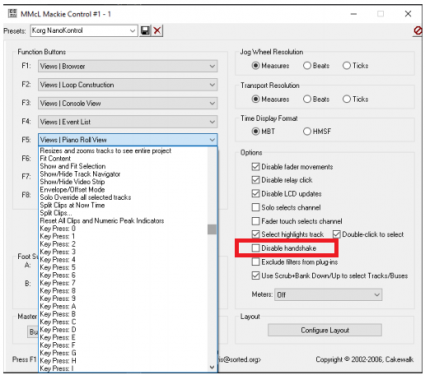
@Lee D - to set things up: First of all, make sure you've got your Control Surface type set correctly within Preferences, using the MMcL version: Here's the difference between them: Next, use the Utilities menu to bring up the Mackie Control dialog (it should be at the bottom of that menu), and make sure Disable Handshake is checked: (ignore the fact it's unchecked in this example - I'm at work, and haven't got CbB available so I'm using the only screenshots I have available!): Then, save this as a preset by giving it a name in the dropdown in the top left, and clicking the save icon. Then click OK to close the dialog.
-
Yeah, I think that would do the trick.
-
Yes, as long as the lanes aren't muted they'll all play together. When you're comping however, it automatically mutes the other lanes for the selected section. This is very quick & powerful if you're doing comping, but a real pain if you're not, as you then have to manually un-mute the lanes. That's why the option to remove comping (and other options) from the smart tool is so cool.
-
As far as I can remember there was no heartbeat for the MCU, but there's definitely one for HUI. The handshake was a specific bit of SysEx on startup that was in the original MCU protocol. Mackie got rid of this in subsequent revisions, but the Cakewalk code was never updated at that point. The MCU clones that support SONAR/CbB have a specific mode to react to the SysEx message that SONAR/CbB sends to it on startup, but all the ones I've seen work fine if they never receive that message. Disabling handshake just removes that whole sysex procedure altogether. @Lee D - where are you seeing the "Connecting" message? Is this in CbB or on the KeyLab itself?
-
You can download the installer from here: http://msmcleod.co.uk/cakewalk/MMcLMackieControlSetup.zip Then pick "MMcL Mackie Control #1" as your controller type:
-
That's fine. Plenty of headroom there.
-
Maybe your AUD.INI is still filled up with all the settings from the Generic ASIO driver. Try deleting AUD.INI ( from %APPDATA%\Cakewalk\Cakewalk Core\) and startup Cakewalk again, which will re-create it. You'll need to set your sample rate etc again, but it'll refresh all its settings for your RME driver. If this still doesn't work, you could try re-installing your RME driver, then deleting AUD.INI again.
-
This is actually a really good idea. I've always shied away from this, as I thought it might introduce noise into the ground... but I guess the frequencies are too high to make a difference? Do you find it affects your audio setup at all when it's in use?
-
Personally I find keeping the master level fairly low during mixing works well for me. With 24 bit, even having a mix at -6 or -12 db still gives you loads of dynamic range. If it's too quiet I just turn my monitor speakers up. The only time I worry about loudness is at the mastering stage, which I'll do on stereo audio file itself rather than within my project. The only exception to this is if I want a quick & dirty master, in which case I'll probably just stick Waves L2 on the master bus for that purpose. Sticking to mastering the stereo audio removes the temptation to go back to tweaking (and probably ruining) the mix.

