SirWillyDS12
Members-
Posts
155 -
Joined
Reputation
78 ExcellentRecent Profile Visitors
The recent visitors block is disabled and is not being shown to other users.
-
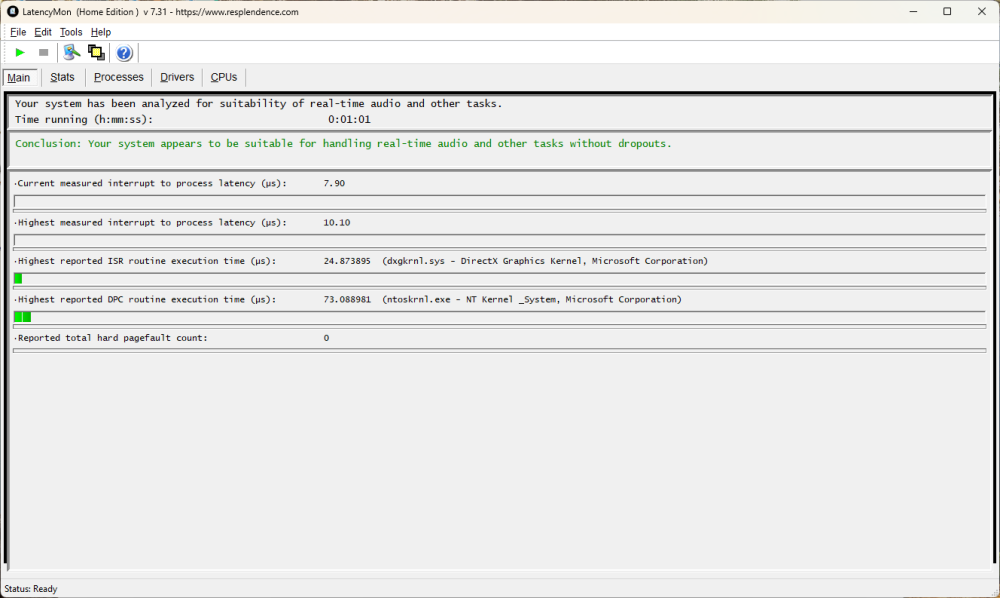
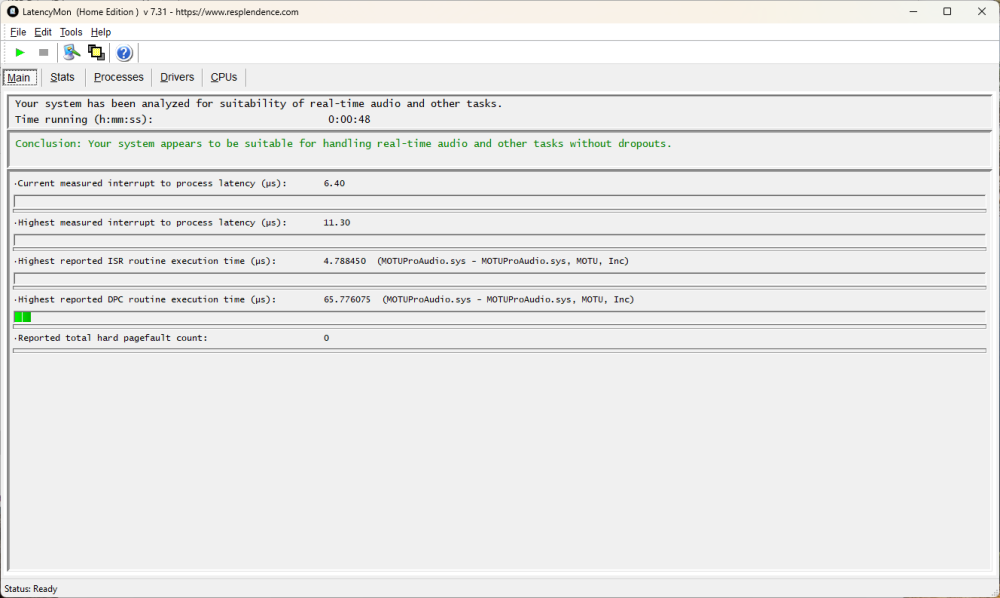
@Mauro Gaspa So this evening I did some experimenting on my system as it seems you and I are the only ones in the community that are experiencing this problem... I used just my Motif XF6 as the audio interface with Cakewalk... Not how I usually run my system, I use my MOTU 828es as primary audio interface and only MIDI my XF6 thru the firewire with audio output into the MOTU 828es... With all the default Windows Power Schemes Cakewalk GUI locked up at some point... The Power Saver profile was actually the best overall with LatencyMon... I switched to my custom plan 7700X Ultimate Performance.pow and used it for some more experimenting... I was trying to get Cakewalk to lockup and it did about there minutes into the song the second time thru... The song is just four midi tracks to the XF6 and then audio back into Cakewalk then out to monitor (No plugins of any kind...)... When it did lockup the highest interrupt spike I had on LatencyMon was 70us... LatencyMon looked like the LatencyMon 5950X High Performance image I posted above... So when I did get it to lockup I had MMCSS enable in both Cakewalk "Enable MMCSS for ASIO Driver" and on the Yamaha Firewire Driver... With MMCSS turned off in Cakewalk and only on on the Yamaha FW Driver I could not get the GUI to lockup with my custom plan... My MOTU 828es does not use MMCSS so I have it set to on in Cakewalk... Cakewalk Help... So, perhaps you have this "conflict" going on as well... I know that you have MMCSS on in Cakewalk, it is in the DMP text you uploaded to OneDrive... Your RME Madiface XT also supports MMCSS, page 18 in the manual... You may want to check your setting on your audio interface to see... I didn't check the other audio interface that you have...
-
You're welcome @Mauro Gaspa I was really hoping that that would work out for you... So you can just leave the affinity like that if it is not causing you any problems, it will help... If it is causing problems just go back and select Delete Mask... But before you do that I have a few other things for you... So this evening I "reverted" my custom power plan (Change Power Plan in Windows 11) on my PC to the default Windows 11 Balanced plan and fired up Cakewalk with my Yamaha Motif XF6... I loaded a song and hit play, at 2:10 it locked up the GUI but the audio continued to play just as it does for you... KERNEL32 the defaulting module, same as in your dump file... I did not change the Affinity for my NVIDIA card back, it was still set to CPU20 and CPU21... I had an interrupt to process of 1200us during the "LockUp"... So next I think you need to load a real Windows high performance power plan... I uploaded my two custom high performance power plans to your OneDrive and renamed them for your processor... 7700X High Performance.pow and 7700X Ultimate Performance.pow... With both of these power plans I can play the exact same song I played tonight on Cakewalk with absolutely no problems or GUI lockup... I spent months tweaking these plans until I was able to get my system latency to below 100us over time... Once in a while I'll get a spike from the NVIDIA Kernel but usually less that 300us with Cakewalk running and playing a song... Your system will probably behave slightly different... One thing is your CPU is faster than mine but I have double the cores... These plans disable CPU core parking completely and also incorporate Interrupt Steering to distribute IRS and DCP's across all your CPU cores... They also disable any sleeps states for USB devices... They decrease CPU performance load states to help "balance" CPU loads across cores... The 7700X Ultimate Performance plan will disable rotating desktop backgrounds and is a little more aggressive for Performance States and Interrupt Steering... So you need to download Windows power plan settings explorer utility and run it... It will give you complete control over your Windows Power Plans... This website Export and Import Power Plan in Windows 11 will tell you how to import the power plans that I uploaded to your OneDrive... The same site will tell you how to Create Custom Power Plan in Windows 11 ... After you Import the plans that I created they will show up in Windows power plan settings explorer utility and you will be able to see what changes I made, I started with the Windows High Performance Plan... They will also show up in the Control Panel so you can switch them from there with just a few clicks... So run LatencyMon with the default Windows power plans and the ones that I uploaded for you... You should see the difference in LatencyMon... So if this doesn't work for you, (I think it will...) you may need to revert back to the December release of Sonar... I noticed from re-reading your post that you said you didn't have the problem with that release... The Cakewalk Team should be able to get you the complete installer...
-
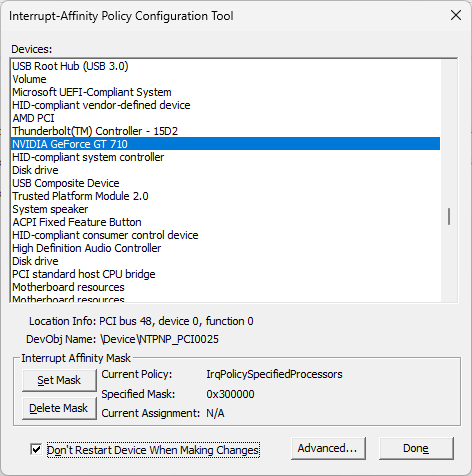
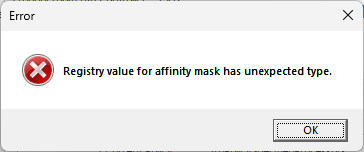
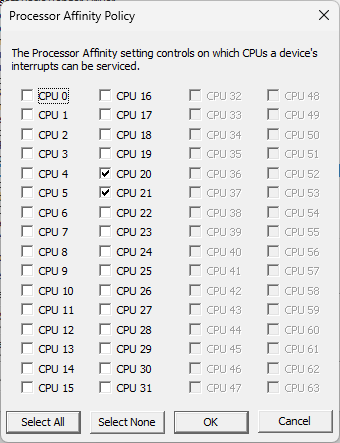
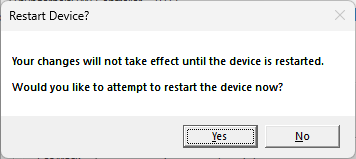
So @Mauro Gaspa I really do believe that what is locking up the Sonar GUI on you is hardware system interrupts from your graphics card that are not executed in time for Sonar... In your video at 10:22 when Sonar locked up LatencyMon also stopped responding for a brief period of time, there was also an interrupt at that very instance that was a bit longer... So if you go to 11:05 on your video, this is when you brought up the CPUs page of LatencyMon... On that page you will notice that Windows schedules almost all ISR and DPC interrupts, probably over 90%, on the very first core of your CPU, CPU0 and CPU1... This is probably the bottle neck that is locking up Sonar, it only takes one late interrupt... You will also notice that CPU2 thru CPU11 are not processing any hardware interrupts... This is a result of the Windows Thread Scheduler and the default Power Management Schemes on Windows 11... I had the exact same problem on my Windows 11 system... Windows 10 was a little better than Windows 11 at distributing interrupts over different cores with the default power schemes... So what you can try next is to get your graphics card off of CPU0 and CPU1 and move it to one of the "Cores" that Windows is not using for interrupts... This will alleviate some of the bottle neck on CPU0 and CPU1 or core 1 and help to reduce overall system latency for all around better performance... You seems like you're pretty tech savvy so I think you can handle this... What you want to do is set the CPU Affinity for your Nvidia graphics card to one of the cores Windows is not using which will be two Logical CPUs... I would use CPU8 and CPU9 as they appear to have the lowest execution time from your video... You will need to download the Microsoft Interrupt Affinity Tool... There is no "install" you just run it... If you do, make sure you use the correct tool, I think there are three in that download... You want intPolicy_x64.exe When you run the tool it will bring up a list of all the hardware on your system which could be quite long... You want to find NVIDIA GeForce RXT 4060... Your graphics card... When you click on it it may bring up an "error" dialog box, Registry value for the affinity mask has unexpected type... Just click OK... After you click on your graphics card click on Set Mask... It will bring up the Processor Affinity Policy... I have mine set to CPU 20 and CPU21, they were the least used by the Windows Thread Scheduler on my system... I've had the Affinity for my NVIDIA GeForce set for months now with no problems at all... Like I said in my first post I had to do this to fix the same problem you're having... I also did some other stuff to lower system latency as well but I think you need to try this first... Use both Logical CPUs on the same Core... As I said above, CPU8 and CPU9 on your system have the lowest execution time right now... After you set the CPUs click OK... When you do it will ask if you want to Restart Device?... Click OK... As this is your video card your screen will go black for a few seconds until it restarts... If you get the Error box you'll probably get it a few more times during the process... I think I get it three times in total... If you do this Windows will move all interrupts for your graphics card to those CPUs, this includes the DirectX Graphics Kernel... This will free up interrupt cycle time on CPU0 and CPU1 for all your other "Stuff"... More than likely the CPUs you move it too will only be processing interrupts for your graphics card and nothing else as they were not processing any before... This may fix your problem but if not there are some other "Tweaks" that I can lead you thru to help your overall system performance and reduce latency...
-
Is there a simple way to delete all (vst) FX in bulk?
SirWillyDS12 replied to Misha's topic in Cakewalk by BandLab
Select multiple tracks holding down "Ctrl"... Continue to hold down "Ctrl" and right click in the FX Rack and select "Delete All"... Repeat for Busses... -
Is it a bug or am i missing something
SirWillyDS12 replied to user6998183183211456's question in Q&A
You're very welcome and glad that worked out for you... On a side note... There are a couple of ways to check the channel info of the MIDI note events in your MIDI tracks... Can be very helpful if you are pasting MIDI note events from another MIDI file... One, double left click on the note event in PRV... This will bring up the "Note Property" box where it will show you the MIDI channel of the note... Two, open up the "Event List" for the track... This will show you the MIDI channel for all events in the track including CC events... If your MIDI track is set to "None" Cakewalk will use the channel info in the events which was your problem with the Triton VSTi... With a track set to None you can control more than one MIDI channel of a multi channel VSTi or hardware synth from the same MIDI track... If you select a MIDI channel for the MIDI track Cakewalk will over ride the channel info in the MIDI events and use the channel you select... -
Not sure if Audio - Sync and Caching, File System would help your problem or not... The page says "Cakewalk will usually perform best with all caching disabled, which is the default setting." but it might be worth a try... It also says this "if you are playing a large file, and using maximum latency, a too-small I/O buffer size may cause dropouts or crashes. Try increasing the buffer size by blocks of 128."
-
Cakewalk crashes when I press spacebar after recording
SirWillyDS12 replied to ISNANODA's topic in Cakewalk by BandLab
Are you recording Audio or MIDI? Or both? Cakewalk would be recording right up until the time you press the space bar to stop... So how do you "stop the recording without finishing the recording"? -
advice: how to align to measures and change temp per measure
SirWillyDS12 replied to jm52's topic in Cakewalk by BandLab
On top of what David said Cakewalk does have the ability to change the tempo by one of four different curves from one tempo to the other... Jump, Linear, Slow Curve or Fast Curve... All four will give a different result... Jump will change the tempo immediately when it gets to the new tempo in the map... Linear will change it in a linear fashion from one tempo to the next on the tempo time line... And the "Curves" will do just what they are from one tempo mark to the next... -
Cakewalk crashes when I press spacebar after recording
SirWillyDS12 replied to ISNANODA's topic in Cakewalk by BandLab
If you haven't figured this out in three years on your own system how do you expect anyone else to when the only info you give is that you stop recording by pressing the space bar? And if you don't really care why should anyone else? If you can't stand it any more perhaps you should take the time to try and diagnose the problem and provide more details about your system and setup with Cakewalk if you wish to receive any help from others... -
Is it a bug or am i missing something
SirWillyDS12 replied to user6998183183211456's question in Q&A
Pretty sure you need to select a MIDI channel for the Triton vst... The midi clips that you are "pasting" have midi channel information in them and most likely you do not have an instrument on that channel in the Triton vst and that channel is different than the channel info of the note events you inserted with the tool... The Roland JV 1080 vst will respond to any midi channel info so it will play the notes you inserted and the notes that you pasted even though they are on different midi channels... Open up the "Inspector" on the left hand side of the screen... Select MIDI in the track strip at the bottom of the screen, Audio is selected by default... Go up to the MIDI section just below the FX rack, the channel will be assigned to None by default (top button)... Set it to MIDI channel one as this is the channel that you put the instrument on in the Triton vst... All of your notes should play now as the MIDI track for your instrument track is now transmitting on MIDI channel 1 and the Titon vst has an instrument on channel 1... With None selected in the MIDI section of the track Cakewalk will respond to what ever midi channel info is embedded in the midi events, which could be multiple different midi channels... -
Hello @Mauro Gaspa So none of these value are extremely out of hand but one thing to note is that the highest DPC routine recorded is from the DirectX Graphics Kernel which works hand in hand with your graphics card... So this was with your project playing, correct? The thing that stands out to me from this LatencyMon graph is the fairly high number of hard page faults... Something on your system seems to be looking for chunks of memory to load from disk into upper memory quite often... This can surely be a cause of program crashes if the page fault is not cleared in sufficient time... In both of your videos, Cakewalk locked up when the play cursor was on the right hand side of the monitor just before it would switch to the next screen... Not quite right at the point but never the less on that side of the screen... Perhaps around that point is a hard page fault that is not dealt with timely between Sonar and your graphics card? So if you could run LatencyMon with Sonar until it locks up and then post screen shots of the other pages in LatencyMon, "Stats, Processes, Drivers, and CPUs as well as Main" we can see more of what is going on behind the scenes on your system that Sonar doesn't like... Some other things to try as well... Does Sonar crash if you are on the Console View or does it play all they way thru? If you zoom your tracks all the way out in Track View so the track screen never refreshes during playback does Sonar crash? A few things to check in the NviDia Control Panel for your graphics card... Under 3D Settings -> Manage 3D setting -> Low Latency Mode... You may want to set this to Ultra if not already on Ultra... Assuming your setting are the same as mine since your graphics card is a different model... And under 3D Settings -> Manage 3D setting -> Power management mode... Set to Prefer maximum performance...
-
@Mauro Gaspa So I have had this exact same type of "Crash" with Cakewalk by Bandlab... GUI locks up/ freeze up but the song will continue to play till the end... Only way to get out of it is to kill Cakewalk with task manager... I watched both of the last two videos that you up loaded and it looks like the exact same problem I have had on Windows 11 with my Nvidia video card... I have a NviDia GeForce GT 710 graphics card... The NviDia system drivers are well known for having problems with very high DPC latency... Most likely your Nvidia card uses the same kernel driver file nviddmkm.sys and this is very likely the cause of your problem with Cakewalk locking up... I have seen DPC latencies as high as 1500 ms on my Windows 11 system using the default power management profiles from the NviDia driver... On my system I use Firewire for my Yamaha Motif XF6 and I have to use the legacy 1394 system driver for the Firewire card that I have... The legacy drive is very hardware interrupt intensive and if I'm using in on a song project it has the highest number of interrupts of any system driver during playback of a song... With any of the Windows 11 default power schemes the Windows thread schedulers assigns both my Firewire driver and NviDia graphics card driver to the same CPU core... Because it does, as soon as the NviDia driver has a very long DPC system interrupt it locks up the Cakewalk GUI but the song will continue to play till the end... For me this only happens when I'm using my Motif XF6 via Firewire so I had to "tune" my system accordingly... To find out if you may be having some hardware drive conflict problems download and install LatencyMon and run it for a while and see if your are getting unusually high DPC Latency from your Nvidia RTX4060 graphics card... Let LatencyMon run while your are running Cakewalk... Anything above about 800us is probably too high if your graphics card and your audio interface are sharing the same CPU core for interrupts... If you are getting DPC spikes up in the 10's of milliseconds from you NviDia card this is most likely what is locking up the Cakewalk GUI... By doing a lot of System tweaks I was able to get my NviDia DCP latency to below 400us and I no longer have the issues with my Firewire card and the two drivers locking up Cakewalk...
-
Not that I know of but being able to block a VST is a great idea... I have a few that constantly "Dirty" a project... I shut off "number of edits" for Auto Save and only use after so many minutes because of the nasty VST's that cause the problem...
-
Seems that they are about 25 years late to the show... They should have done that with Windows XP... Better late than never... But they would have had to pay licensing fees to Steinberg for use of their technology, perhaps they have made a deal with Yamaha for that... To me it seems that MS is just finally admitting that their Audio drivers really suck and always have for Real Time Audio... A point of interest to me in the post was this statement by Pete Brown... That is an understatement... The default Power Management Schemes in Windows 11 are all worthless... I even un-hid the "Ultimate Performance" plan and tried it on my system and can't work on a decent size mix without audio drop outs... The default "Ultimate Performance" plan Parks 15 out of the 16 cores of my CPU and only leaves both logical processors on CPU0 un-parked... The exact same is true of the "High Performance" plan... Both plans steer all hardware interrupts to CPU0 and overload it and the latency is un-godly, sometimes as much as 30 milliseconds... If I wanted a Single Core processor I would have bought one... The "Power Saver" plan actually performs the best on my PC for real time audio of all the default MS power schemes... The "Power Saver" plan, by default has all cores un-parked and I can work on the same mix with that plan that will not run without issue on either "Performance" plan... When I "Down Graded" my system to Windows 11 from Windows 10 I did a complete new install with a new hard drive and kept the Windows 10 installation completely in-tacked on its own hard drive... So the PC is now dual boot with both operating systems... The "Exact" same every thing, only difference being the operating system... I even copied over the power management scheme from Windows 10 to 11 using the Windows Power Plan Settings Explorer Utility and "could not" play the exact same mix using my Yamaha Motif XF6 by Firewire that plays completely without issue on Windows 10... I read in a post somewhere that MS change the "Thread Scheduler" in Windows 11 to accommodate the new Intel Processors and their efficiency cores, perhaps @Jim Roseberry could shine some light on that... So what I had to do with Window 11 that I didn't have to do on Windows 10 was assign my NVIDIA graphics card to it own processor core to get it out of CPU0 or CPU1... Anyone with a NVIDIA GPU running audio knows of their problem, even the gamers... I tried using MSI with the GPU but with Cakewalk running I would get the BSOD "DPC Watchdog"... I also set Interrupt Steering in the power plan to "Any unparked CPU with time delay" and a target load of 2%... I also set minimum unparked cores to %100 so Windows does not Park any cores... By doing that Windows more evenly distributes the hardware interrupts to all CPU's... So after doing all that and more tweaking I can run my Motif Firewire with no issues on Windows 11... The highest latency spikes I get are from the NVIDIA driver, sometimes around 350us but they are all on their own processor that is not used much by Windows or Cakewalk so they cause no problems...


