


msmcleod
-
Posts
7,209 -
Joined
-
Last visited
-
Days Won
39


About msmcleod
-

New track and folder naming (special one about synth tracks)
msmcleod replied to Starship Krupa's topic in Feedback Loop
I normally hit F2 to rename. -
What happened to the Split Instrument/ Instrument track Icons?
msmcleod replied to Bass Guitar's topic in Cakewalk Sonar
The only difference between a Simple Instrument Track and a Split Instrument Track is that the Simple Instrument track is shown as one track in the UI. A Simple Instrument Track is in fact still two tracks, it's just that in the Track View, the header part shows the audio track, and the clips view shows the midi track. The reason they're called "Simple" instrument tracks, is that they're generally created with a stereo only output, and the MIDI track part is sent to the synth on all MIDI channels. That, and the fact they only use up one track space in the UI. Up until the introduction of Per-Output Instrument Tracks, using split instrument tracks was the only way to properly leverage multi-timbral synths. Now you can use either for multi-timbral synths - it's really down to preference, and whatever you're used to in your workflow. As a rule, we try our best not to introduce anything that would require users to change their existing workflow - and obviously there's the backwards compatibility thing with older projects, so both options still exist. FYI: Per-output instrument tracks are really just Simple Instrument Tracks where: 1. The synth is set to have more then one stereo output 2. The audio track is set to receive audio from the synth on a specific audio output 3. The MIDI track is set to output on a specific MIDI channel. ... and those audio output channels / MIDI output channels are incremented each time you "append" a new per-output track for that synth. -
There have been no changes to the way the tempo track works in a long while. The tempo track is basically an automation envelope, which is then quantised into a tempo map each time it's modified. Like any other automation envelope, you can get yourself into a state where multiple nodes exist at the same point in time. So it's likely the delete is actually working, but you're now seeing another tempo node underneath. FYI - here's an explanation of how the Tempo Track works: This won't make any difference - the software is exactly the same. The only feature that differs between Free Tier and Membership is the Track Manager, where the Free Tier shows the old Show/Hide Tracks Dialog, but the underlying code is exactly the same for both - just a different UI. For everything else, there is zero difference between Free & Membership tiers - Free Tier just has some features disabled.
-
This was true in the early days, as: 1. The actual sound production of MIDI was performed by an external hardware MIDI module 2. CPU's / HDD's were relatively slow, so it was an effort for the system to stream multiple tracks of data from disk without interruption (in saying that, I could record / playback 16 tracks with my 2 x Yamaha DS2416's on a P166 with an EIDE drive... no plugins though, as everything was on the card). 3. MIDI modules were limited by polyphony / MIDI channels, and the speed of the MIDI protocol (31.25k baud), so the number of MIDI events in most projects was also smaller. Nowadays however, it's different: 1. The audio for MIDI is now rendered using soft synths, which can be a lot more CPU intensive than most effects if they're actually synthesising from scratch. Those that use sample libraries have to stream multiple files from disk, rather than the single audio file an audio track renders from. Of course there are exceptions: synths that use small in-memory samples, such as TTS-1, which are much lighter on CPU. 2. Soft-synths aside, while the sequencing of MIDI events from playback point of view is much easier on the system than audio, the UI painting is much more intensive due to the much larger number of individual events. Audio event UI rendering has necessarily been heavily optimised - most of the time Sonar uses a picture cache, so that it doesn't need to iterate through each individual sample until you zoom in close to sample level.
-
Yes, this is the case. MIDI clips are way more expensive CPU wise than audio clips. An audio clip has one event : the audio, which is really just a file on disk. A MIDI clip in contrast has potentially thousands of events, held in memory. Displaying the MIDI clips, is a bit like tiling a floor... if you have a few big 3' square tiles, you can tile the floor pretty quickly. If you have 1000's of 1" square tiles, it's gonna take forever. Now take the scenario (for clips with hidden data) where you've actually got 1000's of 3' square transparent tiles with only a 1" square being visible... imagine how long that will take. And if you nudge the placement, it all has to be re-arranged again. That is, in effect what Sonar is doing when it's painting MIDI clips, both on the Clips View and the PRV. Having clips without hidden data will improve performance, but having fewer clips will make a HUGE difference to improving performance.
-
As an alternative to Bounce to Clip(s), you can also use Apply Trimming. For a single clip, there's really no difference between the two. For a selection of multiple clips, there is a difference: Bounce to Clip(s): Removes all of the hidden data, and merges all of the clips into one big clip. Apply Trimming: Removes all of the hidden data, but keeps them as separate clips. This also applies to audio clips as well.
-
AFAIK the Mackie control surface DLL is the only one where multiple instances "work as a team". @azslow3 is correct - either install the MMcL surfaces, and use one of those instances for your other Mackie instance, or use something else like AZ Controller.
-
What are the 4 white dots in a MIDI track view?
msmcleod replied to RobertWS's topic in Cakewalk Sonar
That's telling you that if you double click on that clip, it'll open the PRV. You can change the default in TV Options->Click Behavior->Double Click->Midi Clips The Optons are: Nothing Clip Properties Event List View Staff View Piano Roll View Inline Piano Roll View Long holding the left button down will show a pop-up menu to change it for individual clips. Set it to Nothing if you don't want those to appear. -
Dithering keeps reverting back from Pow-r to Triangular
msmcleod replied to JazzP's topic in Cakewalk Sonar
Confirmed this is an issue. The issue is that the dither settings are being read in before the membership status has been retrieved. We're looking into it. [EDIT] - Fixed for next update.... which will hopefully be imminent. -
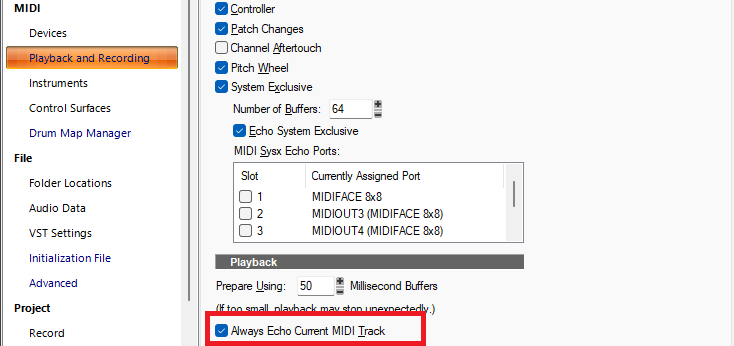
You'll always get this behaviour if "Always Echo Current MIDI Track" is checked:
-
2025.11 Early Access Feedback [CLOSED]
msmcleod replied to Jesse Jost's topic in Early Access Program
"Go to time" is translated as "Zu Zeitposition" in Sonar, so "Gehe" wouldn't find a match for that. However, the current trigram tokenizer ignores words less than 3 characters, which is why "Zu" didn't find anything. This has been fixed for the next update by adding an additional tokenizer. Searching for "zu", will show the following in the next update: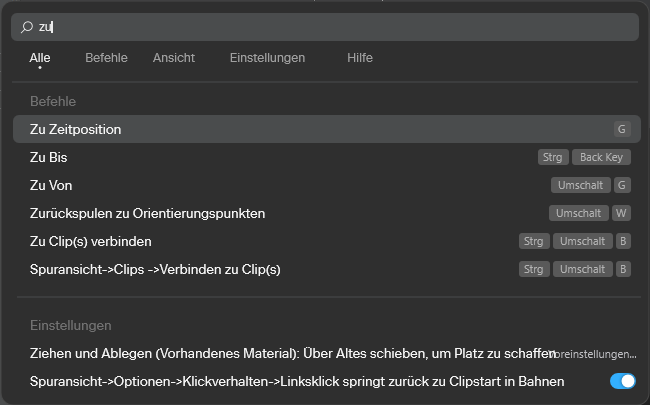
-
2025.11 Early Access Feedback [CLOSED]
msmcleod replied to Jesse Jost's topic in Early Access Program
Thanks - we'll look into this. It definitely should support searching / results in Chinese. Fixed for next update. -
2025.11 Early Access Feedback [CLOSED]
msmcleod replied to Jesse Jost's topic in Early Access Program
Thanks - we'll look into this. It definitely should support searching / results in Chinese. -
Use the right mouse button to lasso the nodes - it won't select a region.
-
Open the Track Manager and check you've not got any hidden tracks. It might be that you've saved a template with hidden tracks, and one a track with that trackId is created, its hidden status kicks in.


