Search the Community
Showing results for tags 'tutorial'.
-
My Ultimate Cakewalk Course (featured on the Pro Mix Academy) is now free on the YouTube channel as well as Mixing A Song In Cakewalk!
-
Updating this list often and many more to come! I am now officially a “BandLab partner” as well. I give my thanks and respect to Meng and his crew for the reaching out and recognizing my efforts over the years. Thank you all as well! Looking forward to helping as many people as I can!
-
Finally, finished my Cakewalk Tutorial Series geared towards beginners. The series is made in a way that even those who are new to music production as a whole (not just Cakewalk) will be able to understand the concepts. We are in fact producing a piece of music through the series. However, the production should be seen as a tool to help the viewer understand Cakewalk effortlessly. Here are the videos - Video Episodes 1 through 5 deals with the most basic stuff that needs to be understood or set up, before we actually start a project. Without these, Cakewalk is quite blank to even start a project. After we have set all the necessary things up, we can start working in Cakewalk. From Video Episodes 6 through 14, we see the core concepts of Cakewalk and see how they actually fit in the actual production process. 1. How to Install Cakewalk by Bandlab Obviously the first thing to do. The installation process should be done with a bit of care, as we need the files in the appropriate locations. Otherwise we might end up having to fix those later in the future, & can lead to unnecessary confusion.In this video, we go through the installation process step-by-step. In the end, we also go through some initial setting up post-installation. If you installed with a random directory, thinking you could change them in the future, a normal re-installation process will not some of them. You will have to follow the steps listed in this page. 2. How to install VST Plugins If a DAW is a factory, then the plugins are the machinery. Cakewalk does have enough plugins to mix, but seriously lacks in the category of Instrument plugins (plugins that create sound).In this video, we see how we can add plugins (instruments or FX) into Cakewalk. 3. Working with Samples in Cakewalk Samples are pieces of short Audio. This video could have been done later in the series. However, I wouldn't have been able to place it right in the story telling. Besides we do need to understand what samples are before we get into the next video. 4. Working with Sampler Plugins Samplers are plugins into which we can load samples. Some samplers can be used for quite simple purposes like triggering a one-shot sample (short audio sample), while some others can be used in sophisticated ways like a synthesizer. In this video, we look mostly look into the former type. 5. Working with Sample Libraries Several small audio samples combine to form libraries. These libraries can be loaded into plugins that can be categorized as Sample Players (advanced sampler). Sample libraries are the way to go if you want to emulate realistic instruments. 6. Cakewalk Piano Roll View The Piano Roll View is where we can write music inside Cakewalk. We write the melody and the corresponding instrument will generate the corresponding pitch. 7. How to make Drum Beats in Cakewalk We can do this by using samples directly in the Clips Pane (Main Timeline) or, by using a sampler plugin. However, there are some more stuff that should be understood to program drums efficiently. We see those in this video. 8. Cakewalk Step Sequencer Watch the video if you want FL Studio like Step Sequencer. Also, the video is kind of like an extension of the previous video. 9. Cakewalk Console View The Console view is like the imitation of the mixing consoles we see in Studios (or movies ?). This is where we mix our project. Mixing is the process by which multiple sounds are combined into one or more channels. The video goes in detail on each module. If you see it from beginning to end, you will be able to translate mixing tutorials on any DAW, into CbB console view. 10. How to Record MIDI In video 6, we saw how we can enter MIDI notes by using the mouse. But, if you do know how to play a keyboard, then you can connect a MIDI keyboard and record your performance. This video involves setting up the MIDI device and all the recording process. 11. How to Record Audio Just like MIDI, we can record audio (vocal, instruments, etc). In this video, we record stuff without using any interface to connect the recording devices. 12. Automation in Cakewalk Automation means to record the movement of a control such that the next time we play, that control plays automatically. Automation is one of the keys to making our project sound good. Not just mixing, they can also give some very interesting musical results. In this video, we go through everything we can do in Cakewalk with respect to automation. 13. Bounce Audio inside Cakewalk We might need to bounce MIDI or audio into the processed output inside the DAW itself. It could be to reduce the load on the CPU, or to implement some creative ideas (like reversing the audio). In this video we go through the two methods to do this. 14. How to Export from Cakewalk Not only in the end of the production, we might have to export the project out of Cakewalk for different reasons (like for collaborating and all). In this video, we go through almost all of them along with the final export to get a streaming ready file. And that is the end of the absolute basic stuff needed to be understood to make music in Cakewalk. I'll still be uploading videos to the same Playlist, but they will not be numbered episodes as they don't need to be seen in order. Regards - AdK (Until I finalise my artist name) ______________________________________ PS - Making Tutorials is not the only thing I do in my channel. My primary goal is to inspire new comers to produce music with Cakewalk & other freeware. Cheers..!
-
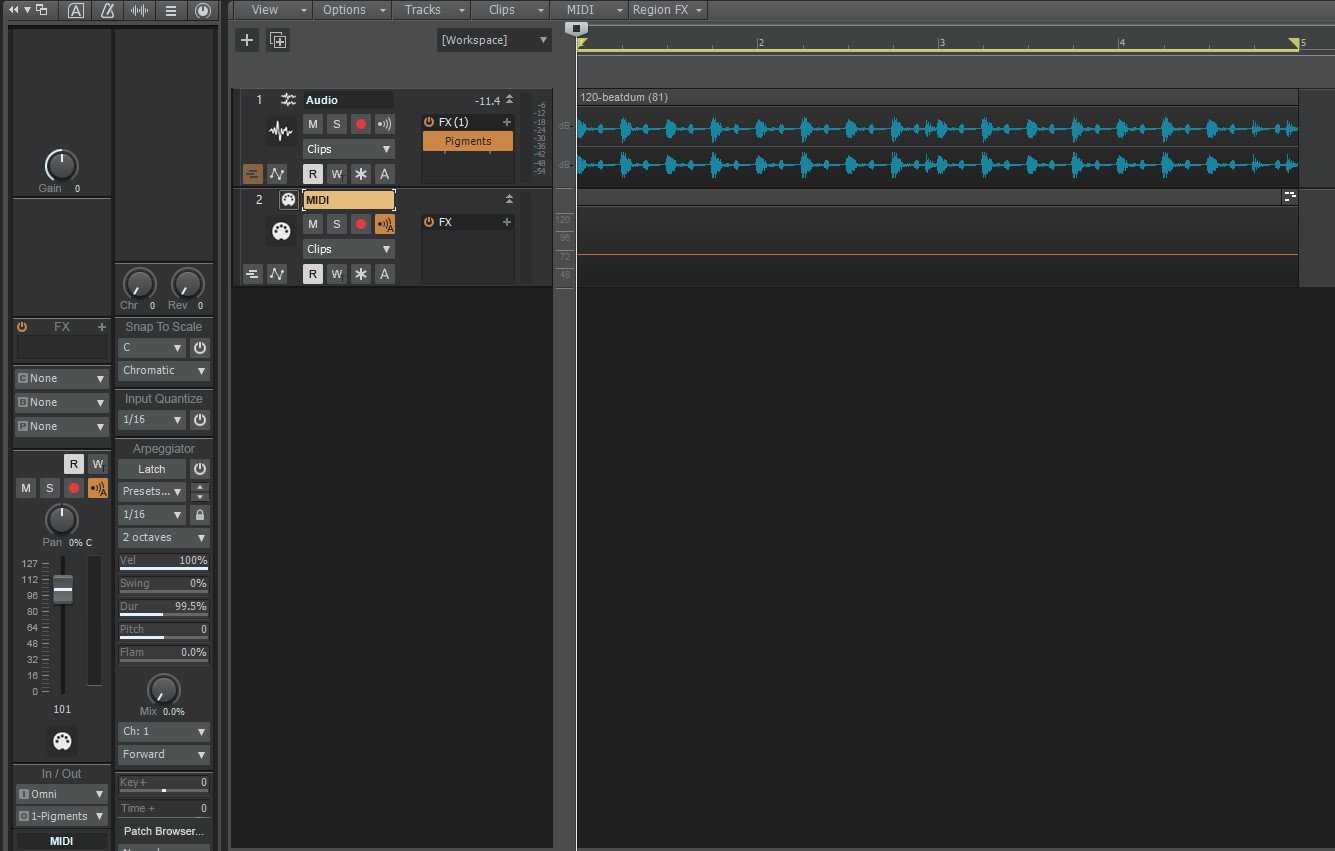
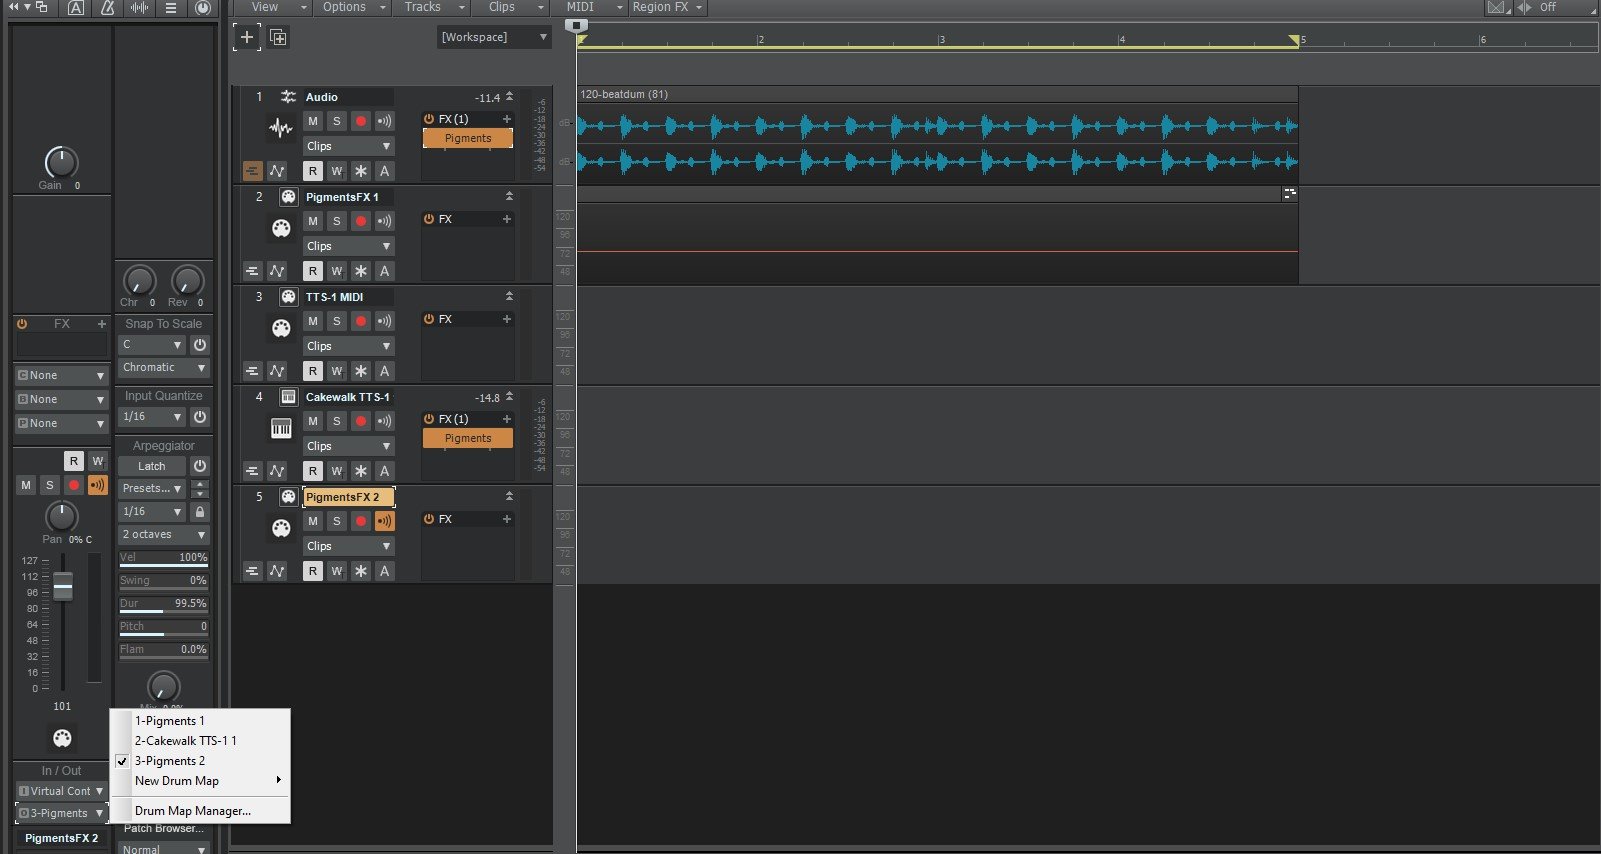
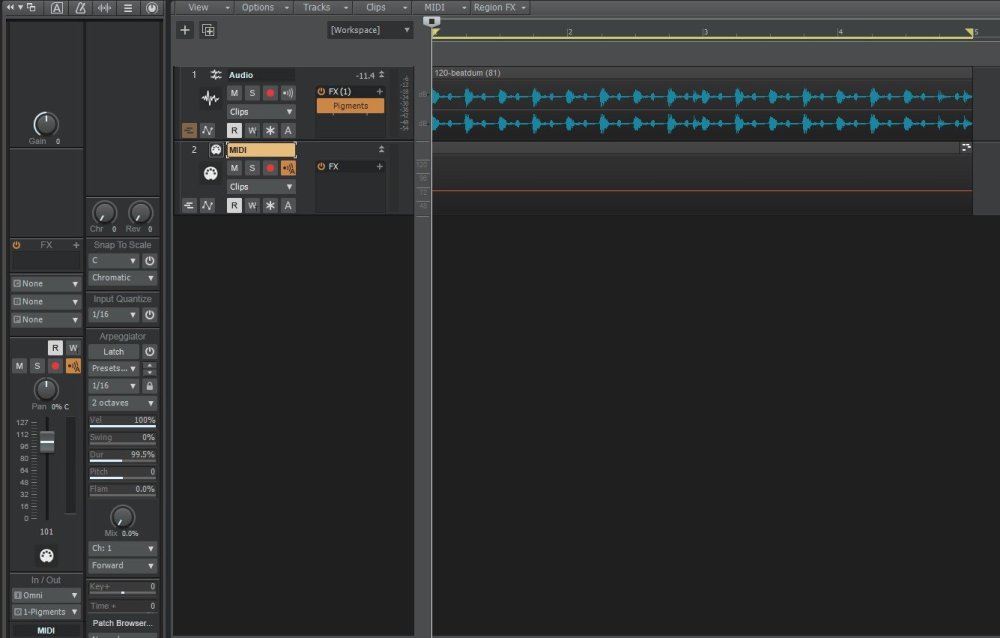
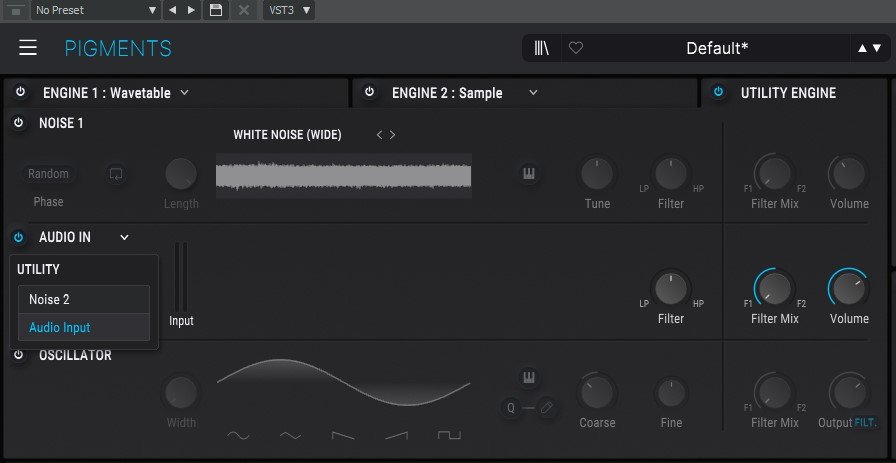
The new Pigments 5 has the ability to be used as an effect. Though not in the traditional sense. After experimenting in Cakewalk I found out how use it as an effect for an Audio track and for an Instrument track. For Audio Effect: As you can see I added Pigments as an Effect. But when you go to insert an effect make sure you choose "Inert Soft Synth" then choose Pigments. There should be a MIDI track for Pigments too and make sure it's Output is set to it as well, as you can see in the picture above. You need to also add a MIDI note in the Piano Roll as a constant note. It doesn't really matter which key. You wont hear anything if you don't have a MIDI note recorded. Configure Pigments like this: Choose a new default preset then disable Engine 1 and enable the Utility Engine. Then make sure only Noise 2 is ON then change it to Audio Input. The volume on the right will be very low by default so you will need to dial it up to hear the audio to a desirable level. For Instrument Effect: Here you can see me using it on both the Audio Track and Instrument Track. To make things easier to follow, name each MIDI track with it's corresponding output and make sure the outputs are correct. The MIDI track for the Instrument Effect should have the Input Echo ON so you can hear it, as you can see from the picture above with the speaker icon in yellow for PigmentsFX 2. This way you can hear the effect as you play with your instrument if you don't have a MIDI input recorded. When you do though, you will need to have that same constant single note in the effect MIDI track just like the above PigmentsFX 1 in the picture.

-
 Hi folks! Recording yourself in a comfortable environment with good acoustics is crucial - but how can you control your DAW? In this video I show how to control Cakewalk by Bandlab using an Android phone! WATCH HERE: https://youtu.be/6ndfakrS6Gw
- 21 replies
-
- 9
-

-

-

-
- cakewalk
- midi control
- (and 3 more)
-
If you've ever thought, "How do I create my own template?" or "What are templates good for?" Here is a more in depth look at exactly how to set up a project template for yourself! Once you've got a grasp on what works for you, it can literally save you hours!
-
The new SongStarter feature in BandLab may just be an awesome way to kick that writers block to the curb! It may take a few tries, but at the least you'll have an idea to go off of. The main thing is that it gets the creative juices flowing and allows for new and fresh sounds to be produced instead of reaching for the same chords or samples again. Have you used it? Let me know what you think? Have you made a song with it? Then share it with me and I'll feature it on the channel! Here's to staying creative and getting out of writers rut! Robert DREAM-CREATE-ACHIEVE
- 1 reply
-
- 3
-
-
- bandlad
- songwriting
- (and 1 more)
-
 The articles will be available on the following page... https://musictech.com/author/scott-garrigus The first installment is up and covers the Arranger. Additional articles will be published after the holidays.
- 43 replies
-
- 20
-
-
-
- recording
- songwriting
- (and 6 more)
-
The articles will be available on the following page... https://musictech.com/author/scott-garrigus The first installment is up and covers the Arranger. Additional articles will be published after the holidays.
- 12 replies
-
- 7
-
-
-
-
- recording
- songwriting
- (and 6 more)
-
Hi folks! In this video we learn how to balance a bass guitar and kick drum, using sidechain compression (ducking) in Cakewalk by Bandlab! WATCH HERE:
-
This is mainly recommended for beginners. But who knows, you might end up finding some new stuff even of you are not a beginner.
-
Hi folks! OMG, I found a way to control Cakewalk with an iPad! It's easy (when you know how). Let me explain.... WATCH HERE: https://youtu.be/d5Fjx5hASVE
-
BandLab is quickly becoming one of the top online music platforms, and with good reason! Due to their business model, you can make music anytime, anywhere. Connect with millions of other users around the world, and release your tracks right from this platform. The social features built in under the hood also allow you to engage with fans and keep 100% of their support. Today we're going to cover the Mix Editor on both the PC (Windows 10) and an iOS device. This will be a great tutorial to kick start your journey into the world on online collaboration with BandLab. Want to download it and use it for yourself? Head over here on your PC: ?https://www.bandlab.com/ Head over here on your phone: ?Android and iOS: https://www.bandlab.com/download - Instagram @BandLab - Facebook @BandLab - Twitter @BandLab - TikTok @BandLab
-
Hi folks! Programming your own custom drum patterns is a key skill, so I jumped into Cakewalk and created a beginner's guide! WATCH HERE: https://youtu.be/zHlDv3fs2F8
-
Mixing vocals can be easy if you just know the right approach. Today, we are going to use EQ, Compression, and even some nice extras to get a vocal to set on top of a mix. What is EQ? It stands for Equalization. This is a term that describes what an EQ is doing, it is literally making things equal. In other words, if you have an offending frequency that is built up in the vocal, you can grab an EQ to make that frequency more pleasent to hear by turning it down. Want an awesome EQ cheatsheet to hang at your mixing station? Join the Patreon group at $1 or more a month and you get access to one! Mixing Vocals in Cakewalk by BandLab
-
Hey all, Several months back I set up a YouTube channel that shows how I make my music via Cakewalk. In addition to examples of my own work, I have several quick and easy tutorials showing the fundamentals of my process which involves VSTi’s and Cakewalk’s MIDI editor, the Piano Roll View (PRV). I also have some videos explaining tips and tricks I use within Cakewalk, one of which is something I call “Off The Grid” composition (OTG). For context, I’ve been using Cakewalk as my primary DAW for many years. However, rather than recording me playing live instruments, I use a variety of virtual instruments as my sound sources and I essentially draw every note manually with the PC keyboard and mouse (no physical MIDI controllers). This removes the limitation of playing skill and allows me to approximate the music in my head far more easily and effectively. You can check out my tutorial videos on drawing music in Cakewalk here: I tried my best to make the tutorials as minimal and succinct as I could so it both isn’t overwhelming and is easy to understand. I hope you find this useful.
-
What an amazing learning experience! From production to recording techniques, to mixing in the best free DAW on the planet, everyone can learn something from this!
-
Track templates in Cakewalk by BandLab can be huge timesavers! Today, X.E.L. Ohh covers the bases on utilizing these awesome tools for beatmaking, however they can be used for any genre of music. https://youtu.be/jGfshA83KuI
-
Hi folks! Many of you have had trouble setting up devices to control Cakewalk. In this video I hope to ease your frustration! WATCH HERE: https://youtu.be/K7x30ZmO5V0
-
Hi folks! I've been trying to unlock the full potential of SI Drums in Cakewalk with some tricks and hacks. See how it went! WATCH HERE:
-
Cakewalk by BandLab has several features to speed up your workflow. Today, we will discuss the ability to group faders. This will not only save you time, but will also save you CPU usage. Instead of having several automation lanes across several tracks, you can group one set of tracks and control them all at once from one lane so long as they remain grouped. https://youtu.be/O70YGUOWZLI
-
 Included are several guides on working with AD2 in Cakewalk, as well as a few "Advanced Drum Editing" guides made by members of the CW team published during the SONAR era (Still relevant for current Cakewalk release as of mid 2021) Addictive Drums 2 (Project Temp +Track Temp +Drum Map) separate-outputs.pdf Cakewalk - Setting up a Drum Map for Addictive Drums 2 in Cakewalk.pdf
.thumb.png.cdc79b2d9ae925373019871bec794f76.png)