Search the Community
Showing results for tags 'workflow'.
-
 Hello guys. I would like to propose a feature that would allow the user to filter what functionalities/actions should be affected by the undo feature in cakewalk. This could be helpful on specific workflows that might require some of the undo features functionality; like a quick undo inside the console view or the browser tab. Thanks.
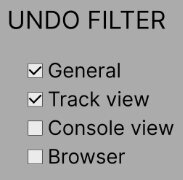
-
 I would to be able to click in an FX bin and start typing, then it would search on-the-fly amongst all your available plugins and display a list. Press arrow down to your desired effect, and then Enter to load it. Please see my mock-up below. Explanation: I have clicked once in the FX bin I have started typing "soni", and only then the search box appears (or it could always exist slightly faded, instead of white) I have pressed Arrow Down once to select Sonitus Gate, which is highlighted. I would press Enter to load the VST effect.
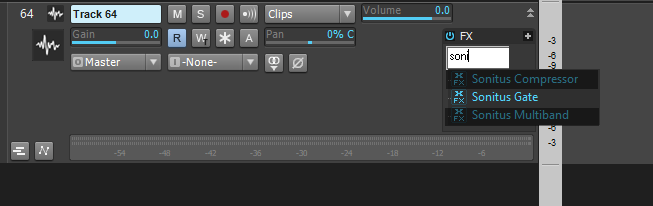
-
 Cakewalk has this annoying habit of moving a converted clip from its existing take lane to another take lane. In fact, it typically places the now-converted clip on top of another existing loop. Is there a setting to stop this from happening? If not, please stop this from occurring. Keep the clip I'm working with in its current take lane.
 -
Step Sequencer - how to insert a beat in already created clip?
Todd Groemling posted a question in Q&A
So it's easy to insert a row, but what about a 'column' or a blank 'bar' or beat...at, say, beat/bar 4? This would then move what was in beat/bar 4 to beat/bar 5? - Unfortunately, I don't think this functionality exists, but I wanted to ask before I request it become a new feature. -
To me, it's all about getting the now time, the start play time and, start record time where I want it in the quickest way possible. However, we don't always set nor want to set a marker. In fact, we don't always know when we need a marker. So, how about if when a user hovers over a clip, a pop-up appears that lets a user choose to move the start time to that clip's start time? Or let the user right click on a clip and have an option to 'Make this the Now Time'.
-
Some of the best features to me are the ones that save users time and therefore make their workflow easier. Ideally this is done by shortening how many clicks or numbers are typed in to accomplish something. For example, I'm off listening back to a tune and suddenly hear where I need to do a punch in. So I click stop (the space bar) right around where I want to punch in. It's real drag to have to type in the exact time or measure and beat where I want to punch in. So how about making the default record start time be whatever the now time is? If a user doesn't want that, then no big deal, the user does what we've always done: Type in the start time we want. But if the user wants the now time to be the record start time, then the user is saved from having to enter in the record time.
-
Say I have a clip in track 5 and I want to copy and paste it somewhere. It appears the default is track 1. To me, most often people want to copy and paste something within the same track, so how about setting the default as the track where the copied clips currently reside? Or, do I just need to be educated how to change the default track? Ideally, it is not a number, but an origin. Again, wherever the copied clips currently reside.
-
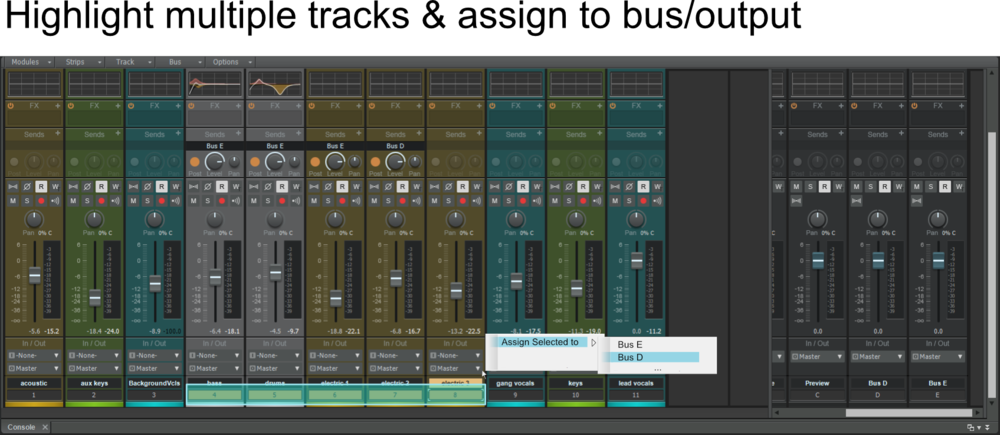
Hello guys. I am not entirely aware if cakewalk already has this feature but it would be nice to have the option to multiselecting tracks to assign to one bus/channel. Currently you still have to select each track to assign it to a specific output. This is not an issue to smaller track projects but in large scale project with a heavy amount of tracks, multiselecting tracks to assign them to one output by only the right click property once would probably make everything much faster and easier. Thanks Cakewalk Dev Team.
-
How about letting users export the Tempo List as a Tempo Map? I'm talking 3 steps: 1) Click Export, 2) Give an option to choose Tempo Map, 3) Press Okay or Save. Meanwhile, I'm trying to collaborate with someone who uses Pro Tools and he requested a tempo map. But I'm not seeing that within Cakewalk. I thought exporting a MIDI file Type 0 would include tempo shifts. And while it seems to do that, the end result is clunky. I chose my MIDI drum track. And even though the drums don't start until measure 7, I dragged the MID clip to the start of the song....meaning the clip starts at zero and shows no MIDI notes until measure 7. But guess what: The exported MIDI file places the start of the song at measure 7. That didn't make me look good or make what I provided user friendly. After the fact, I see I could have said the tempo starts at 120, then at measure 20 changes to 100, then at 50 changes to 85, and finally at 100 goes back to 120. But do I really have to do that?!?
-
-Post deleted-
-
- 2
-

-
- feature request
- automation
- (and 1 more)
-
 I've recently started to incorporate FX Chains into my workflow. I do it not only as a tool to control multiple plugins at once with macro controls. FX Chain gives a chance to build a custom channel strip, where there's possibility to control multiple plugins in one window - without necessity to opening e.g. plugin A to use some high-pass filtering; plugin B to regulate attack, release, ratio, threshold parameters; etc. Because of it I'd hope to see possibility to add more than 6 knobs and buttons to FX Chain in CbB.
 -
 Hi, everyone, I’m a relatively new Cakewalk user, switching from Reason. I love Cakewalk, the sound, the options, the features (I found the Pro Channel awesome), the graphic interface, the modularity, and the countless options. The sound of the embedded tools, to me, is light years ahead of my experience with Reason, and the modularity opens up a lot of versatility in terms of the sound you can achieve. I've found there are, however, a few workflow improvements that can be made, in my opinion, to make working in Cakewalk almost reflex, without having to think, and allow you to focus exclusively on the sound, instead of procedures and workarounds - things that you would intuitively do, but aren't available, things that can replace more complicated operations and looking through menus, mass inserts and adjustments of modules, replicating settings, etc. So I put together a list of suggestions, a few weeks ago. It's around 75 items, and it covers everything from glitches to appearance, but mainly workflow improvements. I'd like to see how many of you guys would like to see them implemented, too, and hope to see as many of them in future releases. I’ve grouped them into three categories, one about necessary fixes, which refer mainly to stability, the ability to remember settings, etc. The second one refers to improvements in the workflow, which could see a better, streamlined processes, some inspired from my experience with Reason, most just by working, and recording my go to reflexes or natural wishes. The third one is a list of personal wishes, that would make Cakewalk like a present box – kind of the cherry on top - and complete in every aspect, at least, to my personal subjective wishes. So here they go. Hope you find them desirable. Cheers and happy holidays! PS> Any idea that you think is useful, and you would like to see implemented, you can select individually and then click on the "quote selection" pop-up, to add in your reply. With enough support, maybe we can see them in the future. Improvements A. Instrument Tracks “Assign to track” option in the instrument/soft synth creation dialog, in the rack, which replace instrument in Instrument Tracks and convert MIDI track to Instrument track, if synth is assigned to a MIDI track. All the in/out associations and conversion of MIDI track to Instrument track be done automatically on “assigning to track”, or menu selection. Allow the Synth Rack and browser windows to be opened in the Console View (both docked and undocked mode). Drag and drop soft synth in the free space (Track and Console View) creates Instrument Track (plus right click insert option in the Console View). Drag and drop soft synth on track (other than in the FX box) (Track and Console View) replaces soft synth in Instrument Track. Drag and drop instrument/synth on MIDI track automatically converts to Instrument Track – in both Track and Console view. Open instruments/synths, in the Console View, on double click on the track icon, instead of opening the icon menu. To open the icon menu, right click. Being able to open instrument/soft synth in the Console view is very important during the mixing process, as there is often need to adjust parameters – output volume, reverb, EQ or compression adjustments in light of any PC adjustments and blending you need to do – for the instruments that allow internal FX options, etc. As of now you need you need a few clicks, and flipping through the windows, to do that. “Replace Synth” option in the Console view, on right click on the instrument icon of Track, same as in the Track View. B. Undo Make Undo operate for all actions performed in the DAW, including PC module/VST plugin parameter variations. C. MIDI Editing Workflow (Track View) Double click in free area writes default length note in PRV, just like now. Double click and drag writes variable length note, instead of single click and drag, like now. Select area/note in PRV with left click – instead of right click, which is counter intuitive. Same for automation nodes, etc. Double click on note deletes it, exactly the opposite of writing it, instead of right click, which is counter intuitive. Provides symmetrical and reflex write/delete, with the same operation. Right click on note/note selection opens up processing FX menu, with Transpose, Quantize, and other usual note editing options available directly in the menu. Quantize, Transpose, Time Stretch, and Velocity be available as direct options on the right-click-on-clip menu, instead of being found in the FX tree submenu, like know – that unnecessarily complicates access. The other, less usual FX stay in the sub tree menu, under “Other FX”. This simplifies access to the most usual operations. Double click on empty lane of Instrument/MIDI track, in Clip Mode, creates clip to default size. Double click and drag creates clip to drag size. Double click on title bar of clip opens PRV, in Notes mode, just as in Clip mode. Also consistent with the usual navigation behavior in all software, where double clicking on item opens it. Resize clip, Fade In/Fade Out available in Notes Mode, just as in Clip mode. This provides consistent behavior between Notes/Clip visualizations, and allows for quick access to PRV, without having to check or toggle the visualization in the track properties. Double click on wave clip opens Clip Editing View (Auto Zoom In), where you can micro cut, delete, move audio to grid, etc. Clicking on existing note in Piano Roll View (PRV) plays instrument note. Copying (CTRL+C) of clip automatically positions the cursor at the end of clip. Stretch/length note adjustment menu on right click menu, on note selection/clip. D. Audio & Track Management (Track View) Selecting track + DEL deletes track (with/without confirmation dialog), and not the last selected clips in track - change selection focus to track on track select (also see Console View DEL track). Selecting FX module + DEL deletes module (also see Console View DEL track). Audio clip copy and paste to take place in the track lane where mouse cursor was last clicked (clicking/cursor in a track lane automatically selects that track for pasting). Drag and drop (import) audio over MIDI track automatically opens Extract MIDI dialog. Moving cursor on upper ruler bar takes into account the current Snap To setting. Closing any open Region FX window reverts to the previous active View, not to automatically to the Console View, as it does now. Export Audio Clip option on right click menu – export directly “as is” without any processing. Adjust amplitude of audio clips with on-clip Volume knob (Audition style). E. Pro Channel Module Options, Mix Tracks (Console View) (Double) click on EQ graph window in Track to open full EQ window, not only in PC, like now. Eliminates unnecessary clicking and scrolling. Allow EQ window to be freely repositioned on the screen. CTRL + Mouse adjustment adjusts any parameter of any PC module (including menu choice for reverb types in REmatrix) across all tracks containing that module, without having to select any tracks. When you select specific tracks, the adjustment only applies to selected tracks. Right now, that option is only available for Power On/Power Off, and for selected tracks only. CTRL + Insert PC Module on a Pro Channel automatically inserts that module on all tracks. If specific tracks are selected, the insert is made on all selected tracks. Copy/Paste function for PC Modules across tracks. The pasted PC Module retains all the settings of the original, copied one. Patch/Setting copy/paste function for PC Modules across tracks. Same as above, but referring exclusively to copying settings from one module to the other. Drag and Drop PC Module from on track to another, same way as for FXs (again, consistent, intuitive behavior throughout). If the target track doesn’t contain the respective PC module, drop inserts PC Module, with the original settings. If the PC Module is already inserted, drag and drop on it copies the settings. Mass insert/changes settings of PC Modules: CTRL + Drag and Drop PC Module on any of the tracks of a selection automatically inserts/changes settings of the corresponding PC Module on all selected tracks. Mass duplicate FX modules: CTRL + Drag and Drop FX plugin on any track of a selection automatically inserts that FX plugin on all selected tracks (same as above). Mass track reroute (Select tracks + select route menu option in any of the selected tracks) (implemented). Track focus change when clicking on track, instead of only on the track number, like now. Makes it easier and faster to select, without having to think where to click. "Duplicate Track" option in the Console View, in the right click menu, same as in the Track View. Moving/reordering tracks by click (in any area without commands, including icon area) and drop, in Console view, without pressing ALT, like now. That seems unnecessary. The exact same way it now happens in the Track View, where ALT is not needed - have the exact procedure for the same thing, across the different views, for consistent behavior. That complicates things unnecessarily, and makes you need to remember different procedures for the exact thing, instead of just being immersed, and performing tasks on reflex. Selecting track/FX plugin/PC Module + DEL deletes track/FX plugin/PC Module (with/without confirmation dialog). Right now, when you select a track/FX module, and press DEL, in Console View, it deletes any previously selected audio/note clips in the Sequencer, which is strange. In Console View, make the Module Menu available as a graphic section with toggle buttons (maybe on the docking bar) for opening or collapsing any of the sections of the Console (for instance “Sends”, and any other module existing in the Module Menu), instead of opening/collapsing it from the View menu. New Open Bus Section toggle button to fully expand the Master/Buses section of the Console View, to the right, to full view (taking into account their current visualization settings – collapsed, PC open, etc.) the same the PC/Properties section does, to the left; then resume previous position on reclick of toggle button. Stereo/Mono toggle button on Instrument tracks, same as on Audio tracks. It could work by enforcing mono/stereo mode on source VSTs, same as the check option available in the VST Properties/shell (implemented). Solo override Mute – on Soloing a muted track, play solo track(s) as if it/they weren’t muted. Allow renaming of FX modules. F. Song Playing/Navigation On activating Play In Loop, Punch In Recording, etc., automatically use current selection to, without having to additionally click on "set selection to", first. That seems unnecessary. Allow cursor to play outside the loop, even with "Loop" button on, after stop and replay, if you set it to a position outside the loop, and only play within the loop if placed anywhere inside it. Allow the Now Slider in the Control Bar to readjust cursor position while playing. On “Stop Rewind Marker To Now Position” selected in Track View/Options, Stop button leaves cursor in current playing position. Pressing stop again moves cursor to Now position. Repeated Stop button pressing toggles between the two. This way that setting can be eliminated altogether. Pressing Stop once leaves cursor where in current position. Pressing Stop twice goes to Now position. Simple to use. Both options are available at all times without setting modifications, and the behavior keeps consistent on all projects. Allow navigator to be repositioned at the bottom of screen, above the control bar, in track view. Allow to make that default for all projects, and also remember position automatically for each project. Moving VSTs into different categories, in the browser, by drag and drop into folder, same as in Windows Explorer. Aim Assist for position cursor on Time Ruler be placed above/under the Time Ruler, without hindering viewing of cursor on the ruler. Mouse Scroll wheel moves slider on both scroll bars (vertical and horizontal scrolling), on placing cursor over them - in all Workspaces. G. Saving Saving project automatically resets autosave counters to zero. No need for autosave to kick in only seconds after the project has been manually saved. Disable automatic autosave after each undo. Let autosave work according to the setting in preferences without additional interventions. Unnecessary autosave takes time and interrupts flow. H. Appearance Add transparency slider for background (native theme) colors, in the track color change dialog (and only for the colored track areas). This will allow track colors to be less affected by the native theme (dark/light/etc.) and display closer to their natural hue (implemented). Allow marker/song sections in the Track View, which can be selected as blocks/chunks, to be assigned individual colors - will affect the background of the section, and not the clip colors - this will help easily visualizing song sections in one glance. Necessary fixes I. Crashing Fixing crashing on VST conflicts – why not just isolate the conflicting VST, and close it, instead of letting it crash the DAW (with maybe an explicit message as to what the problem is). I get crashes when clicking on the stereo/mono toggle button on the Master fader, when I try to reorder tracks in the Track View, when I bulk adjust PC modules pots in the Console view, and in all kinds or random situations. It’s either VSTs that crash the program, or even PC modules. That’s a big issue. J. Remember Project settings (these are on my machine, I don't know if everybody has them, it might vary from one person to the next) Fixing irregular behavior where the Control bar setup is not remembered, on project open. Fixing irregular behavior where mass variation of the REmatrix across several selected tracks (CTRL + mouse adjustment) during playback causes the knobs to be varied by different amounts. Fixing irregular behavior where VSTs that use crosstalk among tracks reset their settings to the default values, under various circumstances. Remember the open/collapsed status of one knob plugin windows, in the Pro Channel of Instrument tracks, on project open (Console View). They always start up as open, on project reload, and need to be reclosed individually, which is really annoying. Remember the order of the Browser, Synth Rack and Help windows, in the right side dock, which always resets on project re-open. Remember the Track View>MIDI/Show Velocity in MIDI clips visualization setting for projects. Remember the Track View>VIEW/Auto Track Zoom setting for projects. Remember the PRV controller pane parameter choice. K. Drivers Recognize 24 bit ASIO drivers, instead of 16 bit, on some soundcards (for instance SB Audigy series). On engine dropouts, don’t stop playing, reset the engine, and keep playing (implemented in the 2019.11 release). Allow projects to work with no MIDI out selection in Preferences/Drivers, or provide a "No MIDI out" check option, instead of allowing the lack of selection of a midi out to cause all synths loaded to automatically be assigned as midi out destination for all midi tracks, which causes the project to behave erratically. Awesome L. Add the SSL 4K channel compressor (complete with Autogain and Peak attack mode, just as the original – I know this may be too much to ask, but those features are magical in the SSL channel compressor - autogain basically tells you what the best compression setting is, and the peak mode allows for tracks to be sent back in the mix without audibly impacting the attack), as third Pro Channel compressor option. Add the CA-2A compressor to the Pro Channel, and as insert FX. I think Cakewalk's is one of the best emulations in the business (have it as a free RE in Reason) (implemented with PC2A, in 2021.04). New Wow/Flutter knob in the Tape Emulator. Maybe review the high/mid-high freq softening in the Tape Emulator. Separate one knob modules in the Pro Channels for Harshness, separate for guitars, and Drums/vocals. The general one available now, is a great idea, and I love it, and use it, but it’s kind of in the middle. HP + LP filters added to the REMatrix Solo, on the wet signal, and integrated within the PC interface. Pro Channel modules available as insert FXs. Fully programmable shortcuts, without limitations (implemented).
- 160 replies
-
- 8
-
-

-

-

-
- feedback
- improvements
- (and 5 more)
-
 Piano Roll - Auto Focus & Auto Lock = Link this options. Hey, guys. ? It will be convenient when editing multiple tracks. Then the instrument (track) can be selected through the selection of notes and at the same time other notes (instruments) will be automatically "locked" (it will be impossible to edit them).
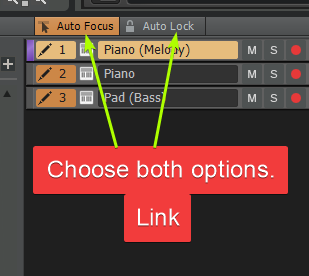
-
- 2
-
-
- midi
- piano roll
- (and 2 more)
-
Track Filter for Arrange View (tags for tracks and groups of tracks). Will be great to have this option for Arrange View. But it must be done... 1. 10 shorcuts for presets for the first ten presets... (The user himself can choose the right.) 2. Toggle switch version (One shortcut for select a filter preset and return to the previous view). 3. To complement the options of this wish - paragraph 5 4. New DOCK "Tags View" or "Filter View" - between the Inspector and the Arrangement or behind the Inspector or to the Right behind the browser Or in front of the Browser. Need to think and discuss. Perhaps to make a special panel in Contol bar like Screenset View? 4. Shortcut for "Add new Filter".

-
- 2
-
-
- workflow
- track view
- (and 3 more)
-
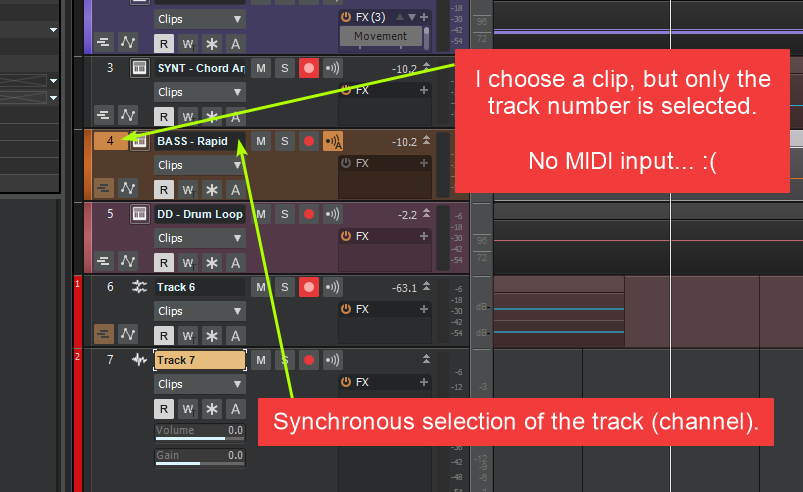
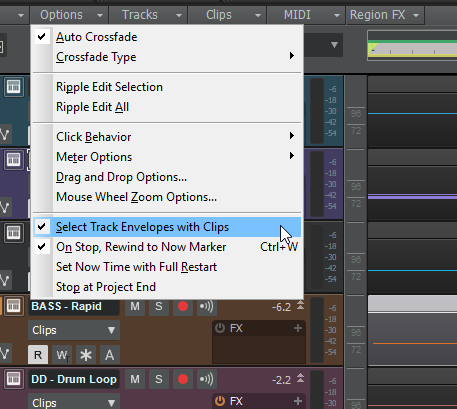
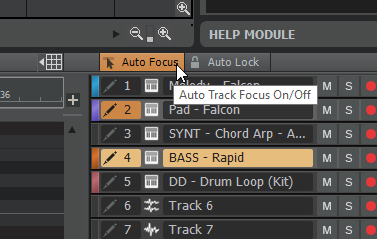
Synchronous selection of channels (tracks): Numbers & Name. Auto Focus. Problem... 1. I have Instrument track (VSTi) 2. I have other track (AUDIO). 3. I select Audio track. 4. I have midi clip in Arrange. 5. I select this midi clip. 6. Press midi-keyboard. - Don`t have sound... I`m sad... I need manual click by track name! 7. Press midi-keyboard - have sound I am happy. Now I can play & record. This is like in Piano Roll - Multitrack edit - Auto Focus. This otions you can add to Option Menu. ? > " Auto Focus"or "Synchronous selection of channels (tracks)" or "The full selection of track" or "Select MIDI for the selected track"...
-
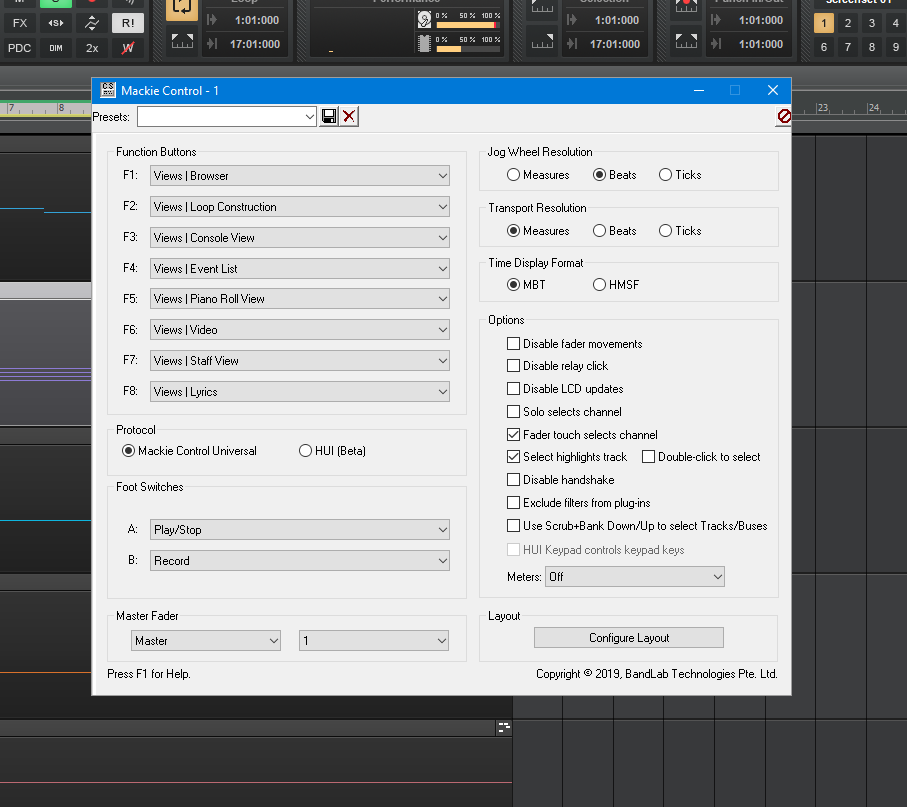
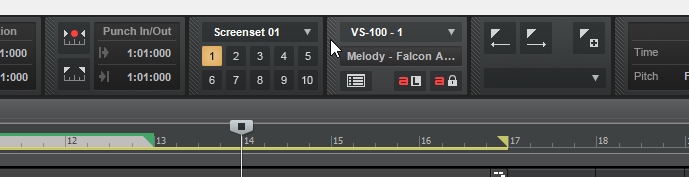
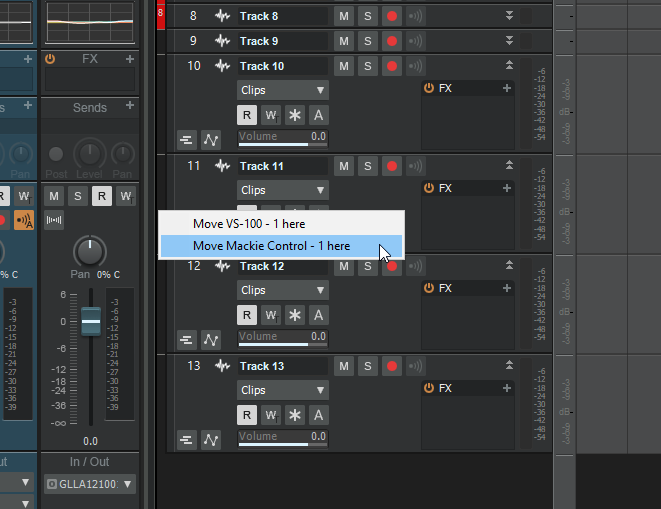
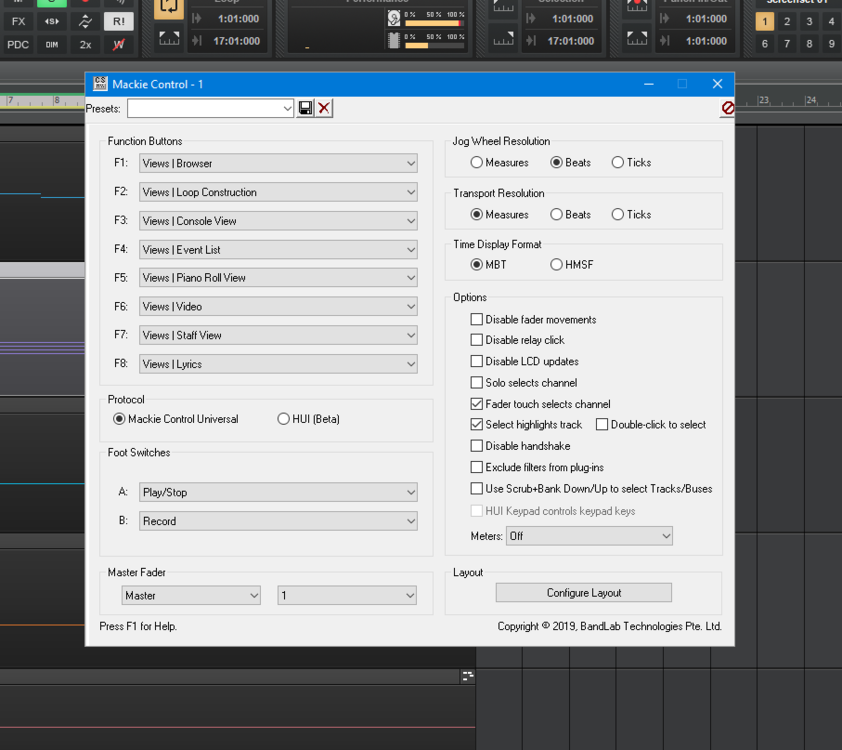
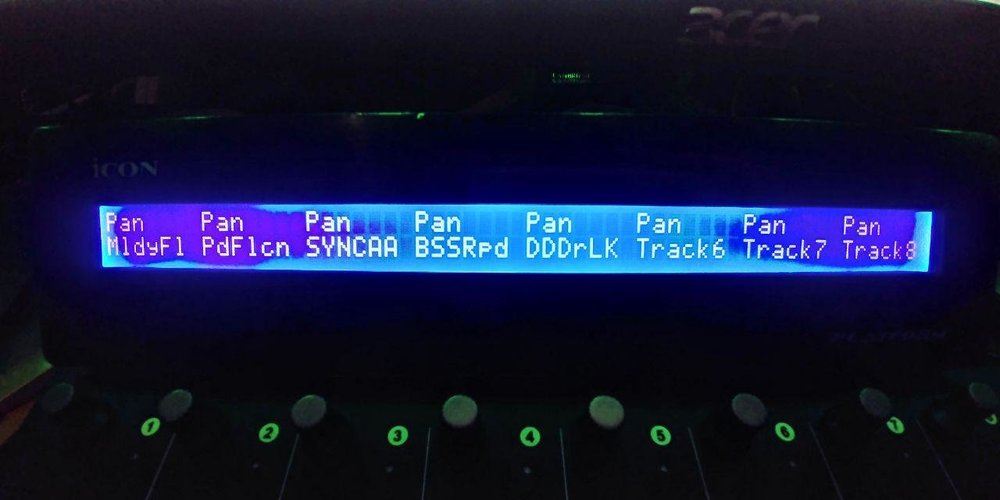
Mackie Control - Automatic switching (rewind) to the selected track (channel). I have iCON Platform M+ and Cakewalk (Roland) VS-100. In CbB we have some options for Mackie Control but will be great to have more... Add some options to Controller/Surface Properties 1. Automatic switching (rewind) to the selected track (channel). If I select Clip or Select Track Number. - Now I need to open menu and select "Move Mackie Control - 1 here". 2. Show Volume/Pan - Now I see only Pan parametr 3. Full Name Track/Short name - Now I see "Short name" - PdFlcn. Full name - Pad - Falcon. If I select "Full Name: I will see "Pad - Fa" (8 symbols). 4. Group selection of tracks. If I select 2 or more track Mackie Control select this track too... not olny one. If I select folder - All tracks in the folder will be selected in Mackie Control. - Now olny one channel selected. Special for iCON Platfrom M+ https://iconproaudio.com/product/platform-m-plus/ In iCON Platform M+ not working: 1. Loop Button (will be great to have Loop ON/OFF) 2. Mixer (will be grat to have Console View). 3. Read/Write buttons 4. Emulation Mackie Control buttons "Shift" > PC keyboard Shift, Alt > Alt, Control > Ctrl, Options > Win or Ctrl+Shift,
-
Hi. Midi note: to change the duration without changing the start and end of notes New Smart instrument... In Studio One I press Alt and move mouse.... Studio One 4.5 https://i.imgur.com/Fa7cz3q.gif Reaper 5.9 https://i.imgur.com/1iGN7bX.gif In the Reaper, this is done automatically without pressing the function keys. It would be nice to have that in Sonar

-
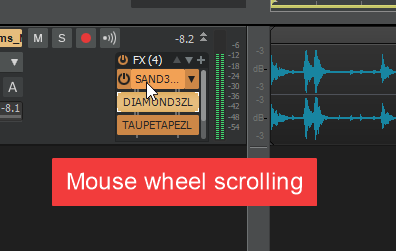
Hi. Will be great to have Mouse wheel scrolling for plugins added to the track.
-
I would like to see tap tempo button near metronome settings toolbar.
-
1) Show an icon that indicates whether a track actually has content in it 2) Allow a 1-click option to show all tracks or hide empty tracks 3) Allow me to designate their type (e.g., Bass, Guitar, Vocal, etc.) - Why? So I can then choose to have Cakewalk group them together and show or hide only those