Search the Community
Showing results for tags 'bug report'.
-
I was working on a track today in which I added some loops and sounds (basically some top loops and drum fills). I don't know why the tracks always tend to get out of sync with respect to one another. I have checked their time stretching of these loops and sounds but they still get out of sync most of the time. Do let me know if you face the same problem or if it's a problem on my side. ?
-
 Hi to all, Yesterday I noticed a bug in the midi CC to/from automation envelopes conversion function that I would like to report. I tried both in the last release 2021.04 and in the latest "early" 2021.06. If the values are of pitch wheel type, there are two distinct (or maybe there's a connection between the two, I don't know...) bugs depending on whether the transformation is performed from envelope to MIDI CC or from MIDI CC to envelope. 1) Automation envelope to MIDI CC: There is probably an error with ( + / - ) in the code of the conversion function because the result is this strange curve. 2) Midi CC to envelope: The peak value never reaches the maximum (+8192) in this case but there is a strange "beveling" on the tip. With other type of midi CC's the conversion function is correct. It's the pitch wheel values that generate problems, probably for the -8192 / + 8192 range of values. I hope that this bug report can be useful in finding the error. It seems to occur only in the presence of values of type pitch wheel in this very useful conversion function that has been recently introduced. The addition of this conversion function has actually proved a lot for me. Be able to visually work with the CC values directly under the midi track (using all the shaping functions available for envelopes) while still retaining the possibility of convert them to the piano roll view. Really useful! Many thanks to all
 -
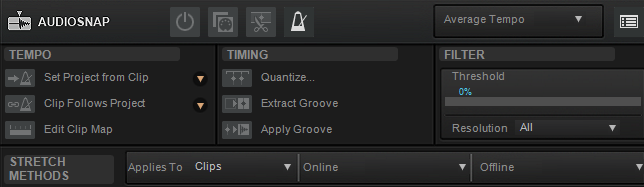
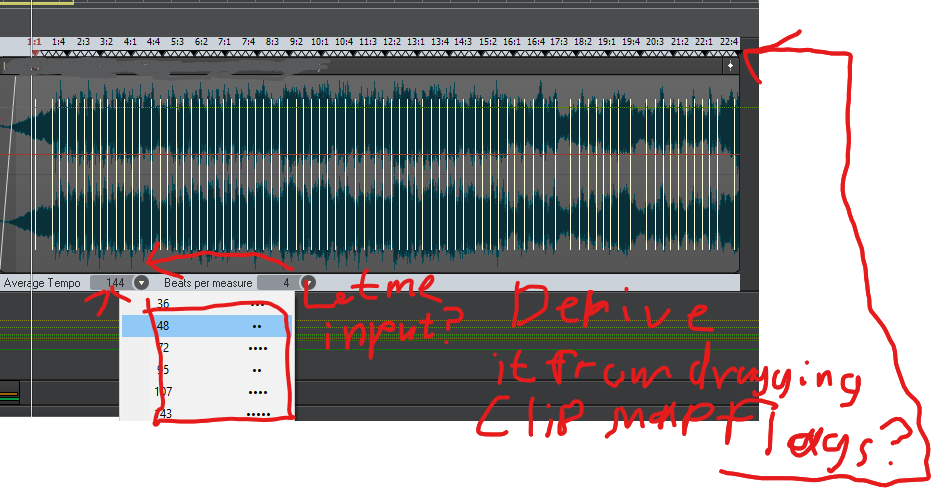
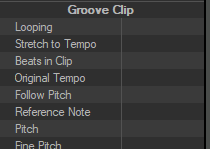
 I can not see the woods for so many trees anymore. 1. It's an enormous pain to have Cakewalk successfully analyze an audio source for its Tempo, and apply this Tempo to the (it may be said.. awesomely improved Tempo Map view!) Tempo Map, by ways of dragging the audio clip into the tempo/measure bar (what is the right term to use here?). Ableton Live among others can do this almost without failure. 2. Audiosnap offers a feature to check the timing values of a clip (fourths or eights for example) and place those resolutions over audio transients (Edit Clip Map). It's EXTREMELY headstrong, however; when I try to move the first beat on top of the first real musical audio transient, it often refuses. When it does snap, the other values often do not follow. I then move the second, third, fourth, or even the 1 of a next measure.. expecting the algorithm to then have enough hand-holding to figure the rest of the audio transients out and place them within the tempo parameters of the audio. But nope. Why can't I input the average tempo myself, to give the struggling algorithm a hand? Why doesn't it change dynamically based on me dragging the temporal anchors (is that the name...? Clip Map Flags? I don't know) on the top of the edit clip map UI? 3. Audiosnap menu is rather wizardy in general. So many buttons.. while Live, or even Logic does it so enormously simply. I think we can do better and clearer in 2021. Although I am one of those customers that asks better and yet does not know how... sorry. 4. What is Groove clip? I can make an audio clip follow the tempo of the project by checking a box in the track/clip inspector view. Does it use the same system as Audiosnap? I've used them both, however these features seem to bite one another... and I have not gotten it to work well once. I probably need to read more documentation/watch tutorials.. but I also really think everything can and should be under the same feature set.. clearly named, with the same iconography, the same or similar UI elements, under the same overarching name, such as AudioSnap. 5. Graphical & UI/UX issues with Audio Clips that span over more than 1 tempo and/or time signature. I've had them display over more or less time than they should be displayed, and when I drag them around, it shows double or half the drag than actually executed when I release the mouse. There's some shady stuff going on there.. Of course you've inherited SONAR and Roland's code.. along with some of their talented programmers, and I'm really hoping that all that code shows promise and can be improved upon, with all these tempo detection/warp/follow features consolidating under one more modern, better functioning algorithm, and more intuitive to use UI. All in all I love Bandlab for rescuing this wonderful DAW. I'd pay a subscription if it were available Keep on rocking and improving this community and software please! ❤️
-
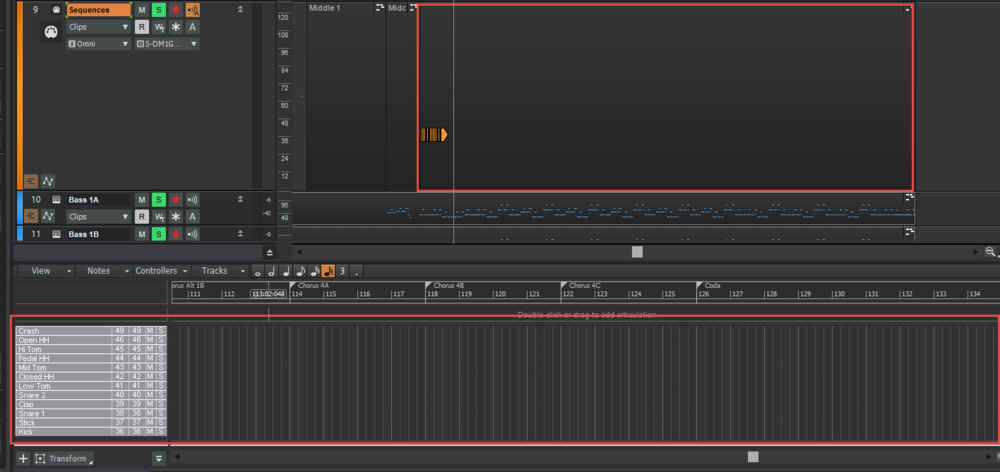
It appears when having multiple step sequencer patterns on a track, sometimes when bouncing to clips, the MIDI notes past the first point of drag extension is not processed. You can see this is going to happen even before bouncing to clips: BUT at this point it still plays the notes correctly, but when bouncing the step sequencer clip, the notes are actually MISSING!

-
I am having a problem with certain MIDI preferences not persisting between CbB sessions. Specifically, my MIDI/Devices setting is not persisting. I have a USB MIDI interface with 4 out of 5 ports active. I've tried to activate the Microsoft GS Wavetable Synth in addition permanently, but the activation won't stick. When I exit CbB, I lose the setting. I have to reactivate the preference before I load up any song in which I want to use that device. Another preference that won't stick is the MIDI/Playback and Recording/Playback setting for "Prepare using: xxx millisecond buffers." That is set at 200 by default. I want to change the default to 400 due to some stuttering, but again this change has to be done every time I start up CbB. I have tried editing a template at Bob Bergen's suggestion on Facebook, and new files created using that template do appear using the edited preferences. However, when you save/close the newly created .CWP files, exit CbB, restart CbB, and reload the .CWP files, the preferences revert back to the original non-template settings. This is most definitely a bug and needs to be addressed. Please help, and thank you. EDIT TO ABOVE PARAGRAPH: The edited template was used without doing the exit/restart procedure. When I exited, restarted, and then tried to use the edited template, the preferences in the edited template had reverted - no Microsoft GS Wavetable Synth, no 400 millisecond buffers. The bug is not fixed by editing a template.
-
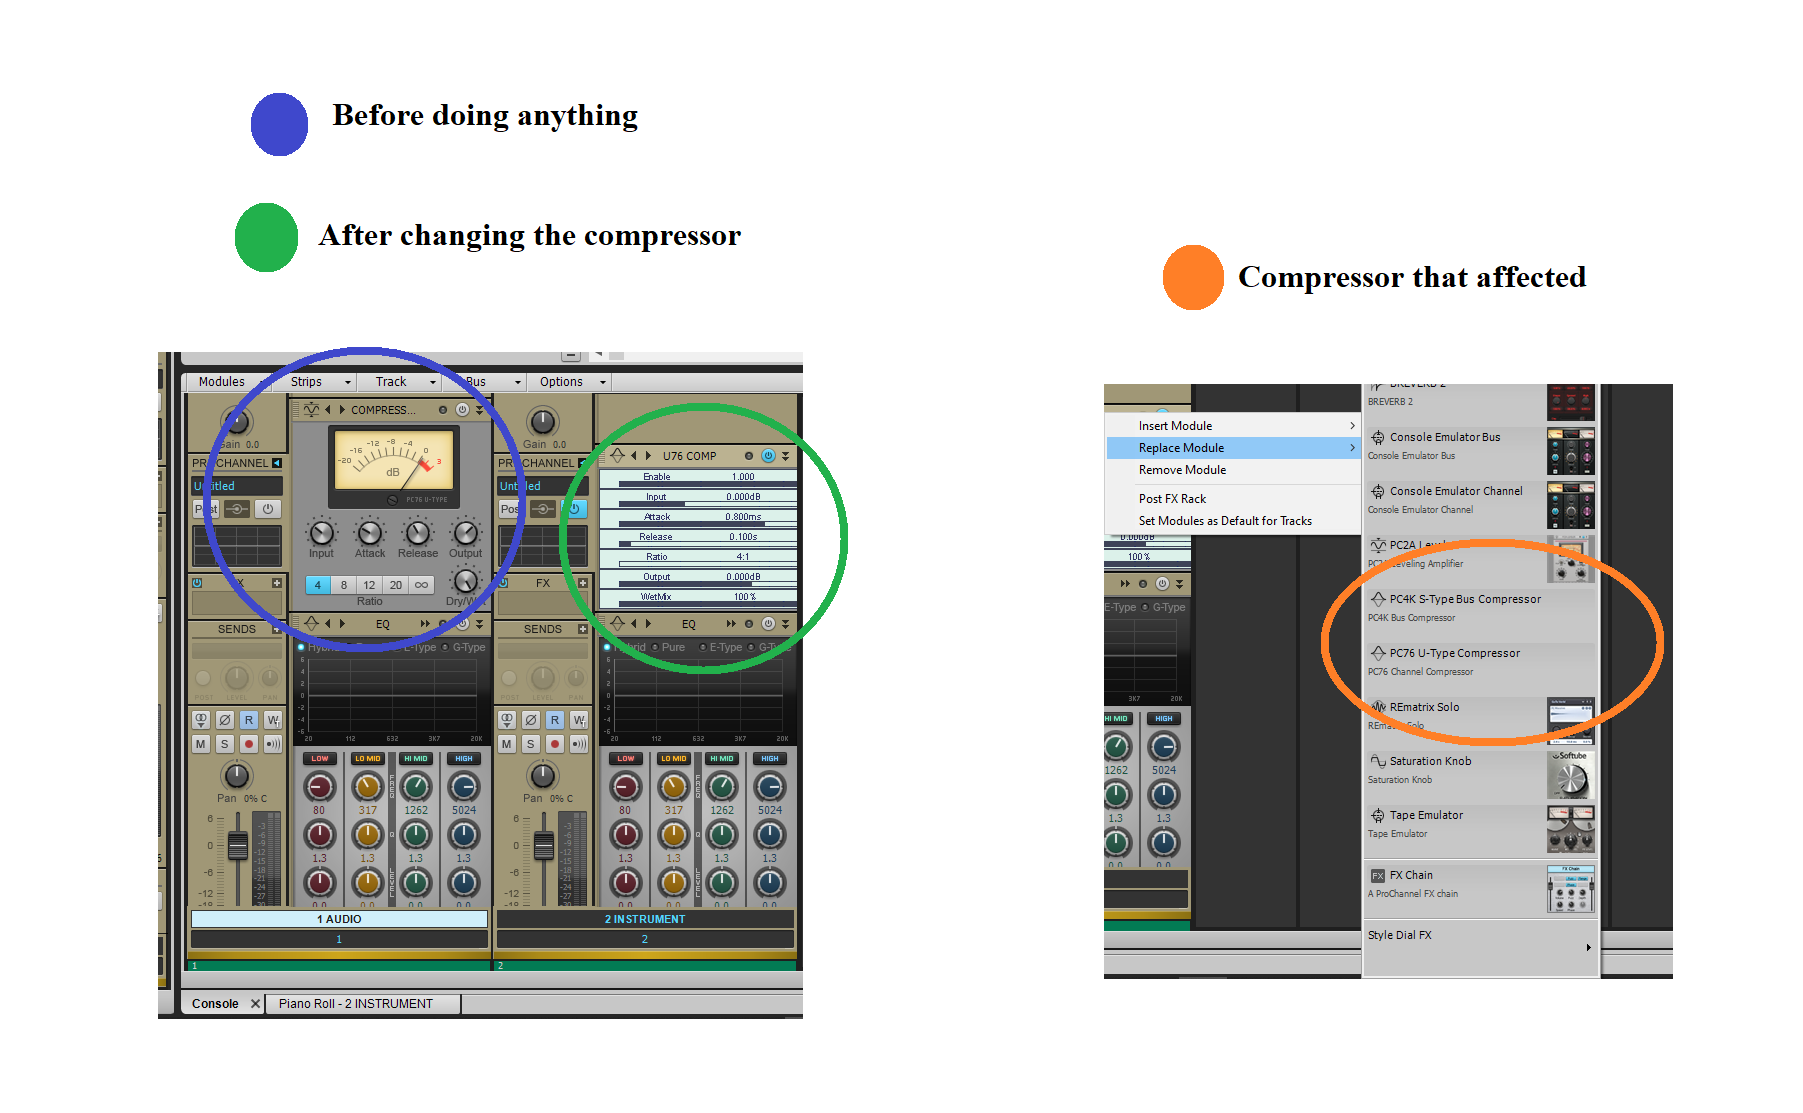
 So, recently I realized that there are bug in ProChannel, specifically the compressor UI. The problem is the UI for the compressor will be broken when I started change the compressor type (like in the left picture), it still work but in my opinion it kinda ruin the mood and also the parameter are little to cramped so it makes it kinda difficult to deal with. This problem so far as I know affecting 2 type of compressor that is PC4K S-Type Bus Compressor and PC76 U-Type Compressor (Like in the left pictures). This far I only tested it with ProChannel in the mixer, so I didn't really know if this also affecting ProChannel in Inspector panel.
-
New to the forums, I have an issue with audio samples folder in cakewalk. Upon creating a shortcut folder for my samples located in an External SSD and placing them in the cakewalk samples folder, I discover that these samples do not appear in the content browser. I tried searching for this issue on these forums but couldn't find any related material. Any assistance is valuable. Thanks
-
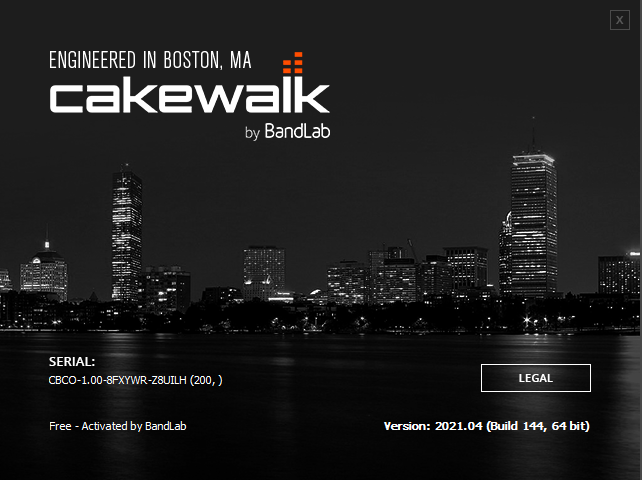
 Hi Bandlab and Cakewalk support, I want to submit a crash report and hope you can resolve this issue. Since the latest update to Cakewalk when I load a project in progress I experience many crashes and cannot work on the song now. Could you advise what to do as I have never seen a reference to RPCRT4.dll before from Cakewalk. Please find attached the Cakewalk Version and Crash Report captures. Thank you Jozsef
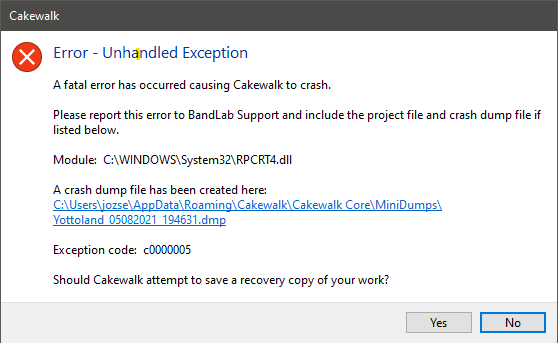
-
Hello, if I select tracks and hold CTRL to change a value for selected tracks, it works in track view but not if tracks are in a closed folder (works if this folder is opened). Is it me or it's a bug ?
-
 I'm using the last EA. I'm trying to assign the key "A" in Piano Roll View, to switch on/off the "Auto Lock" function: But it's not working. It's still activating "Bypass audio effects": However "A" is currently assigned to "Arranger Track": How can I use the key "A" for PRV?
 -
When I try to activate Preferences using the shortcut "P" while Start Screen is being shown, nothing happens.
-
For some reason, cakewalk is extremely laggy and I can't even click on anything. When I am able to click on things, it is delayed by about 12 seconds. It also doesn't let me click on the tab sometimes. The strange thing, I'm on a good computer (Asus TUF FX705DY). What is this, and has anyone else experienced this problem?

-
The baker's rapidly responded to my last bug and are including a fix in the next release. Booyah. So I figured I'd bring up the other biggest nuisance bug that's been plaguing me for months. I took a video again, since that seems to be the best way to show exactly what's happening. Plain and simple, when you're bouncing a bunch of clips together, pretty frequently Cakewalk decides to provide you the large single clip that it should, plus it add a whole bunch of other clips that don't belong, into a new take lane. This happens so frequently across all projects, that I'm sure this is reproducible by someone else. I also just tried it again with auto-xfades off and it still happened. Cheers bakers! ❤️ @Noel Borthwick @msmcleod
-
 I'm still trying to track this one down, but I've been able to reproduce it twice. I'm going to start a new project and see if I can always repro it. But I wanted to bring it up. The details around this: Problem After extensive multi-track editing in Melodyne 5 Studio, during an Audible bounce of the project, it stops half-way through playback with no errors and no drop outs. It just stops playing. The bounce file is written to disk and contains audio up to the point of where Cakewalk stops (as you'd expect if Cakewalk dropped out during a bounce). Upon this point, nothing looks problematic. All tracks still have clips that show the waveforms and the clips all show melodyne is on them (RFX menu). however, The audio no longer plays on all the tracks that had melodyne running. Details Upon saving the project file, the project file size is MUCH smaller than before. IE: The project went from 9 MB with melodyne edits to now 1 MB. ^^^ These are the first time and second time reproductions of the issue. I had to re do about 4 hours of work, unfortunately. I'm fully aware of how to backup projects and as you can see, I have pretty good structure in my process. I have enabled additional auto save iterations every 15 minutes in case this happens again, but what is done is done. I'm still working to reproduce this in a new project, but I'm pretty sure I have a good idea what is happening, since I reproduced the issue in the same project. I believe that Cakewalk is doing some kind of plugin data size check and once it sees X amount of data for a plugin, it's assuming there was a problem and it's deleting all the data. This is purely a guess. But I think it's very coincidental that this point seems to be about 8 MB. How I got melodyne data so large: Melodyne studio 5 is an incredible piece of software. With the latest version, you have manual controls over de-essing, per note / syllable gain adjustments and so forth, in additional to pitch correction (so yeah, no shnarky comments about how you wouldn't need this with a good singer). In multitrack mode, you can also manually adjust stretching and timing of each word. It's a dream come true for adjusting vocals. And yes, there are things like vocal sync, but manually doing this in melodyne yields amazing results. And more importantly, this is what melo 5 studio was designed to do. So it's not like I'm demanding an odd use-case on this one. After talking to a bunch of people, they kept saying things like "you're supposed to bounce melodyne on each track or it does weird things". This is an unacceptable response. Again, the point of melodyne "studio" is multi-track editing in context. But I believe that maybe this is why they bounce each track. They may also be hitting this unknown limitation (assuming I'm correct about the cause. ) I'll be providing better repro steps for this. But I wanted to get this feedback started. If anyone else wants to do a repro, that'd be great too. I had about 7 tracks. On my last reproduction, I just started nudging and making random adjustments, saving and adding more until I saw the project size grow by about 8 MB. Then I did an audible bounce and hit this issue a second time. ❤️ bakers. Looking forward to resolving this. It was a rough weekend and I missed a deadline ? @msmcleod @Noel Borthwick
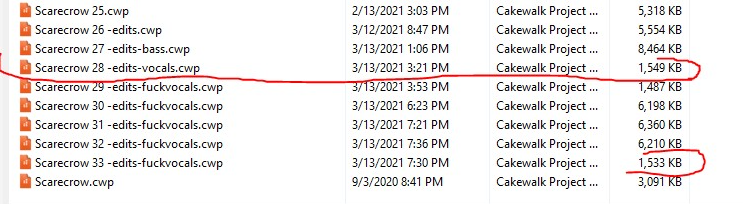
-
It's been doing this for a couple releases now and it's driving me insane. I uploaded a video since that's a lot easier to show the issue. This happens in multiple projects. I'd go as far as to say, probably all of them. When slip editing on Crossfades (shift edge clip over a xfade) - to move the edge + keep the xfade area, it moves random surrounding clip edges. And what's worse is "Undo" only undoes the change I made to the clip I'm slip editing. it LEAVES the horked surrounding clips. And it's not always obvious when Cakewalk has decided to betray me. I had troubles reproducing the issue again, at first, but I uploaded the full video just to show extra At 1:49 I thought I'd reproduced it, but it was just a temporary visual glitch that fixes itself when you let go of the mouse button. The audio is fine. At2:50 you can see where it highlights the clip to the left of the clip I'm working on (even though the audio isn't moved.... yet. But I have a feeling this is related somehow) At 3:40 is the first ACTUAL reproduction of the bug. And then there's many more later. So if you want to skip directly to the issue, go to 3:40 and beyond. I hit this so often, I simple just can't use the shift slip editing at all. https://www.youtube.com/watch?v=C_0xG92NZJE Enjoy and thanks bakers! Can't wait for this one to be fixed. ;)
-
Hi, just a heads up - it's not a big deal and the workaround is obvious and easy, but when changing the buffer size on the RME drivers (v 4.29) to small buffers, (64, 32) Windows gets a BSOD if Cakewalk is open. No problems in changing it without the DAW open, so the obvious workaround is to close CW before changing the ASIO buffer. It also doesn't seem to be an issue if the buffers are large (from 256 up I seem to remember). It's probably as much an issue with the RME driver as with CW but I haven't noticed happening with other applications open, so just thought of mentioning it.
- 3 replies
-
- 1
-

-
- bug report
- rme
- (and 1 more)
-
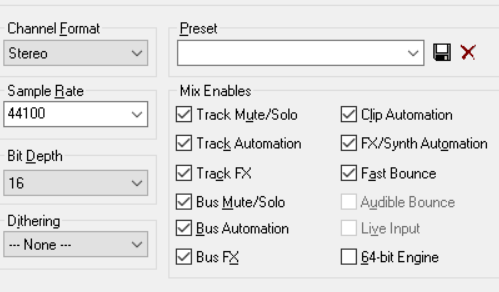
Hello. The wet level automation of REVERB 2 don't works on exported file, but in the program it works. I have checked "Track Automation"and "Bus Automation" in export options. Please for help.

-
I cant figure out what's wrong with it, I can go into older projects where I used the piano roll and switch the piano roll grid from lets say 1/4 to 1/32 and it actually change the length of the note spaces available but now when I do it, it doesn't change I have tried going into view, grid resolution, and then follow snap settings but that didnt change anything. I figured out what the problem was, I opened a new project whilst still having another open and somehow the bugged it and wouldn't change it even after restarting. To fix it I went into an older project with a non bugged piano roll, made a copy of it, then opened a new project from there, and that fixed it for some reason.
-
 I installed the free u-he plugins yesterday and the one in the title causes CbB to stop responding and crash with no error or apparent issue showing. You don't even have to load the plugin. Simply having it in your browser and interacting with the browser causes Cakewalk to hang. The other plugins don't have that issue and Triple Cheese works normally in REAPER and Cubase LE 10.5.
 -
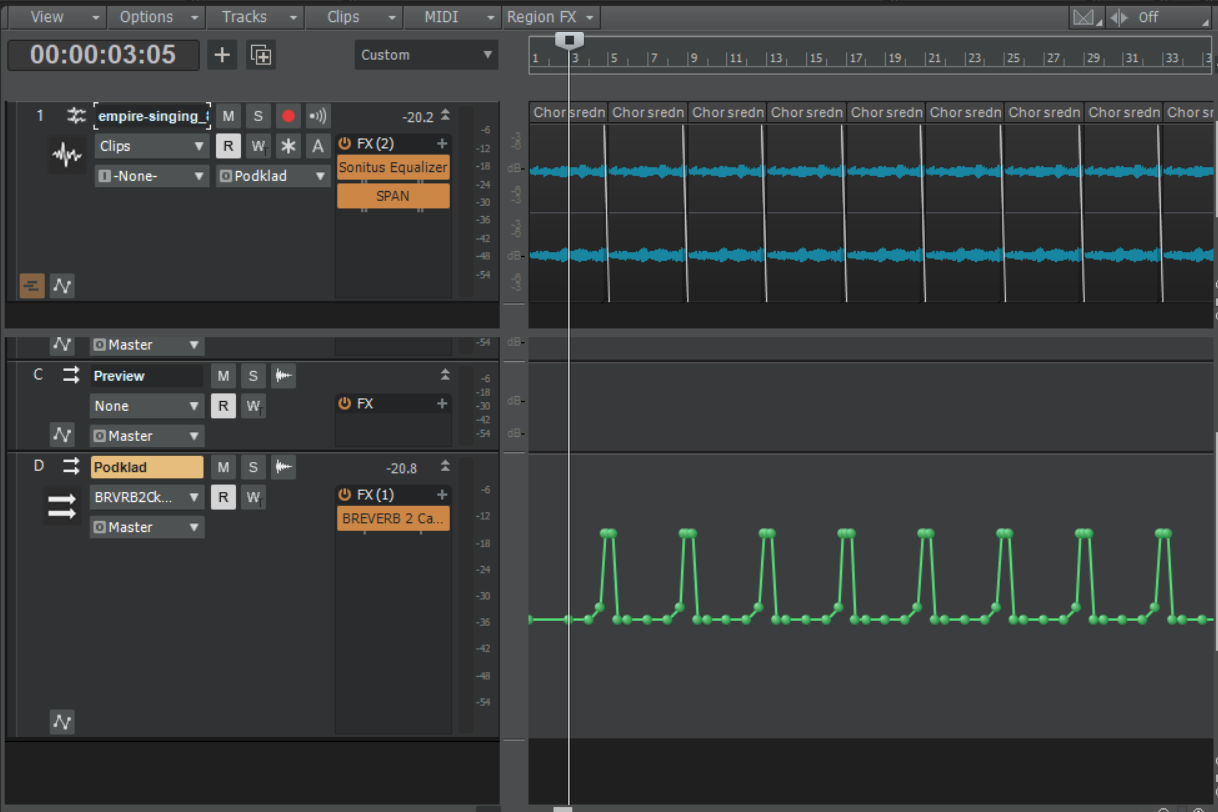
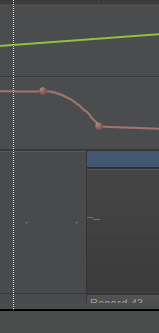
 I can only assume this is a bug, as ive tested it in every way possible, an no-one else seems to have a solution. Automation lanes sending MIDI CC to external gear are delayed ONLY when recording a sequence to an audio track. So, for example, I have a midi sequence sequencing a MODX, in addition to this, I have an automation lane controlling filter cutoff. If I monitor the audio track the MODX outputs to and hit play, everything is in time, the filter opens when i want it to, HOWEVER, if I then proceed to arm the audio track to record, then hit 'R' to start playback recording, the automation is late, delayed by about 1 or 2 bars (at 128 bpm). I have also included an image for reference to explain what I mean: using the image as reference, the red lane is the filter cutoff for the midi sequence (green notes). If the audio track for the external synth is monitored, and simply 'play' in cakewalk is hit, the gear is sequenced perfectly, that curve is at that exact point, HOWEVER, should the audio track then be armed for recording, and recording started using the midi sequence, the automation is sent late, approximately where I have marked. Ill include an example of the 'late' automation: late_automation.mp3 Combined with this image, you should be able to hear the difference between when the automation is sending, and when it should actually be sent. the filter should open up BEFORE the lead starts playing, as sequenced (and which it does do if you simply hit play and monitor the audio), however, it doesn't, as can be heard, it opens AFTER the lead starts, which is later than it is sequenced. This ONLY happens when recording the audio from the external synth when sequencing it from cakewalk. I have checked everything, timing offsets, buffer sizes, nothing is wrong, I even looked at the midi events cakewalk is sending, and the times for the start and end of curves etc... for envelopes are sent at exactly the right time (though, I was using the cakewalk event viewer). This is also not exclusive to just my MODX, every synth I have ever sequenced with cakewalk has experienced this. I have tried multiple different audio drivers, including those for the interface in the MODX, with no change. EDIT: So after some digging around, it turns out this happens ONLY when a count in for recording is set, this suggests to me its unintentional, and certainly a bug, but should also be a quick and easy fix.
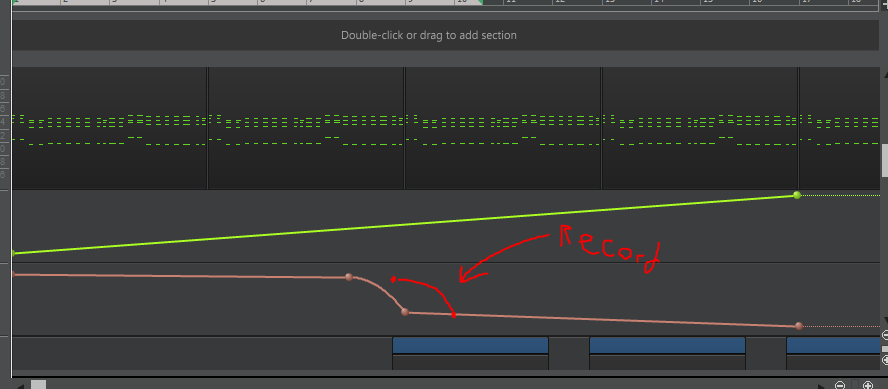
-
I was wondering if I should make this post or not, but it has run its course. There are some issues with the notification system that make it unusable and getting more in your way than anything: - When you click on the bell to see which notifications you have, clicking on any of them automatically marks all the others as read. That makes notifications semi useless, as now you have to remember which notifications are new and which are not simply because you chose to see one. - If you click on the bottom toast to see a notification you just received, it's not marked as read on the bell. While that might be a desirable feature, it may lead to user annoyance after they either went away for a while or weren't paying attention, see a notification on the bell and it's from a message they've already looked at or responded to.
-
Not a huge deal, but while the Bakers are being so attentive to us, I figured I'd ask. I fat finger the automation lanes button all the time. I mean to open up the comp lanes. And when I do this and quickly click it again to un-show the automation lanes that I never wanted to see in the first place, Cakewalk creates a volume automation envelop and leaves it in track view. I really don't need to see volume envelopes until I get to the mixing phase and I want to create fader automation. And I don't really want to see unnecessary automation lines on the track view. It'd be nice, if you open the automation lanes and close it without actually having any fader envelope nodes defined (leaving it in automation "jump" mode for the entire project), the track view continued to not keep the fader automation visible. I know, I'm being pedantic. But I do this all the time. Never hurts to ask. On a side note, if the take lanes and automation lanes icons were more visually distinct, like they were different colors, I'd probably discern between them more easily. But ever since their inception, I click the wrong ones constantly. So I don't think my brain is going to stop. Cheers. 3E476386-5DE6-4558-A557-126280C87FED.MP4
- 2 replies
-
- 1
-

-
- track view
- automation
- (and 3 more)
-
 Running 09.2020 for now. Have a project with about 13 instances of Dimension Pro. Tried adding an instance of Chromaphone 3. Appears to add ok, but as soon as I go to play the project I get a crash. Dimension Pro 64 is showing as the source of the crash. You can see the crash occurring here as it occurred during a live stream: https://www.twitch.tv/videos/813105494 After that I tested something else. I opened an essentially blank test project with no instruments loaded and then added Chromaphone 3. The project played fine. I then closed the test project and went back into my main project and tried to play it, I got another crash even though Chromaphone had been loaded to a different project! I'm assuming there's some memory mishandling here, but I don't know if it's a Chromaphone or a Cakewalk issue. The fact that I experienced this issue with something occuring in one project affecting another led me to believe it was a Cakewalk issue. Cant add minidump for now as it exceeds the max attachment size but can provide if needed.
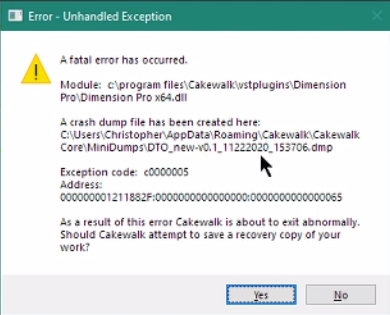
-
Bouncing multiple tracks to a created mono track sometimes gives you all the tracks mixed to a single mono track, sometimes gives you a number of tracks mixed into the single mono track selected and a new mono track that contains the rest. There's no way to turn this behavior off. Changing interleave or setting the destination track to stereo or mono doesn't change anything. Even if you set that bounce to stereo, it will do the same thing, except the tracks will be stereo. The only way to make the feature do what it's supposed to do is sending all the audio to a bus and bouncing that bus to a track. Then it respects what you have set on the settings. Aux tracks exhibit the same bug.
-
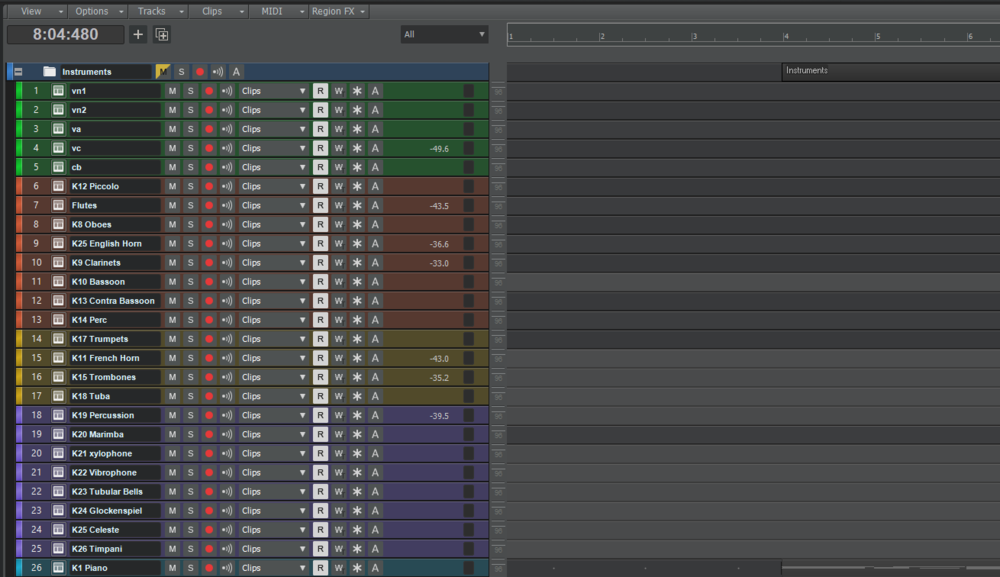
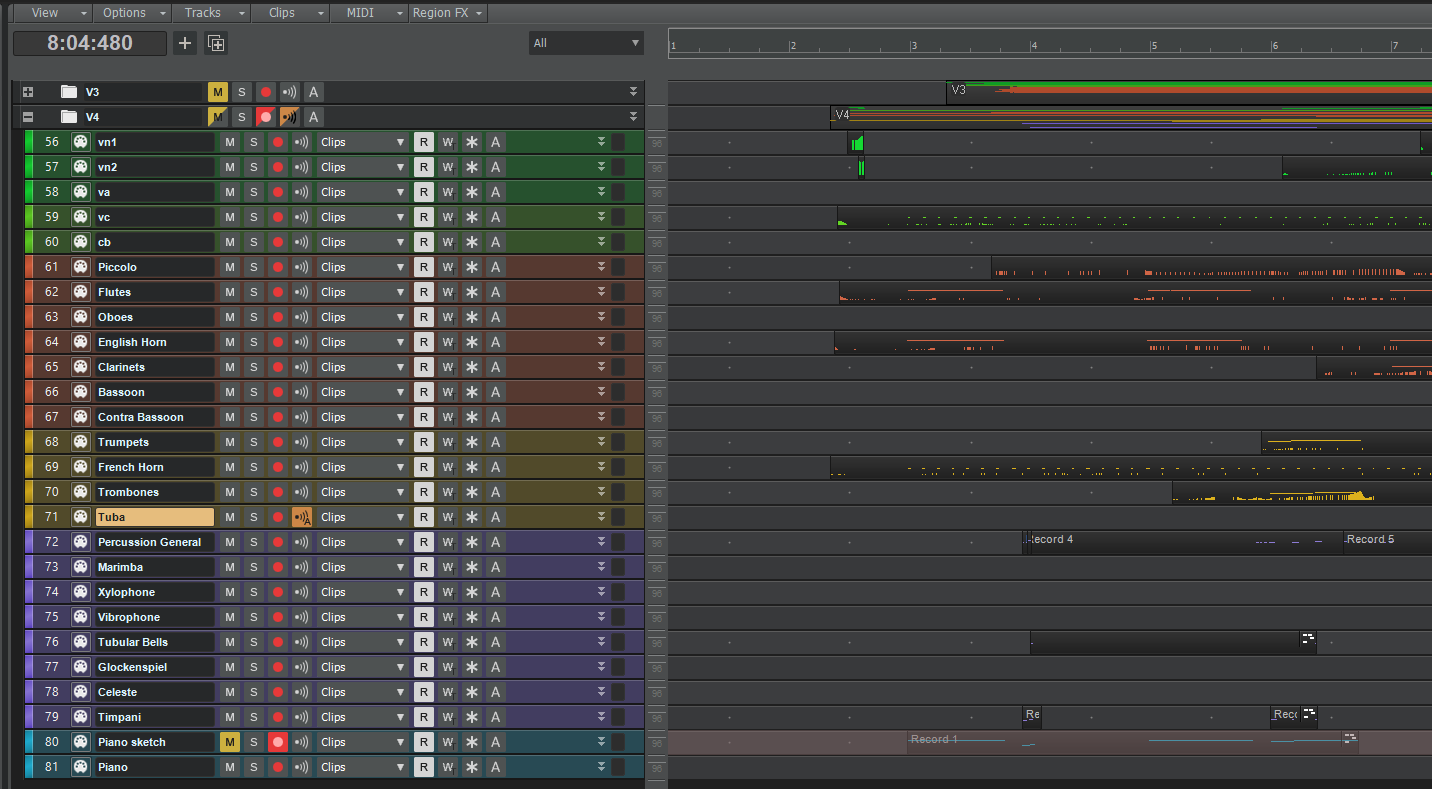
I have a particular use case and I'll do my best to explain it. I'm working on synthestration and my track structure looks as such: a Track folder with a bunch of instrument tracks in it Track folders labeled with a "version" of the score I'm working on. within these version folders are MIDI tracks that correspond to the available instrument tracks in the "instruments" folder. I make big changes to the score periodically and I essentially just duplicate the "version folder" which contains the midi tracks and continue from there. Yes, I could keep these version iterations in their own project files, but I like to have quick access to the previous versions. Loading in a ton of sample libraries in/out just to hear previous version, is not ideal. Also, I like being able to compare notes and harmonic structures, all in the same project. And midi data is small. This shouldn't be a big deal at all. The Challenge I'm constantly soloing out different groups of midi tracks in order to hear how they're playing with each other. When I solo a midi track(s), it works exactly as you'd expect. But when I unsolo the midi tracks, I get no sound, because the source Instrument track remains solo'd, but there are no corresponding midi tracks to feed the instrument track. I have to go to the console bar and click the solo button to un-solo everything and now I'm back to normal. This is unideal. What I'd like is that if you solo a midi track or group of midi tracks that feed an instrument track, upon un-soloing the last midi track that feeds the instrument track, both the last midi track AND the instrument are no longer solo'd. This would have a much more pleasant work flow. Here is a clip to show the issue directly: clip.MP4