

.jpg.bd4afad8655e1f3c2746cbe7821097c7.jpg)
-
Posts
141 -
Joined
-
Last visited
Everything posted by musikman1
-
Thanks for clarifying bitflipper. Makes sense. Yeah I'm an older retired guy so I guess I still have that mindset of the days when we were gain staging with all that analog equip. I remember watching my band's sound engineer, and picking up pointers from him as he was gain staging the board. The good ol' days! lol What I've been used to doing is once I get the mix sounding good, and a good level balance between all the instruments and vocals, I then usually bring everything up equally until I've got the Master channel meters hitting no higher than between -3.0db to -5.0db, and then I add a limiter at that point to get a little punch without ever peaking anything. So let me get this straight, are you saying to add the limiter to the Master channel while it's still down at say -12.0db without ever bringing up the levels of all the tracks once the mix sounds good?
-
Thanks, I will give all the suggestions a try, very much appreciated! I like when the solution is simple! :-) That de-esser is part of CW's vocal strip, and I also have the delay section turned on. So I can just turn off the de-esser section and keep the delay on the submix. I don't think the de-esser is imperative anyway on this particular vocal track. I should be good with just the delay. I will make note of your suggestion for future reference though, thank you.
-
Hey bitflipper, thanks for the reply. I assume by everything, you also mean the music tracks. It seems in this situation in order to keep the vocals above the music I'd have to turn down the music tracks too if I take down the vox to avoid clipping the plugin. . The submix faders for the rest of the instrument mixes are ranging from -4.0db to -9.0db. (This would include AC Gtr, Elec Gtr, Bass, Drums, Keys.) There's always that question of once I have the entire mix running with no peaking on anything, should I reach for the individual track faders or the submix faders to make overall mix adjustments...I do have a general method I follow...see below.. Pull back just the individual vocal tracks, or also the vocal submix fader? What I usually do initially is try to get a fairly strong signal on the individual tracks (no higher than -3.0db) then once I have all the individual music tracks balanced between themselves, and then balanced with the other instruments the way I want them, I bring them all down equally even further to give plenty of headroom in the Master bus. If I need to take any instrument mix down even further in the overall mix after that, I'll generally just use the submix faders. I'm not sure if this is 100% technically the optimal way to do it or not, but until now I haven't had any issues with peaking or not having enough headroom. Please advise if you have any suggestions. Thanks!
-
Hi I've got a couple of lead vocal tracks, and a couple of harmony vocal tracks feeding one vocal sub mix. In the sub mix FX bin I have the following, in order top to bottom...EQ, Waves Doubler, CW VX-64 (just using delay and de=esser sections), and Waves TruVerb Reverb. The individual lead vocal tracks faders are set to -1.0db, the harmony vox tracks faders are set to -4.0db, the Vox Sub Mix fader is set to roughly -2.4db. When playing the track, none of the individual tracks meters or sub mix meters of the vocal are peaking over 0.0db, and the vocals are sitting nicely just above the music, and the Master channel is staying well below 0.0db. When I check the individual plugin meters, it's a different story... All of the FX gain meters are showing just under 0.0db as well, except for the Waves Doubler. For some reason that one is hitting over 0.0db several times throughout the track. Not by a lot, it's peaking to around 1.1db to 2.5db. The 3 gain controls in the Doubler plugin can be set individually for the Direct signal, and the added/doubled Voices 1 & 2. I have the Direct gain set at -4.0db, and both the added voices set at -5.5db, but I'm still seeing the meter in the red on and off throughout the track. I can get it to stay below 0.0, however I'm losing too much gain when I do that, which then makes it necessary to raise the entire vocal sub mix in order to get the vocals back to sitting above the music where they belong. I'm leaning towards just ignoring the peaking going on with the Doubler plugin, since it's not that much over, and I'm not hearing any distortion at all. It's just strange that all the other plugs in the chain are fine. I am thinking that because the Doubler plug is "adding" two extra voices to get that "fattening" effect is why it may be peaking. So the dilemma is, if I start lowering the gain controls for the added voices in the Doubler, while keeping the Direct gain where it is, I lose too much of the effect I intended to get in the first place. In turn, if I lower the added voices gains, AND the Direct gain, I lose too much gain and now I'm reaching to raise the vox sub mix slider because the vocals are too soft in the mix.......which in turn, raising any of the faders will again begin peaking the Doubler plug's meters. I even tried backing off on the output gain of the EQ plug, since it sits in line before the Doubler, and that helped a little, but again, I can't go too far, otherwise I lose too much signal. Any thoughts? Thank you.
-
.thumb.jpg.ca18c085f2915ca23c15f81c3945d966.jpg)
Project Notes showing in MP3 Comment Section
musikman1 replied to musikman1's topic in Cakewalk by BandLab
Thank you, that works!.. much appreciated. I'm still wondering why those notes end up in that comments box anyway. Is that some kind of default setting that can be changed? I'm not certain, but I think this might have began happening on one of the recent updates, because it never used to happen until fairly recently. -
Hi When I try to export an MP3, if I check the "Encode ID" box I noticed that all my project notes are automatically showing up in the Comments box at the bottom. Even if I don't check the Encode ID info box, I can still see the project notes in the comments box, they're just grayed out. In some projects I have a lot of notes. How do I prevent this from happening? I have been just deleting them, but it takes forever if there are a lot of notes because the box is small and I can only highlight a couple of sentences at a time for deletion. This is annoying. Is there a setting somewhere that needs to be turned off ? I've never seen this before. thanks! MM
-
Ok, I wasn't doing that. Thank you for letting me know, that's probably a better way to do it instead of just bouncing the track. Also, I would think having all those Melodyne edited clips sitting there un-rendered would unnecessarily be taking up some kind of CPU or memory as well, correct?
-
Ok I see. Thanks guys! I usually just do a save of my project as I go, then render the entire vocal track once I'm done editing the whole thing with Melodyne. When I render it I just use bounce track function, and bounce that entire vocal track to another audio track, I assume that's the method you are referring to? I think the only other method would be to freeze it, I usually just bounce it down, same result. I'm editing small pieces of the vocal track at a time. Is there a better or more efficient way of doing this?
-
In my most recent project I've been using Melodyne Assistant to edit my vocal tracks. I've noticed after I have done a Melodyne edit on a vocal audio clip (not an entire track), I can't split that clip anymore. When I try the split function is grayed out, unavailable. I can crop it by dragging one end or the other, but can't split it once I've used Melodyne and saved my work. I wanted to split it because I had the same lyrical phrase on the tail end of another clip that came out better after editing with Melodyne. I figured I could just split the clips, and replace the end piece with the better of the two since they were the same lyric/phrase. I ended up being able to work around it by drag cropping them both and sliding the better one into place. Just wondering why does the clips split function gets cancelled out after using Melodyne?
-
Thanks for clarifying John. Yeah I use different reverbs for different things, so the reverb buss would work if I was to just use one blanket setting for everything. For years I didn't pay much attention to setting things up correctly because my projects were simpler. When I started creating more complex projects with multiple tracks for each instrument, I watched a couple of CW videos on YT on how to set up the projects and busses properly, etc....because things became more complex after awhile. I try to keep things as simple as possible, enough to stay organized so things don't get out of hand. Seems to be working well at the moment.
-
It was the reverb. This plug can be inserted as either Stereo, Mono, or Mono/Stereo. I had it in there as Mono/Stereo, figuring I'd be fine, which I was, until I tried panning the tracks. I removed it and re-inserted it as a Stereo plug and all is well now, works fine. It kinda threw me cuz I usually don't use this particular plug very often, so from now on I'll know to add it as a Stereo plug whenever possible. Live and learn! John, I do have the effects on the AC Guitar sub buss, which is how I usually do it....did you mean I should add reverb FX to the Master buss instead? You just said "buss", please clarify. Thanks!
-
UPDATE: Ok, narrowing things down... I just tried turning off the FX in the FX bin in the AC Guitar Buss, and the panning now works fine. This is still kinda unusual though because I've never had this issue before, even with FX stacked in the Buss channel. After reading another similar thread I had checked the interleave switch and that was fine. I know some FX have the ability to be added as either stereo or mono, and some even have a mono/stereo setting. UPDATE: I have 3 FX in that buss channel, and I started turning them off one at a time with the AC Guitar track panned hard left, and I've narrowed it down to one particular reverb FX causing the issue, not sure why yet though, but it is the last one in the chain, so...
-
Hi, My usual routing for most projects is routing each instrument to its matched sub buss, so all drum tracks route to the drum buss, all the acoustic guitar tracks all route to the acoustic Gtr buss, etc....and each buss is routed to the Master buss/channel I recently recorded 2 Acoustic guitar tracks (mono), and want to pan them one left and the other right. The AC Gtr buss pan knob is set to center. This is usually how I set it up and it usually works fine if I want to pan the individual tracks left or right. This time when I tried to pan full 100% left on the first AC gtr track the track meter shows only full signal on the left and no signal on the right(as it should), but I noticed it didn't sound panned, it just sounds like the volume gets lower and I'm still hearing signal through the right side too. The meter on the AC Gtr Buss, however, does show both L & R sides getting full signal, even with the individual track panned hard left. This has never happened to me before, there must be some logical explanation, I just haven't hit on it yet. If I try routing that same individual AC Guitar track direct to the Master instead of the AC Guitar buss, it pans fine that way, it's only messed up when I route it to the AC Gtr buss. All my other instrument tracks in the same project that are routed to subs pan fine. I do have effects in the AC Gtr buss, will check those, but I haven't had an issue with FX in subs before, we'll see.
-
Hey guys, thanks for jumping in here with those solutions! Both of them worked just fine. In the Bounce To Track dialog in the time drop down I clicked on the three dots (...) next to "end" and selected "loop end", which extended it. I also tried bitflipper's suggestion of just dragging the midi clip which gave me the same result. Simple solutions I didn't know about and for some reason couldn't find in my searches. I also don't remember solving it this way the last time, which was many versions ago, just glad to have the solution. Thanks again for being so generous with your time and knowledge. As always the good people that have made up this forum for many years, came through with the answers again, regardless if the problem is a complicated one, or a simple one such as this one. I'm proud to be a part of this community.
-
Funny you mention that Eric, ....right after I posted here I went back to see if the same thing would happen if I freeze a track, and found that freezing the track did pick up the entire trail of the midi clip. Thanks for the reply, your suggestion gave me a temporary work around that I can use for this particular application. However, I'm still in need of a more permanent solution for the Bounce To Tracks option though, because if it's going to do that when I'm bouncing longer music tracks or multiple midi tracks, it's still going to continue to pose an issue for me. Hopefully someone has the answer to that soon.
-
Hi I remember running into this a long time ago, and can't remember what the fix was, but I think it was simple. I'm using a VST synth to make very short recordings (for phone ring tones) which end up being only a couple measures in length. Some synth sounds I use have an audible trail off FX that continue to sound and slowly fade off even after releasing the key on my controller keyboard. When I use Bounce To Tracks to bounce the MIDI track to Audio, it cuts off that audio trail off, and the sound ends abruptly on the audio clip. You can visibly see that the bounced audio clip length ends exactly at the same length as the MIDI clip ends. This is frustrating to say the least. I'm pretty sure there is an easy settings fix, I just can't remember and haven't been able to find it! Any help appreciated if you know why this is happening. Thanks, much appreciated MM
-
Ok, good to hear I'm not the only one ! I haven't yet gotten to the point of using the commit command. ?Interesting that it plays fine after permanently altering the project, I'll have to give that a try. I wonder if they plan to address and fix that in the next version
-
I've been experimenting with the Arranger track feature. I'm still a noob with this feature, but so far I've noticed when I've arranged my song in the order I'd like to hear it, during the playback, the audio has a hesitation or skip at the point when it changes to the next section, (especially if the sections are not in the original order of the song). The song plays fine with Arranger if all the sections are played in the original order I recorded them in. When I begin re-arranging the order is when I get the skip. I even get a skip when using Arranger if for example I want to play two repetitions of the same chorus section. To further test this, I looped that same chorus section just using the regular Loop tool and it loops fine with no skip. When two of that same chorus is butted together in Arranger, it skips from one to the next. All the tracks in this particular project are audio, and I know that audio is likely not going to be as accurate as midi would when using Arranger, but shouldn't it operate with at least the same accuracy as the regular loop tool?
-
Best Hardware for a PC Upgrade? - Help pls
musikman1 replied to musikman1's topic in Computer Systems
Michael, I did try it with a stand alone B3 organ and didn't work. However, my PC tech just fixed it, all set now! He did what you said about uninstalling the driver then re-installing it, but he did fix a couple of other things before doing that. It seems I'm all set now. It was just strange that CW would notice when I turned off the keyboard, and when I turned it back on it asked if I want to add it, but it never showed up in the active midi device list in CW. Thanks guys for hanging with me on this and for all the help, much appreciated! -
Best Hardware for a PC Upgrade? - Help pls
musikman1 replied to musikman1's topic in Computer Systems
Also, I read an old thread posted by Scook directing to another forum that was regarding multiple instances in Device Mgr, which I had. You can see a few grayed out listed along with the solid colored one. I did delete those last night to try to see if that would work, but so far no luck. Here's the thread.... https://www.harmonycentral.com/articles/modules-and-midi/solving-the-windows-midi-port-problem-r309/ It also mentions windows only allowing 10 entries. This is way above my pc knowledge, so I only deleted the duplicates for my keyboard that were grayed out and left the one solid color entry. I'm not sure what all the others are, possibly equip that my pc tech had connected when he did the upgrade, so with not being able to distinguish what the others are until I can speak to him, I just left them alone, which makes more than 10 entries. Still doesn't explain why CW doesn't list it.....also I have a stand alone B3 organ that is also no longer recognizing the keyboard, so it appears it's not just CW.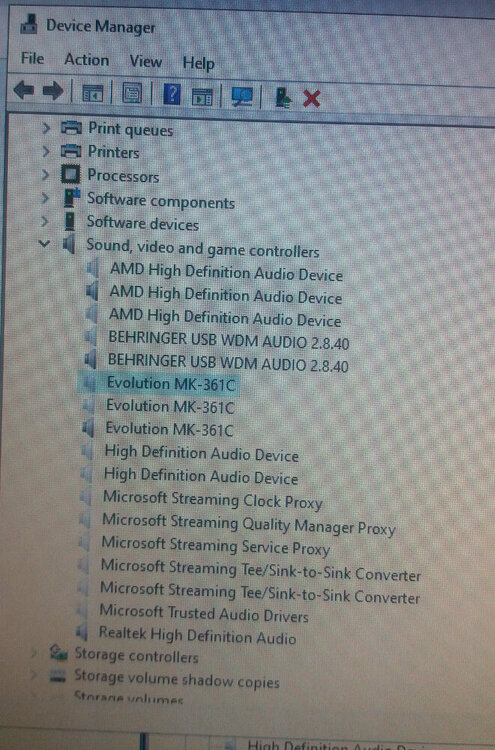
-
Best Hardware for a PC Upgrade? - Help pls
musikman1 replied to musikman1's topic in Computer Systems
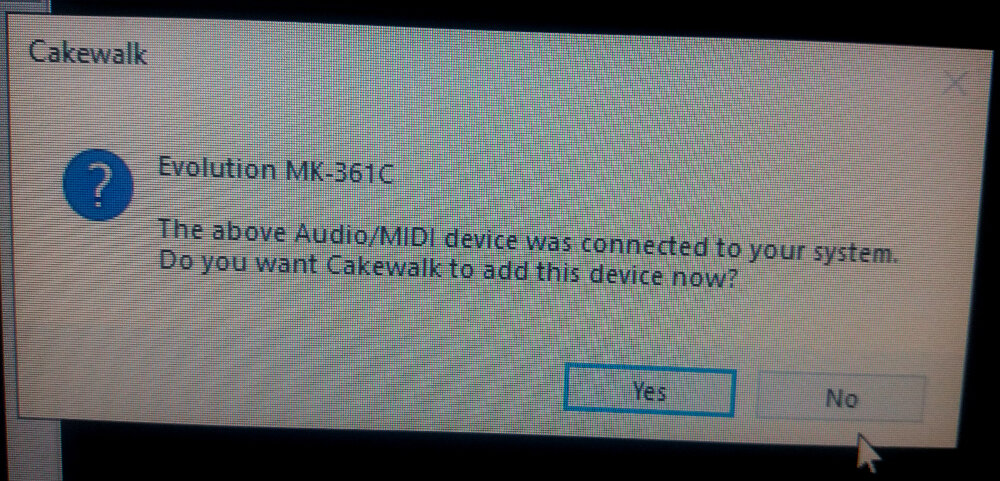
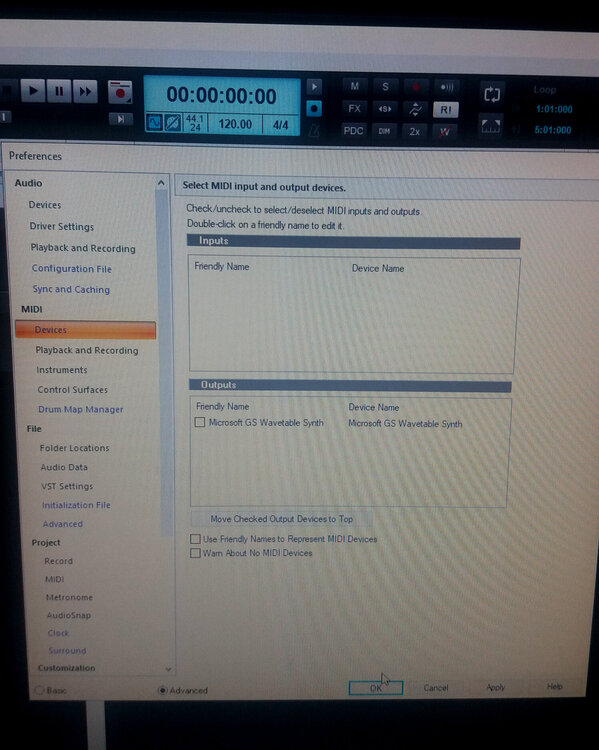
Thanks for the replies, much appreciated. The very strange thing about this, is that Windows has it listed in Device Mgr as working properly. To top it off, today while Cakewalk was open, I shut the power switch to the keyboard and Cakewalk threw a message up that the device has been disconnected and do I want CW to reroute, I chose No. Then when I turned the power back on, Cakewalk asked me if I wanted to Add the device, so I hit the Yes button to add it, but as you can see in the 3rd image, its still not showing up in Preferences/MIDI/Devices. I also tried closing CW after than and re-opening, but didn't work. Same result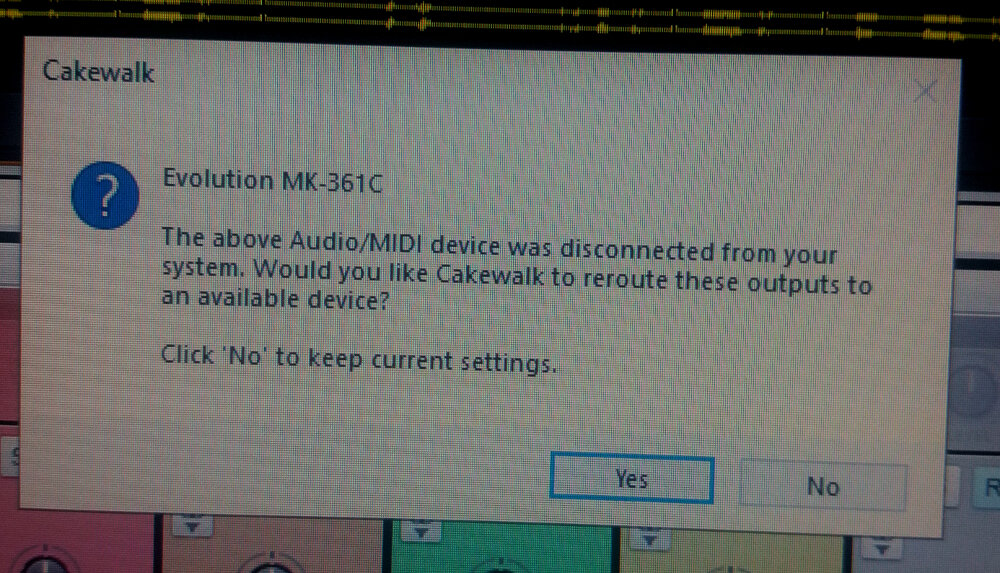
-
Best Hardware for a PC Upgrade? - Help pls
musikman1 replied to musikman1's topic in Computer Systems
It was plugged in and turned on when I powered up just now, but I'll give a reboot with it connected to see if that will work, thanks! Ok, nope, that didn't work. I have a call in to my pc tech, he should be able to figure it out. This midi keyboard is very old, plus it is M-Audio, and typically their drivers can be a pain. I like the feel of this keyboard, which is the ONLY reason I keep using it, but I think it's time to retire it and get something else, once I have the funds to get a new one. This should be a simple issue to fix. -
Best Hardware for a PC Upgrade? - Help pls
musikman1 replied to musikman1's topic in Computer Systems
Yes that's what I thought too, it is listed in device mgr in windows, but when I open CW it's not showing as a midi device option. One thing I thought of is I have yet to authorize my new windows since the pc upgrade, I have to get the new reg code from my tech, maybe that's what's causing the issue. Maybe after that it will work, I'll give it a try, then if not I'll try re-installing the driver, could be corrupted driver. -
Best Hardware for a PC Upgrade? - Help pls
musikman1 replied to musikman1's topic in Computer Systems
Hi, well I just got my upgraded PC back and in the process of checking everything and getting set up again. I have an annoying problem in that Cakewalk is not seeing my midi controller keyboard. I checked in Windows Device Mgr and it is showing up there and showing that it is working properly, but CW still doesn't see it. It just is not listed in CW Preferences/MIDI/Devices. The only difference I can think of is when I upgraded my PC, I now have all 3.0 and 3.1 USB ports, I no longer have any 2.0 USB ports, however, all the 3.0 and 3.1s are backwards compatible, and the ports must be ok because Windows is recognizing it, but CW is not. I've gone through a few old threads here, but nothing seems to be helping. It is an old M-Audio MK-361C, but it had always worked fine before I upgraded my PC. I suck at driver installation, but I did try anyway to uninstall the driver and re-install, but when I went to uninstall I got a message that I would need to close the USB MIDI Series Audio Device Mgr before I can uninstall it. Not sure what that is, so I just canceled the uninstall. Is there something I can do other than uninstalling and re-installing the driver? -
CWbBL CD Burner Utility lacking basic functions
musikman1 replied to musikman1's topic in Feedback Loop
Ah, ok, I thought it might be more expensive. I must have been looking at something different altogether. Thanks, but I'm not going to be able to afford the $400.00 at this point in time, but will keep it on the back burner. I may however look into the elements version.


