.jpg.bd4afad8655e1f3c2746cbe7821097c7.jpg)
-
Posts
141 -
Joined
-
Last visited
Everything posted by musikman1
-
Alright then, so the 32 bit setting covers everything I render without the need for dithering. Thank you my friend. Does that mean even if I just bounce a couple of guitar tracks to save space, just for example, that bounced/mixed guitar track is going to also be 32bit?...(or any other smaller groups of tracks I bounce for that matter?) Ok, then NO dithering at all at any time in CWbB, and only use dithering one time in the mastering software export. Got it. I wonder why CWbB Bounce to Tracks dialog always shows the dithering setting in the drop menu by default?
-
Scook, I don't know tons about the bit depth and dithering. But I did watch a few videos on it from another thread awhile back. I seem to remember that going from a higher bit depth to a lower one....ie...24 to 16 it is recommended to use dithering. Yesterday I realized that I had my Audio Data settings at Record = 24 and Render = 16, and I think I had changed that Render setting from 24 to 16 a while back prior to this project, and then forgot to put it back at 24. So any tracks that got bounced automatically went to 16 bit, even if it was just a couple of guitar tracks and not a final entire mix bounce. As a result I now have a mixture of 16 and 24 ( so that's how I got here) The reason for my question is because I noticed on a project that I had mastered I had a sort of a glitch or stutter on one vocal part on the master but not on the unmastered mixdown. The only thing I could think of that may have caused it was maybe using dither to export the mixdown to wav file, then again using dither in my mastering software may have been too much. I had asked someone knowledgeable who told me they wouldn't recommend using dithering twice like that, only on the final master output. In this particular project I had bounced the mixture of 24 bit and 16 bit tracks down to a 16 bit mixdown track without dithering, then when I exported that mixdown to a 16 bit wav file I used dithering, then when I ran that through my mastering software I used dithering again upon exporting there. So I basically used dithering twice, once exporting the final mix out of CWbB to wav, then again exporting from the mastering software. So am I to assume the best way to do this as far as a step-by-step is to Step 1..... first render/bounce all my tracks ( a mixture of 16 and 24 bit) down to one 24 bit track final mix without using dithering, then Step 2.... exporting that final 24 bit mixdown track to a 24 bit wav file without dithering, then Step 3.... put that 24 bit wav file in my mastering software and export using dithering to 16 bit 44,100? (The end result if I want to say burn a CD is why the 16bit 44,100 final master)
-
My goal is to try to get my final mix at 24 bit with no dithering, prior to using mastering software on that mix. The mastering software will apply dithering at the final stage, as it will be converted from 24 bit to 16 bit. When I looked at the bit depth of all my audio tracks, some are 24 bit, and some are 16 bit. My record bit depth in CWbB is set to 24, and I use drum loops that are mostly 24 bit, but sometimes I need to use some that are 16 bit. Plus there are other tracks at 16 as well, I'd say it's about 60% 24bit, and 40% 16bit. If there is always going to be a mixture of 16 and 24 bit audio clips/tracks, can I still bounce everything down to a final mix of 24 bit without dithering?. .. I'm trying to avoid applying dither more than once. I'd rather have a 24 bit final unmastered mix to put into my mastering software, and then dither down to 16 bit at the final master export. Is there any way to do this if my tracks are always a mixture of 16 and 24 bit? Are my 16 bit tracks negatively affected if I bounce all tracks to 24 bit mixdown?
-
I haven't used the screensets function, I'll have to look it up, but that sounds like another good way to achieve this. Tried this, and it works as you said, as long as the screen availability is smaller than the number of tracks, they minimize all the way, regardless of whether they are each sized differently when opened, which is what I needed. After collapsing, I tried re-opening a few and they retained their original size they were prior to collapsing. Thank you. It seems the console view has a "widen all strips" and "narrow all strips" option, wonder why they don't have one for the track view. I guess the Shift + F is the closest thing. Thanks again, much appreciated.
-
.thumb.jpg.ca18c085f2915ca23c15f81c3945d966.jpg)
DOES THE PRO CHANNEL HAVE A GLOBAL ON/OFF FOR ALL TRACKS?
musikman1 replied to charles kasler's topic in Cakewalk by BandLab
Ok thanks. I must have accidentally Ctrl Clicked on something. it was just strange that not only were all the Global on/off buttons lit, there were two or three modules in every track and sub that were lit as well. I know since beginning this project I never touched any of the pro channels or modules at all. I'm just glad I figured out what the issue was, and glad I had a backup just in case! Thanks guys, much appreciated -
Is there a shortcut to Collapse All Tracks at once in Track View? I know you can Ctrl+A to highlight all tracks, then Ctrl and resize all tracks at once, but can all the tracks be collapsed (and/or opened) at once, regardless if each one is sized differently? I haven't been able to find it in my searches. I know it's been asked before though, so I have a feeling it cannot be done.
-
DOES THE PRO CHANNEL HAVE A GLOBAL ON/OFF FOR ALL TRACKS?
musikman1 replied to charles kasler's topic in Cakewalk by BandLab
This thread caught my attention because of something that accidentally happened to me today. I was working in a nearly complete project today, just highlighting all the tracks that I wanted to bounce/mixdown to one track. When I played back the mix I just bounced the sound was way off from what it originally was before the bounce. For about fifteen minutes, I couldn't figure out what happened. I knew something was different. After looking closer, I noticed the ALL the prochannel Global on/off switches were all "on", in both the regular tracks, and in all my subix busses, plus, some of the prochannel modules had been turned on in ALL the tracks an subs as well. After going through and turning them all off one by one, my project sounded back to normal again. What a pain though! I know I didn't use any prochannel effects in this project at all, I only used 3rd party VST FX, so the prochannel FX somehow all got turned on at once. Is there some way this could have happened accidentally? I didn't think there was a switch that turned on ALL the prochannels at once, including sub busses, is there? -
Right you are scook! I did just figured that out a few moments ago and logged in to cancel the thread and saw your post. I guess I had a senior moment and the fog suddenly cleared! 🤔 Sorry to have wasted a thread here, but maybe someone else will benefit from the info. Thanks my friend, much appreciated.
-
I've resurrected an old project and for some reason the Metronome Bus and Preview Bus were missing in my Console View. I did figure out how to add the Metronome Bus and route the metronome audio to it in the Metronome audio settings in preferences. However, I can't remember how to add a Preview Bus so that when I audition loops in the media window, I can control the volume with a Preview bus/track. Right now the play and stop buttons are lit in the media window when I select a loop, so I know it's playing, but no sound is heard...... so wherever the option is to route that audio is, I haven't found it yet. I've run into this once before long ago, in fact, I probably asked it on the old forum, but right now I can't for the life of me remember how to do it! And I know it's a simple solution. Thanks in advance.
-
In Your Face BASS - What's your strategy?
musikman1 replied to musikman1's topic in Production Techniques
This did not work for me! At least not completely.... I just tried drag copying an audio clip that is a short single acoustic guitar line. I dropped the copy into the midi track, and I got midi notes that played the same rhythm as the played a/c guitar line, but all the notes converted at the same pitch all the way across. I'm thinking maybe there's a setting in this dropdown menu that I'm supposed to use instead of "default"? I do have Melodyne Assistant, so maybe I can do poly too, once I get this working properly. Must be some setting that's not right, cuz the acoustic guitar line is a pretty clean one. I didn't need to open Melodyne, right? I didn't open MD, just drag copied the audio to a midi track. EDIT: Ok, I just tried using the "Melodic" setting and I got the note pitches right, that worked, kool! It's not perfect though, so I guess there's no tweaking the conversion settings. EDIT 2: I just found this thread that has a good simple video on the process, although the "Select Algorithm" dialog didn't come up, so it may have not been added to the CWbB version at the time of that video.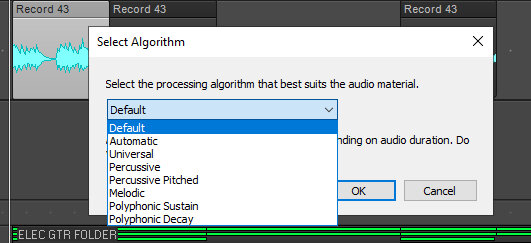
-
Thanks for clarifying John. Ok so you're basically setting the master fader at 0.0db as well. Makes sense. I have an old Joe Meek Comp/EQ (hardware unit), and I love how it sounds on vocals. Last time I did a vocal track I used it. Problem is it gets recorded with the Compression on it, so if I want to add FX in later, I'll be adding whatever FX on top of the Joe Meek compressed vocal. I try to use a mild setting. According to some of the comments I've noticed many are saying they use more than one compressor on the same track. It's a really old unit, but gives the vocals a lot of nice presence.
-
In Your Face BASS - What's your strategy?
musikman1 replied to musikman1's topic in Production Techniques
I have done that many times when the track is originally recorded as midi using a vst synth, it's a good way to audition sounds, just keep dropping in a new synth. However, what I was asking was about what Glenn said. If I'm reading it correctly, he said he records a guitar line (as audio) on an audio track with his Strat, so it's audio to begin with, no midi. Then he said he's "cleaning with Melodyne, and converting it to midi, then playing it using the professor vst or the CW studio instrument bass".... So my question is, how is the audio being converted to midi?? What tool in CW is used to do that? I assumed it might be possible by now, but I've never really looked into whether or not it could be done within CW or Melodyne. So what is the procedure to converting audio to midi? (Is Melodyne doing the conversion to midi?) -
After watching your video again John (#22), I noticed that you do pretty much have all the faders for both individual tracks and submixes set at 0.0. This is what I was referring to in my previous post. With all the faders set at 0.0, John is setting his peak meter target between -8.0db and -12.0db. I assume this means ALL the peak meters, both individual tracks and submixes. At least that's what I noticed on the video. All the meters were roughly between that selected -8.0 to -12.0 range, although in the video, the Master fader was not at 0.0, more like -18.0, which I'm thinking may have been just for the purpose of balancing the mic level with the music level for making the video? In the video you mentioned some tracks can be below that target range, but what if a track needs to be above that range in order to be heard in the mix? An example of what I'm trying to ask is, what if you set everything so the meters are all between that predetermined -8.0 to -12.0db range, and you find that the acoustic guitar is buried in the mix at that -8.0 to -12.0db level? Do you raise the acoustic guitar track or acoustic gtr submix gain so that the meters go to -3.0db in order to balance it so it's no longer too soft? If every other track and submix is in the -8.0 to -12.0 range, you can't turn everything else down or then it puts everything else out of the target range. So how do you compensate? I know it's not cut and dry, but just curious about this kind of scenario when trying to keep everything balanced. I'm going to have to start the mixing process from scratch if I want to try using this method and see what comes of it, because I've been using faders mostly, so setting the faders all to 0.0db is going require me to remix from scratch using the gains. I'm guessing many of my questions will be answered in the process of trying it. We'll see.
-
Craig, are you referring to the individual tracks, or the submixed tracks? ...or both? I've also been thinking about what John had mentioned about keeping all his faders at 0.0 and just using the gain control to cut or boost as needed. As I said before that is a different approach than how I've been used to doing things, using the faders to set mixing levels, instead of the gain. I know my brain is fatigued from reading all these helpful suggestions, LOL🤪, but I guess what I'm trying to figure out is if you're saying to keep all the faders on both the individual tracks and submix tracks at 0.0 and use the gain to level them all out roughly so that all the meters sit at a consistent given number, like -12.0db for example sake, (or whatever number you choose), then....well I don't think I'm understanding this right, because if I set everything the same, I won't be able to mix all the instruments so that they blend correctly without one or some of them going out of the desired meter range. Setting everything the same there's going to surely be some tracks that are too loud or too soft in comparison to the rest, no? Unless I'm likely misjudging how using the gain control will affect the meters, which given my tired brain, I probably am!
-
In Your Face BASS - What's your strategy?
musikman1 replied to musikman1's topic in Production Techniques
Yes Trilian is nice for a lot of things, the arpeggiator has so many options, and they keep adding more. I haven't checked out Bass Rider, but I have heard of it. I just picked up Vocal Rider which I assume is a similar concept, keeping a track's peaking within a set range. Also Glenn mentioned MaxxBass, which I do have as part of my bundle. Last time I tried it out was quite some time ago, so I'll have to revisit that one. Any recommendation for a good MaxxBass preset, or setting that would be a good starting point? Glenn, couple questions....what do you mean when you say you are "using melodyne to clean", and how are you converting an audio track to midi? I usually don't run into a scenario where I need to, but I can see where it would be beneficial if I want to have the same line played by different vst instruments. Can CW convert audio to midi? That octave idea using the Strat and a vst bass is pretty kool, I'll have to try that sometime. I've used an octave pedal for guitar before, and it really widens the sound, but I've only used it for a guitar line or riff, haven't tried it for bass yet. I think I have an octave pedal in the Waves stompbox. -
In Your Face BASS - What's your strategy?
musikman1 replied to musikman1's topic in Production Techniques
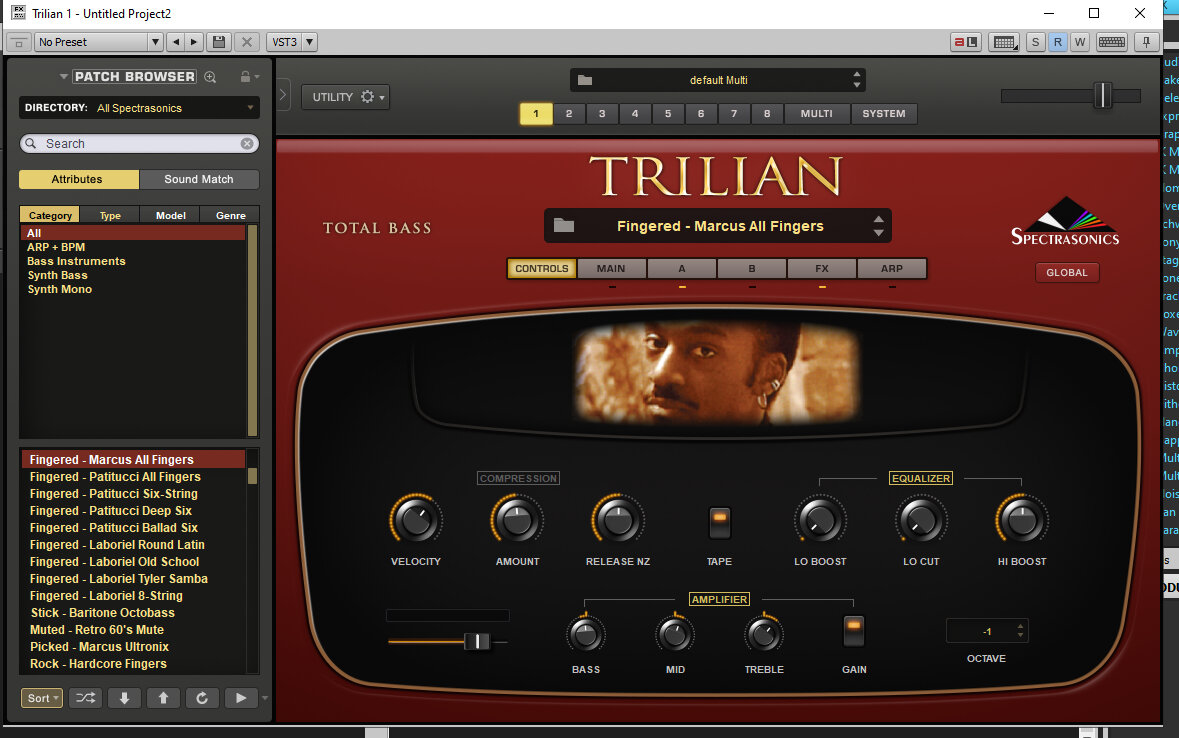
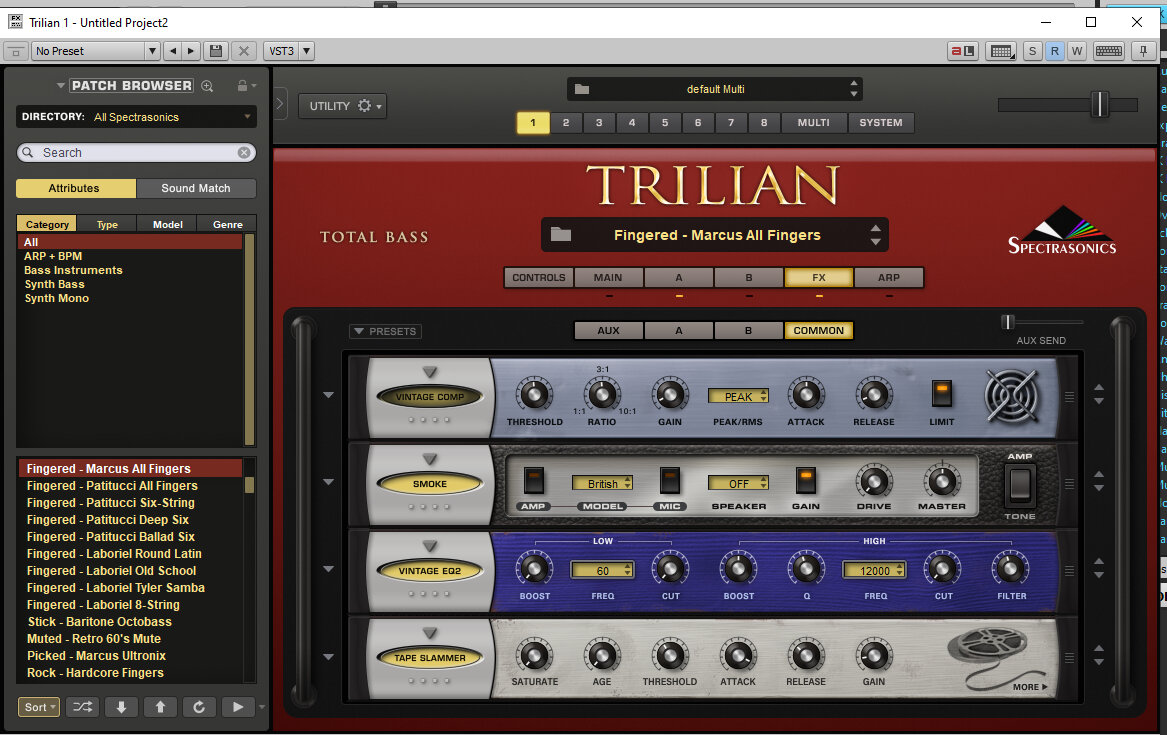
Btw, I checked the IK MM site and searched TRacks 670, and it came up with this "Fairchild Vintage Compressor" https://www.ikmultimedia.com/products/trvintubcomplim/?pkey=t-racks-single-vintage-compressor-model-670 I had a brief look at the Waves C1, I didn't see an EQ shutoff switch, maybe you could point it out. The one I'm looking at is Comp/Gate. As for the "screen with the curves", both screens on the C1 sorta have curves, the top one is for the comp, I think that would be what you're referring to. https://www.waves.com/plugins/c1-compressor I did check out the website for the MCompressor and noticed that it is a bundle. Nice deal for free. Do you happen to have the two different C1's setup, one for punchy then the second for smoothing? Maybe a screenshot of it showing the exact settings would be helpful. If not, no biggie, I'm sure I can manage by the numbers you posted earlier. I have been bouncing the synth tracks. In fact before I upgraded my PC 6 months ago, I had to do that pretty regular. This PC can handle quite a bit, it's just that I'm so used to my old setup which could only handle a few CPU heavy plugs or vsts. I'm just used to thinking efficiently when it comes to that I guess. If that is the way to go, then I'm down. I have at least 2-3 plugs on every instrument, whether they are in the individual tracks or the busses, and my CPU is handling it, so I think I could add a few more without any issues. Gotcha. When you said earlier about cutting all the sub freq (on whichever instrument) to get rid of junk frequencies, the specific range for that was to cut everything below 20HZ right?....or was it 30HZ? I know you said I could cut even higher if it still sounds ok, but the frequencies our ears can't even hear was below 20 or 30, correct? Thank you for the road map LT, that helps a lot. I'm a person who tends to learn and remember technical stuff better by watching someone do it, rather than tons of reading, so any step by step instructions or screenshots make it much easier to sort it all out faster. Learning the details of how these EQ and Comp plugins work is going to help. I've always had a basic understanding of what they contribute to the sound, but there are so many, and so when I just want to get on with a project I tend to just find a preset that I know will be in the ball park for what I want to do with a plug, then tweak it a little. It's faster that way, but I know it's going to be much better and worth my time and effort to learn the details going forward. Plus how to use different ones strategically in a chain is something that I had not explored enough in the past. After reading all the posts here, there are obvious advantages to knowing how to make them all work together, rather than just knowing what they do individually. I agree, priceless info here so far! Welcome to the college of mixing! 🙂 Thank you for adding your strategy Tim, I appreciate it. I hear you, my approach in general is different sometimes depending on genre, and my songwriting covers quite a range. I'm same as you, keyboardist my whole life, plus been learning guitar for about 8 yrs now, (and loving it!). My current project is basic rock, but I've written and recorded blues, country, Pop, Electronic instrumental, and background music for film or animation (in which I like to mix orchestra sounds with synth sounds). As far as songwriting, I haven't really settled into one lane yet, not sure if I ever will. I do have many definite influences that go as far back as the 60s, 70, 80s, (I'm old lol) and I don't really like to try to fit into one style, at least for now. I like my sound to be unique. Music keeps me young, and it's always first priority. And like Starship said, I too am thrilled to be able to make original music in a space I have access to 24/7. I started small when I was very young, recording music with a portable cassette recorder, and doing overdubs using a double cassette recorder, and it was a big deal when I graduated to a Tascam 4 track cassette recorder. So what I'm doing, what we're all doing here, is something that I could only dream of back then. This is a lot of fun! 😉 I haven't tried MODO, but I recently purchased Trilian by Spectrasonics. I have to say it provides any kind of bass I could possibly need, whether it be synth or acoustic. Many sounds are modeled directly from flagship keyboards, and classic bass guitars. It's got a built in, very sophisticated, and versatile arpeggiator that is loads of fun to use. All the sounds are high quality samples too. So far I haven't really even scratched the surface of the library, there are just plenty of sounds to choose from. These videos are older, but you can see what it can do. Trilian Acoustic Demo https://www.youtube.com/watch?v=dsj26oEoBfo Trilian Electric Demo https://www.youtube.com/watch?v=ZYU93OtvzjA Yesterday I thought that before I begin adding plugins, I might try giving my bass sound some tweaks right in the Trilian controls. It has an "up front" control panel which is super convenient, and most of the controls there directly tie in with its on board FX rack. I had mentioned that in this particular project the bass is getting kinda washed out a bit, and I noticed on this particular sound that the compression control is not activated, and that is the default setting. So I activated it and that seemed to help, plus there's a basic EQ section there which helped when I increased the mids a little. So I figure if I can improve on the sound source before adding plugins, it may make things easier going forward. Here are a couple screenshots of the Controls, FX Rack, Arp, and Patch browser. One kool thing is the Control panel changes depending on which bass patch you're using, so it's uniquely tailored controls for each patch.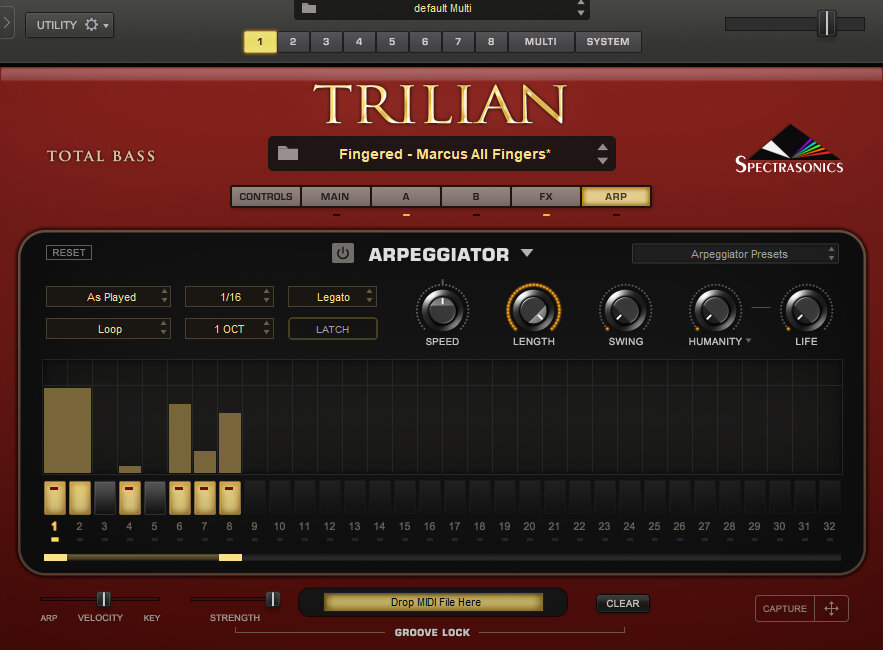


-
In Your Face BASS - What's your strategy?
musikman1 replied to musikman1's topic in Production Techniques
Thank you for the reply, much appreciate the advice! Not much time at the moment, so I will address the rest of what you said tomorrow, but for now just a quick couple thoughts....I am getting the concept, and keep the analogies coming, it's making things easier to understand, thank you! I did notice today that just the overall level of my bass track in my current project is lower than all the rest of the submixes, and I can't bring up the individual bass track without it peaking the meters. So tomorrow I think I'm gonna have to turn down the rest of the mix so I can get more headroom on the bass, cuz right now it has nowhere to go. Maybe the comp will also help once I've gotten that far. The way I have most of my projects set up is all the instrument and vocal tracks are routed to submixes for each instrument. So I'm getting the concept that Lord Tim and others have shown me here as far as using the EQ to carve frequencies to make room, etc......but after trying some of that today, I think I need to practice a bit more, it seems easier said than done. That said, although I think it was Tim who mentioned it better to use the plugins on the regular track instead of the submixes, it's not CPU friendly for me to put an EQ and/or Compressor on every individual track when many of my projects will end up with for example, ...7 keyboard tracks, 4 elec gtr tracks, 4 acoustic gtr tracks, 6 vocal tracks, so my thought is just put one on the subs for each instrument, since they are all routed there anyway. I probably can do the individual track with bass cuz there's usually only one or two bass tracks. Sometimes when I have multiple tracks for one instrument, it may just be a duplicate or overdub to get a fatter sound, so I can't put plugins on one of the tracks without putting them on all the others too. So what I'm asking is about the initial setup and placement..., according to what I've been learning, and what you've been saying about compressors, (punchy one and smooth one), where and in which order do I place these plugs? I like to keep things organized, and right now I have plugs all over the place, some on individual tracks, others on the submixes. I'm assuming a typical scenario, going by what you guys are suggesting, would be to put the EQ first in line in the submix(es) for carving frequencies as mentioned previously, then the punchy comp 2nd in line (in the submix), then the smooth comp 3rd in the chain in the submix, then whatever other plugs I use, like delay or reverb, doubling, etc, after that, depending on which instrument submix I'm working with. Does that sound like the right approach as far as where to put these plugs, and in that order? I'm only saying use the submixes for the instruments that have many tracks feeding them. I would think I could use the same FX chain order in the individual bass track(s) since there usually is only one or two. I'm just looking to see if I'm in the ballpark here, just as far as setting things up, I don't want to start off on the wrong foot....set it up correctly first, then I can experiment with the plugin settings from there, using the guidelines you guys have given me. -
In Your Face BASS - What's your strategy?
musikman1 replied to musikman1's topic in Production Techniques
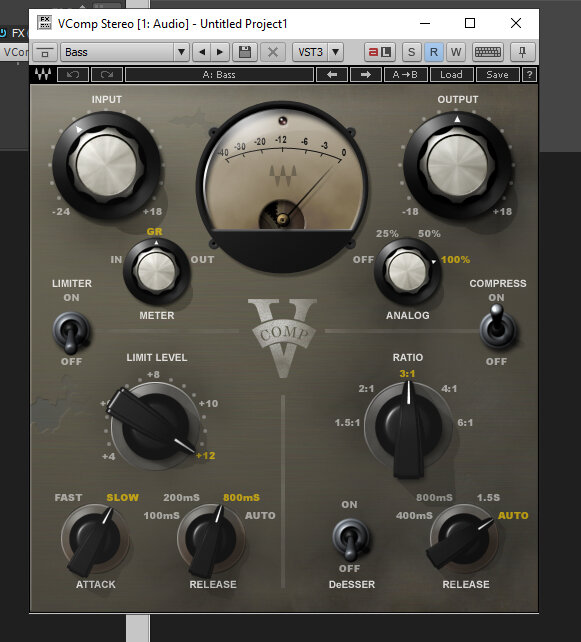
Thanks LT, we've been talking mostly about cutting out the sub lows, so you're saying there should be some subs left in and "treated". I wouldn't know which subs to leave in and/or how to treat or process them, so until I do I'll just use the info that you guys have been sharing with me to try to first cut the mud and separate the frequency ranges of each instrument. I would ask though, if our ears can't hear the sub lows, would the purpose of leaving some in there be just for when listening on a surround system that has a sub speaker? Thanks Starship, I'll keep that TrackSpacer in mind next time I have a few dollars in my music budget. Thanks for giving me a road map for some comp settings. I typically will try to find a compressor preset that works and tweak from there if needed. A lot of the presets will be named for what they would best be used for, which helps. I will likely download and try that MCompressor, but I also have quite a few already. I'm not sure if you are familiar with any of these, but if you do recognize any of these and can make a recommendation on which to use, that would be great. With T-Racks 5 Plugin Suite I have T-R5 Bus Compressor, T-R Classic Compressor, TR5 Opto Compressor, TR5 Precision Compressor/Limiter, TR5 White Channel (which is a Compressor & Gate/Exp & EQ combo). With Waves bundle I have C1 Comp, H Comp, V Comp. Some seem a bit more complicated than the rest, so again, to save time I usually check out the presets as a starting point. A couple of these have the word "Bass" in the preset name, which are in the screenshots, so you can see the settings they start you off with for bass compression. It seems these Bass preset settings don't line up with the starting settings you mentioned above. The TR5 Comp Attack is 67.6ms, you recommended 7ms, and the Release is 346.0ms, you recommended 50ms. I'm sure it varies for each individual's preference, so the differences probably don't mean much, I just noticed the numbers were quite different.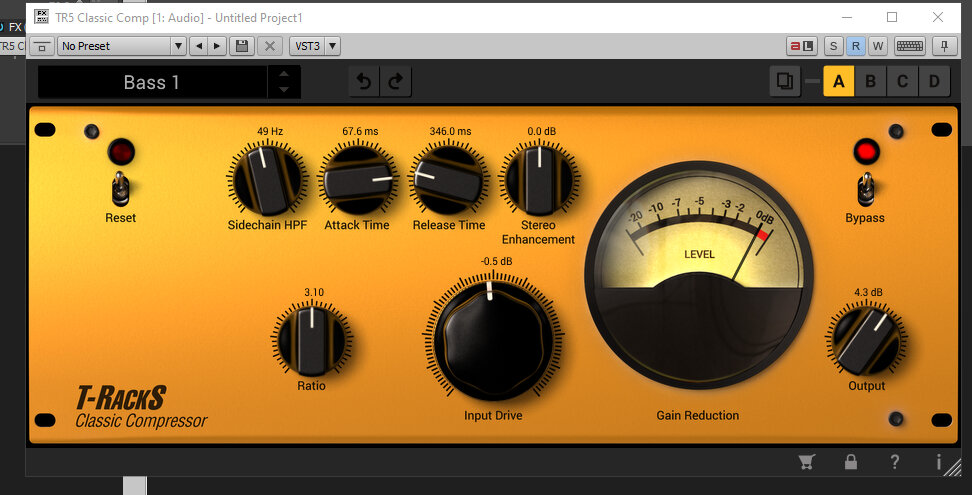
-
In Your Face BASS - What's your strategy?
musikman1 replied to musikman1's topic in Production Techniques
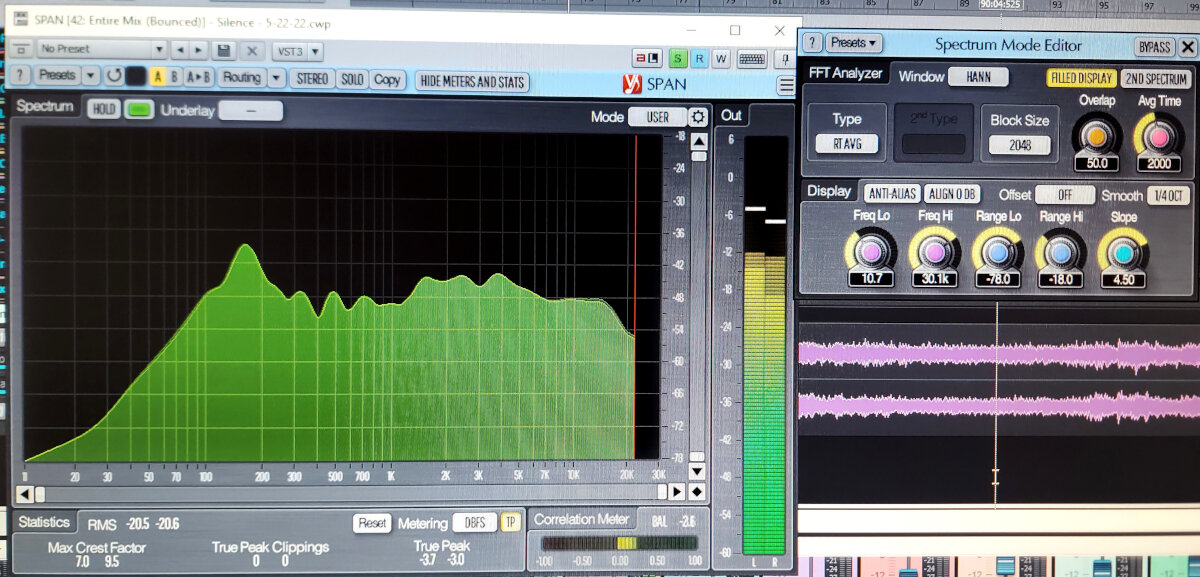
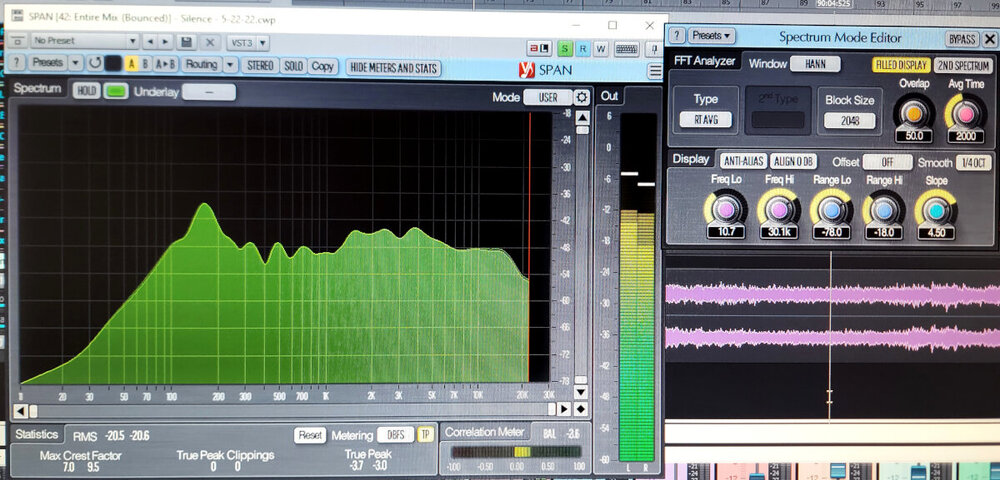
900hz bass boost kind of surprised me, that is quite a bit higher in the spectrum, but you know it works so I'm looking forward to trying that out! I have a couple of distortion plugs, one is SaturatorX by IK Multimedia, though right now I don't know which setting I'd use, so I'll have to try a few and see how they sound. SaturatorX...... https://www.ikmultimedia.com/products/trsaturatorx/?pkey=t-racks-single-saturator-x I'm beginning to better understand this whole concept for the most part, thank you so much for taking the time to explain this, very helpful! I will have a couple hours each afternoon beginning tomorrow, so I'm going to begin the process of checking each instrument, seeing what the SPAN looks like and start cutting where it seems needed. I figure as I go through each track, I'll throw on a hi-pass, cut the sub freq, then move along from there, listening with the hp EQ off, and then listen with it on as I go, going back and forth as I gradually roll off more low end. That way I can compare and make sure whatever instrument I'm working on doesn't start to lose its original fullness. Then I can make adjustments after listening to it in the full mix later. I think I had watched a video awhile back on getting clean tracks on distortion guitar, and acoustic guitar. I have both on the track I'm working on, and so I did already roll off the low end on those and it made a big difference as far as the guitars cutting through better, especially the acoustic guitar, which was originally getting lost in the mix. It was surprising to me how after hi-passing them, the guitars sound so thin when soloing the tracks, but in the mix they sound so full! Btw, what did you think of the SPAN screenshot I posted for my own mix as compared to the one I posted for the commercial CD track? To me there were some differences, but the differences didn't seem drastic. Checking mixes with SPAN is new to me, so I couldn't really tell where the differences were between my mix and the commercial CD mix. I do know mine wasn't mastered, and the CD was, but just looking at the SPAN image they seemed relatively close in appearance to me. Were you able to see anything going on there? Just curious. -
In Your Face BASS - What's your strategy?
musikman1 replied to musikman1's topic in Production Techniques
Btw Lord Tim, I just checked out those tracks, awesome! I saw the stomach cramps faces hahahaha! Seriously, that bass & drums sound is what I'm striving for. I don't write metal, I like it sometimes, but my stuff isn't that heavy. But that is the punch I'm talking about, and in addition, it's CLEAN. If I can get my low end sounding clean like that, and with punch, that would be great. Once I can learn it, I can apply it to every project going forward. I watched a video about something you mentioned as far as rolling off unnecessary frequencies on other instruments using EQ in the individual tracks. I'm starting to notice in these videos where the EQ is used to carve out unwanted or unnecessary freq, even in the high end. I'll have to check each instrument to see what the SPAN tells me, but how do you know what frequencies to cut? I get that cutting extreme highs and extreme lows, but what else in between can be cut, say for example on a keyboard track? I have a Keith Emerson "Lucky Man" synth sound playing a line one of my projects, and I have a chug electric guitar sound that is kinda bassey, so I will look at those two. So what do you usually look for as far as seeing a freq range that can be eliminated without ruining the sound? Just curious.. I would think that some tracks don't interfere at all and don't need any freq's gutted. So how to tell which instruments need gutting? -
In Your Face BASS - What's your strategy?
musikman1 replied to musikman1's topic in Production Techniques
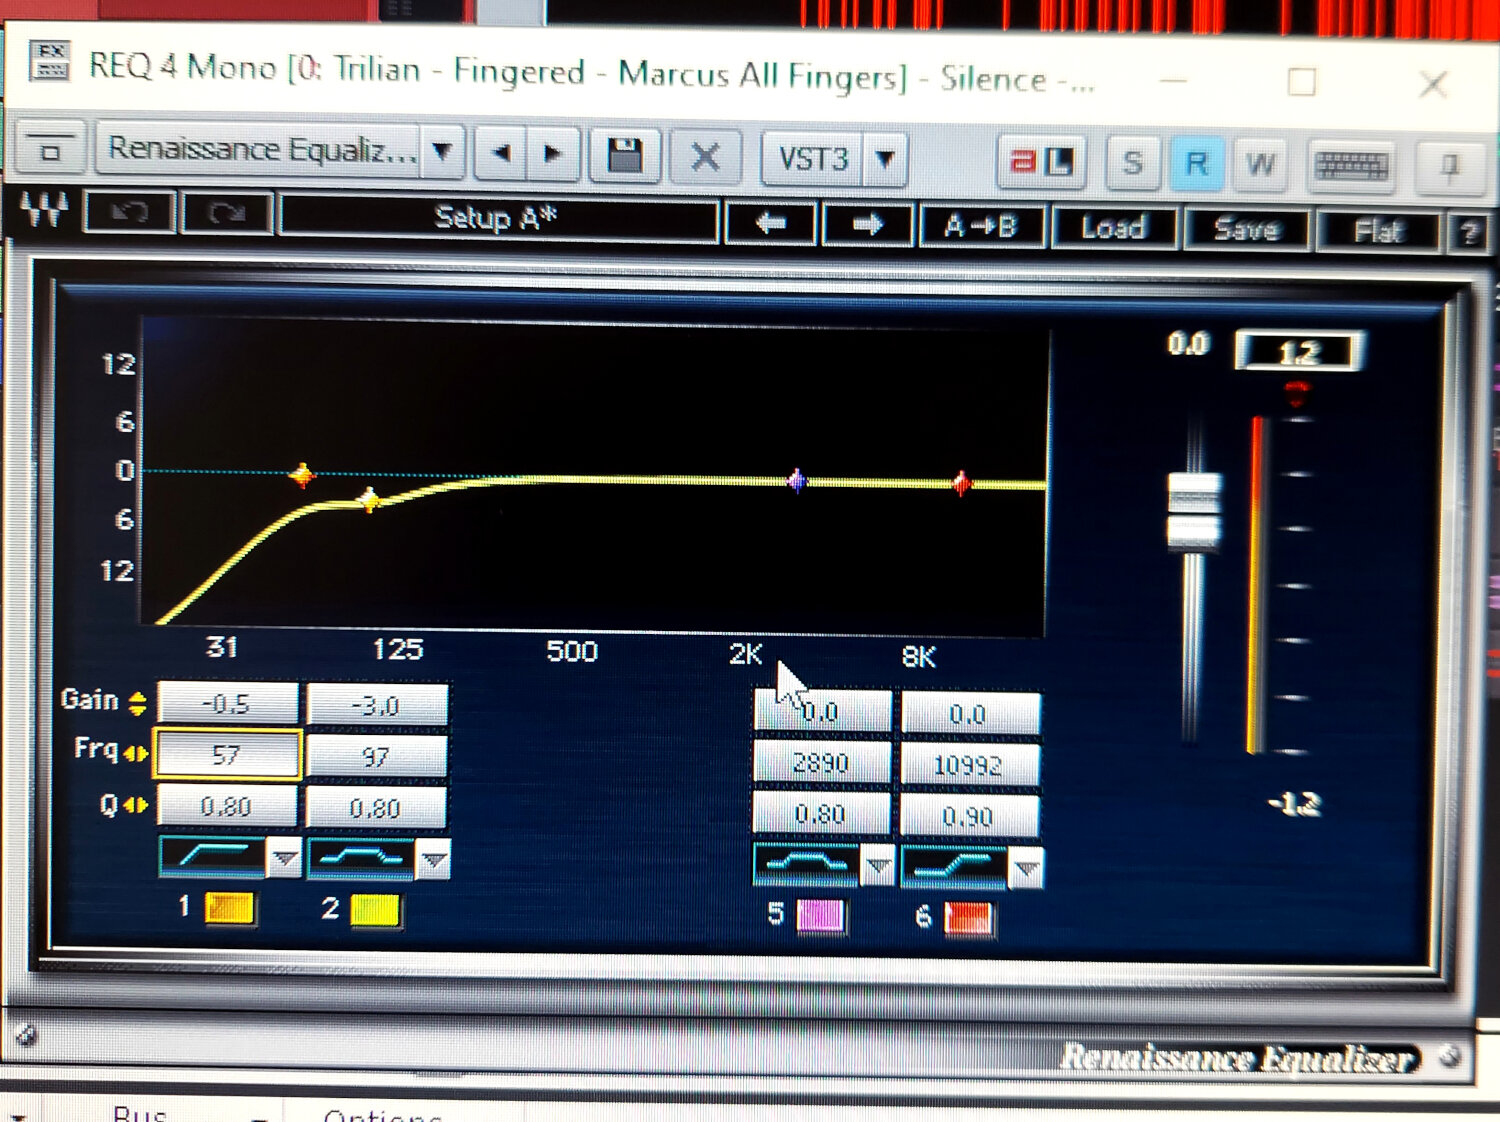
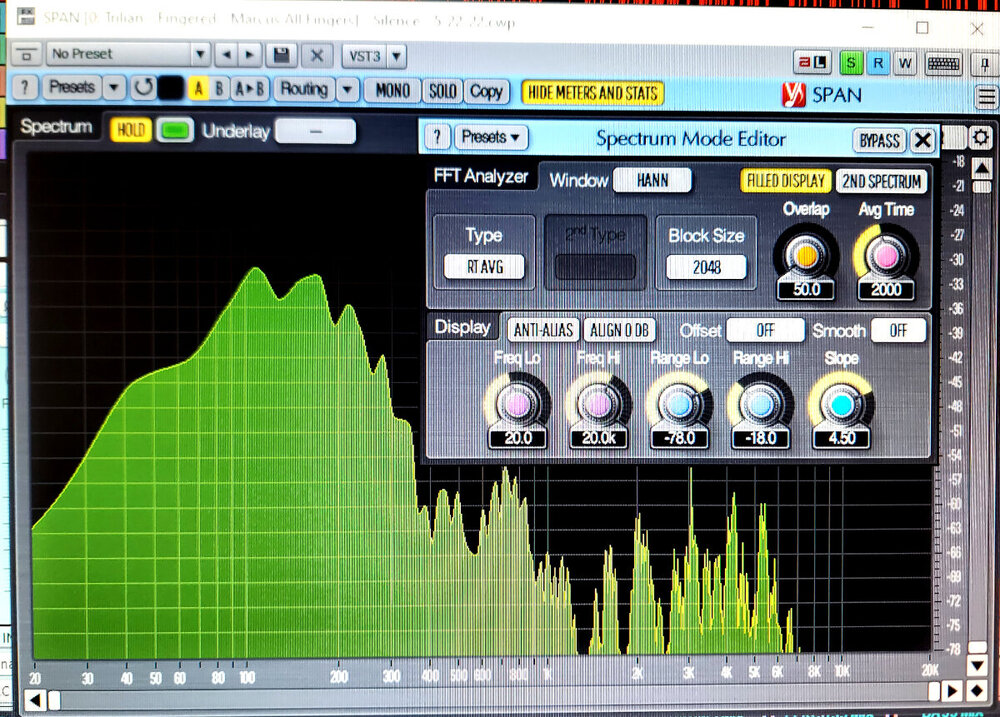
I'm not sure if I uploaded these photos correctly or not. But anyway, just for a quick experiment and to allow you to actually see what my mix and bass track looks like....I installed SPAN and checked the bass track by itself, and then the entire mix (no limiter), then put SPAN on a commercial CD track that I think has a similar sound to it. I literally just installed SPAN and did this 5 min later, so I don't know if there are any settings I'm supposed to be dialing in beforehand or not, I just used the "Smooth" feature at 1/4 for the test on the full mix. I opened the settings so you could see them anyway. 1ST PIC IS THE BASS EQ, 2ND ONE IS THE BASS SPAN SNAPSHOT, 3RD ONE IS MY MIX, 4TH ONE IS THE COMMERCIAL CD SONG I have an EQ on the bass track which is still a live VST MIDI track, I haven't converted to audio yet. The Bass track EQ is just to roll off the sub freq, but maybe I didn't go down far enough cuz I still see some sub freq creeping in at a low level. To me, the commercial CD SPAN image looks somwhat close to my own song mix. I was expecting to see a lot of difference. I do see some differences, although I'm not sure what exactly needs adjusting yet, or how to go about it. I'll figure it out though. Any obvious differences stand out to you in those SPAN snapshots of my mix, as compared to the commercial CD snapshot? What do you guys see? As for your previous post Lord Tim, thank you for clarifying, and luckily I upgraded my PC so I may be able to add in a few more EQ plugs without choking my computer. I do usually add plugs on the sub mixes only, as long as the individual tracks sound ok, so I do check the individual tracks first. But I figure if the individual tracks sound ok then I can just use one instance of any plugs I want to use on the sub for that instrument. Drums are a little tricky because most times I'm stuck with using loops, so many times I can't really separate the individual drums, except maybe for the cymbals that I add in on a separate track from the loops. So if I EQ the drum track to go after the kick drum, anything I do will affect the rest of the drums in the loop unfortunately. I did watch a few YT videos about all the stuff you guys have been teaching me, and I've definitely learned some valuable lessons already.

-
In Your Face BASS - What's your strategy?
musikman1 replied to musikman1's topic in Production Techniques
Thanks so much everyone for the helpful info. An analyzer is something I'll have to spend some time getting familiar with going forward, and hopefully I'll be able to incorporate it as a regular part of my process. I do use a mastering EQ to roll off the sub freq. I usually use the preset "cut boom" as a starting point, which does eliminate that part of the frequency range completely. I usually put it on the master track at the end. Once I started doing that awhile back, I noticed a big improvement in the clarity of the low end. There have been occasions where I've used it on an individual track, like acoustic guitar, but mostly I've used it on the master track. So this is where the question sometimes arises in my mind as I'm checking the mix, ....If I notice the low end is a little muddy on a few keyboard tracks, and the bass track, should I use an EQ plugin on all those individual tracks, or just use the Master EQ on the master track to cut the frequencies out. Sometimes just one EQ plugin on the Master track with the low end rolled off seems to take care of all of it. I'm just thinking if I use an EQ on a keyboard or bass track to eliminate sub freq, then another EQ on the master track, do I really need it on both?..or all? Also , I do get what you said about being careful not to back it down too much or it will sound thin, and I've noticed that a few times. I just don't want to be using a bunch of EQ plugins on individual tracks if I really don't need to. I try to stick with plugs mostly on the Sub mixes and Master track. The bass track usually seems to call for some EQ and/or Compression. I suppose once I get used to using the analyzer I'll be able to better narrow down where the plugs are needed. I hear ya, I usually wait until I've mixed everything before using any FX on the Master channel. If I have any FX in the master while I'm checking the individual tracks, I usually do bypass them. I'll listen to an individual track, then listen to that same track in the context of the full mix with no FX on the master. In the current track I'm working on, the bass track is getting a little lost in the full mix, and so just to experiment, I added a limiter to the Master track, and it definitely seemed to bring the bass track more into focus. Same holds true if I export and use a mastering software, which has the EQ compression, and limiter built in. I know I can't rely on this, but it at least it has been a quick way for me to compare check what the mix will sound like when enhanced with those tools. But like you said, if I can't trust my mixing environment, or monitors, etc....then the only way to know for sure is to use the analyzer to see what's really going on. Yeah I thought that was interesting. Certainly something I've never heard of before. I think of distortion as something reserved for electric guitar mostly, so I never really thought to use it on bass. Just thinking about it I can't really imagine what it would sound like so I'll have to try it! When you blend the distorted bass track with the original, do you keep the original bass track gain up and keep the distorted bass low and just leak it in to blend it, or is it a 50/50 on the gain for each? I will try this! I have that "cut boom" preset on my EQ plugin that rolls off the sub, not sure the exact freq but this is something to consider. Especially since I noticed that even when I use the EQ cut on my master track, when I export and run it through a mastering software, I notice that some of the low-mid boominess is exaggerated again. I'm sure it will be of some help. Much appreciated. -
In Your Face BASS - What's your strategy?
musikman1 replied to musikman1's topic in Production Techniques
I actually have a metering suite by IK MM, and tbh sad to say I'm not well trained in how to use it since I seldom have used it. I'd have to watch a video or dig into the manual to get familiar with it again. No sense trying to use it if I'm not going to understand what it is I'm looking at. Like I had mentioned in another thread, I'm a musician first, sound engineer second, so I still have learning curves now and then when it comes to the technical stuff. But anyway, here's what I have, and I believe this is the only one I have, but from what I understand it's decent quality.... If you have any brief tips on using the analyzer, that would be kool. https://www.ikmultimedia.com/products/tr5metering/ I almost always try to figure out why it's not working and I experiment with different plugins to see what kind of results I can get. I have had some success with my mixes in that regard, and I don't always run into major trouble with bass tracks. That said, however, if there is an area of improvement that pops up more often than not, it's with balancing and mixing the bass with everything else. So although I'm not totally out in left field with this, I do need and want to improve that part of my mixes. I'd like to de-mystify it and get a better handle on how to get it sounding more like what I hear on pro CDs. Sometimes I think the bass track is sounding a little lost or a little off, then I'll add a limiter to the master track, or I'll export the mix and run it through one of my mastering software and that will take care of it straight away and it will sound great. Other times that might not work, so it's been something that I just want to be better at and feel more confident in knowing what to do, rather than just experimenting blindly with different plugins, hoping one will work. Hey treesha, thanks for jumping in, always good to hear from a bassist. I don't have the Izotope plug, but I did check it out. I too usually spend time looking for what will work in that specific project. Sometimes I like to record the bass track early on, so I may not find out til later when the mix is more full how it's gonna work out. I actually have a TON of plugins, it's just a matter of selecting the one that will be most likely to help in whatever project situation arises. I have the Waves Gold bundle, which is a well rounded mix of plugs. I have IK MM T-Racks with a bunch of extra modules that I've added over the years, Stealth Limiter, 432 Master EQ (which I use often), compressors, reverbs, there's a bunch. I also have Lurssen Mastering Suite, which is kind of a quick one step mastering software, and for quite a few projects it has worked out pretty well. So I'm not lacking plugins, that's for sure. Agreed! I have pretty good ears from being a musician for 45 yrs, I play keys primarily, and my secondary is guitar, which I began about 8 yrs ago. I have always made music a priority in my life, even when I couldn't do it full time. Now that I'm semi-retired, I have the time and I want to make the best of it. I can rely on my ears to get a decent finished product, sometimes a very good one, but you know how it is, when I compare it to songs on a CD or the radio, it seems to fall just short enough to make me think....."what the hell am I missing?...I'm so close!!" ....and that is why I started this thread! :-) -
In Your Face BASS - What's your strategy?
musikman1 replied to musikman1's topic in Production Techniques
All great info guys, thanks a lot for showing up here with your input, much appreciated. Actually, my newest studio setup is in my apartment at a senior living complex. I used to have a well designed studio with at least some wall dampening and bass traps, but all that is gone now. Plus here I really can't play my mixes super loud without disturbing others. I do have wall to wall carpet, and have Auralex monitor pads, plus a few panels of Auralex strategically placed on the walls. I do need to add a few to the back wall though, in the process of getting that ball rolling. So the environment isn't perfect but not too bad overall. I'm just using some KALI 6" monitors, which mix really flat and for the most part true. At first I thought it was the monitors, and they may slightly factor in, but that said, I can play a mastered CD of my favorite band and I'll hear the punch on the bass pretty well, and then play one of my "unmastered" mixes and it sounds kinda flat in comparison. That said, my "mastered" mixes do sound a step above the unmastered ones, but still pale in comparison to a pro CD. So I kinda ruled out the monitors and/or the room conditions as being soley responsible, though they do factor in. Apologies for not mentioning my room and monitor setup prior to this, I would imagine it would have helped make things clearer. I probably should also mention that although I have a friend who occasionally records live electric drum tracks for me, I mostly have to otherwise use loops. So isolating specific drums is not always an option unfortunately. I used to have Mackie 824s, but for where I live now I had to tone it down some, so I went smaller. There is a difference for sure, smaller speaker factor, but I have to say they sound decent and give a pretty accurate reflection of the mix, and it is what I have to work with for now. I do use some very flat headphones that don't enhance the low end, like many do, but I try not to use them if at all possible when it comes to mixing, unless it's very late at night when others are sleeping. You have certainly given me a lot to think about Lord Tim, some of it is a bit over my head, but not so far that I can't figure it out, and I at least have something to sink my teeth into! Thanks for taking the time to give me the details, much appreciated. I hear ya loud and clear John. Being a keyboard player I can't tell you how many times I've been to a club to hear a local band, and the keyboard player is technically sound, but is using garbage sounds and has no clue how to select the right sound for each song. So yes, selecting the right bass sound here is paramount in my opinion as well. That's why I bought Trilian because their samples are very good, and the selection is plentiful. So I do spend a good amount of time sifting through sounds until I hit on one that fits as best possible. -
All makes sense and every time I think I'm getting somewhere, I realize I have much still to learn! Thanks again, it's a process I intend to improve on, and with all the good friends' advice here, I don't see any reason to fail! Continuing my effort to learn how to get better mixes, here's the thread I just posted regarding bass....