


Marcello
-
Posts
318 -
Joined
-
Last visited
Posts posted by Marcello
-
-
6 minutes ago, scook said:
This
means all future recordings will be 16bit.
To see the bit depth for existing clips use
Bloody hell some tracks were recorded at 16 and some at 32, what should I do? I export it in WAV at 32 anyway?
-
I remember I recorded this one at 32 but I'm not 100% sure I did. DOn't remember
-
11 minutes ago, scook said:
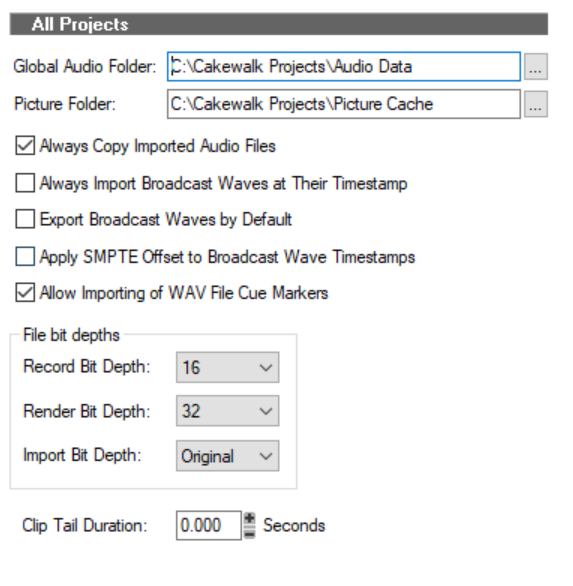
Record Bit Depth is set in Preferences > File > Audio Data
As a rule this should be set the same as Audio Driver Bit Depth in Preferences > Audio > Driver Settings
Main menu Project > Audio Files shows details about clips referenced in the project.
Thanks man!!
This means it was recorded at 16 or at 32? I suppose 16? what is render referring to?
-
Hi guys, I have started recording some songs at 41000 sample rate and 16 bitrate, then I figured out it was too low so the next songs I recorded at 48000 sample rate but then I don't remember at which bitrate, maybe 24 maybe 32, thing is that I did back and forth exporting some old songs recorded at 16, and now in my Preference settings I have 16 by default, but is there a way to check at which bit rate the tracks were recorded in cakewalk??
-
2 minutes ago, msmcleod said:
In your screenshot, it looks like two mono tracks were created.
Did you have Import as mono tracks checked?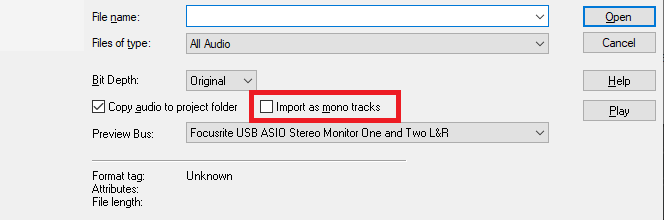
Right dude! Thanks a lot!!!
-
Guys! I have an issue
I exported my mix in WAV, entire mix, indeed it creates one WAV file.
Then I need to import this file in a new project for the master, but when I do Import > audio
it creates 2 tracks, I don't gt it, this never happened, it seems almost like one is mono and the other stereo, doesn't make sense, do you know how to fix this??
If I just delete the second one it sound shit, like in mono.
-
37 minutes ago, Ted K. Ling said:
Different people have different needs, as far as levels they are working to. Some use -18LUFS, others stick with -23. The ability to change this is to allow the graphic to truly represent their "goal". On your first graphic you had an excessive amount of overs (the red dots at the top of the graphic) which (I think) made you "panic" a bit, like "WTF is going on here ...". If, for example, you had Youlean set up @ -14LUFS (which of course is louder than the default -23), you would not have seen so many of the "overs". But, this obviously does not change your mix ... it's only to give you a clue what's going on. Also, you can get a graphic representation of dynamic range, not just loudness, by clicking on the oscilloscope button.
But you've moved on and are getting great info from others here. My post was only a heads-up in case you didn't know too much about Youlean.
Good luck with you productions.
I think I'm getting it, guys, the post has been going for quite long, thank you all.
I basically didn't figure out that I had to balance the threshold in the limiter with the input gain, so I increased the input gain quite a bit to stay below 0db and then decreased the threshold, now the gain reduction is not that heavy and persistant in the whole track, it sounds slightly lower then what I expected but I'd rather not risk to squash it and have a lower volume.
-
On 8/4/2021 at 2:55 AM, Ted K. Ling said:
Looking at your graphics, it looks like you have the Youlean set at the default of -23 LUFS (that's where the red bar starts). I dunno if the free version can be changed, but the purchased one (cheap at around 30$) you can change all that (see Settings, the cog-wheel - there are a few different windows of options). You would get a completely different read out if you set it up to -14 LUFS.
Anyway, just mentioning this. Good luck.
mmm ok than if you can change the meter settings, what do you need the meter for? I mean if I need the meter to tell me not me telling the meter LOL
-
9 hours ago, John Vere said:
The Dynameter does look like a great tool. It makes a complicated task a lot easier. I will pass on the $125 Can price tag as my music seems fine without it but I would defiantly think about it if it was more like $30-$40. I think that's what the You Lean meter was and it has more than paid for itself.
I think the reason I don't have an issue is the way I use compression and limiting. I always set them so there is very little activity on the meter. Even my Multi band. If a certain frequency is showing too much compression I go back to the mix and seek out the offending instrument. This is were sub busses come in handy. Just mute a sub buss and if the issue goes away you have narrowed down your search. I tend to push most instruments to the wall and then back them off a bit. The limiter/compressors are only used to catch peaks not to squash. I find -12 to -14 LUFS just fine.
yea that's way too much just for a meter. How do you check if there is too much compression or not happening? I honestly cannot tell just by listening yet, some meter? how do you use them usually?
-
2 hours ago, Kurre said:
Is it a oscilloscope you need?
No I have found one is called bx_meter, it measure the dynamics and tells you if your mix/master is squashed or not
-
45 minutes ago, John Vere said:
I thought you had the youlean loudness meter?
That doesn't tell you if the overall song dynamic is ok or is flat.
-
1 hour ago, martsave martin s said:
No I'm looking for one that measure the dynamic range, it's for mastering mostly.
-
Hi guys,
anyone knows some free plugin similar to dynameter to mesure the song dynamic?
Or either a way to have dynameter for free?
Even these quite simple plugins are quite pricey, like 80 bucks for a meter?? woo.
-
8 hours ago, bitflipper said:
No, dither is only necessary when changing bit depth from a higher one to a lower one. (btw, the correct term is bit depth or wordlength; "bitrate" refers to sample rate, e.g. 44.1KHz vs. 48KHz, and only affects frequency response).
Always prompt reply! Thanks man
-
1 hour ago, bitflipper said:
Yeh, some people are really good at duplicating a performance. So good that you don't even notice it's double-tracked. David Gilmour was one such performer, both on guitar and vocals. But the overdub will always only be close, never perfect. And that's kind of the idea. Our ears are really good at discerning differences, even when those differences are very small.
As John notes, it's most noticeable on headphones. But beware, many things sound great on headphones but get thin on speakers, where the channels can blend in the air before you hear them. Headphones don't have that crosstalk, and can hide things like phase cancellation.
Years ago I did an experiment. I double-tracked a vocal and then used V-Vocal and AudioSnap to make their pitches and timing match very, very closely. It didn't just kill the double-track effect, it sounded awful. Like it had been recorded in a concrete pipe. To my surprise, I'd gotten the two tracks so similar that they were suffering from comb filtering. Something that can also happen with guitars, especially when you use the same acoustic guitar for two tracks, with the same mic position in the same room.
Indeed that’s what I noticed it sounds like one in the center, I’m just gonna rerecord.
-
 1
1
-
-
Hi there,
I have recorded at 16 bitrate, I know during master if you recorded at 24 bitrate and then master at 16 bitrate you should use dither.
In my case I have recorded at 16 bit, and I will export my master at 16 bit, so should I use it anyway?
-
9 hours ago, John Vere said:
Yes I think you are going to get it someday for sure it’s a life long project for me. Best thing I ever did when I started was read a couple of books. One was https://bgaudioclub.org/uploads/docs/Yamaha_Sound_Reinforcement_Handbook_2nd_Edition_Gary_Davis_Ralph_Jones.pdf
The other was
http://index-of.es/Varios-2/Handbook for Sound Engineers.pdf
Amazing thanks
-
41 minutes ago, John Vere said:
The OP has started a whole new thread on same topic. Have any of you downloaded and listened and looked at the song in question. If you do you'll see and hear what is wrong. This goes way back to a thread by Marcello a while back about panning guitars where he was struggling with that issue.
There is a lot of real good tips and advice in all of these threads due to answers from a lot of very knowledgeable forum members. He's super lucky to have top quality answers as this is not always the case on the internet. I'm not too sure he has followed through with much of what has been said or he wouldn't need to start another thread.
Here is my observations of this project.
He is using a reference track that is defiantly a casualty of the loudness wars. If you want to join the loudness wars then you better be an experienced fighter.
The guitars are hard panned and at the 2/3 mark are drowning out all other instruments.
It's a tricky composition because it has a wide dynamic range over the length of the song. It has a quiet intro and it builds. Bit said way back at the beginning that this was an issue.
His solution seems to be to keep trying to turn things up instead of ,, ya, we all know this answer all to well.
Yea I did take advantage of precious advises thanks, indeed I think I improved it a bit. I will keep working on it and try with different references.
-
Guys I'm wandering, Is it OK to copy the left panned guitar track and paste it on the right in another track?
I have 2 guitars a rithmic one very distorted, and another lead one.
Right now I have one panned on the left and one on the right.
Would be better to have the lead one in the center and the rithmic left and right?
I was thinking to copy the rithmic guitar track and paste it on the left creating another track, then change the amp sim so they have two different sounds.
It seems to me thought that when you do that is not really separate left and right but it sounds kinda in the center.
Is this good practice or not?
-
20 hours ago, Craig Anderton said:
As far as I'm concerned, dynamics are a good thing, not a problem to be solved
") In any event, the explosive drum part will determine how loud your master can be, and as you've found, the only way to change that is to limit the explosive part, which you don't want to do because then the overall volume isn't loud enough compared to your other tracks.
In any event, the explosive drum part will determine how loud your master can be, and as you've found, the only way to change that is to limit the explosive part, which you don't want to do because then the overall volume isn't loud enough compared to your other tracks.
If you're planning to release with a streaming service, then if the other songs are above their target, they'll be turned down to have the same perceived volume as the song with the explosive drums. So it may not end up being an issue anyway.
If not, then you have to resort to workarounds to make the sections with the non-explosive drums sound subjectively louder. One way to do this is to automate EQ on the final mix by just a little bit, around 3.5 to 4 kHz (with a broad Q). Do this only in the parts that are softer, then "fade" it back to normal in the louder parts. The ear is more sensitive to this frequency range, so the music will seem louder.
You can also try using a transient shaper on the explosive drums to bring down the peaks slightly, without having to use limiting. This may allow raising the overall level by a few dB.
The real problem is that there will always be a tradeoff between dynamics and how "loud" you can make the music. In recent years, dynamics have been traded off for a louder perceived volume, because you can't have both.
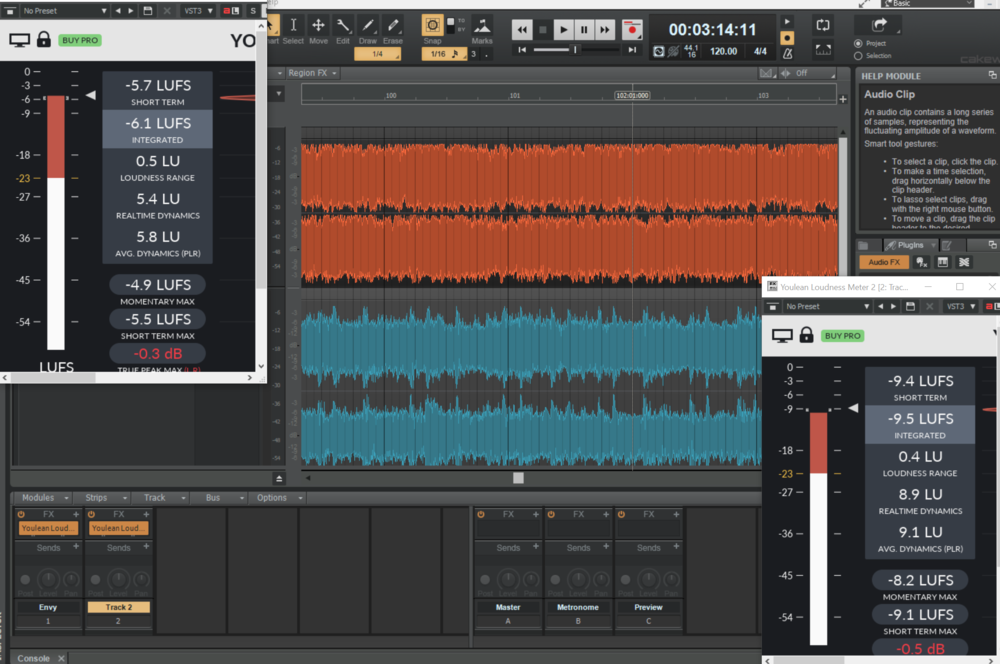
Sorry Craig just to show you
I have compared my master with the reference track I'm using (FLAC version), I start understanding the problem here, look at the loudest part of the reference track (on TOP) and look at my mastered track (below). This is why is doesn't get loud enough like the reference track, do you see those spikes? peaks? Those are the snare and kick mostly, based on what you see what do you suggest? I think I have compressed the drums enough, if I push the limiter more the snare basically disappears compared to the rest, it drawns below the other things.
What would you suggest?
-
1 hour ago, Will_Kaydo said:
Depends for what you looking? For guitars or vocals?
This one is a must have. Click here.
And these serve different purpose Click here 2 Fuzz plus 3 is my personal favorite.
No I meant some analyzer, nevermind.
I have compared my master with the reference track I'm using (FLAC version), I start understanding the problem here, look at the loudest part of the reference track (on TOP) and look at my mastered track (below). This is why is doesn't get loud enough like the reference track, do you see those spikes? peaks? Those are the snare and kick mostly, based on what you see what do you suggest? I think I have compressed the drums enough, if I push the limiter more the snare basically disappears compared to the rest, it drawns below the other things.
What would you suggest?

-
9 hours ago, Marcello said:
Bloody hell guys I think I made it I have placed this saturation plugin with one nob on my drums bus and now it sound much louder without taking too many DBs. A practical solution also for you if might have the same issue.
Does anyone know any free plugin for distortion listening?
like Soundwaves Reveal plugin but that costs a lot.
You place it in the master bus and it will reveal any distortion caused by the limiter pushed too much, that otherwise you might not hear. For those like me who still have to develop the ears

-
8 hours ago, Will_Kaydo said:
Good for you! Right attitude you're having with this. Most guy's would have given up by now.
Do you know that this is build into the prochannel? lol.


Shite! I didn't know! indeed I installed it with iLok LOL. I have removed it now and used the one embedded. Thanks
-
3 hours ago, Will_Kaydo said:
Bingo! Now you're getting the hang of things.
But the big question is: How do you understand the K-system?
Bloody hell guys I think I made it I have placed this saturation plugin with one nob on my drums bus and now it sound much louder without taking too many DBs. A practical solution also for you if might have the same issue.
-
1
-


HELP: How do I check at which Bit Depth I recorded??
in Cakewalk by BandLab
Posted
ok so from my understanding if you recorded at 16 bitrate and you export at 32 bitrate doesn't really matter, but if it's the opposite you should dither otherwise gets lossy correct?