
Josh Wolfer
-
Posts
214 -
Joined
-
Last visited
Everything posted by Josh Wolfer
-
3 - Exporting stems easily
-
Not a bad suggestion. Basically turning track folders into DCAs. I personally just bus everything that should be bussed together and then you get the same functionality, but with the extra flexibility of the bus (such as plugins)
-

controlling the PRV's horizontal scaling
Josh Wolfer replied to John Bradley's topic in Feedback Loop
Yeah. I'd love to see a melodyne style short cut for scrolling / resizing. It's super convenient. -
This doesn't work well in general. The clips still act very odd when editing them in take lanes. Especially trying to dial in nudges and fades. It ends up creating tons of extra edits all of the place that aren't necessary and just end up fragmenting the heck out of everything. Yeah, which kind of defeats the purpose of having take lanes with a master comp within a single track. I can do this as a janky work around, but it's kind of silly.
-
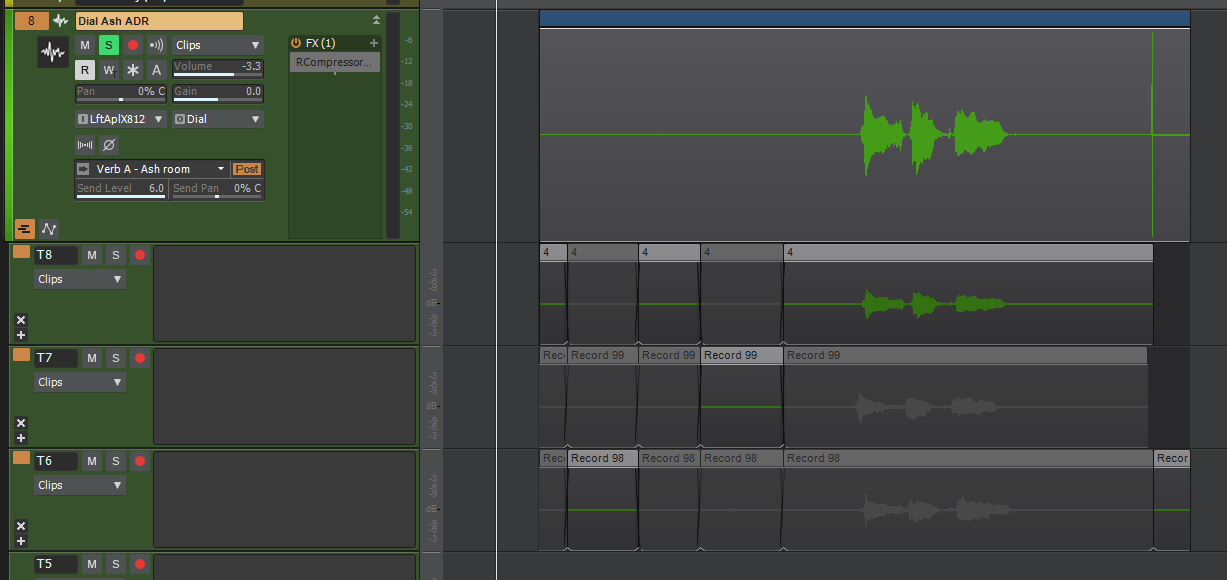
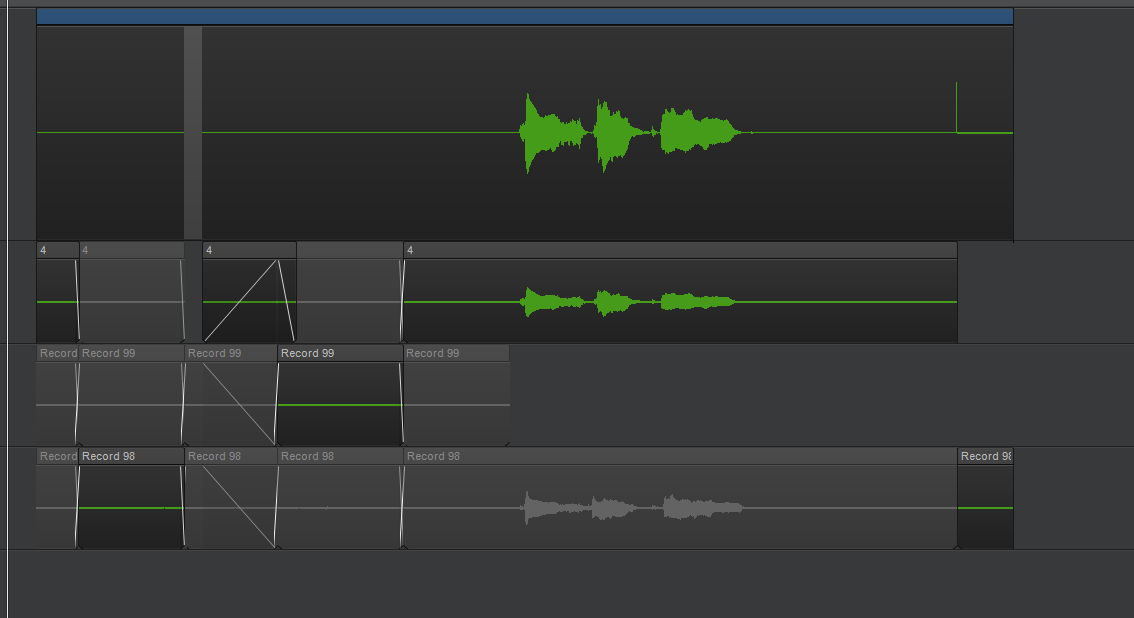
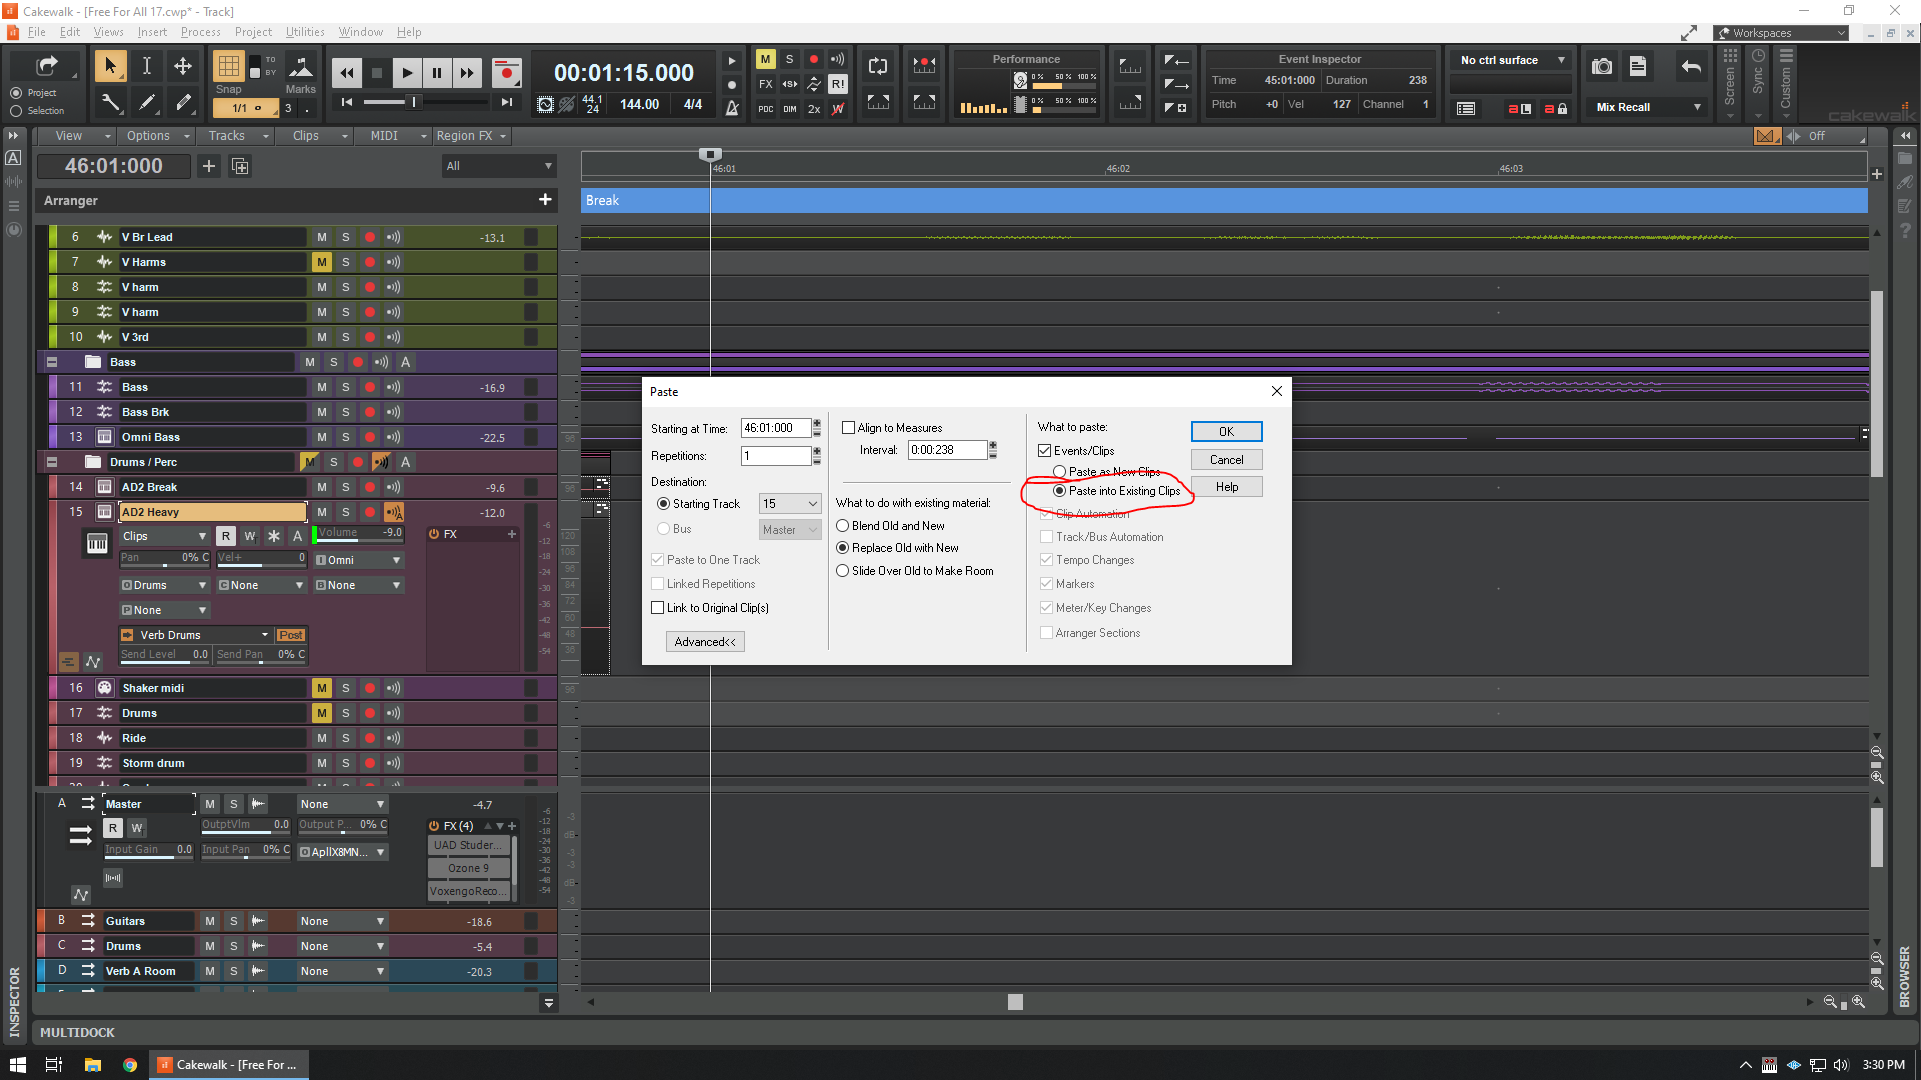
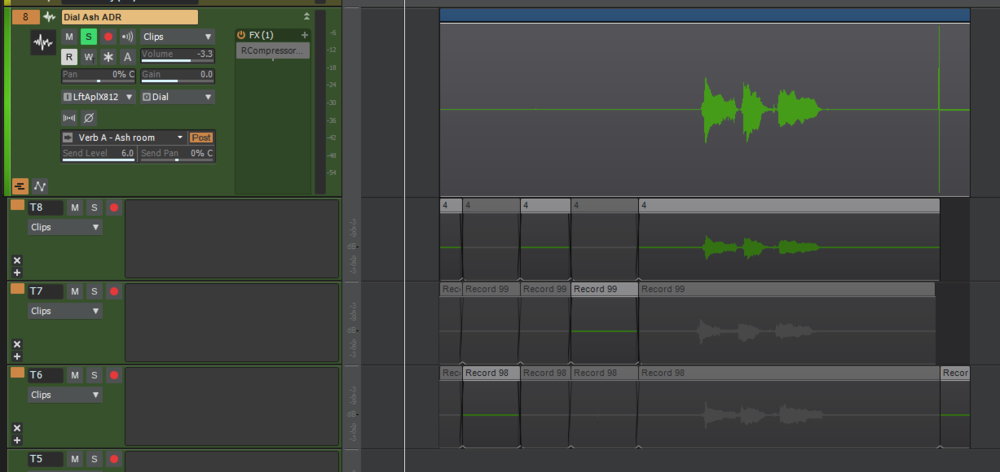
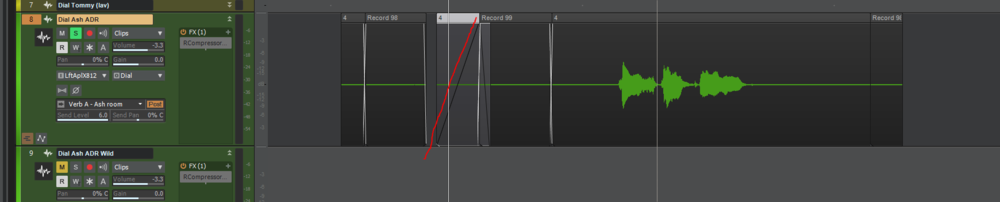
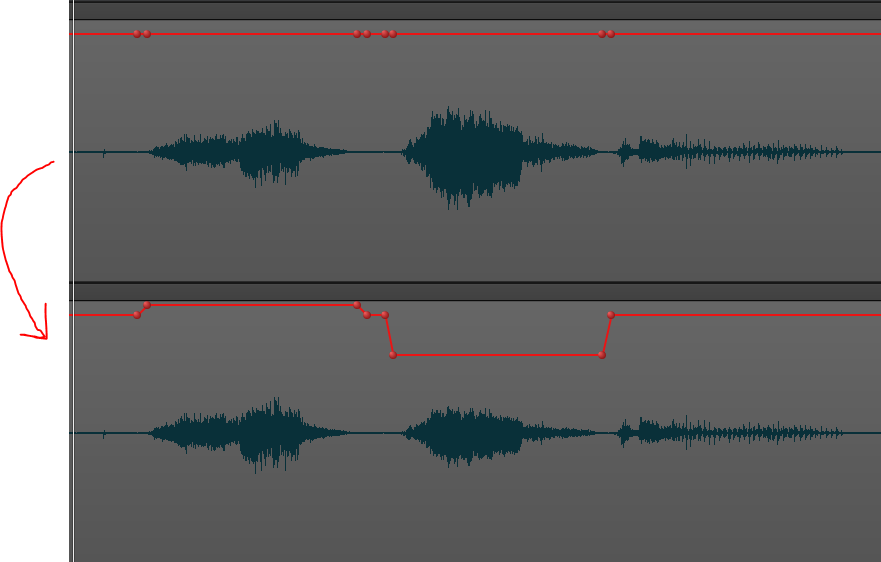
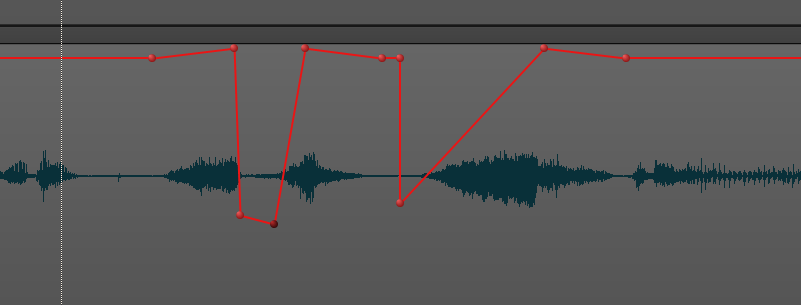
I'm calling this a bug, because there is no way that this could be considered by-design (I hope). I do a lot of editing and comping. If you have a bunch of comps in the take lanes and you pick and pull from different takes and then collapse down to the main track and slide clips around and x-fade the edge, the X fades go bananas (best way to put it). All the hidden, UNUSED clips in the comp lanes still affect the USED clips, making the x-fades completely non-sensical. Super frustrating. I've tried this with both "Display muted clips in the parent track" on and off and the behavior is the same. What I have to do, is after I've decided which comped clips to use, I have to go and complete delete out every other take and then collapse them down and finish editing. This completely defeats the purpose of having comp lanes for future pulling of clips if I change my mind later. It's simple, once I've chosen the clips from the various take lanes and collapse the track, all my edits to clips should only affect the clips I've chosen to work with. This is incredibly easy to reproduce, but in case it's needed, here are screen shots of the issue: Choose some comps: I then select a clip that I want to nudge a hair: When I nudge it to the right, the starting cross fade is complete jacked up. It should have only changed the ENDING fade, since now there is overlap with the adjacent clip to the right. To see what's happening, expand the comp lanes back out: ^^^ what is that shenanigans? Those other ghosted takes should NEVER affect the master comp. you can see that Cakewalk thinks there is overlap between clip "4" and clips "record 98" and "record 99". And thus it's jacking up clip 4's starting x-fade.


-
Feature Request / Bug Fix (not sure which applies)
Josh Wolfer replied to A Quiet Traveler's topic in Feedback Loop
Not exactly what you're looking for, but I did just confirm that Mix Scenes (in the control bar) *DO* honor enabled and disabled plugins. So this might get you one step closer to A/Bing, even if it's not as convenient as having a carte blanche way of disabling all X plugins. -
Global FX latency monitor. Play/Record/Bypass selector
Josh Wolfer replied to Misha's topic in Feedback Loop
Bumping this up, because I still have times where I play "find the plugin causing delay". And I used to think "np, I'll just enable PDC", but I found that if I do that, audio is misaligned after I turn it back off, so it's kind of a pain. Bakers, please consider. -
Feature request: PianoRoll enhancements
Josh Wolfer replied to Sergei Pilin's topic in Feedback Loop
I believe this can be done with drum maps, but I've found them to be frustrating to use and just deal with it. But I've wanted this feature for a long time too. -
Feature: Partial clip gain via control shortcut + selection
Josh Wolfer replied to Josh Wolfer's topic in Feedback Loop
Okay, so that works about 1/2 way for what I'd like. I didn't notice that behavior before, because I was holding control and clicking from the center, and you have to put the mouse on the top of the clip frame and drag from there. That is better. Now if there was a way to adjust the gain of the clip, outside of the gain automation, that'd be the final piece that would make this a perfect workflow for me. Clip Gain automation for movements over time and this new method for adjusting gain of a selection (without creating automation nodes and lines all over the place.). Thanks for the tip on dragging from the top, that gets me 1/2 way to where I'd like it to be and greatly improves the work flow. -
*edit Looks like this can partially be done already via the method mentioned in the second comment. woot. So the this request really is about having a method to quickly adjust clip gain in selected parts, out side of the clip gain envelope. I just discovered that you can hold control and click drag from the middle of a clip and instantly change the overall clip gain. SUPER HANDY!!! No more having to middle click -> clip gain automation. What would be even better is if I could make a selection of part of a clip and then control+click drag would change just the gain for the selection, eliminating the need to add or adjust nodes. And what'd be even better is if for this method of gain editing, worked outside of the clip gain envelope! There are two distinct reasons why Clip gain needs to be modified: 1. Static adjustments (My #1 repeated workflow). 2. Automate a slope over time or more complex gain automation over time. There's would be better separated into 2 workflows within Cakewalk, instead of the one-size-fits-all approached. More details below. 1. Adjust a quieter or louder section of a clip to be more even with the rest of the clip. This is basic static, up or down. For something like this, why am I messing around with nodes? I should be able to select the area and control click it to move the whole selection up or down. I suggest for an edit like this, you just: Change the clip drawing somehow to visually show that it has been modified from the original (maybe a different outline, or shaded color) Show the wave form change (this already happens thanks to the last update) Not show this change as part of the clip gain automation. This should not be restricted to the +6dB limitation of clip gain automation. You should let me boost to my hearts content. This is a 64 bit internal audio engine. Cakewalk already supports 32bit float clips being beyond "0dB". This should be relatively trivial to implement. Adjust the gain over time (automation) This type of gain automation needs to have a visual line to track complex changes over time. There is no better way to do this kind of automation than how it is already implemented in Cakewalk. Having a 6dB cap on this makes sense, because for the most part, once your clip is leveled the way you want it, you don't really need to automate more than 6dB up in a slow. I'd personally say 10dB is more reasonable, but that's just my opinion. I would LOVE LOVE LOVE you if you implemented this. This is one of the biggest hindrances I run into when doing film sound. I have to make A LOT of gain edits. Some people work around this by splitting the clip apart (alt clicking) and then adjusting the clip gain on the split sections. This works, but it's a pain in the butt still. Optimal work flow, would just be to use the partial selection on the clip and adjust from there using control click. Please consider. I have talked to many people on the forum and they seem to also agree this is a sticking point.
-
Exactly as the title states. Probably a slightly non-standard use for the arranger track, but I'm doing film sound editing and I like to use the Arranger track to mark big scene changes. It would be awesome if I could split an arrangement section into 2, by alt clicking, just like you do with clips in track view. You can already right click -> Split at now time, so this is just making a faster way to do that.
-
Aleo, I myself and MANY others always update to the latest versions and I can say with certainty that they are always better than the previous version. I have come across minor issues in a new release, but upon reporting them, they are fixed in the very next release. And again, these are minor issues. I recommend updating to the latest version and then investigating further. Hopes this helps in some way. I have never been happier with Cakewalk. I've been a Sonar user since 1.0.
-
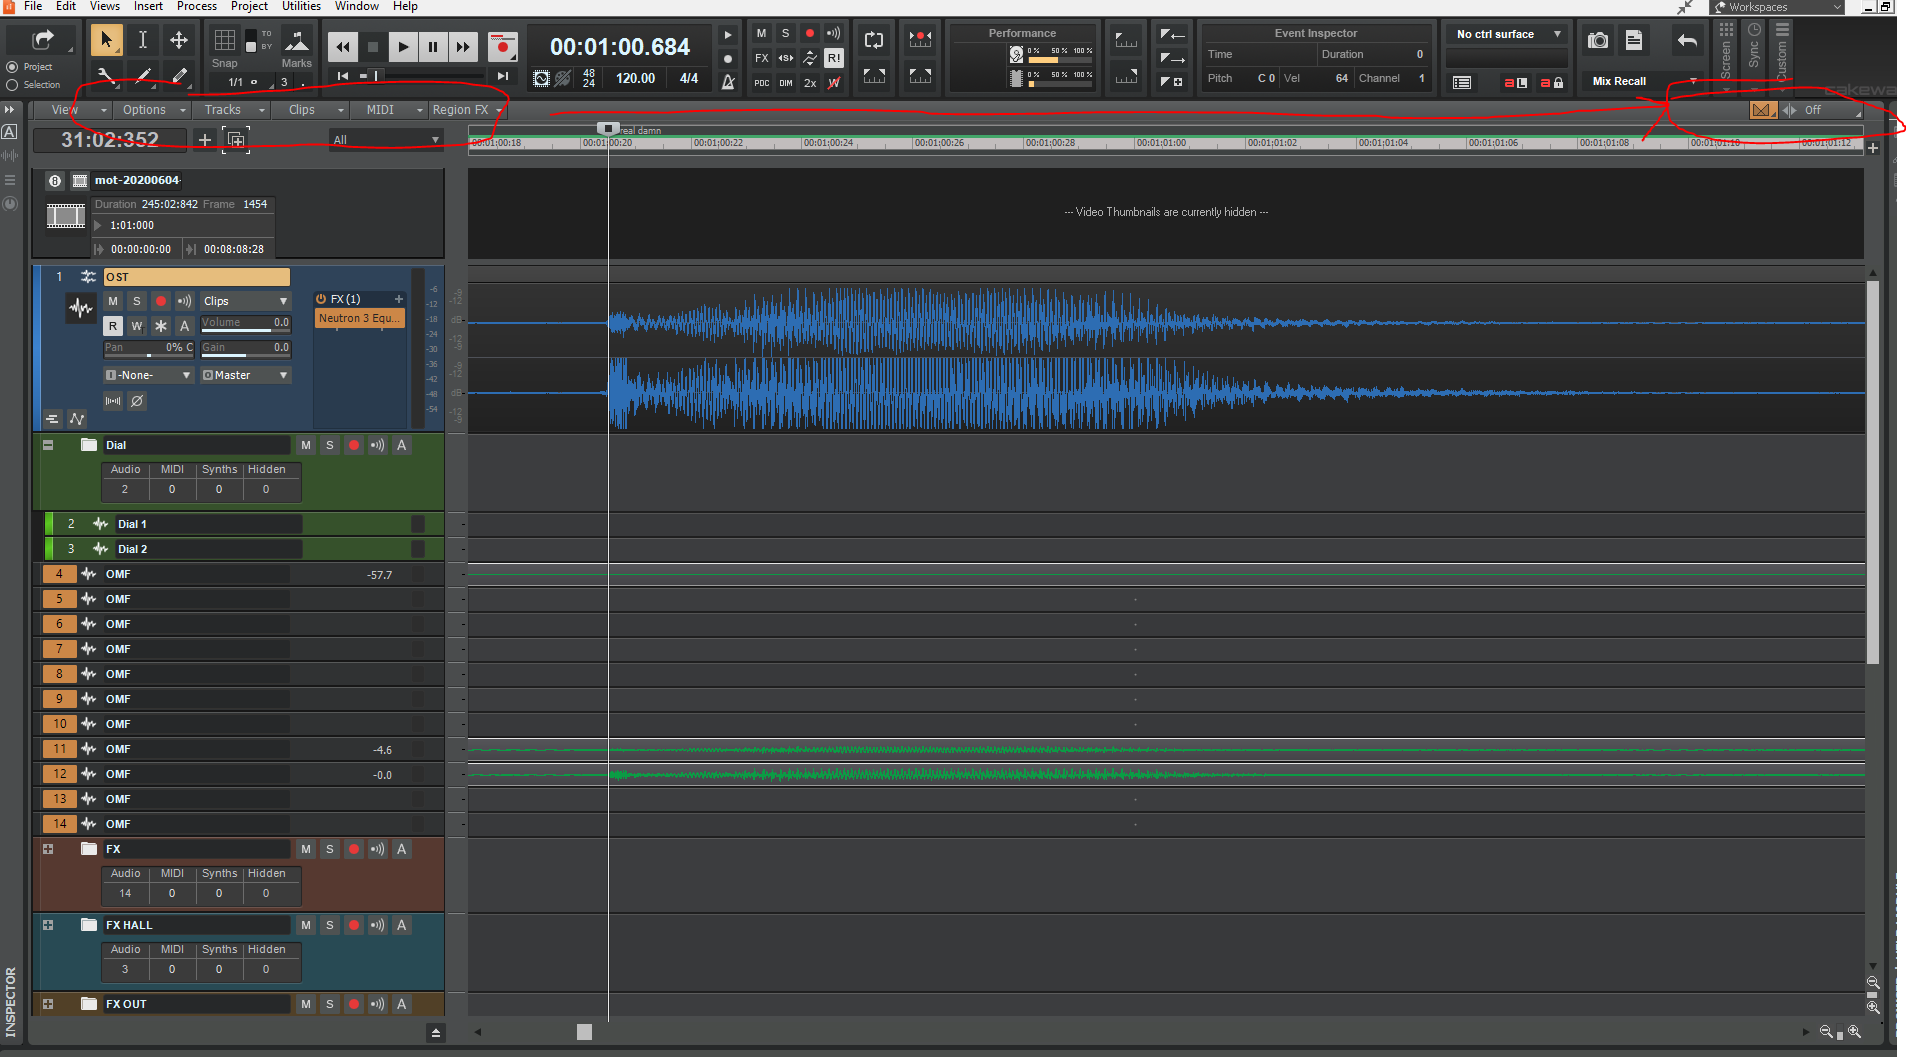
I previous created a feature request for adding the following option as a quick icon toggle. But today, I realized that there really is an endless number of options I'd want as quick click toggles. We all have our own work flows and different desires. So really, I think it'd be great to provide an option for EVERY single toggle, as a quick icon on the top right of track view. This is frankly, the number one reason I hated moving from 8.5 to x1. Because I had my toolbar customized for my exact workflow. I eventually got used to the new way of doing things, but there really isn't a reason that the space on the top right of the track view can't be used to re-introduce this previous flexibility. Having xfades and ripple editing toggles are immensely important. So let's complete this new feature and make it extend to every option. I know I've said it before, but I'd pay for something like this to be added. Thanks!

- 1 reply
-
- 1
-

-
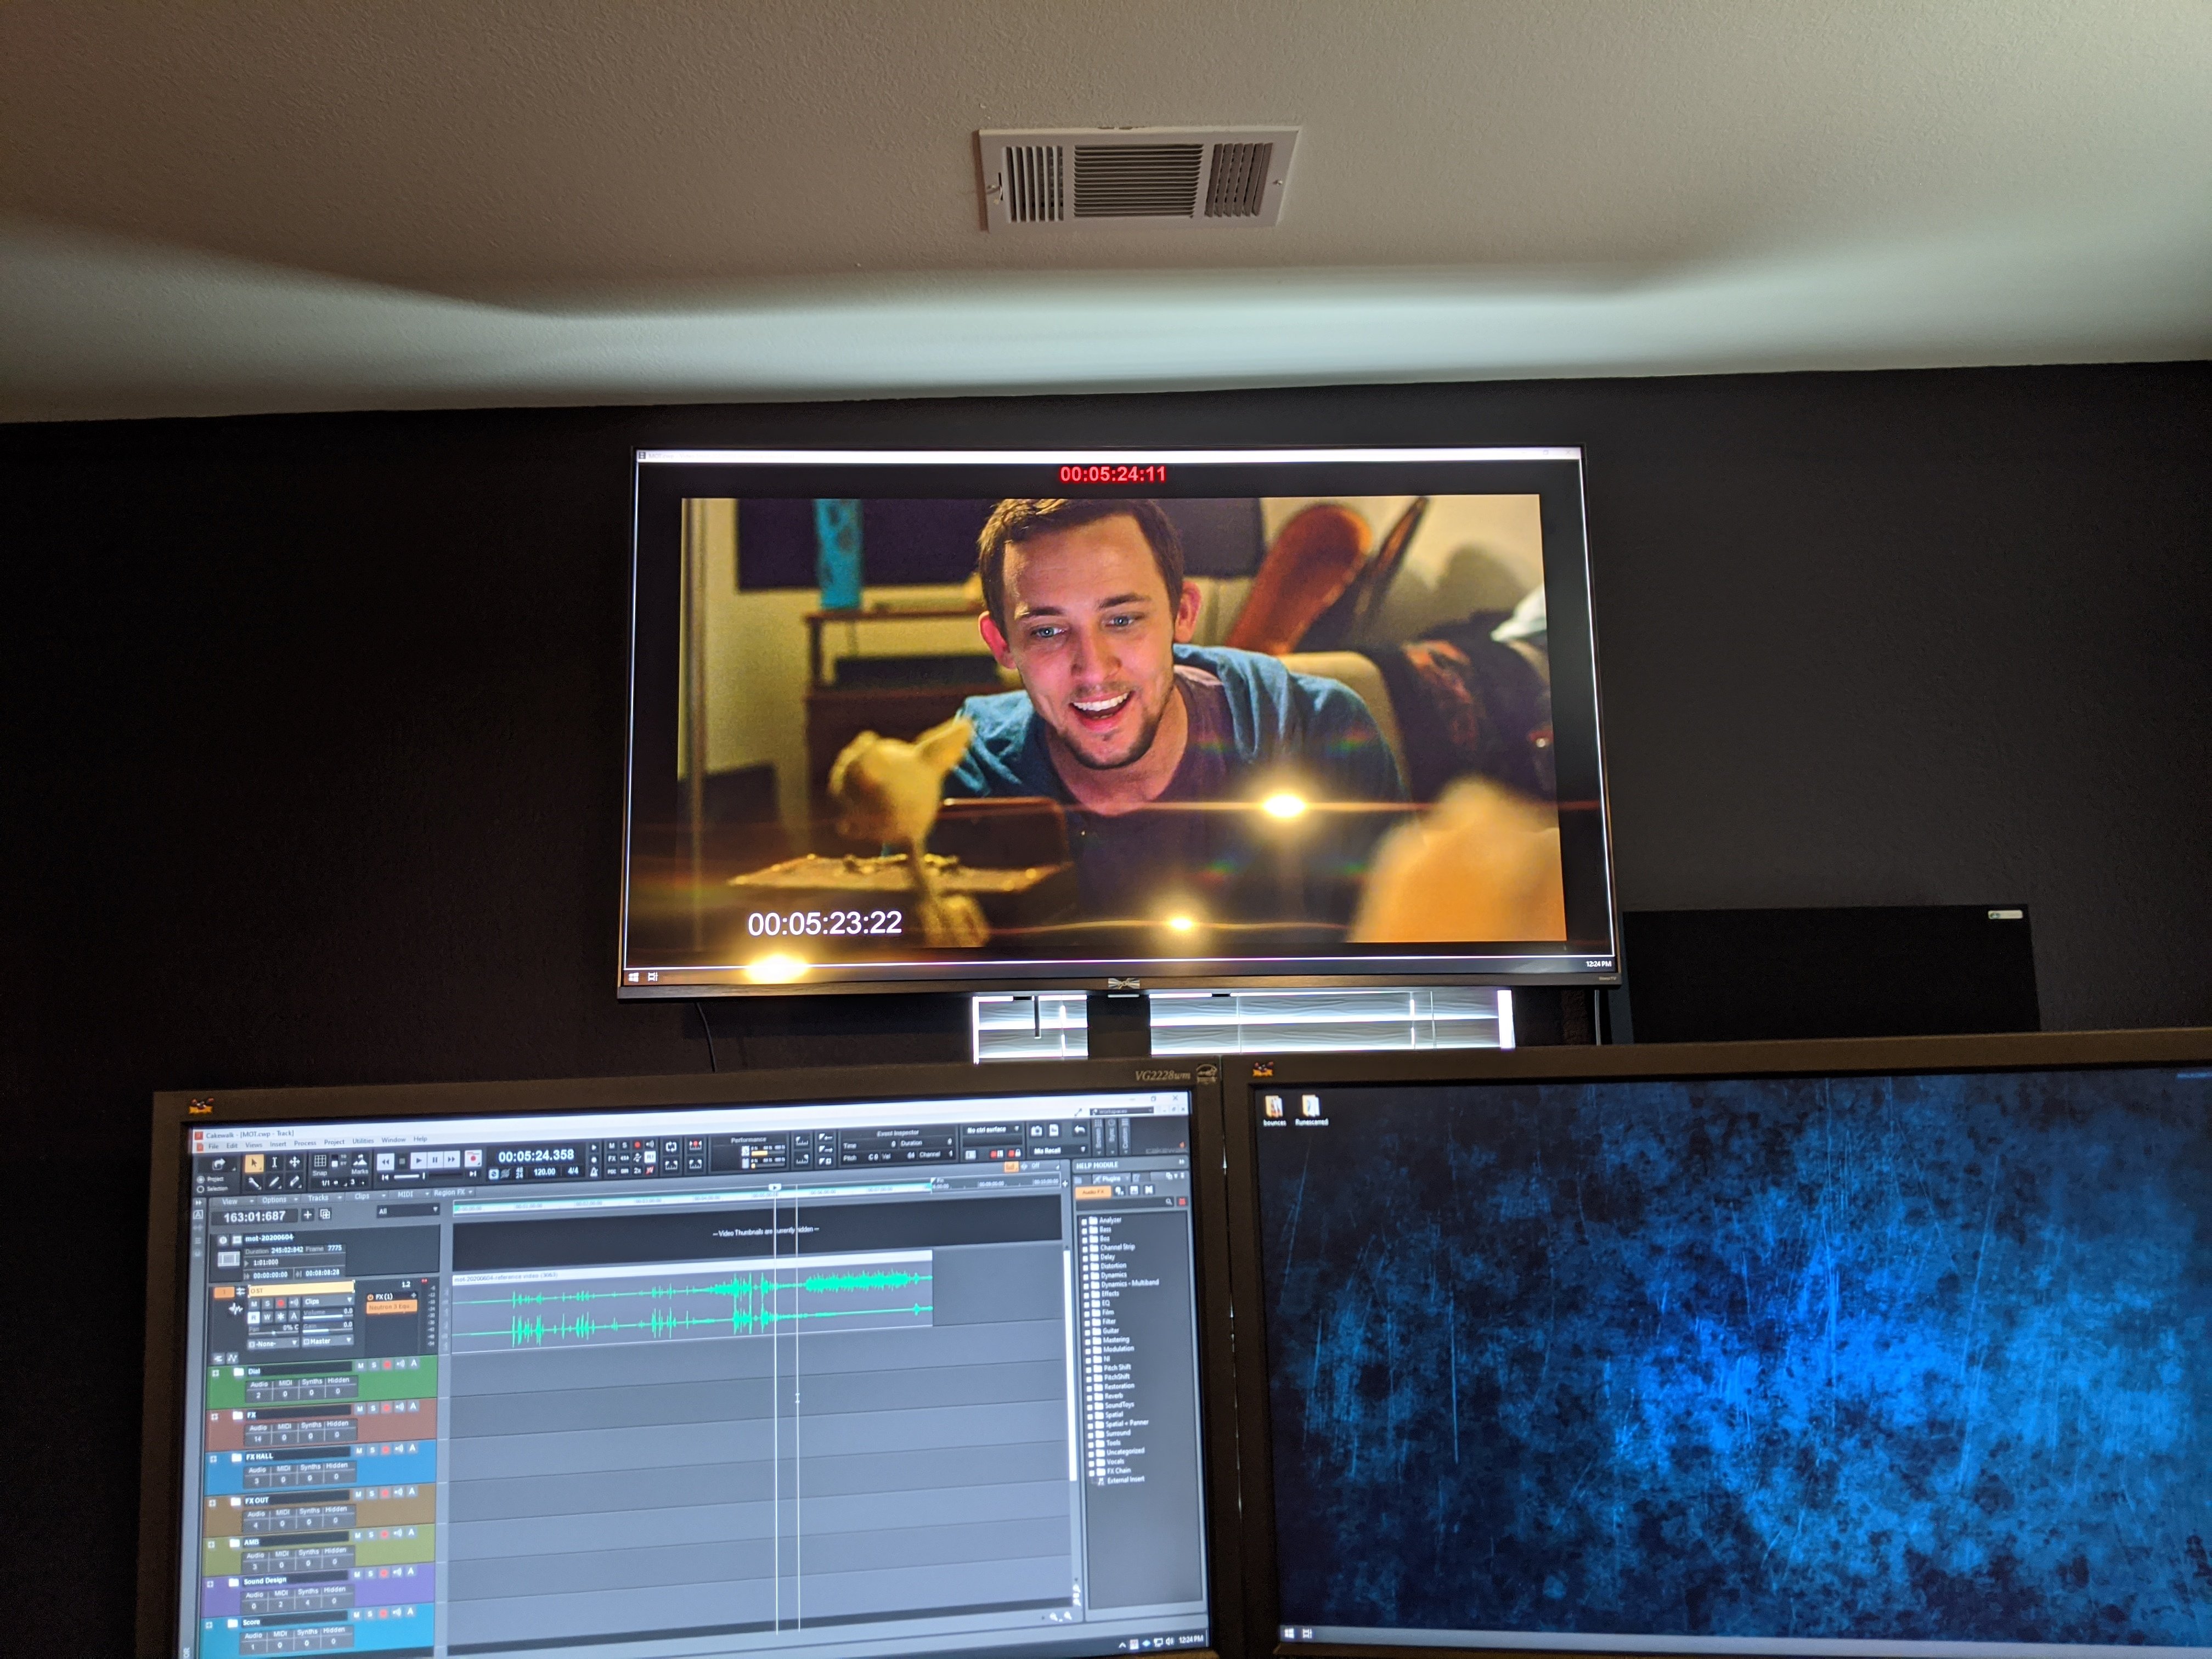
Simple. Not crucial, but would be nice. For film sound, I have the video view on a third monitor. I'd like it to be true full screen (not just maximized), with no borders, no start menu.

-
Definitely. And if each of these prv views or splits could have the option ghosting and locking other midi tracks, so you could have a frame of reference regardless of what view you are in, that would make writing harmonies better. For one, you don't have to keep checking to make sure you're adding notes to the right track before clicking oh, and you would be able to see it if two of your instruments are hitting the same note at the same time, without having to switch between tracks in prv.
-
I appreciate everybody's comments. Very much so. The "pain in the *****" Delta is massive between simply remembering which notes do what in prv and trying to set up a drum map. I hope Cakewalk revamps at some point though, because this would be very handy to have an intuitive and streamlined process to make programming percussion better. But until then, I've been using prv for 20 years, and I will just continue to do so. Setting up templates and obtuse drum maps and trying to get them all to work together makes me want to gouge my eyes out.
-
Bug: Cannot define midi instrument definitions in 2020.05
Josh Wolfer replied to Josh Wolfer's topic in Feedback Loop
I'm trying out the linked clips technique. I thought this was going to work. And it does work if I'm manually entering every note. But if I click in a pattern and then copy and paste it, the paste is ALWAYS a new clip and doesn't stay linked. Completely frustrating. I thought that this option in paste special would take care of it, but it doesn't. So I guess I'll just be programming my parts and then I'll either wait to until the end and dupe it over or just keep duping the parts every few minutes like I've been doing.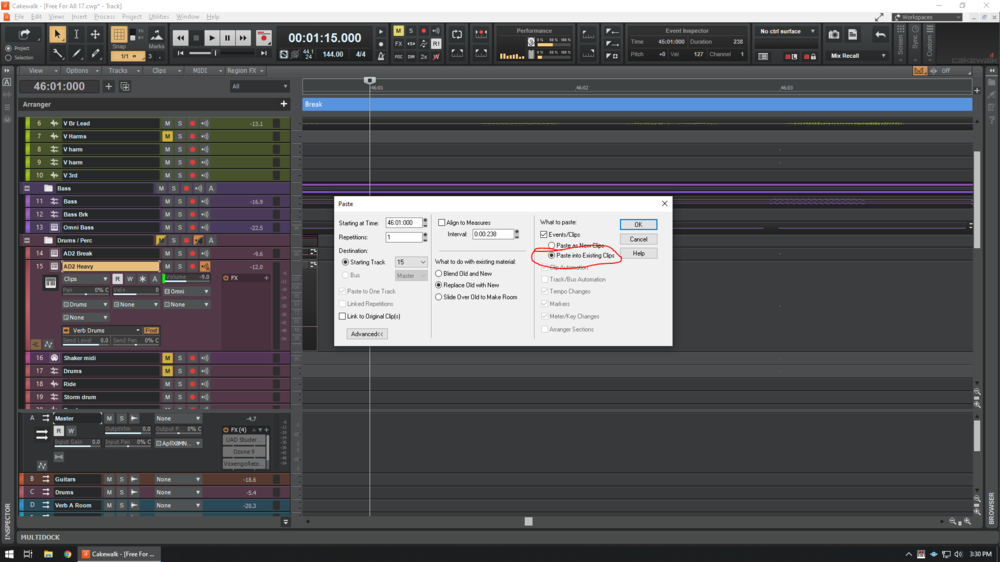
-
Bug: Cannot define midi instrument definitions in 2020.05
Josh Wolfer replied to Josh Wolfer's topic in Feedback Loop
Actually it looks moot. If you have to tell PRV every time to use that instrument def to display the correct names, it's not worth my time. I'm comfortable enough with finding the correct note to hit. This is just eating up time that I should be producing. Appreciate your help. If Bandlab ever makes this easier to use, I'll look at it again. for now, it's insanely too cumbersome. -
Bug: Cannot define midi instrument definitions in 2020.05
Josh Wolfer replied to Josh Wolfer's topic in Feedback Loop
@scook I appreciate the information. What a royal PITA. I did see that KB article and was trying to follow it, but just got frustrated and gave up. Once I found that drum maps can't trigger multiple outs for the same in note, it lost a massive part of why I was trying to set this up in the first place (as is mentioned in my drum map post). I see the master.ins and can modify it. Is there an AD2 definition set for the values that should go into the master.ins already made somewhere? The KB download assets are a template file, drum map, and cwx file, which appear to all be different then modifying the master.ins values to get the right names to show up. Thanks. Very much appreciate your help. -
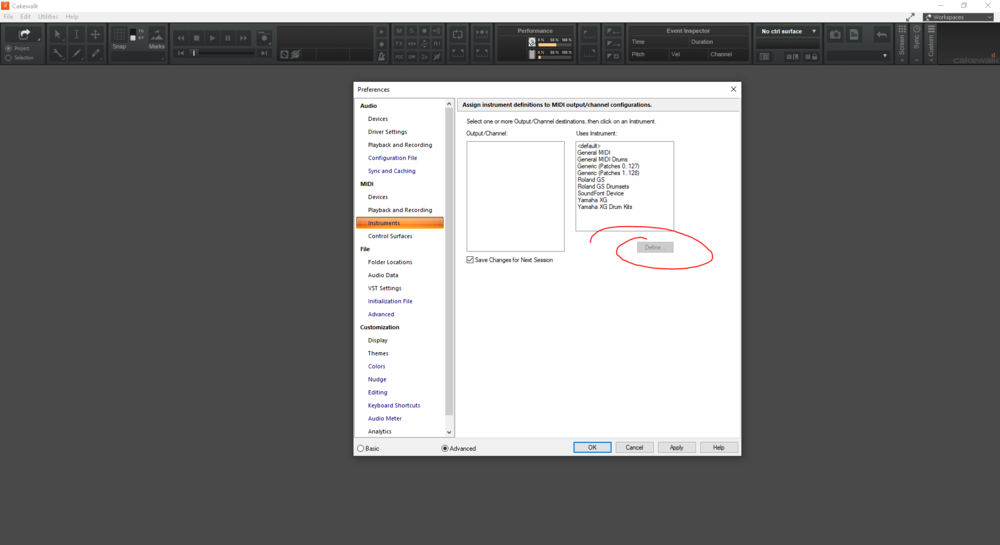
*** Edit *** Appears that this is working as designed. Just ignore this post. --------------------------------------------------------------------------------------------------- Not sure if this is new to 2020.05, since this is the first time I'm ever trying to define an instrument. But when I go to prefs -> midi -> Instruments "Define" is greyed out and cannot be modified. I tried this both with a project loaded and unloaded. If I click on any of the options under "user instrument" it immediate becomes deselected. I'm trying to load in an instrument definition for AD2 to make PRV easier. Cheers.
-
I think the title says enough, but in case it doesn't.... Drum maps are almost unusable. They're extremely cumbersome and should be completely revamped. In a dream world, this is how I'd want it to work: In the Track, I can define whether or not the midi track is for percussion (drum map) or for standard midi notes (standard piano roll) If Drum Map is chosen, I can double click on the PRV note to rename it to whatever sound is triggered (IE: Kick out, Kick in, snare top, so forth) Multiple out assignment: I want to trigger multiple percussion instruments simultaneously and should be able to say that map note X triggers both output NoteX+instrument1 and noteY+instrument2 This is for layering percussion that should be triggered together. These are the core items. I'm not even sure what else. I was excited when I just thought about drum maps and after trying to set it up, in its current form, it's not even worth my time.
-
Bumping this, because it's making the PRV VERY difficult to use when I'm programming drums. Gonna have to make markers on each change which is unfortunate
-
Very simple. I LOVE LOVE LOVE the new arranger. What I don't like is having to repetitively define the sections every single time. For example, I like consistency. So on EVERY track I work on: Intro: light blue Verse: green Prechorus: purple chorus: Red Break / reintro: darker blue. So forth. If we could define these templates from the get go and then just click on what it is, That'd save time in both changing the colors AND naming the sections. Thanks!
-
PDF are still one of the number one attack vectors. You made it slightly better by using pdf, but I still wouldn't touch it with a 10 foot pole unless I'm on a computer with Sandboxie on it. I suggest you copy and paste your contents into the post. The more difficult you make it to see what your requests are, the less likely they are to be implemented.
-
How about a real time track filter/find feature? (maybe CTRL + F)
Josh Wolfer replied to GreenLight's topic in Feedback Loop
What would be awesome is if this could also find clips by name. I do film work and sometimes I'm hunting through a bunch of tracks to find that "one effect" that I want to modify. This would potentially help me find it faster.