

Josh Wolfer
-
Posts
214 -
Joined
-
Last visited
Posts posted by Josh Wolfer
-
-
Simple. I'm selecting multiple clips and want to rename them all at the same time, to the same name. Can't do it today.
The reason? I'm working with an AAF for film and the editor provided a bunch of FX split up into multiple clips and I want to name them all at once instead of one by one.
Thanks!
-
On 3/30/2021 at 8:10 PM, Maestro said:
Other DAWs and NLEs are dropping OMF support as it's been deprecated and considered a legacy interchange format for years.
Newer software that never had OMF when it was actually de facto is not going to add it, so lacking AAF support will become increasingly more of a handicap, especially if you [also] work in the film post industry.
This is exactly what I'm running into. Avid media composer doesn't even support OMF at all. So it's not even an option. I had to find a friend with Pro tools to convert this last AAF for me, to OMF. There is a tool to do the conversion, but it's $200. If I'm going to drop that, I'll just use that toward another DAW, like pro tools, which is $300 for a year. I'd rather just stay native to cakewalk, especially for indie gigs where I'm doing all the post sound. It's getting harder and harder to do this though.
-
It's becoming more common to only have AAF support film work. In the past, I have requested and received OMF, but I just received a project in AAF and it looks like this is how it's going to be from here on out.
If there is a way to implement this in Cakewalk, that'd be great. I'm looking at other tools in this thread to do the conversion. It looks like I'm going to have to go that route for now. But the tool is $200. Not cheap.
-
On 3/18/2021 at 1:47 AM, Clovis Ramsay said:
i've never detected feelings of frustration from CTRL-Z before in my life until watching this! Though, I do share similar moments with my instance of CW. Rendering hard gain settings via the "file menu-process audio-gain..." will restart the track to begin just after the section that was rendered, meaning it creates a whole new track that is wayyyy ooff time and killing my vibes.
I CTRL-Z so hard I that I CTRL-7 now! Somehow Z and 7 can substitute for each other, pretty neato i thinks!Can you take a video of your issue? I just did the process audio gain and couldn't see any issues. It only applies to a single clip, when multiples are selected though. So that could be an issue in itself.
-
FYI. Repo'd and the bakers have the bundle file
")
-
 1
1
-
-
Okay. Well I couldn't reproduce this today with the same file that I did twice before, so that's a bummer. 😕
If I get more, i'll write back, but as for now, I guess we can file this under "the universe hates josh". It doesn't appear to be size related. I created a new project and spammed melodyne on all the tracks and got it to 14MB, and couldn't repro again. /sigh.
Thanks for listening
-
I'm still trying to track this one down, but I've been able to reproduce it twice. I'm going to start a new project and see if I can always repro it. But I wanted to bring it up.
The details around this:
Problem
After extensive multi-track editing in Melodyne 5 Studio, during an Audible bounce of the project, it stops half-way through playback with no errors and no drop outs. It just stops playing. The bounce file is written to disk and contains audio up to the point of where Cakewalk stops (as you'd expect if Cakewalk dropped out during a bounce).
Upon this point, nothing looks problematic. All tracks still have clips that show the waveforms and the clips all show melodyne is on them (RFX menu).
however, The audio no longer plays on all the tracks that had melodyne running.
DetailsUpon saving the project file, the project file size is MUCH smaller than before. IE: The project went from 9 MB with melodyne edits to now 1 MB.
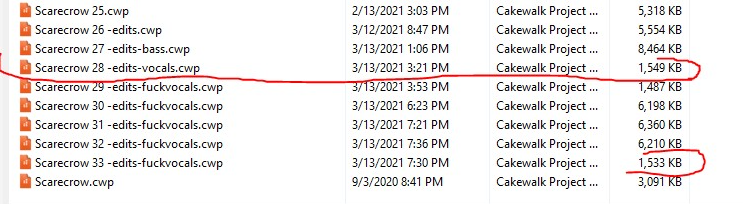
^^^ These are the first time and second time reproductions of the issue. I had to re do about 4 hours of work, unfortunately. I'm fully aware of how to backup projects and as you can see, I have pretty good structure in my process. I have enabled additional auto save iterations every 15 minutes in case this happens again, but what is done is done.
I'm still working to reproduce this in a new project, but I'm pretty sure I have a good idea what is happening, since I reproduced the issue in the same project.
I believe that Cakewalk is doing some kind of plugin data size check and once it sees X amount of data for a plugin, it's assuming there was a problem and it's deleting all the data. This is purely a guess. But I think it's very coincidental that this point seems to be about 8 MB.
How I got melodyne data so large:
Melodyne studio 5 is an incredible piece of software. With the latest version, you have manual controls over de-essing, per note / syllable gain adjustments and so forth, in additional to pitch correction (so yeah, no shnarky comments about how you wouldn't need this with a good singer). In multitrack mode, you can also manually adjust stretching and timing of each word. It's a dream come true for adjusting vocals. And yes, there are things like vocal sync, but manually doing this in melodyne yields amazing results.
And more importantly, this is what melo 5 studio was designed to do. So it's not like I'm demanding an odd use-case on this one.
After talking to a bunch of people, they kept saying things like "you're supposed to bounce melodyne on each track or it does weird things". This is an unacceptable response. Again, the point of melodyne "studio" is multi-track editing in context. But I believe that maybe this is why they bounce each track. They may also be hitting this unknown limitation (assuming I'm correct about the cause. )
I'll be providing better repro steps for this. But I wanted to get this feedback started. If anyone else wants to do a repro, that'd be great too. I had about 7 tracks. On my last reproduction, I just started nudging and making random adjustments, saving and adding more until I saw the project size grow by about 8 MB. Then I did an audible bounce and hit this issue a second time.
❤️ bakers. Looking forward to resolving this. It was a rough weekend and I missed a deadline 😕
-
6 hours ago, msmcleod said:
@Josh Wolfer - If you get a project you can repro this on, can you bundle it up and send it to @Jonathan Sasor ? I've tried to repro this with 3 or 4 projects and can't get a repro.
Absolutely will do. I made a FB post too and it looks like other people have run into it too. We'll try to track it down.
https://www.facebook.com/groups/333570523387557/permalink/3838016606276247/
Cheers!
-
I'll bundle this file up and see if I can quickly repro on my secondary computer
-
2 hours ago, sjoens said:
Curious, so I checked this out and did not experience the OP's issue either way I selected the clips. But I've come to know each user has their own special set of weirdness with Sonar/CbB as no 2 systems are alike.
Are you using Comp or other that SoS recording? That could be a factor as I only use SoS or D&D (drag & drop) to create clips.
In this case, it's SoS recording. However, I've experienced this purely with Drag and drop as well, when I'm splicing together sound edits for film.
I wonder what the magic combo is to make this happen...
I'll see if I can reproduce consistently with a pattern.
@sjoens I appreciate the response.
-
I made another video. Same behavior when selecting the track.
I did try the flatten comp option and that appears to work correctly though. Check the video. I think you'll agree that this is definitely a bug of some sort.
Cheers.
-
The baker's rapidly responded to my last bug and are including a fix in the next release. Booyah. So I figured I'd bring up the other biggest nuisance bug that's been plaguing me for months.
I took a video again, since that seems to be the best way to show exactly what's happening.
Plain and simple, when you're bouncing a bunch of clips together, pretty frequently Cakewalk decides to provide you the large single clip that it should, plus it add a whole bunch of other clips that don't belong, into a new take lane.
This happens so frequently across all projects, that I'm sure this is reproducible by someone else. I also just tried it again with auto-xfades off and it still happened.
Cheers bakers! ❤️
-
1 hour ago, msmcleod said:
@Josh Wolfer / @marled - thanks for the report.
We've reproduced this issue and have a fix for the next release.As always. Extremely appreciative of all the work the bakers do. Thanks @msmcleod!
-
 2
2
-
-
-
It's been doing this for a couple releases now and it's driving me insane. I uploaded a video since that's a lot easier to show the issue.
This happens in multiple projects. I'd go as far as to say, probably all of them.
When slip editing on Crossfades (shift edge clip over a xfade) - to move the edge + keep the xfade area, it moves random surrounding clip edges.
And what's worse is "Undo" only undoes the change I made to the clip I'm slip editing. it LEAVES the horked surrounding clips. And it's not always obvious when Cakewalk has decided to betray me.
- I had troubles reproducing the issue again, at first, but I uploaded the full video just to show extra
- At 1:49 I thought I'd reproduced it, but it was just a temporary visual glitch that fixes itself when you let go of the mouse button. The audio is fine.
- At2:50 you can see where it highlights the clip to the left of the clip I'm working on (even though the audio isn't moved.... yet. But I have a feeling this is related somehow)
- At 3:40 is the first ACTUAL reproduction of the bug. And then there's many more later.
So if you want to skip directly to the issue, go to 3:40 and beyond.
I hit this so often, I simple just can't use the shift slip editing at all.
https://www.youtube.com/watch?v=C_0xG92NZJE
Enjoy and thanks bakers! Can't wait for this one to be fixed. ;)
-
1
-
On 2/5/2021 at 4:51 AM, Bruno de Souza Lino said:
Only worry would be this causing an issue Ableton is known for: it constantly indexes its folders and places it reads and writes to just so you can do searches like that. That often results in performance issues.
Could always make it only index on demand.
-
Not a huge deal, but while the Bakers are being so attentive to us, I figured I'd ask. I fat finger the automation lanes button all the time. I mean to open up the comp lanes.
And when I do this and quickly click it again to un-show the automation lanes that I never wanted to see in the first place, Cakewalk creates a volume automation envelop and leaves it in track view. I really don't need to see volume envelopes until I get to the mixing phase and I want to create fader automation. And I don't really want to see unnecessary automation lines on the track view.
It'd be nice, if you open the automation lanes and close it without actually having any fader envelope nodes defined (leaving it in automation "jump" mode for the entire project), the track view continued to not keep the fader automation visible.
I know, I'm being pedantic. But I do this all the time.
Never hurts to ask.
On a side note, if the take lanes and automation lanes icons were more visually distinct, like they were different colors, I'd probably discern between them more easily. But ever since their inception, I click the wrong ones constantly. So I don't think my brain is going to stop.
Cheers.
-
1
-
-
On 11/13/2020 at 3:49 AM, brandon said:
Hi Josh - what would dragging the clip to desktop provide?
It provides a copy of the audio track that is frozen, so you can manipulate it further. You can also just copy the frozen clip to another audio track and it will remain there, even after unfreezing the original source track.
Sorry for the late response. I took a break from these forums for a while.
-
I have a particular use case and I'll do my best to explain it. I'm working on synthestration and my track structure looks as such:
- a Track folder with a bunch of instrument tracks in it
-
Track folders labeled with a "version" of the score I'm working on.
- within these version folders are MIDI tracks that correspond to the available instrument tracks in the "instruments" folder.


I make big changes to the score periodically and I essentially just duplicate the "version folder" which contains the midi tracks and continue from there. Yes, I could keep these version iterations in their own project files, but I like to have quick access to the previous versions. Loading in a ton of sample libraries in/out just to hear previous version, is not ideal. Also, I like being able to compare notes and harmonic structures, all in the same project. And midi data is small. This shouldn't be a big deal at all.
The Challenge
I'm constantly soloing out different groups of midi tracks in order to hear how they're playing with each other. When I solo a midi track(s), it works exactly as you'd expect. But when I unsolo the midi tracks, I get no sound, because the source Instrument track remains solo'd, but there are no corresponding midi tracks to feed the instrument track.
I have to go to the console bar and click the solo button to un-solo everything and now I'm back to normal.
This is unideal.
What I'd like is that if you solo a midi track or group of midi tracks that feed an instrument track, upon un-soloing the last midi track that feeds the instrument track, both the last midi track AND the instrument are no longer solo'd.
This would have a much more pleasant work flow.
Here is a clip to show the issue directly:
-
Scrolling / filtering to every context menu, would be great.
-
1
-
-
On 11/7/2020 at 2:46 PM, Will_Kaydo said:
Seriously? ARE YOU REALLY GONNA TELL ME THAT'S HOW THAT WORKS WHEN IT'S CLEARLY PITCHBEND.
Wow!!!
Don't know what DAW you're using - all I know is, im using cakewalk.
Okay. One, you don't need to be a dick.
Two, I made a mistake and thought that was a volume automation line and it's really the midi pitch wheel.
Three, that's not what the OP is asking for. He's not asking to automate the midi pitch controller, he's asking to pitch bend audio clips.
-
2
-
-
Will_Kaydo, All you're doing is automating the volume, not pitch.
-
1 hour ago, Base 57 said:
This would be very helpful. An Arranger track display for the Staff View wouldn't hurt either.
In the meantime, have you tried the Inline PRV?
I wasn't aware of the Inline PRV, so thank you for that. For everyone else, you get to it by changing your track filter to "notes". Unfortunately, this isn't a great workaround for me for a few reasons
- I'm doing a lot with midi CC automation as well and it doesn't appear that you can lanes for CC / velocities.
- I'd hate to have to maximize random midi tracks regular in order to see the notes well.
- I'm doing a bit of scoring and I really need to see groups of midi notes from other tracks to see where harmonic structure lies between multiple instruments.
But that was a good suggestion. I appreciate it.
-
There have been major improvements to Cakewalk lately. The Arranger and now Articulation Maps is INCREDIBLE. but, I can't stress this enough:
Having an arranger track that is not visible within the PRV window is a seriously downside. Especially if I want to use an arranger track essentially as a chord track. I've mentioned this before, but I'm posting it again, since the latest version still lacks it.
This would drastically improve the usability of the arranger track for composers.Even if I use PRV docked in the multi-dock and don't maximize it, it doesn't line up with the track view, making that not a workable work around.
Please, Please, Please implement the option to turn on the arranger track in the PRV.
-
3
-
 1
1
-


Feature: Rename multiple clips at once
in Feedback Loop
Posted
Rad! Did not know this. Cheers!