


-
Posts
6,886 -
Joined
-
Last visited
-
Days Won
21
Everything posted by Starship Krupa
-

Stopping drones with a Korg nanoKONTROL 2...
Starship Krupa replied to msmcleod's topic in The Coffee House
You will become one with the Korg. Also, like User 7 of 905133's post, I honestly thought this was a topic about controlling a virtual instrument and was wondering why Mark would put it in Coffee House. -
Make it able to clear "Recent Projects" list.
Starship Krupa replied to Miguel Ruiz's topic in Feedback Loop
Also, unless I just haven't found it yet, a way to clear them from Start Screen. I launch using Smart Screen, and the recent projects clutter is a bummer. -
If there were a reaction stronger than "Great" idea, I would have used it. "Excellent Idea." How to delete a marker was something that baffled me, and that I had to Google. John is absolutely correct about the "mid-click" modifier key being non-standard Windows, and given how Windows-compliant most of Cakewalk strives to be, rather odd, and it sure feels weird. I tried all of the standard modifiers before giving up and Googling. Alt+right click or something might be good, but just having it in the context menu would be a step in the right direction.
-
In Your Face BASS - What's your strategy?
Starship Krupa replied to musikman1's topic in Production Techniques
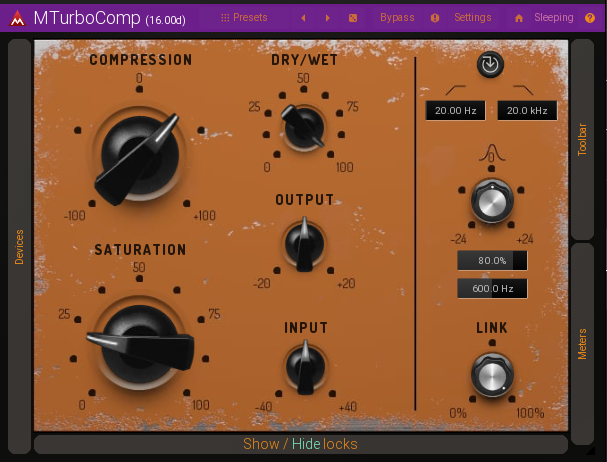
That is par for the course. There's another thing that a compressor can do, which is "glue" the individual instruments in a submix together. This helps them sound like they all exist in the same virtual space, it complements how our ears hear things. This would be your bus compressor, which is typically slow and more characterful. The T-Racks 670 sounds great on buses. Finally, the master bus compressor, another slowbie. I don't know if this is considered a hard and fast rule, but if I want to do the punchy compressor thing, I put it on the individual track. Then, depending, I put the smoothing compressor next in line. Thing is, it's a judgment call on all of this stuff. Some synth sounds don't need any carving or compression, they come out of the box ready to go. So far, I never use reverb as an insert effect, only as a send effect. I need to learn more about using multiple reverbs and especially delays, to help place instruments in a 3-D space. I want to create mixes that you can walk around in! Well, what are you saving your CPU power for? 😄I'd guess that your system has more capacity than mine, and 20 tracks with instances of compression on each one would be fine on my system, as long as the plug-ins were well-coded (and it sounds as if you're using pretty good stuff). As Tim mentioned, the cycle eaters tend to be the ones doing heavier lifting. A compression algo looks at the level of a signal and responds to it with level adjustments. Depending on how much "mojo modeling" is going on, that's not typically an "expensive" computation. Fortunately for this equation, the type of compressor I tend to use first in line is MCompressor or elysia mpressor, which don't do a lot of mojo modeling. The smoothing compressors are a better place to sprinkle that pixie dust. Every channel of my DAW has one of the best para EQ's I've used built right into it, the ProChannel QuadCurve. Matter of fact, the ProChannel has a few pretty good compressors in it. I would've recommended one of them if they had more extensive metering. If you find your system bogging down under the weight of too many plug-in instances, then it's time to start bouncing synth tracks to audio. Virtual instruments are usually way bigger cycle eaters than FX. Then Cakewalk can just read them as audio files. As someone who has learned to play 4 instruments, I'll say that I've probably put as much time and work into getting better at mix engineering as I have into any one of the instruments I play. By the time I became a rock music fan, at around age 5, Revolver and Pet Sounds had come out and firmly established the concept of recording-studio-as-instrument. The Moody Blues were already recording Days of Future Passed. So I've always thought of it as such, and I'm beyond psyched to get to live my dream of being able to produce music all by myself, using nothing but my own gear, in an environment I can access 24/7. It's just like learning to play an instrument. It takes building basic skills, such as we've been discussing, and it also takes practice practice practice. I can tell someone verbally how to play an Em chord on the piano, and a C, whatever but for them to learn enough on piano or organ to create music is going to take a while. Watch YouTube videos, subscribe to Tape Op (it's free), read Sound on Sound at the library or electronically. It takes woodshedding. It's taken me years to be able to speak with any true confidence about these topics, and I still consider myself a n00b. And what I'm telling you is merely the way I've learned to do it. 2 years from now, you and I, presented with the same basic tracks, could make all the "right" mix engineering decisions and still come up with different sounding finished songs. -
He changed 2000 MIDI files' channel assignments? If so, ask him how he did it and reverse the process. Why would he have been messing with your files? I'm thinking that what is more likely is that he changed the channels on your gear? That's a relatively easy fix. There should be a way to go into these devices' settings and check what MIDI channel they are set to listen on. They should be set to Omni, or maybe for the drum machine, Ch. 10.
-
Drive shows as half full but as empty when opened.
Starship Krupa replied to Twaddle's topic in Computer Systems
Illustrating the need for regular backups. -
In Your Face BASS - What's your strategy?
Starship Krupa replied to musikman1's topic in Production Techniques
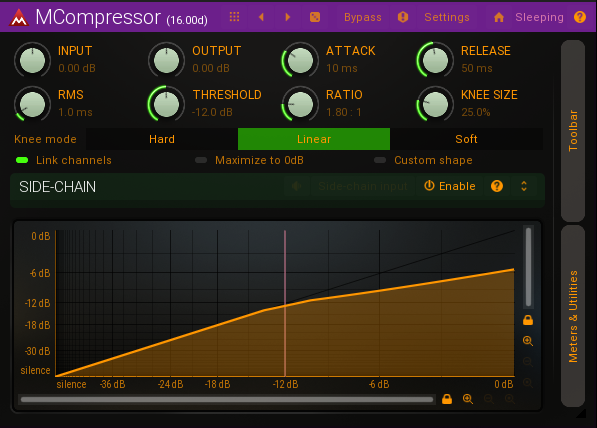
I'd say that if you want to use something that's already in your locker, go with Waves C1. Turn off the EQ function, and pay attention to what the screen with the curves on it is showing you. It has a similar display to sonitus fx and MCompressor. I like the one in MCompressor because it's BIG. I love the sound of the T-Racks processors I have, but the metering in the compressors is pretty slavish to the vintage vibe they're going for. Not the best for learning on. Re: MCompressor, it's part of the Meldaproduction FreeFX Bundle, which includes 36 other top quality FX and utilities. I use MStereoscope on every project, and MNoiseGenerator and MOscillator are great for equipment setup. I mentioned MAnalyzer earlier. They're all part of the bundle, all free to use. Okay, yes, the settings on those "bass" presets are way "slower" than the ones I suggested. They're set up for the thing that compressors were originally designed for, which is to control the dynamic range. Bass notes can leap out at you in a bad way, bass players put dynamics into what we play with slaps, picking harder or softer, etc. Sounds great "in the room," but not so much for a recording where you don't want a sound to dominate. I know, counterintuitive, if you're looking for the bass to "pop," why reduce the dynamic range? In short, reducing the momentary level spikes allows you to set the bass track's overall level higher without it poking your ears every time a high-velocity note sounds. My quest when I started recording vocals was "how the heck do these mix engineers get the lead vocals to sit out in front of the speakers like a hologram?" I played my engineer friend a track from Elliott Smith's XO to demonstrate. He had me do two things to my vocal track. First was smoothing compression, second was sweeping for the "honk," which has become a topic of controversy due to people misusing it. Sweeping for honks is a way to find any obnoxious freq buildups that are due to the imperfections of the recording chain and the nature of instruments and voice. You listen to your track for something that's unpleasantly poking out (and I emphasize that because part of the misuse is that some people think you have to do it for any freq that sticks out, and that's not true. Just the one(s) that are clashing and poking the ear), and first exaggerate them to make sure you have it right, then drop them a bit with the EQ. My rule is no more than 2 honk notches on a given track. It sounded great, a big step toward what I was looking for, but it seemed counterintuitive: why would I take things away from an instrument (my voice) that I wanted to stand out. Well, duh, if you knock down the spiky things, you can crank it higher in the mix without it sounding obnoxious. Get the concept? We tone down the spiky things so that we can turn it up and have it not hurt. So what is the role of the "smoothing" settings vs. the "make it bounce" settings? With one, you're emphasizing the instrument's rhythm (and this was not, I think, the original intention of the compressor, engineers just figured it out), with the other, you're making sure that the level is reasonably smooth. We use two compressors. The "bouncy" (or "punchy") one goes on first, then the "smoothing" one. If you have ever refinished something, coarse sandpaper first, fine later. Same idea. All along the chain, dynamics processors are smoothing it out so that it can be louder. What are we listening for as far as gain reduction? Until you tune your ears to hear the effect of compression, a good all around number on your meter is averaging 3-6dB. It's hard to do too much damage at that number. When you get better at it, the "bouncy" one can have more GR. P.S., for the "smoothing" compression, I like something like the T-Racks 670 (it sounds so good it's like cheating) or whatever LA-2A they have. -
In Your Face BASS - What's your strategy?
Starship Krupa replied to musikman1's topic in Production Techniques
Wanted to mention: one of my favorite tools for getting rid of collisions is Trackspacer. The way it works is that if the sound of one instrument, we'll say piano, is obscuring another, we'll say guitar, you put Trackspacer on the piano track and make a send from the guitar track to the piano track. Et voila, whenever the guitar is playing, its frequency range is reduced in the piano track. So if we think about what Trackspacer is doing, we can do it manually by deciding which instrument we want to emphasize in each frequency range. Let the piano take the mids, let the guitar take the upper mids. As Tim mentioned, our ears/brain fill in the "missing" information from the track that's had the cuts applied to it. We haven't gone much into compression yet, but creative use of that (rather than just using it to smooth out poky transients) can really make a track pop, while at the same time helping to keep it out of the way of the other tracks. On bass, start with about 7ms attack, 50ms release, 4:1 ratio. Tune threshold until the gain reduction meter is peaking at around 5dB. Use 0% or "hard" knee. Then play around with the release until you hear the bass "swinging" with the rhythm. I suggest not using a "vintage emulation" type compressor for this as you're learning, because the quirks they add can obscure things. Many people have learned their compression chops using Meldaproduction's free MCompressor. Don't let the price fool you, it's one of the best workhorse compressors out there (the only thing it lacks is a mix control for easy parallel compression, although there are fairly simple solutions to this). There's no compressor I would recommend more when learning compression. The sonitus fx compressor that comes with CbB sounds good, but it has that tiny display. -
At least in Cakewalk, during that wait period, if I click on the title bar, it'll show "not responding," but it pops back. Transport doesn't stop, though. Sorry to hear about your troubles; Objeq Delay is one of my favorite sound design/glitch tools.
-
Well, until the Rolling Stones started taking him on tour with them, B.B. King was a thing of the past, too, so I will be keeping the forum flame alive until something actually better, and by that I mean "better at conveying information and fostering a sense of community" rather than "better at attracting people with the attention span of a cocker spaniel puppy" comes along to replace forums. I think the issues with Facebook are at least twofold, maybe more. First, information posted there is really ephemeral. It scrolls away, it's gone, no searching topics or thread titles. I eventually get bummed about answering the same questions over and over. Second, some answers really need to be long, and Facebook doesn't lend itself to that, big blocks of text in smaller type. Third, due to its structure and culture, Facebook encourages people to try to be "helpful" when they really have no idea what they're talking about. Forums have the advantage that they are communities, and as such, reputation has a certain amount of value, both for people holding the opinion and for the person hoping to get and maintain a good reputation. If I think someone is being a little rough on a n00b, I'll try to pop in and encourage civility because I have something invested in helping the community be a welcoming and friendly place. Facebook, and especially YouTube, encourage a more "hit and run" style. Lord knows, I just saw a YouTube Cakewalk user who asked his viewers for help with a crackling and dropout issue he was having with Cakewalk on a powerful new computer (turned out to be a plug-in, surprise!). There were 2 or 3 valuable responses, and the rest were suggestions to switch to whatever DAW the person typing favored. One person suggested he try ASIO4ALL (rather than the driver supplied for his RME PCIe interface). Great use of the downtime, John! Your collection is a great set of tutorials on the basics.
-
I'd like to start a topic where we can post Cakewalk-centric YouTube channels. My latest find is Bongonzo, who is into beat making and EDM-related topics: https://www.youtube.com/c/Bongonzo I discovered him by way of a new video about automation by Lorene "Produce Aisle." https://www.youtube.com/c/TheProduceAisleMusic Here are some more, if I forget anyone, my apologies. @John Vere's Cactus Studios: https://www.youtube.com/channel/UCIImmMf5qdvYsgRLQvlZlFA @Xel Ohh: https://www.youtube.com/c/XELOhh1 @Creative Sauce: https://www.youtube.com/c/CreativeSauce (who just did a "Fix My Mix" with Lorene) @Robert McClellan's Home Studio Simplified JustDaNorm: https://www.youtube.com/c/JustDaNorm/ @AdK Studios: https://www.youtube.com/channel/UC92yvXuf5WO5KG11V8MWtbw
- 23 replies
-
- 10
-

-

-

-
presets VST3 Presets - .vstpreset support
Starship Krupa replied to André Jacobs's topic in Feedback Loop
That would be Unfiltered Audio, for one. As you point out, most plug-in manufacturers do have their own preset management systems. As you also say, you have "about 75 PA plug-ins," which is a thing that is shared with most plug-in deal watchers: their discount deals have been so generous (and the plug-ins of such quality) that we have many of them. If I only had a handful, it would be no big deal. Toss up a Disney+ movie on monitor 2 and punch them in. Another issue with it, and I'm always mindful of the new user, is that like me, people might never even realize that these excellent plug-is come with presets. And of course, new users need presets more than anyone else does. If you would like a "beta tester" for your script, I'm not afraid to get cozy with regedit. And I run at 1920x1080 100%. -
Whaaa? FM&D is almost the last theme I would think you would dig (after EVA 01 and Yellow Submarine). 😄 It's a cool theme, very fun.
-
Mix Compensation for Hearing Impairment?
Starship Krupa replied to rontarrant's topic in Production Techniques
Some of the most enduring pop music mixes were produced by a guy who is deaf in one ear. Brian Wilson. I don't know how he managed stereo mixes, maybe he had help. His stuff still gets heavy airplay over 50 years after it was recorded. Sir George Martin produced into his 80's, and you know that he must have had some rolloff by that time. There is an art to listening that goes beyond the basic sense of hearing. Mix engineers learn to listen to detail, mindfully, which is a talent that is learned. I learned by listening to This Is The Moody Blues on headphones for hours upon hours when I was in high school. Their music and mixes have so much depth and detail that I wanted to explore the space they created. I have uneven hearing loss in both ears, both because of loud music exposure and age. Also tinnitus. But my ability to listen is still intact. As @treesha said, listening to reference tracks (I can't stress this enough, it's useful for so many things in the mixing and mastering process) through your monitor system to get a feel for what a balanced mix sounds like is a great idea. Boz Labs' freeware Panipulator is a great plug-in that lets you mono your mix, swap left and right, and send the mono to one side or other, which is different from listening to mono on two speakers. It also lets you do weirder stuff like flipping phase on one channel to account for poorly configured playback systems. A version of it used to come with SONAR as a ProChannel module. I also check the overall balance (pan and tonal) of my mixes with a couple of Meldaproduction free tools, MStereoAnalyzer and MAnalyzer. One more thing: I have a nice porch and have been known to take the laptop out there for some producin' and mixin' with my ATH-M50's on. I'm a porch rocker. 😄 -
Yikes, anyone who hasn't snagged Audiomodern's collection of freeware FX needs to go there right now. Filterstep, Gatelab, and Panflow are amazing. Top notch (pun not intended) for electronica and EDM. https://audiomodern.com/free/
-
In Your Face BASS - What's your strategy?
Starship Krupa replied to musikman1's topic in Production Techniques
SPAN is great, and much loved. My favorite tool for this is MAnalyzer, which has presets that allow you to compare the tonal balance of your mix with typical curves from different genres. It's great for knowing whether I'm in the ballpark. -
No problems here. But as with all A|A|S plug-ins, the first time you show the UI, it takes multiple seconds to display, and during that time, the DAW's UI can also stop updating and go unresponsive. So it looks like the whole thing has frozen, but I just have to wait it out.
-
ʔEnough to make you cough up your lunch. Not to mention these abominations:
-
Not to worry, I've been using Cakewalk for years and still sometimes forget to record a mono signal to a mono track. Welcome!
-
How to feed Waves Abbey Road Studio?
Starship Krupa replied to Jeremy Murray-Wakefield's question in Q&A
This is odd. I've never tried working with surround in Cakewalk so I don't know, but research via Google suggests that surround plug-ins aren't supported. Yet as you point out, Cakewalk sees that it has 8 inputs. It recognizes them, it just doesn't know what to do with them? Doubly odd, since Waves claims compatibility with Cakewalk by BandLab. I'd also contact Waves and ask them exactly what they mean by "compatible." -
I understand that English is likely not your first language. You need to be clearer on what a "Stroke Map" is. Cakewalk by BandLab (SONAR is long gone) has no feature with that name.
-
levels Export wave LEVELS, Master LEVELS
Starship Krupa replied to Sergio Miranda's topic in Production Techniques
I shoot for everything I export to -1dB, using the LEVELS plug-in from Mastering the Mix. If I'm not sure I've done a "hot" enough export, I load the file into Sound Forge or Audacity and just normalize it to that. If the files you're getting from FL Studio aren't similar in level, you should work on your understanding of FLS' metering and how it relates to mixdowns/exports/renders, whatever they call it. It's not always the easiest thing to get a handle on. I now set up a dedicated bus for exports and do my exports from that bus rather than Cakewalk's "hardware outputs." -
Exported audio sounds different on different speakers?
Starship Krupa replied to Ron Pipes's topic in Production Techniques
So you cut the bass and midrange and it no longer sounded boxy. This is not surprising. What may we glean from this? In general, if you find that things have too much midrange and/or bass when you reference them on other systems....that suggests that your monitoring setup is somehow deficient in those areas. Simple as that. You're cranking those freqs to compensate for it. Good on ya for chasing down the issue. No longer a mystery, now you know what's wrong, you just need to figure out how to correct it. Mixes not "translating" is an old old problem for which there are well-established solutions. This is the most golden of advice. One of the first tricks I figured out all by myself back in the days of cassette 4-tracks. Like how Bauhaus sounds? Play some Bauhaus on your mixing system every once in a while to "remind" yourself what a well mixed and mastered track sounds like. Yes, I was into Bauhaus back in the day. So, now we've established that at least compared to your other listening environments, your BX-5's, sitting where they are, have some frequency dips at your listening position. What can we do to help the situation? Take a look at how you're positioning the monitors in relation to your head and how you're mounting them. Those things look to be back-ported, so make sure you don't have the backs jammed up against the wall. As much as you're able, try moving your workstation to a different place in the room. Ideally, as most know, your speakers should be placed to form an equilateral triangle with your head. Try to achieve that as much as possible. If they're sitting on a desk, raise them up. If you turn your head to look at a monitor, you should be staring straight into its tweeter. Do they have frequency balance adjustment controls on the back? If so, experiment with them. If they don't, you could possibly put an EQ on an output bus, after the bus you export your mixes from. You can get a reference measuring mic for around $50 new. That will allow you to take accurate measurements of frequency response at your listening position. I did this, but just grabbed the most accurate LDC mic in my locker ("a half-***** job is better than none!"). Put it on a stand where my head usually is and swept tones and white noise through my speakers while watching on an analyzer plug-in. The Meldaproduction FreeFX Bundle comes with all of the software tools you need to do this. Doing this satisfied me that there wasn't anything TOO weird going on with my setup. I don't have bass traps as such, but I also don't have 4 parallel walls and I do have multiple bookcases in the room, which actually serve as pretty good bass traps in practice. 10' ceiling with coffer beams also helps. Worst is a room with nothing on the walls, uncarpeted, parallel walls, 8' ceiling. But some people have that because that's what they have. I won't say unequivocally "you need to treat your room in XX way" because we don't know exactly what freqs your room is emphasizing (although upper mids and highs sounds likely, so you could try hanging a blanket on the wall behind you and see what happens). Can you afford to consider different monitors? Maybe now that your ears know better, it's time to go audition some and take it to the next level. Maybe not. None of my monitors is likely to show up on anyone's wish list (more likely they'll say they had a set of them back in 1997 and outgrew them) but I know their sound and how it compares with other setups. My Events are, as they say, "revealing," which works for me. -
In Your Face BASS - What's your strategy?
Starship Krupa replied to musikman1's topic in Production Techniques
Probably the best thing I do for that is listen to reference songs in whatever genre I'm working in, songs that I think are well mixed and mastered. And I listen to them on my monitoring system. When asking for advice on "how do I get this sound?" it makes it much easier to give advice if you give us an example of exactly which "CDs and radio songs" you think do a good job of presenting an "in your face" bass sound. Different genres call for different methods. Go to YouTube and search for "how to mix bass" or even "how to get an in your face bass sound" and you'll find plenty of information. A mistake that I think a lot of people make is in assuming that "bass"=low end. I grew up listening to Paul McCartney's bass coming through on the 2" speaker of a plastic AM transistor radio. Our ears "fill in" the rest when we're listening via imperfect reproduction systems. Listen closely to those well-produced songs and you'll likely find that the "bass" sound that pops out is much higher in frequency than we might expect, and that the extreme lows are rolled off with high passing. As a listening exercise, try throwing a steep highpass on your bass track and slowly bringing it higher and higher until it doesn't sound like "bass" any more. When I do this, it's always higher than I expect. The way it "looks" in my mind is that there's the "upper" component of the bass sound, where the pluck, snarl, whatever, is, depending on whether I'm using a bass guitar (or sample of one) or a bass synth sound. Then down from there comes the space that I cut out for the kick drum, often involving sidechaining with Trackspacer or just a compressor. Then down from there in a space all its own is the pant-flappy boom, the amount of which can vary depending on what genre and what I'm trying to achieve. Club sound systems can reproduce it, earbuds less so. To make any fast attack rhythmic sound stand out better, I use compression, usually with about 5-10 mS attack to let enough of the attack portion through, and 100mS or shorter release. This isn't to smooth it out, it's to give it a bounce that resembles how our ears naturally react to instant sounds. I didn't twig at first that compression can be used not only for the gluing and smoothing functions (that were the first parts of its job that I understood), but also to shape the dynamics and rhythm of sounds. As a side effect of putting this kind of "bouncy" compression on other sounds in the mix, I find that it helps them stay out of each others' way. I started a thread on this forum about noticing an example of that. I was twiddling a compressor and thought it was the one on the bass track because it was affecting the bass track in a big way. Then I noticed that it was on a different track. What I was doing was just getting that track out of the way of the bass track, leaving space for it to come through. If I can't hear my bass distinctly, what's covering it up? Look for things that might be covering it up and maybe work on them a bit. It might have less to do with the bass sound and more to do with the other things we try to cram in. In trying to understand it better, I thought of it like looking at an image. If all of the elements in the image are tinted medium orange, it's harder to pick out individual elements. This is how I think of the usual advice to carve each element its own space in the frequency spectrum. However, if we take a full-range image and then make a spot on it that's completely bright white, even though that bright white spot isn't strictly "in the way" of the darker elements in the image, it still draws the eye's attention away, and maybe even make the iris close somewhat. This is akin to having a poky loud sound in the upper mids: nothing to do with "bass" as far as frequency, but its volume makes the ear recoil and pay less attention to what's happening lower down. In this way, sounds can mask other sounds that aren't even within the same spectrum. Not something to be afraid of, rather something to notice. As for listening environment, I don't know if there's such a thing as a perfect listening environment. I figure if I can play my Radiohead reference CD on my monitors and it sounds killer, then there's no reason that with mixing and mastering chops, I can't theoretically produce something with at least a similar sonic balance. I haven't deployed any bass traps as such, but I have 4 different sets of monitors connected to my workstation, plus good listening systems in my bedroom and living room, plus headphones and automobile. I work on it until the song sounds good on all of those systems. Hey, why not? After all my stuff is listened to more by me than by anyone else. 😁 P.S. I've heard nothing but good about Kalis. It's on my to-do list to go down to GC and audition some. -
So it sounds like your issue isn't that your laptop isn't fast enough, it sounds plenty fast and it sounds like you're happy enough with its speed. It's rather that you are looking at Task Manager and seeing all this RAM that you paid extra for "going to waste." The thing about RAM is that you just want to have enough that you don't run out of it under taxing conditions (like sample-heavy projects). You don't say how much RAM you actually have installed, I'll guess 24G. That's great, but I've never come close to hitting the ceiling on my laptop which only has 8G of RAM installed (that's all it's designed to be able to hold). And I do use some sampled instruments. Not a full orchestra's worth, but some. It's reserve capacity. Unlike me, you don't have to be concerned at all about the size of whatever sampled instrument you're using in a project. You can load anything you want with confidence that the system isn't going to have to start using your drive as virtual memory. That's what your extra RAM is "doing."
