


-
Posts
6,805 -
Joined
-
Last visited
-
Days Won
21
Everything posted by Starship Krupa
-

Detect and shift the pitch of an audio track
Starship Krupa replied to Starship Krupa's topic in Production Techniques
I have more than one key detector, and Hornet's is one of them. My favorite is actually Antares', which runs on my iPhone. Hold your phone up to the monitor and hit play. I also have enough musical theory and a good enough ear to work out a song's key by playing along on piano or organ. I usually don't need key detection if the thing's in concert pitch. Where I have trouble is, if I hear that it's off, figuring how far high or low the whole thing is. It seems like the tools for "pitch correcting" that I have access to are about idetecting and correcting performances where notes here or there can be out of tune. It's when I get into the area of the whole song or phrase being sharp or flat due to the performer having an out of tune instrument or the song having been deliberately pitched up/down at mastering time. I'm just surprised that this task isn't more common; given the hip hop producers, crate diggers, people pulling samples off of old vinyl records that I imagine. Seems like a pretty basic question: "I want to use this sample, but it's out of tune with the rest of my song. How can I fix that?" I don't know if it's just me, but it's been difficult to find information on standard methods for this. There are tools for finding a song's key, but for checking to see if it's in concert pitch, not so much. I know right away if it is once I try to start jamming along with it or matching it to other samples. But in which direction and how far? I guess if you want to make sure your song won't be used by me in a mash-up, pitch it up or down by a couple of cents before you send it out. -
Audio - Change pitch to standard tuning?
Starship Krupa replied to sadicus's topic in Cakewalk by BandLab
You can change pitch in Loop Construction view. Open the Loop Construction view for the clip, then from the Clip menu, select Loop Properties. Check the "Stretch to project tempo" box and then you will have access to the options at the bottom to adjust the pitch. -
I've only seen it when importing clips I started in Piano Roll View. If you work entirely in Step Sequencer, you're more likely to just see 5/6. I got lucky, I just happened to have a clip loaded with the contiguous cells. The variance in the button shapes is so slight, what really matters is that 5,7,9, and 11 should share the same color, and 6,8,10 and 12 share another. I just use the default Mercury or Tungsten images as a template and paint bucket in the colors I want.
-
Insert Soft Synth command (for Custom module and keystroke)
Starship Krupa replied to Starship Krupa's topic in Feedback Loop
As far as I can tell, there is a key sequence that will open it (which you kindly detailed), but it can't be bound to a keystroke (combo or single) or placed in the Custom Module. What I want is for it to be able to be bound to a keystroke or assigned to a Custom module button, like Insert Surround Bus now is. I insert soft synths way more often than I insert surround buses. If you were going to say "Global Menu," that's the name I use for the menu at the top of the main Cakewalk window (shows Track View by default). It might be called "Main Menu?" I haven't run across the nomenclature in the documentation. My guess is that you know, so please fill me in if you are inclined. It contains several items that IMO would be handier in the Track View, Console View and/or Piano Roll View menus, where they'd be closer to the action. I wind up having to switch from view to view to access certain menus, which is unnecessarily confusing. -
One of my favorite ways to add tracks is via the Global menu's "Insert Soft Synth" command. It's the only way to add a soft synth without also creating either a MIDI track or making it a simple instrument track. It's in a clunky location, all the way up in the Global menu. I've combed through the custom keystrokes editor and the list of commands available for Custom module, but this one isn't in there. It should be, I'd use it all the time.
-
Aye, this. A peeve of mine for sure. It really hurts usability because when we're learning how to do something, we figure out how to do something and then tuck that information away for future use. If there are multiple ways to do the same thing, scattered across multiple menus, we can have all of those multiple paths cluttering up our memory. If we've half-forgotten something, then next time do it via the different steps, those two mess with each other. Even once we have it down, our brain is still asking, "how do we do it this time?" Adding instruments is the prime example, and then you have the thing where the spiffy newer dialog spawns the "Windows 98 called and wants its dialog box back" window. One of my favorite ways to add synths is the "Insert Soft Synth" command way up in the Global menu, because it's the only way I know of to add only a synth track, without an accompanying MIDI track (or as a simple instrument). I'd like to have that available as a Custom Module and keystroke command.
-
Event List is something I haven't spent much time with in theming, looks like deeper diving is in order.
-
Could you share which color in Theme Editor sets this? I'll need to check this in my themes.
-
In most areas, Cakewalk considers "Bypass" to be the active state in Theme Editor. Fortunately, we can provide a bit more clarity with custom button images. All of my custom themes (see sig for links) clarify the Mix Module buttons for FX bypass, PDC disable, and plug-in oversampling. The former show a red slash across the button when they're in "bypass" and the latter uses "1x" when oversampling is disabled. I also change the Pre/Post buttons in Console View's Send and ProChannel so that the default "pre" state says "Pre" rather than greyed "Post." Feel free to swipe the images.😊
-
Excellent. This is where custom themes start to improve on the original UI choices in terms of basic usability. Those Mix module buttons drove me nuts. Next thing is to change the default Pre/Post button text so that it reads "Pre" when it's in that state. It's funny, but these things smooth the workflow by eliminating that moment of "okay, which state is it in again?" One of my Easter Eggs is what you see when you bypass all effects. It might be a local SF East Bay joke, but even if you don't get it, it's still descriptive. Yeah, I weighed the pros and cons of changing buttons as far as varying from the pictures in the documentation, but I decided to just go for it. It takes a certain amount of sophistication to load custom themes anyway, and I consider my buttons to be more intuitive (and certainly more visible) anyway.
-
It's subtle, I guess, but they show up when you have contiguous notes in a row. Plop down one and you get cells 5 and 6. Put two next to each other and you get cells 7 and 8 on the left and 11 and 12 on the right. Put down three and you get the aforementioned left and right, plus 9 and 10 in the middle. If you check out the shapes of the individual cells it gets clearer still. I hope this clarifies it. I figured it out by numbering each cell and then examining them closely. It helps if you slow your tempo way down. The hexagrams make it harder to see, but it's possible.
-
documentation Young Lady's Illustrated Primer to Theming Cakewalk
Starship Krupa replied to Colin Nicholls's topic in UI Themes
It was late and I couldn't think of a better term for 6 horizontal lines. I throw the I Ching from time to time. Double hamburgers? You got it just right (as usual), except the term I should have used for that was "highlighted." Anyway, I'm sure that anyone who wants to delve into it now has everything they need. I am so curious to find out if anyone other than me actually does anything with Step Sequencer, as it seems that the .STH Lords as a group maybe don't spend much time working in that view? I've been going through the views I use less to see whether there's something I can add to my workflow, and that's when I get more interested in making them more attractive. Anyone up for round cells in Step Sequencer? 😄 The hexagrams might be an issue there. -
Perhaps you already have, but the first things to check are whether snap is set to "to" or "by," and then in Preferences check "Snap Intensity." Also, check to see if Smart Grid is messing with you. When in PRV thing that helps me is to decouple the Track View snap from the Piano Roll snap and set the snap I need for notes, which is often different from what I need for clips.
-
So it's like the selection highlight in the Time Ruler, it chooses a color based on which color you set for the Ruler background.
-
I wouldn't mind another Metafilter license. That thing is whompin'.
-
Okay, mind blown. They have Guitar Player, Guitar World, and Guitarist as well. Thank you so much I'm sure you're not alone, but I do at least skim all of the articles. I got the free COVID year and then let it ride for another year because I get at least that much entertainment out of it, and dang, but they do have an archive of samples! A number of the CM suite plug-ins are daily users for me. ADM CM is my go-to for playing drum samples, G8 is great, JST/Boz Spatializer is my top fave stereo image tool. It's probably a lot like buying plug-ins and not using them; we get all excited about getting something new, but then realize we already have it. Processors, knowledge of digital recording methods, whatever. It's not a bad thing to brush up or get a new tip now and then.
-
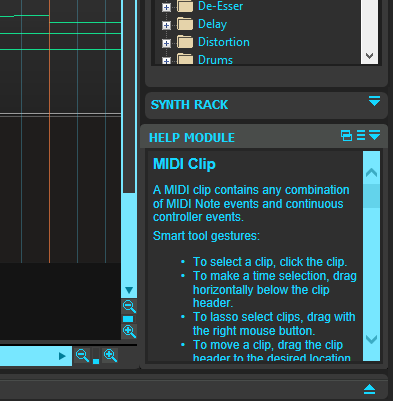
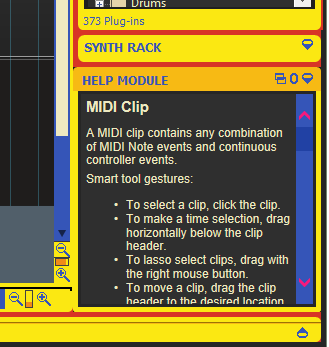
Here's a snip of Midnight Blue, showing both my custom scroll bar colors and what the Help scrollers look like: Same view with Yellow Submarine: The red arrows in Yellow Submarine suggest that they may be controlled by a color selection elsewhere in the theme (or custom color settings, there's always that), although I'm not sure exactly where. It would sure be nice to have this scroll bar in the Browser instead of the generic non-themeable ones we have now. I kinda like the look of it, it would be nice to have everywhere else, too. Looks more modern, easier to see. I'd have to be able to change the colors of the arrows and thumb, though.
-
As all themers know, the Step Sequencer is just behind Matrix View as one of the first Cakewalk elements to attack when one sets out making a custom theme. Or maybe not. Well, in case you ever want to really make that theme unique and do up the Step Sequencer, I have decoded all 12 cells of the Step Sequencer / Step Button image. The Step Sequencer divides things into odd and even measures. Each step sequencer step can have 6 different states depending on whether it is in an odd or even measure, whether it's active (meaning you've clicked it to make a note sound), inactive (empty), and then whether it's highlighted because the playhead is currently over it. So if there are only 6 states, why do we have 12 cells? This is so rows of contiguous active steps can have rounded corners at each end. So in addition to all of the above, we also have images for the leftmost, middle, and rightmost active steps in a row, plus one for a single isolated step. This adds 3 button shapes plus their highlighted forms. Without further ado, I present the different cells of this button and what states they represent: Cell 1: Empty step in odd measure Cell 2: Highlighted empty step in odd measure Cell 3: Empty step in even measure Cell 4: Highlighted empty step in even measure Cell 5: Isolated step Cell 6: Highlighted isolated step Cell 7: Leftmost step in row of contiguous steps Cell 8: Highlighted leftmost step Cell 9: Inside step in row of contiguous steps Cell 10: Highlighted inner step Cell 11: Rightmost step in row of contiguous steps Cell 12: Highlighted rightmost step
-
documentation Young Lady's Illustrated Primer to Theming Cakewalk
Starship Krupa replied to Colin Nicholls's topic in UI Themes
Errata: p. 89 : "Step Sequencer / Step Button (Off)" and "Step Sequencer / Step Button (On)" Describing colors, they should both be Step Button Bar (Off) and Step Button Bar (On). They're used to display those "hexagrams" that appear atop active step buttons. Step Sequencer / Step Button is a a 12-cell image. All cells are used in the Sequencer, BTW. -
I never noticed that the module had scroll bars because I never have the Help Module open. Quick test on my system with EVA 01 and Yellow Submarine says that the colors are fairly congruent with Scroll Bar background, so maybe this is One of Those Things.
-
Detect and shift the pitch of an audio track
Starship Krupa replied to Starship Krupa's topic in Production Techniques
Well, I've gotten at least as far as: Open the clip in Loop Construction View. Select Clip/Clip Properties Check Stretch to Project Tempo That gives me access to the following dialog: It's kind of unintuitive to have to check "Switch to Project Tempo" when I want to keep the tempo and shift the pitch. It also leaves the heavy lifting of detecting the clip's original key to the user, but if I know how far off it is and just want to crowbar it up or down, it looks like Cakewalk can do it. Just seems like those fancy algorithms could be put to use here detecting the base pitch and key of the original clip. It looks like Cakewalk is doing a better job of tempo detection these days, but maybe I just fed it a better sample this time.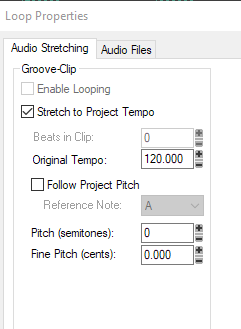
-
If you use those images, yes.
-
Not to take anything away from VSTBuzz, but I highly recommend the 2-fer bundle that includes Boom. I bought the pair for $10 when Plugin Boutique ran a sale, and while I thought that I would probably use Drum Synth 500 more, Boom has become my standard go-to drum machine.
-
Detect and shift the pitch of an audio track
Starship Krupa replied to Starship Krupa's topic in Production Techniques
And again, I am puzzled by the (non) response. Is there perhaps another DAW that would be better suited to this task? -
Interesting and friggin' awesome.


