-
Posts
476 -
Joined
-
Last visited
Everything posted by winkpain
-

Extremely odd "Group" behavior as opposed to "Quick Group"
winkpain replied to winkpain's topic in Cakewalk by BandLab
And on that note, @David Baay, could you put up a link to your post on the old forum for curiosity and comparison? Is it still available? -
Extremely odd "Group" behavior as opposed to "Quick Group"
winkpain replied to winkpain's topic in Cakewalk by BandLab
These are all excellent points. And I was coming just back on board to do something along the lines of "re-pinging" the issue, as it is, in fact, quite an annoying one. I have found that the odd behavior noted above leaves behind curious "remnants" that cause confusion. In my examples with grouping the Mute functions as seen in the second video, I have found that, going back into the project where I first noticed the problem, tracks that I had been working with in the manner shown have remained mysteriously muted without any indication on the track's Mute button. This is likely (I guess?) related to the Mute buttons not responding correctly as you see in the second video in that, maybe tracks are being muted without the indicator on the track showing it. I don't know. But I found that toggling the master Mute button on/off in the control bar would relieve it, although...not consistently. Suffice it to say, there is something very weird going on when grouping Instrument Tracks that warrants looking into. -
Extremely odd "Group" behavior as opposed to "Quick Group"
winkpain replied to winkpain's topic in Cakewalk by BandLab
Wow! OK. Perhaps it was an issue when Instrument Tracks came in that never got ironed out? If it's been 5 years, I guess it's not on the table, then. Good to know about, at least. -
Extremely odd "Group" behavior as opposed to "Quick Group"
winkpain replied to winkpain's topic in Cakewalk by BandLab
Further evidence: The Group function works as expected with Audio or MIDI only tracks. So, the issue is only with the special combo "Instrument" tracks, and no matter what virtual instrument they are connected to. -
Extremely odd "Group" behavior as opposed to "Quick Group"
winkpain replied to winkpain's topic in Cakewalk by BandLab
Same thing. It perhaps showed as an "existing" group in video because I had sampled the scenario a few times. But Starting a new empty project, setting up as seen in video, choosing New Group, etc. all behaves in this same odd and incorrect way. I noticed it when working on a project and wanting to set up this grouped Mute toggle situation, but I have now tested it with, as I say, new projects, closed and re-opened, rolled-back to previous version, and re-installed current version. It is consistently f***ed up in all scenarios. -
There is something very obviously not right here! I am noticing some very odd behavior in grouping controls. I see it in the current release and tried rolling back to previous release and found it to be the case there as well. A quick description of examples and videos: I have several tracks that I want to toggle the alternating Mute states of in an "A-B" manner, so grouping the Mute buttons is in order. I mute every other track, then do a CTRL-A, select All, and CTRL-click any of the tracks' Mute buttons in the "Quick Group" manner and get the expected behavior, both in Track View and in Console View. This is shown in the "Working correctly" video. Next, I set the tracks up similarly with alternate tracks muted, do a CTRL-A select All, CTRL-right click and Group all the Mute buttons with a group letter and color (not Quick Group, in other words). After doing this, I expect that clicking any of the now grouped Mute buttons will have the effect of the toggling achieved in the previous arrangement. This is not what happens as you can see in the "NOT Working correctly" video. On the contrary, none of the Mute buttons work in the expected way except the last one (I have tried with different numbers of tracks, and it is always only the last track that works as the group toggle), and that is only the case in Track View. In Console View it's all very, very...odd. I show this in the video by clicking on each of the Mute buttons in both views, and well, you can see what happens. (In addition, at the end trying a CTRL-right click and "Remove from group" with all tracks selected does not function as expected here.) This is, for sure, not right. Quick Grouping works for my toggling purposes at the moment, but why this behavior with "permanent" grouping?? Surely there is something wrong...
-
I am liking the Tempo Track addition! Couple questions, 'tho: Is there currently a toggle setting somewhere to select tempo changes with clip (for copies or moves) such as there are with envelopes and articulations? This can be done with a "Copy/Paste Special...", I know, but curious if there is a quick toggle option to lock/associate tempos to clips. and Is there a way to select multiple tempo changes and collectively alter their curve type to a preferred one? Or a way to set the default curve to something other than Jump?
-
Interesting that you should have just asked that as well! I have never had the need until just now. Of course the multiple clips can be added to multiple lanes within one track, but they all start at the same time. So not the answer to our question/request. Nor is it a very likely oft-desired scenario: multiple clips all on top of one another on the same track. (?)
-
Is there a way to drag many multiple selected clips from the Media Browser pane into a single track so that the clips insert themselves one after the other at their clip boundaries on that single track?
-
I have found, over years of trying to decipher the Key Bindings settings, that it is best to: save/export your current settings so that they are easily retrievable (with an import) Choose "Zap all..." to return to only the default bindings which show as bold text in the key pane then attempt to troubleshoot creating just your one desired custom binding to see if that works in your desired instance Although it says in the manual that you can reassign defaults to your preferred binding, I have found this to not necessarily be the case, or not to work as expected. And I can't quite figure out why exactly it isn't the case when it isn't. But zapping all and starting fresh from the ground up is a way of figuring some things out that you can then hope to incorporate into your custom bindings file (that you exported/imported). The functioning of these bindings settings is somewhat opaque in my opinion. For example, the asterisks that appear next to custom bindings are sometimes black, sometimes red, apparently to indicate something. What that is, I dunno. It is not mentioned anywhere in the documentation (as far as I can tell). It is true that you can have the same keystrokes assigned to multiple functions in different "Areas", as well as in addition to their default assignments. So, it all can end up being a bit of a confusing mess if you are a customs bindings junky like myself. I spoke of it in another post from a while before - if you care to see more there, scroll the the Aug 30, 2019 entry and read a bit from there. If there is newer, more enlightening information, I would love to hear it as well! Anyway, this maybe doesn't help, just spreading the information.
-
@Matt Dunn - just curious as I have been dealing with this too. Do you notice a difference if, leaving your Auto save time setting as it is, you set the changes setting to 0 as opposed to the maximum number of changes? (which is what exactly?)
-
Pop and Crackle with new ASIO interface, latency apparently not the problem?
winkpain replied to johnchowseymour's question in Q&A
My issue was insurmountable. Weeks of troubleshooting with two separate Tascam units and popping problems all over the place. I am convinced there is something wrong with the driver. I outlined it all here as well. The Tascams are returned and out of my life for good, I'm sorry to say (for Tascam), and now I'm the happy owner of a new Focusrite 8i6 which plugged in, loaded up, and worked like a charm within the first minutes and on! It is such a pleasure to just buy something and have it just work! -
8i6 That's what I meant.
-
@John Vere I hear ya. Don't think I'll go for the MOTU, then. I for sure want power supply option. Definitely looking at the 6i6 or just staying with Steinberg and upgrading to a larger one. I'm just tired of the back-and-forth shipments! "Good" thing life is still so shut down for me and there is still no work at the moment! That's why I decided now to have at all this now.
-
In fact, what we have here is a failure to communicate!

-
No. Too simple. In my situation, the popping happens all over the place , input monitoring on or off. In fact turning it on or off is one of the many scenarios that causes it. And it happens, I say again, even when just browsing the internet! And it all happens whenever any setting other than 44.1K sampling rate is chosen, in Windows or in DAWs. Tascam "Support" continue to get back to me simply repeating to make sure that the Windows Sound setting for sample rate matches the DAW chosen sample rate. You can be sure that I have confirmed that many times over. And anything other than 44.1K, pop-pop-pop.
-
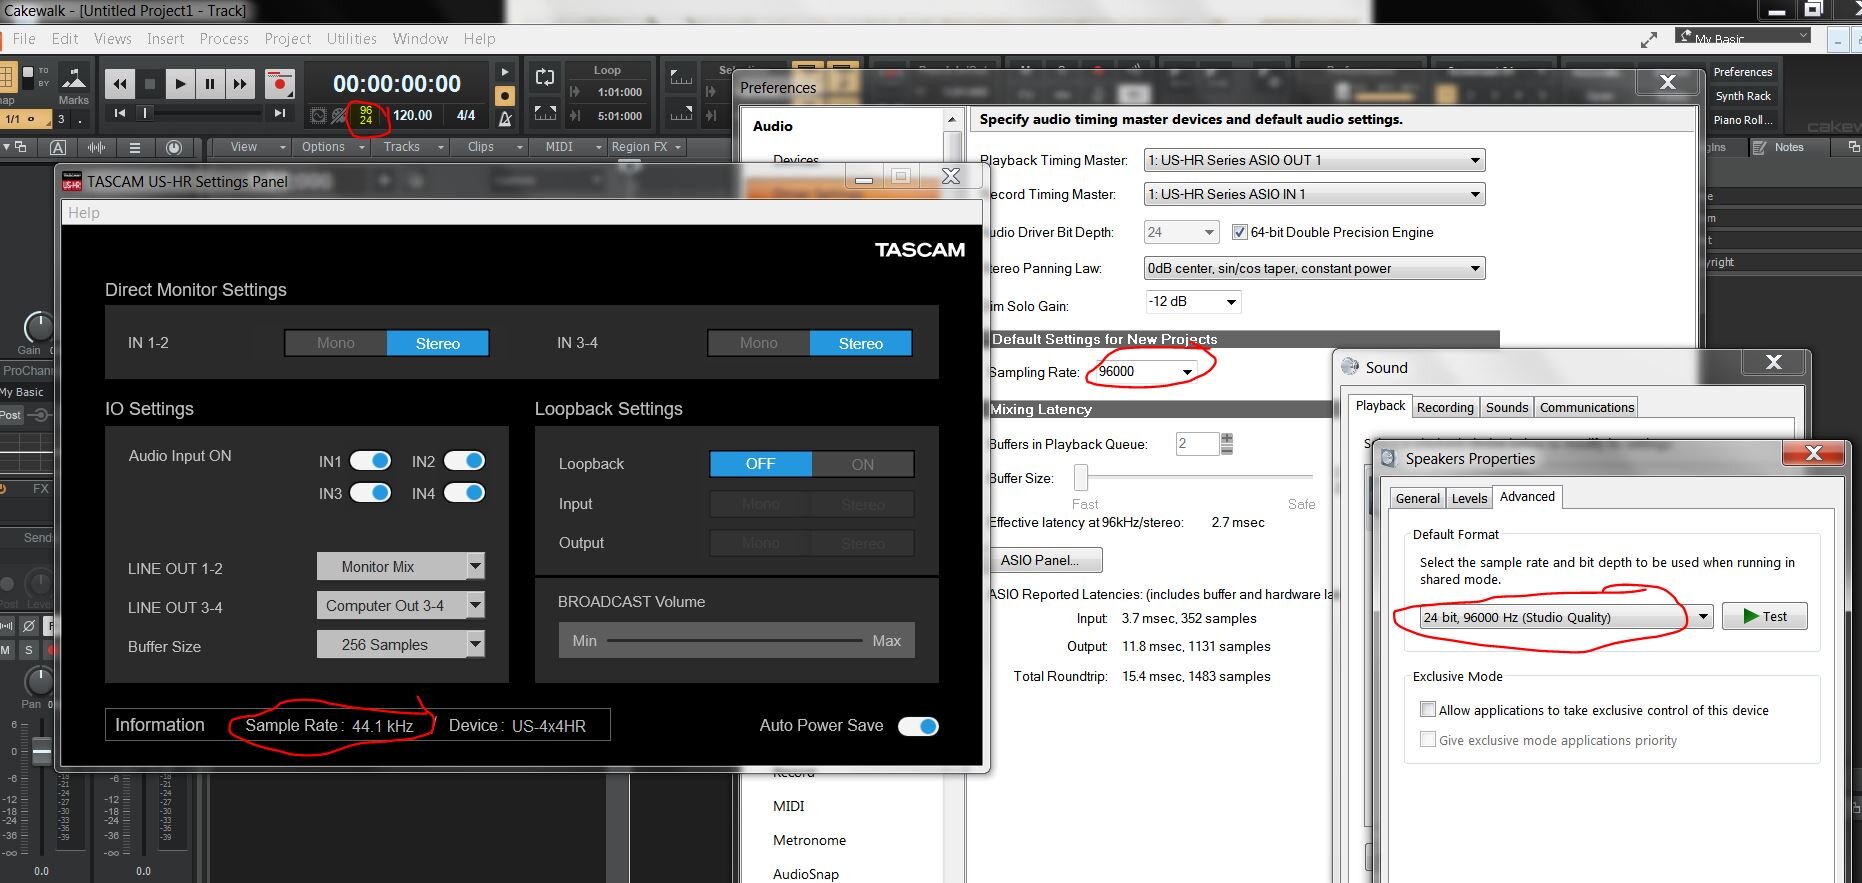
No, John, My panel looks different, and when I talked with Tascam they told me it was a completely re-worked driver and that there was no other, older driver of theirs that would work with it. Perhaps this is related to the new "HR" functioning (which I assume means High Resolution) that allows you to set buffer size down to 4 samples! (if your machine can handle it.) And here's the final clue! I guess in all my troubleshooting I hadn't tried this before, missing the proverbial forest for the trees. If I set the sample rate to 44.1 in CW.... no more pops! Same with Windows Sound settings. Set it to 44.1 , all the pops go away with the browser issue (which is bizarre to me). Any setting other than 44.1k sample rate in either Windows or CW, and the Tascam driver seems to get confused. Bleh! So, a professional grade, brand new audio device and driver and I can only get it to work "right" with ASIO4ALL or in 44.1k only. Not gonna do it. @DeeringAmps For sure they've missed something. If I am really the only one to have this issue, given all my troubleshooting on two machines, I would have to start believing in some supernatural causes! And I'm not gonna do that either. It is mildly annoying that in my couple calls to Tascam they didn't want to try and figure something out, given that it's a new item/new driver out in the wild, as I say. So, yes, it's going back to them! (Both of them.) No problem there, I just got it. Now I'll get something else.
-
Hey wow! I finally made it to the top of a Google search! Yeah, the changing sample rate seems to be like what's going on. But why would that happen all the time? Why at all?? A kind of clue to that is the fact that when Cakewalk "lets go" of the audio driver when closing, and even though it's set in Windows AND in CW as 48k, the readout in the Tascam panel goes back to 44.1. There is no way to set the sample rate within the Tascam panel either, it's just a readout. It doesn't do that if CW (or other DAW) is still open, and it doesn't do it every time. And I can then go into Windows Sound settings, set it back to 44.1 apple, and then set it again to 48, apply, and then in Tascam panel it shows 48. But after opening CW at 48 and closing again, it sometimes goes back to 44.1 in the panel. There is nothing else (to my knowledge) in my setup that would change the sample rate. So what gives? Certainly a Tascam driver issue. In talking to Tascam they just said that they "have no reports" of this issue (which is a little annoying, because here I am reporting it), so they can't tell me anything that helps.
-
Yup. Not that Tascam has let me down before. But yes.
-
{This is a continuation and a little bit of a repeat of info from this post, but as I kind of hijacked the thread there with my problem, and the OP's issue was solved, I wanted to present it on it's own for information's sake and in the remote case that there is a wizard out there that sees a solution. Please excuse the cross-post of redundant info} I have a brand new (now my second) Tascam US-4X4HR which I so very much wanted to love. I have nothing against Tascam and have never had issue with Tascam products in the past. This audio interface is a new upgraded model of a previous interface and hot off Tascam's production line with a new driver and only one version of that driver. Please assume that my system is a professional audio set-up (built by PCAudio Labs) that I have been using for years with multiple other devices without issue. My issue is loud pops/crackle whenever the audio engine is being accessed. I have no issues (that I've noticed yet) during record or playback, but the sometimes very startling POPs are very unnerving and don't leave me feeling very secure about its ongoing operation. In Cakewalk specifically, the pops happen when: whenever first starting CW accessing the Preferences page and making a change to the audio settings whenever toggling the state of the audio engine in the Control Bar whenever adding a VST instrument (if I add 16 instances of the instrument with the "Track per output" setting, it pops 16 times in slow succession) whenever adding an audio track template with a VST effect on in its bin whenever toggling the Record Enable button on audio tracks In my thorough troubleshooting I have: installed, uninstalled, re-installed the Tascam ASIO drivers (many, many times now) changed out USB cables (many different cables, USB A and C) moved the device to every USB port on the computer (all ports are USB 3) tried it in a USB 2 only hub in case USB 3 ports are incompatible (they are not supposed to be) tried with device plugged into power supply and with only USB buss power removed all other ASIO drivers from my system(s) confirmed Windows Sound to share sample rate and bit depth settings with CW or other DAW performed all necessary "tweaks" to Windows to ensure smooth audio - i.e turned off networking, bluetooth, etc. - (which, in any case, has been done and set for years) talked to Tascam who just scratched their heads and suggested that I... replace the unit with another one in case the problem resided "in the box", which I did The issue remains. POPping happens whenever, especially Cakewalk, "grabs" the device, it seems. I say this "especially" because in Ableton, for some reason, the popping only happens when toggling the audio engine on and off. I can toggle record states, add VSTs, or anything else without this popping that happens with all those actions in CW. I guess the programs access the audio engine/driver in different ways.(?) I can also say, 'tho, that the popping happens (very, very strange to me!) in a browser when I am online and changing pages!(?) on pages that don't contain audio. On this forum, for example, when clicking from page to page through a post. This, however, is not consistent, but odd. None of this occurred before with any other device, and I can plug back in my previous Steinberg UR22 without any issue. The other weird thing is that, when troubleshooting (as was suggested in a Sweetwater article) with the ASIO4ALL driver (which I installed for just this purpose)...... all the popping in CW and elsewhere goes away and the device behaves "normally"! Normal for ASIO4ALL, that is, which 'though fine for some, I am not willing to settle for using it with a brand new device with it's own actual ASIO dedicated drivers. But this is an odd indicator if you ask me. It shows me that it can work, at least. Another important troubleshooting factor is that all of the above holds true for a second machine, totally different system. One is a Windows 7, one a Windows 10. So, different cables, different ports, different actual units of the device itself, and all on different machines with different operating systems: same problem! What would you say? It would sure seem to be a driver issue to me. But there is only one driver available from Tascam. Who of any of you reading this has a new US-HR device with its driver and has no issues? Or, better, who has one and had this problem and fixed it?! Long shot, I know. I have to say that if it weren't for the Cakewalk specific issues, I would be inclined to just go with it. The issue is almost non-existent in Ableton and the popping on the browser is intermittent and audio in the browser is not a priority. But really, it's not a good sign. If there is anything that stands out that I have missed, please tell me. Otherwise, let this be some informative input on the Tascam US-4X4HR device. Perhaps it needs a bit more time out in the wild to be tested. I don't know. If there is nothing forthcoming it just goes back to Tascam...
-
Pop and Crackle with new ASIO interface, latency apparently not the problem?
winkpain replied to johnchowseymour's question in Q&A
Yeah, I mentioned Behringer as kind of a joke. I think of them the same as ASIO4ALL. In fact the driver that "comes with" a lot of their interfaces is the ASIO4ALL driver! There are several folks here who laud the new Behringers, but anyway... I have an exchange on order now just in case the problem is somehow in the box. I doubt it, it seems so very much like a driver problem, but it's worth trying. If the replacement doesn't work I'll look into the Focusrite or MOTU (although your issues and the lack of power supply are a drawback). Perhaps I should just stick to Steinberg, since I have been using my UR22 for years without issue , and just upgrade to the larger version. -
Pop and Crackle with new ASIO interface, latency apparently not the problem?
winkpain replied to johnchowseymour's question in Q&A
Yes I thought of this. It is precisely like the pop/crackle when changing the sample rate on the audio card. However, I have made sure the bit and sample rates in the Windows "Sound" properties (all other audio is disabled) matches my desired settings (24b/48k) in my audio software in order to keep those in line. BUT, sometimes when opening the Tascam ASIO settings panel it will nevertheless show 44k as sample rate readout (it is not a setting there, just a readout) even though all the software, Windows included, is specifying 48k. And sometimes it shows the proper 48k. It is always actually at 48k within the DAW, 'tho, so go figure. Another clue to strangeness is that whenever accessing said settings panel, whether from the Start Menu or from within the DAW, its window opens up saying "Device not connected" and takes a second or two to then "connect", and this even though the audio engine is running within the DAW and even if I've just had the panel open and closed it and then opened it again. The popping also happens whenever changing tabs in my browser when online or when pausing and starting a video, for example! It is all very strange, as if the Tascam is being connected and disconnected with almost every action that might require its services. I don't know if this makes computer programming theory sense, but this is how it seems. Not what I expected from it. I guess I'm sending it back. I don't think I can live with it. And I can't deal with A4A. I ran my own hardware loopback latency tests with it just for shits and giggles and had different results with the same buffer settings almost every time I hit record! Ach! what a mess! This is why I hate make changes with this stuff. -
Pop and Crackle with new ASIO interface, latency apparently not the problem?
winkpain replied to johnchowseymour's question in Q&A
No sorries, man! You are right, and I am with you. I continue to value all your input wherever it is on this forum. I think you are right on our shared level of experience, but alas I feel you have a slightly deeper level of understanding than I. And you bet I tried the USB 2 hub (which would also rub me the wrong way if I had to use that to connect the Tascam!) BUT, it did not work. Still had the pops when accessing the audio engine. So far, only using ASIO4ALL or the Magix driver (which I think is A4A in a slightly different coat) allows me to work with no pops, I am sorry to say! Interestingly, when working in Ableton, it doesn't pop as much (with the Tascam driver - not at all with A4A). Toggling the audio engine on and off will do it for example, but this is not part of my usual workflow, so no biggie there. But toggling record enable, or loading VST instruments, or rendering clips will not cause the popping in Ableton. Any of these actions, as I say, do cause the annoying popping in Cakewalk. I guess the two DAWs have different ways of grabbing and letting go of the audio engine. Or at least this is how I've come to think of it. (And yes, I have turned off "exclusive mode" for the driver on the Windows audio properties in case this has an effect.) I wonder what exactly is the protocol of accessing the audio engine and how it differs (or if it differs) between applications. I feel that somewhere therein lies the rub of my wound, so to speak. Not that I would know exactly what to do with that information if I had it. I love the Tascam box, tho! The nice angle of the dangle and it's ins and outs and it's screaming buffer size possibilities (the "loopback" function I don't really understand, seems to be a podcast-y, zoom-meeting-y kinda thing, and I don't come across those needs in the music studio). I am on the edge of being able to return it (for the Behringer, I guess), or just settle for ASIO4ALL (no!), or live with the pops. I would so love to figure it out, tho.... -
Pop and Crackle with new ASIO interface, latency apparently not the problem?
winkpain replied to johnchowseymour's question in Q&A
I understand all these points, and indeed I have read all those posts you mention and agree with all the outcomes and opinions. I only mentioned you specifically, John, because I value your opinions and knowledge in the matter and happen to agree with you. I was not countering what you have said. I have no love for and do not want to use ASIO4ALL on this brand new device! It is precisely this that has me so befuddled. The issue is certainly not the laptop's not liking ASIO drivers. I have a laptop built by PCAudio Labs that is my professional audio workstation that I have been using for years with dedicated ASIO drivers on the various audio interfaces that I have used with it without issue. I have only used ASIO drivers on it. As I say, my previous Steinberg device works fine with it. A Focusrite worked fine with it. Each with their own ASIO drivers. I am not wanting to disparage Tascam in general at all. I have trusted them as well, and that is why I chose to buy the US4X4-HR. Nevertheless, I am having this very bizarre issue, and only with the Tascam driver as it happens. I don't want it to be the case that ASIO4ALL is the driver that "works", but it so happens that seems to be the case. Something must be causing the issue with the Tascam drivers and I would very much like to find out what. The only thing that is impossible for me to check, and what worked for @johnchowseymour with his original problem, is to connect the Tascam through a USB 2 only port. Neither can I try a different Tascam ASIO driver, as this is a brand new unit with only one driver version available for it so far. I spent the day on the phone with Tascam support and confirmed all this. I am at a loss with it and this is why I turn to your wiser technological minds for ideas. -
Pop and Crackle with new ASIO interface, latency apparently not the problem?
winkpain replied to johnchowseymour's question in Q&A
Yes, I still have my Steinberg that I was replacing with the 4 in - 4 out new Tascam device. I have no issues with that other than needing the added inputs/outputs. BUT now I have found that, similar to the OP's situation while trouble shooting, when using ASIO4ALL or another ASIO "container" that came with my Magix software (which looks for all the world exactly like ASIO4ALL) I do NOT have the popping issue !!! So this puts me in quite the bind! In my bones I want to be using the included driver from Tascam but it has this annoying issue in all scenarios, on two separate machines, and ASIO4ALL just works without any tweaking. Of course I can't use the Tascam settings panel which has loopback (which I don't use anyway) and switches for the inputs (that I would like to use), and I can't therefor turn down the buffer to 4 samples (which I couldn't do successfully anyway, but it's cool). AND it just rubs me the wrong way to have to use ASIO4ALL. I had just gotten rid of it on both my machines after having read so much against its being used (I'm thinking of you @John Vere and others) and I tend to agree with this. I would only reluctantly rely on it when mobile at times and having only my onboard Windows 7 audio. So now what?? If the device can work without issue with ASIO4ALL but not its own dedicated driver?! This seems to indicate that it's not a problem with the device itself. And I've been on the phone with Tascam tech support who tell me all the things that I've already done are what there is to do.