

bobbyswamp
-
Posts
7 -
Joined
-
Last visited
Posts posted by bobbyswamp
-
-
On 12/16/2022 at 12:04 AM, Lord Tim said:
You don't need to put a trim plugin on the master, there's already 2 ways to do it:
You'll find Input Gain as the built-in equivalent of a "Trim plugin" - that's the entire point of the gain controls, they boost or trim the signal to make it appropriate for the bus or track. They're to get the gain correct for any further work, before it's sent to the track or bus volume control for actual mixing.
If you're not planning to run any effects on your master, it's honestly just as easy to turn down the master volume. CbB won't clip internally, so even if your master is peaking out like mad, if you just turn it down, it'll do the same job as dropping track volumes, adjusting the master bus input gain or inserting any other 3rd part trim plugin. It's not ideal and you should adjust your track volumes first, but this will work just fine.
There's so much in that video which is either anecdotal, outdated or explained wrong it's not funny, honestly.
The biggest thing that I think you're getting tripped up on here is that he's got all of the faders at 0dB and says "hey look, it's clipping the master, let's fix it" ... DER. Of course it's clipping the master, all of the tracks are turned all the way up!
So his solution is to drop the gain on each track. OK, fine - that might solve the issue with a certain number of tracks but there's going to come to a point where your gain 1: won't turn the tracks down enough to stop the master from clipping because that might work for 10 tracks but if you have 80 it's going to be entirely different, and 2: is a really bad idea because if you drop your track gain so much that it's quiet enough to not clip your master, it's not going to send the right signal into any track effects... which is the entire point of what the gain control is for.
The Track Gain control is to get the signal the correct level before it goes into the track. It is not for mixing with. The track Volume control is.
Please, ignore these kinds of videos. The intention might be good and if you're an experienced mixer you can see the value in them, but if you're not used to the way the signal flow works, then it'll seriously trip you up and have you scratching your head wondering why everything isn't working, and then chasing solutions that require plugins to fix stuff.
Let me break it down again for you in steps, that if you follow them and don't over-think anything, will get you exactly what you want to do. Start with a clean slate here - imagine you haven't watched a video about this stuff yet and you're going in completely fresh.
STEP 1: Record your tracks
If you're importing in pre-recorded tracks, jump to Step 2 and ignore this part.
1. Get a decent level on your instrument going into your audio interface. Make sure it's not peaking out into the red.
2. In Cakewalk, insert a new audio track, hit the record arm button and see how your levels look coming in. You want to aim to get them somewhere between -18dB and -6dB. Honestly, so long as it's more than about -18dB on average and not clipping, it's fine. If it's too quiet, turn it up as much as you can on your audio interface. If it's too loud, turn it down on your audio interface. Don't adjust anything on the track in Cakewalk at all yet.
3, Repeat for each track you want to record, then skip to Step 3.
STEP 2: Import your tracks
If you're not recording your own tracks, follow this step instead of Step 1.
1. Import in each track. Leave your track volumes at 0dB for each one.
2. Have a look at each track's level - none of them should be clipping at all, or there's something set up wrong somewhere. They should be somewhere between -18dB and -6dB ideally. It doesn't matter if they're louder than this, so long as they're not clipping. If they're definitely too quiet, turn the gain control up for that track. If they're running pretty close to peaking out, it's fine but I'd still suggest dropping the gain until you're around the -6dB mark at most.
3. Running all of these tracks together will make your master clip. Don't panic, that's addressed in Step 3.
STEP 3: Adjust your track volumes
This is actually the part where you mix. The other stuff is track preparation.
1. More than likely, your master is clipping. Start by turning all of your track Volumes down, maybe to -6dB. If your master is still clipping, turn them all down even more until it's not clipping. Note: This is the track Volume control, NOT the track gain controls. Volume controls can go down to silence (-inf) so there's really no lowest level you can drop them to. You might find that all of your tracks are dropped to -24dB before your master doesn't clip, maybe even lower. That's fine. Whatever has to be done, do it.
2. Now, adjust the Volume and Pan of your tracks to get the balance right for your actual mix. If you've given yourself enough headroom by dropping all of your tracks, your master shouldn't be clipping, but if it is, aim to drop all of your tracks again if it's not too much of a pain to do so. It's not the end of the world if not - you can just turn down the Input Gain on your master and that will achieve the same thing, but it's best to get the tracks themselves right.
3. Add in any track effects necessary. Make sure that if you do add in any effect that its output isn't adding in any extra crazy boosts to that track. If it is, turn the effect output down.
STEP 4: Master Effects
At this point, you should have your mix that is either not clipping your master, or if it is, it won't be by very much and you've turned down the master's Input Gain to compensate.
1. Add any effects to the master bus if you want to add any final processing to your mix overall. If it's now clipping the master, turn down the effect's output.
2. Export your mix.
And that's it. So long as your tracks have a reasonable kind of level by using the track gain, and you use the track volume to turn everything way down so it's not clipping your master, you'll have a mix. No "trim plugins" or any crazy "let's get all of the tracks to this EXACT level" mathematics are necessary.
The best thing about YouTube is there's a wealth of knowledge out there to help people getting into this type of work. But the worst thing about YouTube is there's a chorus of voices that aren't all necessarily right, or aren't explaining things in the way that beginners can understand. Unfortunately it's hard to tell the good from the bad and it's easy to pick up bad advice that you take onboard is gospel. I know I certainly have been there myself (pre-YouTube, but I learned absolutely dumb advice that I had to unlearn which really hindered my growth as a producer far more often that I'd like to admit).
This forum is filled with amazingly knowledgeable people who do this stuff professionally and have won major awards for their work - I'm constantly learning new things from people here. We're all here to help and explain stuff, but you really have to let go of assumptions so you can take the advice onboard. There's nothing worse than fighting with yourself when it comes to learning! You'll get this.
")
Man, I googled and landed here on this thread because I am having the same issues that Victor was coping with. Thank you, Lord Tim for this amazing and helpful, step-by-step checklist for mixing. It is EXTREMELY helpful to me!
-
 1
1
-
-
17 minutes ago, John Vere said:
When I use it I simply extract the Midi data and then remove the regional effect from the track. I can then either keep the original audio track or delete it and just use the midi data which is what I always do. So there’s no need to have any regional effect activity in projects.
Way cool info! Thanks, John. I'm checking out the video now. Thank you.
-
1
-
-
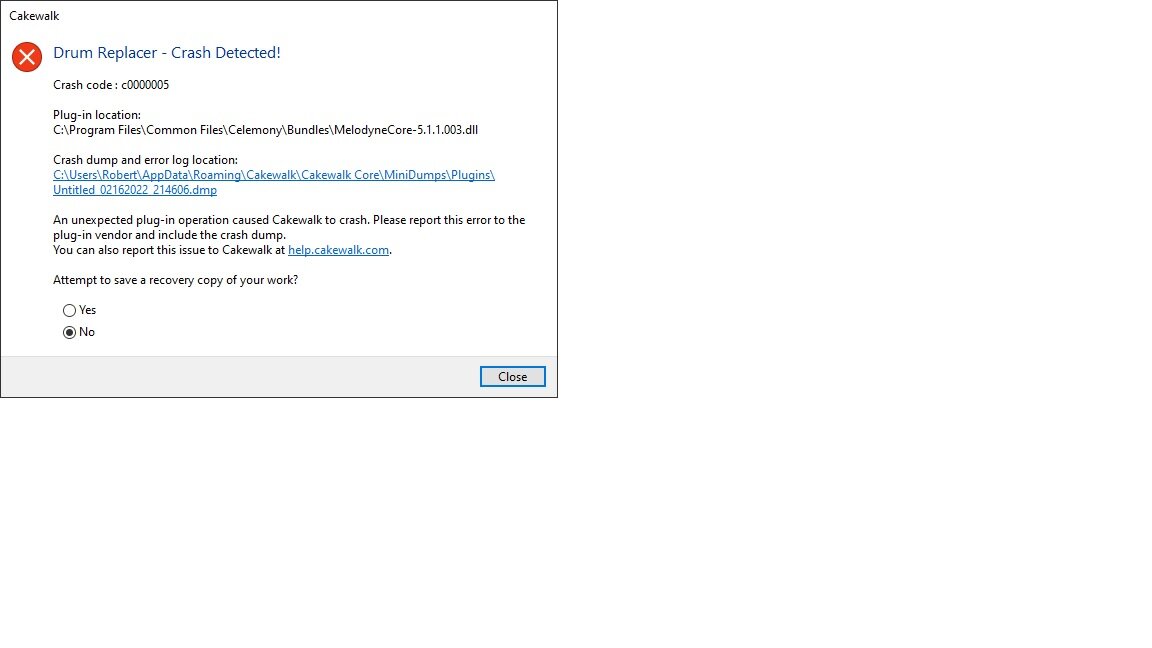
28 minutes ago, scook said:
Drum Replacer is not a regular VST3 plug-in, it is a Region FX only.
It is normally excluded by default in the plug-in manager so that it does not show up in the regular plug-in layouts.
Adding Drum Replacer to a track/clip FX Rack or ProChannel can crash the DAW.
Make sure to send the dmp to support but the actual crash is coming from a Melodyne dll.
This may be something Celemony needs to address, if it is not a case of adding the plug-in as a regular VST.
OK, thanks, scook. Good to know the crash is actually coming from a Melodyne dll. Thanks!
-
Hey, all. I downloaded the latest update last night. Afterwards, when I tried to open the song I was working on, I got this pop-up (image enclosed below) and Cakewalk crashed and closed. I re-started Cakewalk up again, went into "Plug-in Manager," highlighted Drum Replacer and opened up properties. I unchecked the box that is labeled "enable as plug-in." That allowed me to open up the song. But, of course, all the work I did in Drum Replacer is now unavailable because the plug-in is turned off. What happened?! Should I just re-install CBB so Drum Replacer lines up properly again? I contacted Bandlab Support and "Sean" responded really quick, but I'm still waiting for his recommendation. Thanks...

-
Suggestion #2 worked! THANK YOU! I was pulling my hair out getting that "Code 5" error message every time! Thank you, Mr Borthwick!
-
So glad I found this thread! Allow me to join the ranks of "idiots," LOL! I was unable to pan any of my tracks and I was convinced the culprit was the latest update by Bandlab. Spent two days pulling my hair out until I found you guys, pointing out that it might be a hardware, not software issue. Turns out it was the 3.5mm to 1/4" replacement adapter I had just bought for my headphones. I bought the wrong type! It's not stereo compatible. It was the cheapest one in the store and I didn't read the label....AHHHHRGGHH!
-
 1
1
-
Greyed out clip
in Cakewalk by BandLab
Posted
I needed help with a "grayed" out guitar clip (take) that I had copied and pasted to a new session. It wouldn't play! This thread helped me fix it. It was simply brought back to life using the "Clip Mute/Unmute." I'll keep an eye on it, as you suggested. Thanks!