-
Posts
69 -
Joined
-
Last visited
Everything posted by Chris Boshuizen
-

Introducing Cakewalk Next and our new brand identity
Chris Boshuizen replied to Jesse Jost's topic in News & Announcements
That's very exciting Noel. Can't wait to see the new products! And, thank you for your infinite patience here on these forums. The 23 pages and counting of comments here is very reassuring for Sonar's future! -
Introducing Cakewalk Next and our new brand identity
Chris Boshuizen replied to Jesse Jost's topic in News & Announcements
I'm old enough to remember when this product was called "Cakewalk" by 12 Tones, not sure why they ever changed it to "Sonar by Cakewalk", and I certainly don't know why Bandlab is now repeating the same and turning it back into Sonar by Cakewalk. Is is it the brand or product? Was Sonar more popular than Cakewalk? I haven't been missing the Sonar brand and this seems to be just creating more brand dilution. -
Please add "End of Song" functionality
Chris Boshuizen replied to SloHand Solo's topic in Feedback Loop
And these are suggestions for things to fix, so if people still find issue with it, it's worth putting on the roadmap. Stray automation nodes have been the bane of my existence for decades. I would love to see this suggestion implemented. -
Suggestion: remove bus numbers from export bus files
Chris Boshuizen replied to Chris Boshuizen's topic in Feedback Loop
Ah, I hadn't tried the presets and wasn't using the tags because I was thrown off by there being no bus number or bus name in the tag pop up. It it seems {tracknumber} {trackname} work for buses so all it seems well-covered actually. Consider this solved, thank you! A couple of inconsistencies remain in the number schemes however: In my case, I was talking about just changing the source category to "Buses", and changing the filename to text "My Song" (instead of {projectname}). That is what produced the odd result above, with files appended with dash and a number like MySong-BusName-1.wav. If I leave the filename as {projectname} the bus name doesn't show up, and the numbers are in parentheses ProjectName (1).wav. If I use tags, I get indexed numbers, like this MySong-BusName-001.wav. In the spirit of my initial suggestion, this default bus naming is very odd, and could probably be retired. But given that the tagging works great, I wouldn't call it a high priority to fix. -
Suggestion: remove bus numbers from export bus files
Chris Boshuizen posted a topic in Feedback Loop
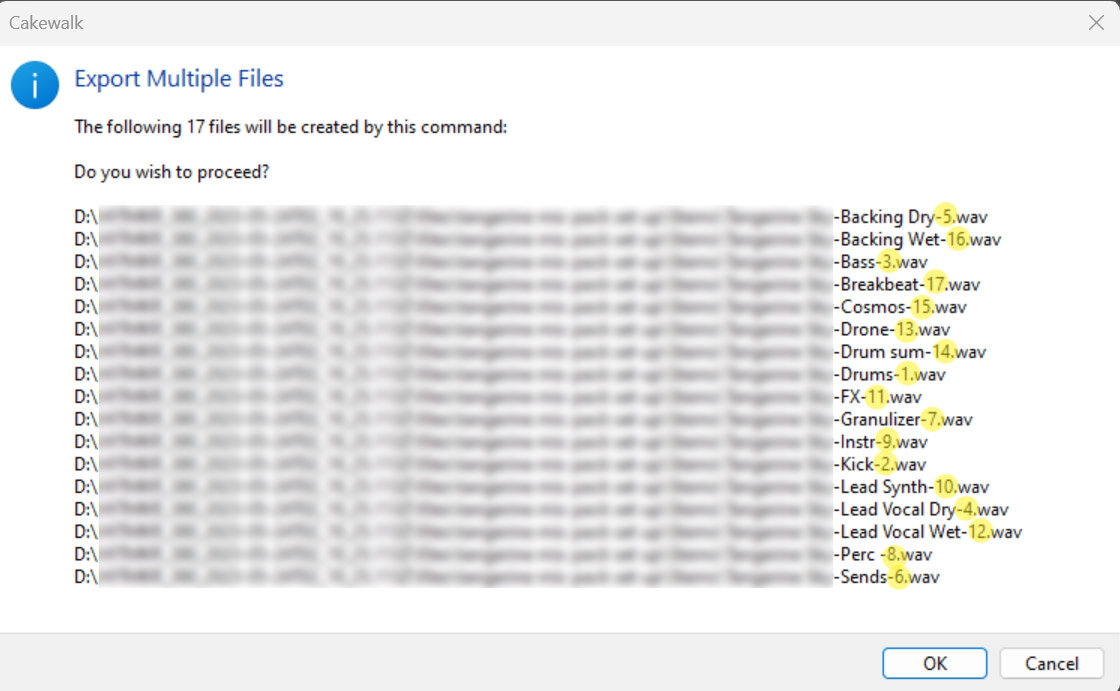
I would like to suggest that the numbering of buses on export be removed, because the numbers don't do anything useful, look ugly, can lead to confusion, and cost time to remove in file explorer. As you all know, bus export makes files like the attached image. For some reason the bus numbers get appended to the export wave files in the format Filename-busName-busNumber.wav. This seems illogical, because with the number placed after the bus name, the resulting files cannot be sorted by bus number, and the bus numbers likely mean nothing to anyone you would send these files to. In fact, a file name MySong-Snare-2.wav begs the question, where is snare 1? Or, if you have two snares, what is MySong-Snare-2-3.wav supposed to mean? The more involved your project, the uglier and less useful these numbers become. I always think these files look unprofessional and spend the time to remove the numbers before sending to anyone, especially when there is risk of confusion. It would be much nicer if they weren't there at all. But I'd happily take an option to turn them off, or at least reprogram it so they appear before the bus name, like this: Filename-busNumber-busName-.wav A list like this would be kind nice! MySong-1-Kick.wav MySong-2-Snare 1.wav MySong-3-Snare 2.wav tl;dr: putting bus numbers after the bus names is confusing - consider putting them in front or removing them.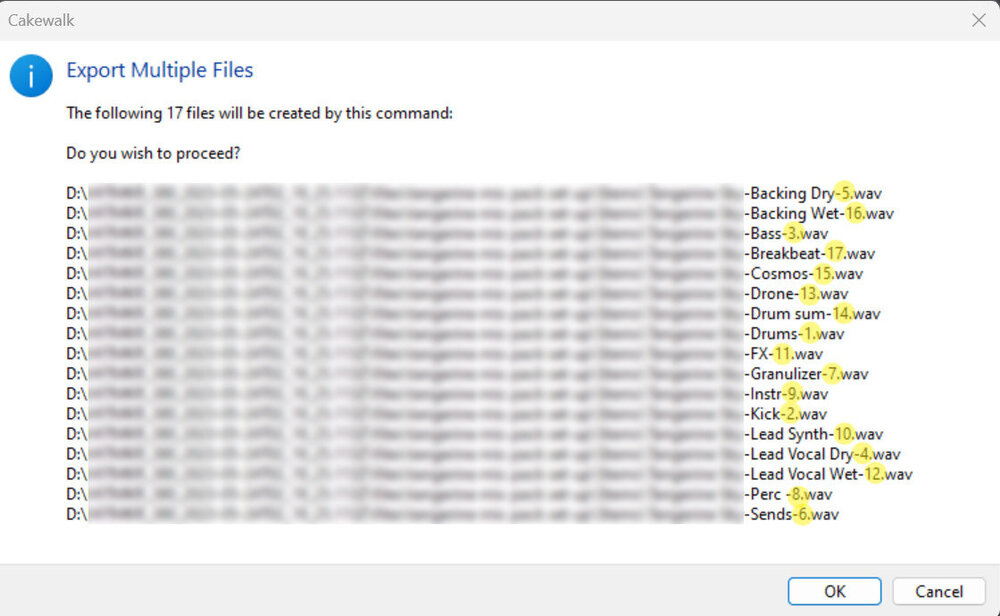
-
Export Entire Mix does not export entire mix
Chris Boshuizen replied to Chris Boshuizen's topic in Feedback Loop
Thanks, this is correct. But source might be an overloaded term here. There's sources, and routing, and output. The one you have described, I would call routing. Additionally, if sources are to be considered "where the audio is tapped from" what tracks are selected in the arrangement should have absolutely nothing to do with that. -
Export Entire Mix does not export entire mix
Chris Boshuizen replied to Chris Boshuizen's topic in Feedback Loop
Yes, that is it. But thanks for pointing out the secret source panel! -
Often for me it is stray automation dots, usually on the volume track. Eg, if you create an envelope when the project is 100 bars long, there might be a dot at the end of the clip. When you shorten down to 75 bars, the stray may still be there. Do a quick scan of all automation lanes and delete the dots. I just worked on some 1 hr+ live sets and out at bar 1900 there was a bunch of stuff that caused me the same issue.
-
Export Entire Mix does not export entire mix
Chris Boshuizen replied to Chris Boshuizen's topic in Feedback Loop
@Mark Morgon-Shaw I guess I'm trying to see the bigger picture here too. I'd love Cake to be around for another 25 years more, but that won't happen unless it keeps up with the times. If something can be done faster in another DAW, or RTFM is required because things are too different., not a familiar, or unintuitive, we'll lose users, and that would be a shame. -
Export Entire Mix does not export entire mix
Chris Boshuizen replied to Chris Boshuizen's topic in Feedback Loop
I've been using Cake for nearly 25 years, and I don't have a perfect track record remembering this. In fact, ever after starting this thread I still made the mistake 3 more times this week! But not only do I use other DAWs, I also use related apps like video editing software. If Adobe Premiere Pro had this design issue, there'd be riots! Imagine running a 20 hour rendering project to find out it had only exported the subtitle track because that was where your last mouse click was! While some of us have remembered the necessary song and dance routine to get it to do what we want, those small inconveniences still represent time delays, cognitive burdens, and overall friction in the creative process. You may be relieved if you weren't paying those microscopic mental taxes every step along the way. -
This is probably a major audio engine rewrite, so it's a bit of a long shot - but it would be great if Cakewalk could play mixed sample rate audio files without conversion. Modern CPUs can certainly handle it, and if the internal engine is oversampling, it is doing most of the work already. The conversion on load seems unnecessary. It takes forever for large files, and wastes a tonne of disk space duplicating data. You could still set the sample rate for your audio interface (and export) but that should have no bearing on the wave data being loaded and played. Just an idea.
-
Export Entire Mix does not export entire mix
Chris Boshuizen replied to Chris Boshuizen's topic in Feedback Loop
Yes, I definitely started this thread in the spirit of a feature request. How about Entire Project? Because then you can have selected tracks/buses -> through entire mix be different. -
Export Entire Mix does not export entire mix
Chris Boshuizen replied to Chris Boshuizen's topic in Feedback Loop
100%. Export what you hear. -
Export Entire Mix does not export entire mix
Chris Boshuizen replied to Chris Boshuizen's topic in Feedback Loop
This may be my new permanent habit. Very clever. Anything that is a time waster or involves redoing steps is anathema to me. -
Export Entire Mix does not export entire mix
Chris Boshuizen replied to Chris Boshuizen's topic in Feedback Loop
I tried my best today, but I could NOT find a way to export a whole song without selecting Ctrl-A before opening the dialog. None of the options presented seemed to override the prior, arbitrary, track selections. -
How about if the file menu opened a modern version of that dialog in the start screen, with clear options like the ones you use now? At the end of the day, they are two versions of the same thing.
-
Export Entire Mix does not export entire mix
Chris Boshuizen replied to Chris Boshuizen's topic in Feedback Loop
It has been that way for years, for sure. But every week I still make a mistake because the UI is so unclear about what's going to happen. Today I just walked away from a 20 minute render (1 hr+ long live set with edits) and came back to find I'd exported only track 1. To be honest, I don't even know what settings to change to make it export the whole mix. Again, if you can hear it without selecting Ctrl-A, then you should be able to export without hitting ctrl-A. To your point on exporting iterations of selected tracks, a "selected tracks" options would be fine too. One thing, perhaps unique to Cakewalk, is that this interface is trying to let us pick source material, routing, and destination files. It's complicated, for sure. But part of the complication is that the default source is wherever you made a selection 20 minutes ago and weren't even thinking about any more. That is the hidden complication that makes this a bug, not a feature in my mind. -
This is probably planned, but it's wasting enough of my time every day I want to mention it here. The action in File -> New is out of date. It pops up the old New File dialog, which requires a project folder. The start screen and Ctrl-N just open projects without this, so can we make the menu behave the same as Ctrl-N?
-
This has been a problem for years - unless you do a ctrl-A to select all tracks and all time, only the current track is exported. That happens even when "Entire Mix" is selected. The export dialog gives no obvious clues that this will be the behaviour, and there are a number of settings that indicate that it isn't going to behave this way. If you have only one track in selection focus, it will export only that track, no matter what you pick in the export dialog, This was a problem with the old export interface and sadly survived into the new interface as well. Even when you see that the source is the hardware outputs, and entire mix is selected, you still don't know. It is extremely confusing, because if the project PLAYS everything no matter what is in focus or selected, it should EXPORT everything just the same. Suggestion: the export dialog should default to entire mix, exactly as it plays, by default, and the code should be updated so that is truly what happens. Selections and focuses should be ignored unless the source is changed to track(s) or buses.
-
Want to send a song to space?
Chris Boshuizen replied to Chris Boshuizen's topic in General Music Discussion
Thanks Noel! Yes I did, I made two new tracks with the British actor Stephen Fry: https://smarturl.it/drchrispy-onebyone -
Hi Everyone! I am a former NASA engineer and 20+ years Cakewalk user, and I'll be flying to space on Blue Origin's next rocket launch. [ref][ref] I am making a playlist of fellow creator's music with me, and auctioning the USB thumb drive to benefit a music charity. If you want to send your song into space, just email an mp3 AND a soundcloud link to songtospace@drchrispy.com I'm about to head to Texas for training in a day or two, so might be late answer questions here, but happy to try answer any questions you might have. Cheers Chris AKA Dr Chrispy
-
omg I have been waiting for this for so long! Congrats to the CW team, this looks like a monster releaese! Thank you!
-
Is anyone else seeing an issue with midi not being recorded? Since the latest patch, I find if I try record midi, the clip vanishes when I hit stop. If I open PRV I can see the notes appearing as I am recording, so it is definitely seeing the device and the incoming midi data, but as soon as I hit stop, the entire clip vanishes from the track view and the notes are gone! I will do some more investigating later - but just wanted ask here before I file a bug report! Thanks all!
-
Thanks Kurt! Appreciate the comment and thanks for listening! Haha yes, with this track we could do lots of silly things, it was a fun one to work on. Thank you David, really appreciate the kind words! Thank you Mark! We probably spent too long on it, but hey, it works! By the way, you seem to like Voyager! Here is one I posted last year, also made in Cake:
-
Hi All! Here is a song I wrote in Cake/Sonar. I just released the music video that i made over the last 6 months. I think the video makes the song sound even more nuts! Editing the vocal samples in this I used a pretty unconventional workflow. I wanted some of Haji Mikes phrases at natural speed (unedited) and others with a slightly quicker cadence. In fact, in this song are many sentences he didn't record exactly that way, I made them up in editing because it sounded cool. I also wanted to drop the vocals down one 1/2 step in pitch. Rather than using Cakewalk's clip tempo/stretch tool, or melodyne, I went offline and made two new audio files rendered in high quality, both pitched down, and one faster. I did the changes in Image Lines Edison because I liked the sound and quality best. I then dropped those into the project, applied a temporary tempo change to the sped up one to slow it back down and time match the original. Then I muted one clip, grouped them, and then split all the phrases and words I needed out of both audio files simultaneously. That was a super fast work flow, and gave me hundreds of linked pairs of vocal samples and phrases to select from. I then selected all of the clips corresponding the tempo changed clip, and took the temporary change off. That left me with two tracks: one full of natural speed sliced clips, and the other with sped up clips, temporarily muted, but with each clip starting at the same start time. And this last point was the key - after split, everything was still in the same place. I could then drag each pair to where I wanted them for creative purposes. And one of the nice things about grouped clips in Cakewalk, if you mute them, the state of both clips flip, so the muted one becomes unmuted, and vice versa. So for every phrase, I could audition the faster or slower clip and see which sounded better just by hitting the k key. If you didn't follow any of this, I'll post a screenshot! It is a bit strange, but I feel this way I got a higher quality result than just splitting on track, and stretching clips willy nilly as I needed them. And without further ado, here it is: