

Emanu3le85
-
Posts
86 -
Joined
-
Last visited
Posts posted by Emanu3le85
-
-
On 8/2/2024 at 3:21 AM, jwnicholson78 said:
very cool.
jeff
Hi jwnicholson78 thanks for listening, I'm glad you like it.🤟🏼
26 minutes ago, Bajan Blue said:Hi
Really like this - some nice use of synths
Very enjoyable listen
Cool
Nigel
Hi Bajan Blue, thanks
I used vst synth free
Bass - Tal noisemaker
Arp and Melody - Odin2
Pad - Synth1
Sound Fx - Surge XT
and other synths too.
Thanks for the support🔊
Emanuele Corallo aka Lunatik Lektro
-
38 minutes ago, jack c. said:
well done.jack c
thanks mate, greetings from Italy ??
-
fourth song done on cakewalk, Prochannel N type on channels and bus
Bye
Emanuele
Ascolta Lights di Lunatik Lektro su #SoundCloud
-
3 hours ago, azslow3 said:
https://www.azslow.com/index.php/topic,206.0.html
")
Some controllers show assigned parameters. NI Sxx controllers have displays for that (M32 has tiny display... it also shows current parameter and value, but it is hard to see). Mackie (and compatible) devices have per control displays.
And for all controllers you may have a separate window which shows the layout (at least with "Cakewalk ACT" and AZ Controller). So if you have space on monitor (or a dedicated monitor.... or in case of AZ Controller a phone/tablet with TouchOSC or other OSC client installed...), you can have current "labels" for hardware controls.
I haven't yet fully understood the AZ controller, I'll try to understand better
-
1 hour ago, Astraios said:
And that also has the advantage that you know exactly which parameter you are controlling. The hardware MIDI controllers have the huge disadvantage that the switches, controls and buttons are not labeled and you have to have everything more or less in your head. If it gets extensive, you need several layers to operate everything. too complex for my needs www.youtube.com/watch?v=r9vUMnX_T3Y
to explain myself better, when I build a sound there are 3 phases
1- timbre construction (when I open a new synth with init patch)
2 - set the initial values of some parameters (no automation envelopes just a long static line) as a filter or key follow via track automations
3 - automate the envelopes of the chosen parameters whose initial values I have previously set
my post refers to phase 1 in which I don't need automations but simply all the synth parameters that can be managed immediately with a dedicated midi controller for that VST, as if I had an hardware synth, I make electronic music and use a lot of synths and I like to build the sound myself, It's really frustrating to build sounds with the mouse for all the sounds I use
-
18 minutes ago, Astraios said:
I don't know if this helps, but you can also record all softsynth parameters (at once) into the instrument track (using the 'write' function). Then all the parameters of your synth are available in envelope tracks. That could be 300 pieces (or more). You can then assign fixed MIDI controllers or MIDI notes to these individual tracks using the sonar remote control option. If I'm not mistaken, the assignments will be retained the next time the project starts...
this is the method I have always used, I find it excellent for setting the initial values of a parameter but to interface an entire synth with it I find it not very dynamic, the solution I am looking for is only for the initial construction of a synth timbre, in which you need all the parameters immediately, when I have finished building the sound the track automations to manage the values are also fine
-
25 minutes ago, azslow3 said:
Softube Console 1 is to control corresponding mixer strip.
For "instruments", there are just 2 DAW independent solutions. For both you run the instrument in a wrapper. One is AKAI VIP and another is NI Kontrol. Both work with combined devices (keyboard + controller). AKAI VIP always was just "an attempt". NI Kontrol is well supported.
Long time ago there was Novation Automap (with controllers without keyboard), but that line is not continued.
All NI controllers use encoders, for me suboptimal for synthes (no "real" feel). But obvious advantage they are always "in sync" with parameters, so you can switch between banks/synthes without problem. If you don't really want the keyboard, there is M32. Even so it has 32 small keys, it has small size and can be used just as controller. They are almost optimal to control all NI plug-ins. Many third party plug-ins also have NKS support.
But if you are serious about using Cakewalk and controller, I recommend as first to give your Launch Control a try with AZ Controller. After following "Quick start" (5-10 minutes), you will be able to use "a hint" from my previous post and have your device controlling one particular synth (may be 20-30 minutes for you). You can also try "Startup preset" (there is Youtube step-by-step video), to try "ACT Dynamic mapping" (another 15-20 minutes). After that, you will probably have the answers on following questions:
- are you really going to use controllers?
- do you think encoders will work better then finite knobs for you?
- do you want spend time making good for you layouts/presets or prefer "ready to go" solutions?
And then you can start to think which other device to buy (or not...).
very detailed, Yes, I am more intent on building something for my needs, my dream is to no longer use the touchpad or mouse, at least for the most creative needs. I see that there are many solutions, I will look at the solutions you gave me one by one and I will see which one I will be better with, thank you
-
49 minutes ago, azslow3 said:
"MIDI learn" inside VST(i) is the thing of that VST(i). If you save the project, but the next time you load it the mapping is gone, that means the plug-in is not saving it. So you need to ask plug-in developers what is wrong, host (Cakewalk) has no influence on internal plug-in MIDI mappings.
ACT in general is the only option if internal mapping is not saved by plug-in. ACT is using "Parameters" exposed by plug-in, not sending any MIDI to the plug-in. ACT "Dynamic mapping" can be tricky in terms of "remembering" the mapping (configuration XML files can be "corrupted") and focusing plug-in (you don't need it on monitor, but you need select it and "lock" it, then you can close it, focus other plug-in, etc.).
An alternative approach is "Direct parameter control". But in your case it is available throw AZ Controller only (Cakewalk own ACT software use it exclusively for Mackie controllers). I must admit that peace of (my) software is not newcomers friendly (even so in practice, when you know what you should do, the mapping will take less then 10 seconds per control... The action list per control is "Rack <required synth> <parameter>" + Value (with default options for launch control), duplicate N times, MIDI learn and change the <parameter> in Rack action for each knob). The advantage over Dynamic Mapping (and MIDI learn inside plug-in) - you can control different parameters of different synthes/fxes at the same time.
thanks for the clarification, as far as the synth rack is concerned the problem is that I don't have many knobs available to map a synth, it seemed that midi learn was the most logical method to controll an instrument, my problem is having full control and flexibility during the sound design phase, it is frustrating to play the keyboard with one hand and move the parameters with the mouse with the other, I would like to emulate a real synth, even if the problem of midi inputs would arise, because keyboard and midi controllers are independent inputs. maybe the Softube console 1 can do for me?
-
4 hours ago, John Vere said:
I looked at the link but I don't think it's what I'm looking for, maybe you understood that I perform live, no, I meant to control the parameters of a vst instrument in real time by interfacing them with the Novation launch control, but at the end of each project every midi learn parameter is forgotten
-
My idea is to map a simple synth like "Tal noisemaker" onto the Novation launch control and command it "live" even if its midi track is not selected or even if it is not displayed on the monitor, in reality I can do it with midi learn but at every closing the project the synth mapping is not remembered, I don't use ATC control because it is a bit complicated and because it only works if the vsti is displayed on the monitor, is there a way to save the midi learn parameters? Thanks
-
Clip color
in Q&A
7 hours ago, Glenn Stanton said:apro semplicemente quelli con cui sto lavorando e li scorro. in questo modo posso riporli nel rack del sintetizzatore se non sto modificando qualcosa, e ottengo la versione a schermo intero o scalabile in modo da non strizzare gli occhi così tanto ? e se riduci semplicemente a icona la finestra del sintetizzatore, fai clic per aprire è quasi istantaneo... lo stesso per FX... ovviamente se avessi un paio di schermi potresti dedicarne uno per impilare le finestre del synth...
I have used Reason for many years and am not used to individual windows, with the Behrringher X Touch, I memorized the synth opening on a "function" button now when I select the track I open the synth directly from the X touch, I have the second monitor but I use it for the mixer, putting there the vst is a bit inconvenient because it is a bit far away
-
 1
1
-
-
Clip color
in Q&A
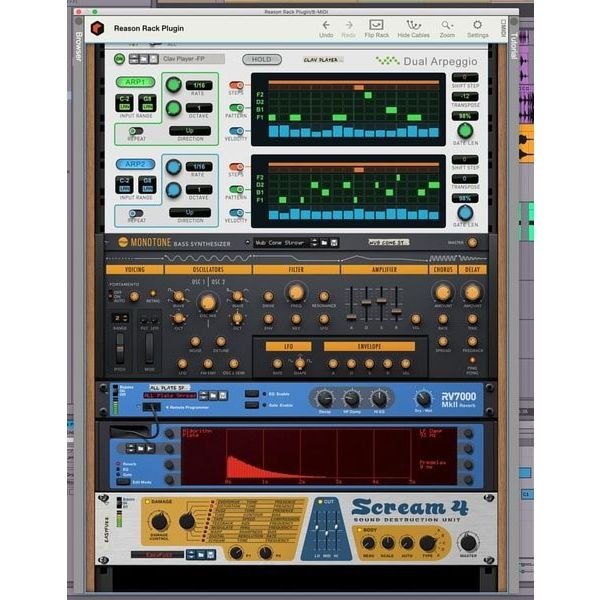
this is the reason rack, I mean something similar only for the vsti used in the project, for me it would be very useful because i do a lot of electronic music songwriting I would be much faster if I had all the synths available in a rack without having to open and close windows
-
 1
1
-
-
Clip color
in Q&A
53 minutes ago, sjoens said:They are always in the Synth Rack. Just click the synth icon on the left side to open them.
Otherwise you can move the synth to the Multidock so it's only a tab away when you want it and out of sight when you don't. Click the tab to open. Hit the D key to return to Track View.
This is exactly what they did to Console View and all the rest of the views. They no longer have their own views. There's a way that they can but it's awkward and clunky to navigate.
I meant a synth rack like Reason Studio13 where everything is there without having to click the open button, the sonar synth rack is an interfacing of the vsti but you don't see them stacked graphically one under the other, thanks for your advice
-
Clip color
in Q&A
9 hours ago, sjoens said:Nothing in the OP indicates that.
AFAIK there's no way to change it. Once you move it tho, it will reopen at the new location as David said.
Yes. Search for "clip" or "clip background". The main gray clip background is not listed in Preferences but it is listed in Theme Editor.
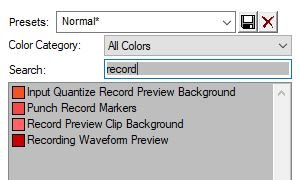
In CbB, record colors are displayed for you in the screenshot I posted above. I used the search word "record". The 3rd one changes the default record clip background. Unless you changed it or are using a custom theme, the record clip background default should be dark red until recording is finished, then it turns gray. The gray background is not listed in Preferences but it is listed in Theme Editor.
Once you change a color, save the color set with a new name so it can be recalled later without altering the default color sets.
that's why I couldn't find it, because it's in the theme editor not in the color settings, in fact in the color preferences I changed many things but I couldn't really find the background clip, as regards the position of the vst, yes at the beginning if I put them in the center they remain but then something happens and they reappear in the left corner, for this reason I have always wanted a vst rack system like Reason 13, that is, to make the vst appear directly in the Sonar synth rack, so by scrolling down you would have all the virtual instruments visible , but perhaps these are just my perversions
-
Clip color
in Q&A
2 hours ago, sjoens said:Not sure if this is what your asking about...
CbB and Old SONAR have this in Preferences:
New Sonar does not!
Would be nice if OPs say which version they're using since CbB and Sonar are extremely different in many areas.
I'm clear that I'm referring to CbB, I wanted to change the standard background of the clips but I still can't, if I open the color preferences but I can't find the exact wording for the clip background
-
Clip color
in Q&A
11 minutes ago, David Baay said:Once you save a project with a plugin UI in a different position, that position will be the new default. You can achieve the same for completely new projects by saving a tempate with some plugin moved to the preferred position (not sure if this persists with no plugins in the template). Workspaces may also recall I changed default position - I haven't tested that.
EDIT: Project and Track Templates can also be used to define default clip colors, and the Clip Properties tab in the Track Inspector allows independently specifying custom foreground (waveform/notes) and background colors.
even if I set the central position, it seems that sometimes it no longer maintains the previous position and returns to the left perhaps when I close the vst window
-
Clip color
in Q&A
10 minutes ago, Glenn Stanton said:so you're saying the track color is not applied to the new clips after you're done recording them? or you're saying that while you're recording they're dark gray? for the former - turn on the track colors. for the latter? no idea possibly a feature request.
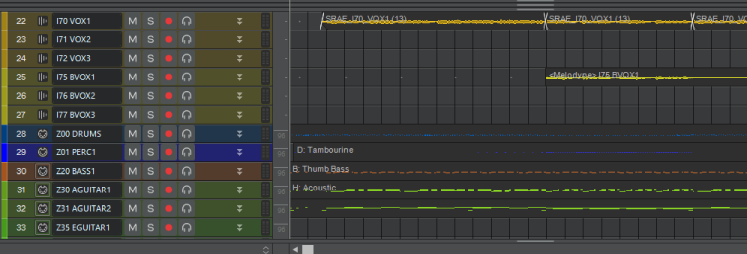
exactly, when I record they are dark gray which is the same color as the midi and audio clips in your screenshot.
I thought I could change that standard color for any clip without having to change it every time but make it permanent
-
Clip color
in Q&A
26 minutes ago, Glenn Stanton said:in general, the clips use the track color setting:
in the preferences, i check the "show strip colors" to make the tracks use the color (the small knurb on the left end is where you select the color for the track).
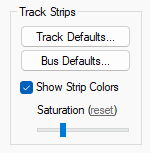
I didn't mean to remove the colors from the tracks but to change the standard dark gray of the newly recorded clips or automations
-
Clip color
in Q&A
25 minutes ago, treesha said:I think in the clip inspector there is an option to change the clip color
I meant the base color of all clips when you record.
If you change the color from the inspector it will only be for that particular clip, but if you record again the basic color will return (dark grey) I wanted to know if I can directly change the default color
-
Clip color
in Q&A
Is there a way to change the starting position when opening a vst? by default it opens the plugins in the top left corner. I would like to understand if I can make them appear in the center of the screen from the first opening.
Is it possible to change the default color of the clips? I can't find the wording in "colors".
small nonsense but which gives me less stress when I do songwriting.
-
On 6/13/2024 at 4:05 PM, MisterGreen said:
On mine, I just click the "Output" button and it switches to the buses. Clicking it again switches back to the tracks.
on mine that button doesn't work, then I discovered that there are the Mackie protocol settings in (Utility) but I have already left the faderport, now I have a friend's bringher X touch and everything works, both buses and channels, thanks for the advice
-
54 minutes ago, azslow3 said:
For this controller specialized solutions should work better then Mackie.
Original or alternative.
Interesting, i'll try it
-
6 minutes ago, Helios.G said:
as far as I remember, the Presonus Faderport option does not appear but only Mackie control XT and Mackie Control, I will try to check again, thanks for the help
-
1
-
-
30 minutes ago, azslow3 said:
On original Mackie MCU, there is "Control group" section (at least in Cakewalk layout), which switch between Tracks, Buses (AUX) and Mains. To switch from other devices, they have to send corresponding MIDI message (Note 76, 80 or 81).
I don't know if Faderport send them (I don't have Faderport).
Yes, even by setting the MCU on both the faderport and the DAW I don't have full control of the faderport as if I were using it with its native program and all the controls don't work except the main ones: play, stop, ff, rew, rec, arm, mute, solo , the track selectors and the fader, all the rest of the controls like loop, pan, bank, mix, proj, don't work
Mind Your Manners
in Songs
Posted
Very deep and immersive.
Emanuele