


msmcleod
-
Posts
6,905 -
Joined
-
Last visited
-
Days Won
35
Posts posted by msmcleod
-
-
I've just tried 2 x Mackie Control XT and a Mackie MCU without issues.
I'm not sure what you mean about how Cakewalk labels the extenders - there is no labelling, just the MIDI port name which Cakewalk gets from Windows.
You should be able to simply add the devices in order from left to right.
So in my case, I've got Mackie XT #1 : channels 1 - 8, Mackie XT #2: channels 9 - 16, Mackie MCU: channels 17 - 24.
I simply add them as follows in the Control Surface preferences dialog:
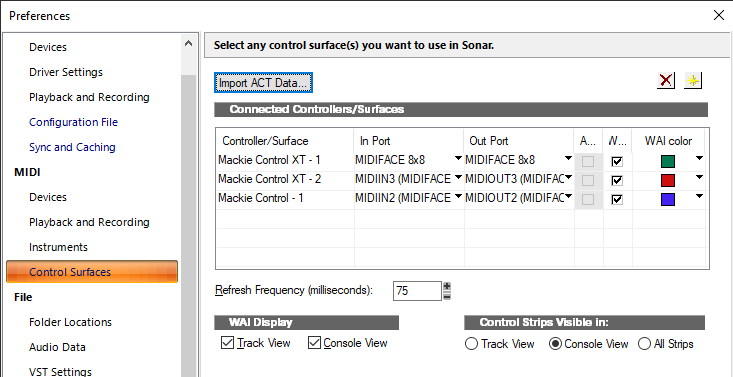
Obviously if the Behringer units use USB for MIDI, you'll need to take care to set the correct MIDI ports, but apart from that, Cakewalk will automatically assign the strip channels in order you've added them.If you wanted the main unit to control channels 1-8, then extender #1: 9-16 / extender #2: 17-24, you'd add them as:
Mackie Control
Mackie Control XT
Mackie Control XT -
FWIW I've got an ancient 3rd gen i7, 4 core / 8 threads running at 3.4Ghz and 32GB RAM. I'm only using the on-board intel integrated graphics.
I see massive improvements in Sonar over CbB especially with lower buffer sizes.In saying that, I'm using a newer version of Sonar than is currently public - more engine optimisations have been done over the past month that aren't yet public, but even so, the current public release still performs better than CbB in most projects for me.
-
 4
4
-
-
29 minutes ago, Sergei Pilin said:
I simply look at the Task manager with the same project running. Where Bandlab uses 30% Sonar uses 40%. Where Bandlab is one/two plug-in away from start crackling, Sonar is already crackling. So when I see in the changes "we made several performance improvements to the audio engine to improve CPU use" I wonder under what circumstances these improvements become apparent, maybe you need some Threadripper 24 threads CPU and the 10 threads one I have are not enough to see the improvement. Right now what I see is a perfomance downgrade compared to Bandland on _my particlual computers_.
Do you have the spectrum analyser turned on in the console view? Try turning it off - on some machines this can make a huge difference.
-
1
-
 1
1
-
-
I've had this issue in the past a few times - in all but one of the cases, cleaning the contacts solved the issue. The case where it didn't work needed both the contact replaced on the PCB (using conductive silver paint), and the rubber contact switch replaced (this is literally a matter of lifting the old one off and putting the new one in place).
Before opening it up, first try (in this order):
1. A vacuum cleaner across the keys
2. Spraying under/between the keys with a can of compressed air.
3. Try spraying some contact cleaner or WD40 in there while wiggling / playing the keys. WD40 is usually better than contact cleaner as it won't damage the carbon on the PCB / rubber contacts. Don't use switch cleaner - it's way too harsh.
If all those fail, it's time to open it up and clean the contacts with Q-tips. If the contacts themselves are damaged, sometimes you can get away with using a pencil to replace the carbon, but that won't last forever... you can buy a conductive carbon (or silver) pen for $10 - $20 which will do the job properly. Obviously check everything with a multi-meter before you close up.-
1
-
-
Time delay in ms is currently in development. It probably won't make the next update, but hopefully the one after.
-
1
-
2
-
-
By far the best way to expand the 1820 is the Behringer ADA8200.
-
1
-
-
This seems overcomplicated to me.
Why not just create presets in the Track Manager?
You can then select which preset to use either using the Track Manager button drop down menu (in Sonar), or the Track Manager itself in either CbB/Sonar. -
5 hours ago, murat k. said:
Thank you for the information. Could you disable the write enable feature for the shortcut to work? There is no need for that.
I think the reason this was required was so that the command knows what automation to snapshot. Otherwise it has no way of knowing.
-
There shouldn't be any need to go to these steps.
Click on the Patch browser button, and you can choose definition for any .ins file you've imported, then search/select the patch from the list:
-
2
-
-
2 hours ago, Cobus Prinsloo said:
Thank you, I appreciate your interest in this matter. Please find attached work file. I've deleted all non-relevant tracks and synths from this project - leaving just the percussion and 1x FX tracks, all deriving their sounds from 5 instances of the TTS-1. If you go to Track 4, clip 6, (see screenshot) you will see what happens when trying to alter its velocities in the Step Sequencer. Just for testing -- I made the velocities of every second Snare step almost 0, and muted the entire Kick step track. On my side, this does not alter the loudness of these steps at all.
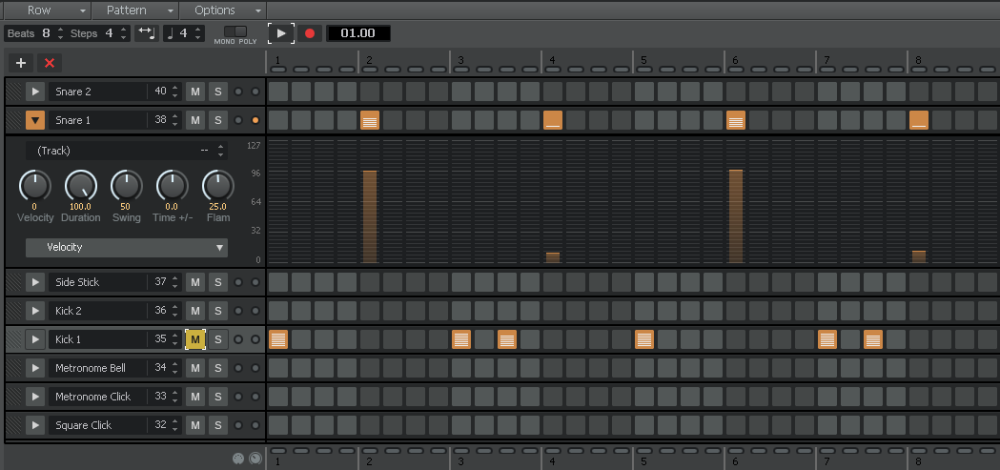
Have you changed the Velocity trim (MIDI gain) control on the track?
-
It's working fine here, however the documentation is somewhat misleading:
To create a snapshot of a track or bus parameter1. Move the parameter control to where you want it.
2. Move the Now Time to the location where you want to create the snapshot.
3. Right-click the control and choose Automation Snapshot in the pop-up menu. You don’t have to write-enable the track or bus module. An indicator will appear on the control to show that automation has been added, and a node will be added to the control's envelope on the track.
4. Make sure the appropriate Automation Read button is enabled, play your project and listen to the results. You can undo the snapshot by using the Undo command, or by taking another snapshot at the same Now Time.
This is all true for right-clicking the control, however for the keyboard shortcut to work you do have to write enable the parameter (i.e. within the corresponding automation lane).The keyboard shortcut will take an automation snapshot for all write-enabled parameters.
-
1
-
-
I'd seriously consider shutting your PC down overnight.
I used to have a PC tower that ran my email / source code / media server that was on constantly. I replaced it with a fanless low-powered PC primarily to cut down noise, but the saving in power usage was shocking... like several £100's over the course of a year... enough that I could buy a new guitar every year if I wanted.-
1
-
-
Can you show more of the dialog? In particular the "What to Export" section.
-
26 minutes ago, David Baay said:
Overwrite only applies when you restart the transport in between takes. Loop-recording in Overwrite mode is similar to Comp recording - each pass gets a new lane, and the clip in the last pass is left unmuted while all others are muted. The main difference is that the penultimate take will be entirely muted in Overwrite mode even if the final pass is only partial; in Comping mode, the un-overlapped part of the penultimate take will be split off and left unmuted so you have something sounding throughout the looped region on playback. In either case you can unmute any clip by selecting it and hitting K on your PC keyboard. Or, if you only want to hear one at a time, you can click in the bottom half of any take where the Comp tool is active which will automatically unmute that take and mute all others.
Are you sure you don't mean Sound on Sound?
- Overwrite mode literally overwrites what you've previously recorded.
- Sound-on-Sound allows you to build up a track by recording several takes, whilst hearing the previous ones
- Comping records several takes while muting the previous takes, so you can quick-comp the takes choosing the best bits afterwards. -
7 hours ago, Tin Weasel said:
I'm curious - what is negative track delay?
Based on Mark's response, it's obviously not setting the "Time+" parameter to a -ve value in the Inspector on a MIDI track?
Actually, it is setting the Time+ to a negative value... but the key difference is to also be able to specify this in milliseconds, rather than the current implementation which is in musical ticks only.
A lot of orchestral libraries require a negative millisecond delay. This is to account for things like the bow touching the string on a violin before it actually plays the note - i.e. you get the note to start early so you hear the "bow" effect, but the actual musical sound starts playing on grid.
A delay in musical ticks is fine if you've got a single tempo in your project (you just workout how many milliseconds a tick is for that tempo, and enter that tick value), but if you've got tempo changes, then the actual length in milliseconds of each musical tick will change with every tempo change.
Also, I believe the current implementation allows you to enter negative time, but doesn't actually respect it (it clamps it to zero).
The workaround in CbB is complicated. Essentially, you have to add a positive delay for all other tracks, equal to the tick equivalent for the largest millisecond delay. For each tempo change, you're going to need a complete new set of tracks with a different delay.As to why it's not here yet - simple answer, is it's really complicated.
The MIDI engine schedules groups of notes ahead of time in time windows (based on musical ticks). A negative delay requires scheduling notes early, meaning they might need to be added in an earlier time window, with the reverse being true for positive delays. Get it wrong, and you get doubled notes or missed notes (we suffered both issues in the early implementations of the negative articulation delay). Not only that, each and every MIDI event needs to be time adjusted, converting the millisecond value to its new tick value - this requires a lookup of the tempo map for every event. Add looping / user seeking in the timeline, and it gets complicated really fast.-
1
-
-
28 minutes ago, Glenn Stanton said:
i know. i have it preset in my templates so it's all set up. still not the same as "None". maybe switch the text to "Omni" instead of "None" to remove new folks confusion.
If you uncheck "Always Echo Current MIDI Track" in Preferences->MIDI->Playback and Recording, it'll stay set to None.
-
1 hour ago, Mr No Name said:
At the minute I'm struggling for motivation,
When this happens, I just record a cover song... not only does it help to get back into the swing of things, it also gets your muscle memory re-engaged without having the pressure of being creative. There's nothing more frustrating than not being able to "drive" your DAW without having to to think about it.
-
2
-
-
2 minutes ago, Skelm said:
Thanks for the responses - after some hair-pulling, I found the issue. The VST2 - VST3 switch to "replace if possible on project load" was on, and the problem plugins had all loaded the VST3 version and subsequently lost their envelope assignments. Switching that off loaded the VST2 versions as before, and the automation assignments back to where they were. Ideally, losing these assignments should force the project to continue using the VST2 version, as there is no warning that the replacement is not like-for-like, and it is not immediately obvious that the automation is no longer working (in my case, anyway).
Glad you sorted the issue.
What plugin manufacturers should be doing if possible, is ensuring their automation parameters match between VST2/VST3 - I guess this isn't the case for some of your plugins, which is likely the reason it didn't work.
-
My bet is you're using a Workspace that is hiding surround. Try setting your Workspace to "None".
-
3
-
-
18 hours ago, Skelm said:
I am wondering if this may be a version issue. Is it possible to download an older version of the installer so I can test this? My previous PC was on version 2022-11. Thanks.
I think it's more likely to be a plugin version issue than a Cakewalk version issue, especially if the plugin went through several upgrades from an earlier version on your previous machine.
-
10 hours ago, Glenn Stanton said:
sadly, the "none" = "omni all possible MIDI on the entire planet welcome here" has been around forever. possibly one of the best changes that could be made in the immediate future -> "none" = "none" (i don't want to receive MIDI from anyone). 🙂
FWIW, you do have the following options:
- Use "All External Inputs", which will exclude any soft synths. This option appears as soon as a soft synth is inserted.
- Use an input preset-
1
-
-
3 hours ago, bad gateway said:
if enabling midi out on synths that support it causes "midi leaks" that screw stuff up, surely this is a bug report?
Back in the hardware days, you had three flavours of MIDI ports:
1. MIDI In, MIDI Out, MIDI Thru - where Thru was an exact copy of what came from In, and Out was whatever the device generated
2. MIDI In, MIDI Out - MIDI Out only had what the device generated
3. MIDI In, MIDI Out/Thru - here, the MIDI Out had both what came from MIDI In and whatever the device generated.
There is no MIDI Thru in software synths, so it's up to the plugin vendors to decide what their MIDI Out does - i.e. some behave like (2) above, and some behave like (3).
If you have one that behaves like (3), then the synth will essentially repeat whatever it received from the MIDI track.
If you have another track that is set to "All MIDI Inputs", then it'll receive MIDI from that soft synth.
This isn't a bug - it's just how it behaves. You just need to be aware of your MIDI routing.-
2
-
-
@Kurre is correct - the option wasn't available in CbB.
CbB doesn't support different DPI settings - instead it tells Windows that it's not DPI aware, and Windows automatically scales the UI accordingly. For the most part it does a pretty good job, but can lead to fonts/icons being slightly blurred as part of the scaling.
Sonar on the other hand is DPI aware (a mammoth development task), which is why those options are available.
Dealing with Plugins, especially those that are DPI aware and/or support scaling is tricky, as depending on how the plugin is doing it's scaling, Sonar's DPI adjustments can end up fighting with the Plugin's DPI adjustments.
For 99% of plugins, there's usually a setting that will work for the plugin - iZotope being a notable exception, although I believe they are aware of the issue and are working on it (it's not just Sonar that has scaling problems with some of their plugins).-
1
-
1
-
-
FYI - to stop MIDI Output being enabled on newly inserted synths:
1. Open Synth Rack View
2. Click on the "Insert Synth Options" dialog button
3. Ensure "Enable MIDI Output if Available" is unchecked, then click OK.
-
1
-

"Server Busy" - Error Message
in Cakewalk by BandLab
Posted
This is more than likely BitBridge showing this message (the thing Sonar/Cakewalk uses to load 32 bit plugins).
Chances are, the plugin its trying to load isn't there, or is having compatibility issues with a newer operating system.