


msmcleod
-
Posts
6,935 -
Joined
-
Last visited
-
Days Won
36
Posts posted by msmcleod
-
-
What display resolution / scaling are you using?
IIRC CbB has a minimum screen resolution requirement, so if your resolution is too small on some view the data won't fit into the cells. -
Check this setting... you probably want to set it to 0:
-
 1
1
-
-
On 12/4/2024 at 3:43 PM, Sock Monkey said:
This is the Cakewalk Next sub forum Next doesn’t have a a tempo map. It also doesn’t read tempo from Midi files.
It seems to have very little midi features at all. Like no midi tracks and hardware output.
It would seem to be designed mostly for creating music? using audio loops and samples and has everything you need for that. But if you’re a midi user it rates at the bottom.Next has a tempo track, and internally has a tempo map.
Adding a MIDI file to a blank project will import the tempo map from the MIDI file. -
The MT-32 was my first proper synth (I don't count my Casio HT700). I later replaced it with a CM-64 (which is basically an MT-32 and a U-110 in the same box with no display).
I wrote an MT-32 editor on the Amiga - amazing how good and how deep the synth engine was for the day.
None of the "real instruments" sounded any good at all on it, except may. It was a synth, not a sample player. The samples it did have were essentially attack transients.
The TTS-1 is completely sample based. -
Just to clarify:
Sonar/CbB supports multiple audio outputs from VSTi' (i.e. soft synths) that have them.
Sonar/CbB doesn't support multiple audio outs from VST effects at present - just a single mono or stereo output. This limitation also applies to VSTi synths you add to an effects bin (as opposed to creating an instrument track). -
The way Sonar/CbB handles RPN / NRPN is to interpret them as per the MIDI spec - i.e. as 14 bit controllers.
There are some hardware devices (and even more VST/VSTi's) that ignore the MIDI spec and just treat RPN/NRPN as standard 8 bit CC messages.You can tell Sonar to bypass the special RPN/NRPN handling by adding the following to TTSSEQ.INI:
TranslateRPN=0This will cause Sonar/CbB to treat RPN/NRPN messages as standard CC's. It doesn't stop you using RPN/NRPN as such, but you'll have to handle the MSB/LSB yourself as separate CC messages:
CC 98 - NRPN LSB
CC 99 - NRPN MSB
CC 100 - RPN LSB
CC 101 - RPN MSBNOTE: I've no idea what the consequences would be if you had a project with RPN/NRPN's in it, then you re-open and try to use that project after adding this to TTSSEQ.INI.... so beware.
-
 2
2
-
 1
1
-
-
On 9/9/2024 at 3:43 PM, Ian T said:
Hey,
I think we are talking past each other here Mark. ie potentially using differing definitions.
What I mean is: can I record changes in tempo or at least, gradually change the tempo after recording.
Playing at various tempos during a single piece, is very natural for musicians.
In some DAWS you can map tempo to a controller, and record those movements. This is what I mean by automation.
Some DAWS even allow you to play at a varying tempos, without a click and try and work out the tempo fluctuations later, to map a grid to it.
Thanks,
Ian
Actually having re-read this, the way you can do this is using "Fit to Improvisation"
What you do is:
1. Create a MIDI track, and arm it
2. Start recording from the beginning and play a single note for each beat of your project
3. Stop recording
4. Select the clip you've just recorded
5. From the main Process menu, select "Fit to Improvisation"
This will extract the tempo from what you've played and populate the tempo track.
If you simply want to adjust the tempo of what you've already recorded, all you need to do is alter the tempo envelope on the tempo track.
MIDI tracks will automatically follow the tempo.
Audio tracks can follow the tempo, if you set the clips to follow tempo within the clip inspector. -
Templates you can just copy over from C:\Cakewalk Content\Cakewalk Core to C:\Cakewalk Content\Sonar (assuming you're using the default folders).
Themes are not supported in Sonar.-
2
-
-
Just to clarify:
The "4ALL" in ASIO4ALL is what causes the problems. ASIO4ALL opens all WDM drivers and combines/presents them through an ASIO interface. When the Apollo WDM driver is in use by ASIO4ALL, it causes issues trying to open it separately using its own ASIO driver, as the physical Apollo hardware is already in use.ASIO4ALL does pass the Steinberg ASIO tests - it's the Realtek ASIO driver that doesn't.
Sonar/CbB enumerates all available ASIO drivers on start up. When it enumerates ASIO4ALL, ASIO4ALL grabs the Apollo device and remains open in the system tray causing Sonar/CbB to be unable to fully access the real ASIO driver.There's nothing wrong per-se with ASIO4ALL - it serves a specific purpose and can be useful in a two scenarios:
1. Where there are no suitable ASIO drivers available for a particular device, and for some reason WASAPI isn't suitable
2. You need to combine several audio interfaces - note there are additional word-clock syncing requirements in this scenario.
Most users however are unaware of how it works and the consequences of using it - the issue in this topic being the most typical outcome.So in summary:
With the exception of Realtek, you should always use the manufacturer provided ASIO driver. If you're using the onboard Realtek device, use WASAPI. Don't install ASIO4ALL unless you know exactly how to configure it (which will probably need to be re-done every time its opened), and you fully understand what it's doing... if this isn't the case uninstall ASIO4ALL.
-
2
-
2
-
-
You can create as many arrangements as you want.
Just create an arrangement without the section you don't want played, then play that arrangement.
-
1 hour ago, Promidi said:
If you have never saved then sorry, it's lost.
I think for autosave to have worked (if enabled), you have to have saved at least once (if this is not correct, can someone please correct).AFAIK this is the case.
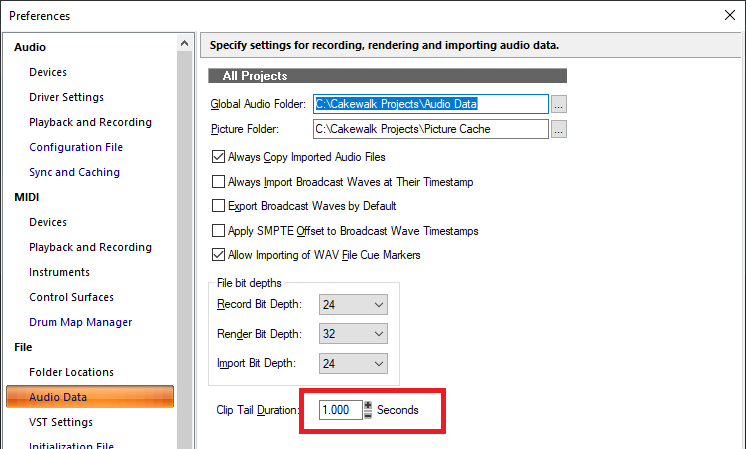
Any MIDI will have been lost, however any audio that was recorded will be in your Global Audio Folder - by default this is C:\Cakewalk Projects\Audio Data, but it'll be in whatever path is set under Preferences->File->Audio Data.-
1
-
1
-
-
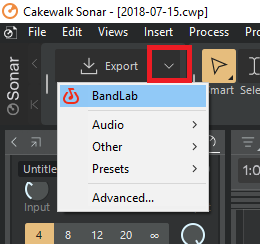
Main File Menu -> Export -> Publish to BandLab
Alternatively, use the Export module:
-
2
-
1
-
-
1 hour ago, mettelus said:
Depending how much you like to tinker (BIG if), there are quite a few videos of folks converting cheap kits (like Guitar Hero stuff) with new piezo sensors and Arduino controllers. Evan Kale had one from probably a decade ago that I cannot find now with the code he used to make them velocity sensitive. The folks heavy into Arduino usually have the coding supplied and detailed build descriptions in their videos (what to really look for if searching them). The actual parts are fairly cheap for such projects, but the coding and soldering can be challenging (why the videos are nice resources when they are converting something or building from scratch). Those guys take things that have basic pads and turn them into something more usable. Complex kits have more sensors on the pads/cymbals (rims, bell, etc.) so a cheap kit is likely to have only one dead-center on the pad and less things you can fire off while playing.
For years I used a Remo practice kit, modded with piezo sensors glued to soup tin lids inside them. I cut the foam inserts in half and wedged the tin in the middle, and put a 3.5mm jack socket at the bottom (in retrospect, the side would have been better... they fall out too easily otherwise, so I had to tape them). These then got plugged into an Alesis DM5, which allowed me to tweak the sensitivity. I had 11 pads in total: kick, snare, 3 x toms, hihat (with a standard sustain pedal as my hi-hat pedal), ride, splash, china and two crash symbols.
In fact even now, although I use an Alesis Nitro as my main kit, I still use three of those pads as extra symbols via the DM5.
Both the Alesis DM5 or D4 have trigger inputs, so either will work for this kind of setup.
The D4 sounds are similar to the SR16; the DM5 has more sounds of better quality.-
2
-
-
Given that the crash was in mfc140u.dll, I'd recommend reinstalling the C++ redists:
-
Time+ has always been applied when exporting as MIDI - all we've done is allow you to specify in milliseconds as well as ticks.
MIDI Export / Save As is effectively a bounce operation, so the result is "what you hear".Even if we offered an option to bypass the Time+, we'd get users that complain that they needed the delay on one track but not another.
By far the easiest way to get around this is to:
1. "Save As" myproject-nodelay
2. Open that project and set all the Time+ to zero
3. Export your MIDI from that project.
-
I use this thing for sampling.... best £17 / $20 I ever spent on Amazon:
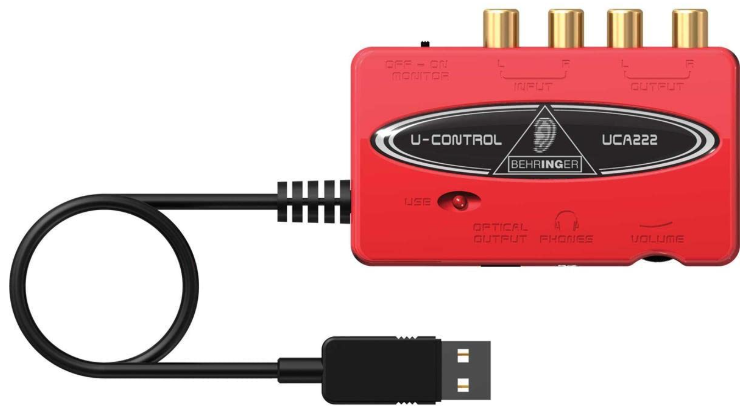
Absolutely no issues with quality, as there are no mic-pre's... as long as it's got a good line signal going in, you'll have no issues.
The only downside is no official ASIO drivers.... well, actually there is an old 32-bit one that does work ok (if you can find a download for it), but for 64 bit use WASAPI or (dare I say it...) ASIO4ALL.
I use SampleRobot for sampling, which takes around 24 hours to sample an 128 patch synth... so to ensure I'm free to use my DAW / Office machines, this only gets used on an old laptop.
In saying that... ANY decent audio interface with 1/4" line inputs will work - a RCA to 1/4" adapter (or ready made up cable) will do.-
2
-
1
-
-
While AUD.INI has the details of all your audio devices, the actual driver mode (i.e. ASIO/WASAPI/WDM/MME etc) is stored in the registry.
Try renaming the "Core" key to "_Core" in the registry under:
Sonar:
Computer\HKEY_CURRENT_USER\SOFTWARE\Cakewalk Music Software\Cakewalk\Sonar
CbB:
Computer\HKEY_CURRENT_USER\SOFTWARE\Cakewalk Music Software\Cakewalk\Core
This will cause Sonar/CbB to re-create it on re-launch, defaulting it to ASIO.-
2
-
-
9 minutes ago, Peter Hudson said:
Thank you for your comprehensive answer as always. Before I bite the bullet and buy the Behringer X-Touch can the rotary encoders be made to control the Pro Channel EQ? I got this working fine on the US-2400 using ACT learn and our son modified the MackieControl.ini for me.
Assuming it behaves as a standard Mackie Control (which I believe it does), it should be fine.
As long as "Exclude Filters from Plugins" is unchecked, then the Pro Channel EQ / Pro Channel Compressor will appear as the first two plugins on a track.
Their knob/parameter mapping is defined in MackieControl.ini
Personally I don't control plugins from my MCU, as I've got the Mackie C4 which I find far more convenient, so it's not something I do often. I'm surprised Behringer haven't done a X-Touch equivalent of the C4 - they did with the old BCR2000, which was an awesome product and very popular.One thing that has come to mind is another user was having problems with two Behringer X-Touch Extenders - for some reason, the second extender wasn't appearing as a MIDI device in CbB/Sonar, only the main X-Touch and the first extender were being recognised. This may be an isolated incident, however a workaround would be to use the standard MIDI ports for the 2nd extender. Something to bear in mind though.
I've got to get hold of two identical USB based MIDI devices to troubleshoot this. I'm not sure if it's a Windows thing or a Sonar thing, but if I can establish that Sonar correctly lists two identical MIDI devices twice, that would rule Sonar out of the equation.
I have established that a Mackie MCU with two Mackie XT's works without issue - that's going into a MidiTech MIDIFace 8x8 using standard MIDI cables. -
15 minutes ago, Max Arwood said:
😂you'd need a 3' concrete wall 😂
YES! Or 2 -2’ with a 3’ air gap between them!
Yeah, that'd work... but then you've essentially got walls 7' thick! That's a LOT of space to use up.
-
1
-
 1
1
-
-
I've had great results with plywood on the outside with 4" of loft insulation (couldn't afford rockwool), a 2" gap, then 4" of loft insulation on the back of drywall. The gap between the two walls is important, as it gives the sound an opportunity to disperse before hitting the second layer of insulation, by which time its energy has been drastically reduced.
It doesn't work with loud incoming low frequencies - you'd need a 3' concrete wall for that, but that's where high-pass filters come in handy. I don't have a sub in my studio so low frequencies leaking out isn't an issue.I cranked my 2 x 150W speakers up to full (way too loud to listen to inside), shut the doors and walked around the building... I could only just hear the music, and it was so quiet I couldn't discern where it was coming from. It was like I was sitting on a bus where someone was wearing headphones/earbuds with the volume up. At normal volume, there was just silence outside.
One thing I would say is, if you're ever designing a room from scratch (or considering converting an existing room), bear in mind it's going to be MUCH smaller than it was originally after sound proofing. You're going to lose a ft on each wall, and the same on the ceiling. I did the floor in my studio as well (the inner room is completely separated from the outer room and suspended on expanding foam), but this isn't always necessary.
-
2
-
-
Looks like the drivers for the US-2400 were designed for Windows XP. It's unlikely these will work with Windows 11.
Windows 7 is pretty good with XP drivers, and I have a Windows 7 boot option for this reason, but the new Sonar won't run on Windows 7 - it relies on features only available in Windows 10 and above.
I guess you could get a old NUC or laptop running Windows XP / Windows 7 with a decent hardware MIDI interface (e.g. MidiTech MIDIFace 4x4), and run something like MIDI-OX on it to replicate the MIDI data from the US-2400's USB MIDI ports. You'd then need an additional 4x4 MIDI interface on your main DAW PC to connect to the NUC's MIDI interface via old-school MIDI cables.
However this is a bit clunky and it'd probably set you back around $300. In saying that, since your son is a software engineer, I'm sure he could set it up so that everything automatically configures itself on boot-up.
There may also be a way of running a Windows XP virtual machine to "host" the US-2400... it'd be complicated to setup though - i.e. the VM might not work with the USB port, and you'd need to use some network based MIDI drivers on both the VM and the main machine to pass the MIDI data between them. It'd also eat up CPU cycles which you'd probably rather be used by your DAW.
You may want to consider replacing the US-2400 with a Mackie MCU Pro + 2 Mackie MCU Pro XT, or the Behringer X-Touch + 2 x Behringer X-Touch Extenders.
Both of these devices have old-school MIDI output ports in addition to the USB port, so you can always fall-back to old-school MIDI ports should USB drivers go out of date.
You'd need to check measurements though... the Mackie + 2 x XT will almost certainly take up way more desk space than the US-2400. You'd need to check the Behringer's measurements.
There's also the Presonus Faderport 16 - this is extremely compact and works well with CbB/Sonar. It's USB only though, only 16 track, and only has one rotary encoder shared by all channels.-
1
-
-
7 hours ago, Sock Monkey said:
I used Cakewalk as a VST host for live gigs a year ago. It took a bit of head scratching to find what would work and not screw up on me mid gig.
The solution was each VST was a different Midi channel.
All I had to do was Switch to the desired channel to play any given Synth.
There is a GLOBAL INPUT ECHO.
Then used Midi learn and I had control over each tracks volume as well as an effect send.
My Keyboard can be split and send on 2 different midi channels. Or I can layer 2 channels.
Using 2 keyboards is only a matter of setting the instrument tracks to Omni or? I have 3 Keyboard controllers. But I really didn't see what a second controller would add if the one controller has the right options.
This is by far the easiest method.
I used this method live for years with hardware gear - just set all your instruments to different MIDI channels, then change the MIDI channel of the controllers.
There were exceptions of course, where I needed to change patches instead using a program change, but the MIDI channel method worked for most scenarios.-
1
-
-
I tend to duplicate the track, then archive/hide the original.
I find Melodyne works best if you make your changes, then apply the region fx - if nothing else, it frees up CPU, but it also protects your project against any possible incompatibility issues should you upgrade Melodyne and try to open an older project.
But obviously you're committing your changes... so keeping an archived track with the original means you can always go back if you want.-
1
-
1
-
-
make sure this is checked in preferences:

-
2
-
Feature Suggestion: Ability to disable play of any segment in an Arrangement
in Feedback Loop
Posted
You don't need to keep every arrangement, and I suspect you're not going to try every single possible combination of sections.
What I'm suggesting:
1. Duplicate the existing arrangement
2. Delete the section(s) you want to mute
At this point you could Undo to get the section(s) back, and remove another section... or you could delete the arrangement and duplicate your original again.
It might be worth you posting a video of what your existing workflow is here...