msmcleod
-
Posts
6,101 -
Joined
-
Last visited
-
Days Won
26
Everything posted by msmcleod
-
I did originally write a lengthy reply to this thread detailing how to group assignable controls, however there are a few issues: 1. The group assignment is lost on save/reload 2. The assignable controls don't always work with groups - i.e. sometimes they affect all grouped VST parameters, sometimes not. 3. The assignable controls seemed to be fixed to the first four parameters for DX effects, and can't be re-assigned. I'll get bugs raised for these, but can't make any estimate as to when they'll be fixed. Most people don't know the assignable controls even exist, so it's a pretty niche set of bugs compared to the other bugs in the queue.
-
@John Vere - DXi synths running in CbB are never 32 bit. 64 bit applications can only use 64 bit DXi's, and 32 bit applications can only use 32 bit DXis.
-

New "Add Track" dialog - "instrument track per output" is always grayed out?
msmcleod replied to Sal Sorice's question in Q&A
I've pushed a fix for this issue, but I can't give any time-frame as to when an update with the fix will be available (hopefully soon, but it's not my call). In the meantime, the old Insert->Soft Synth synth dialog will allow you to pick this option. -
Output 3 different midi tracks to separate audio tracks
msmcleod replied to Frank DeFede's topic in Cakewalk by BandLab
To use multiple outputs on the TTS-1, you have to route the MIDI channels to the audio outputs within TTS-1 itself, as by default all MIDI channels route to the main stereo outputs.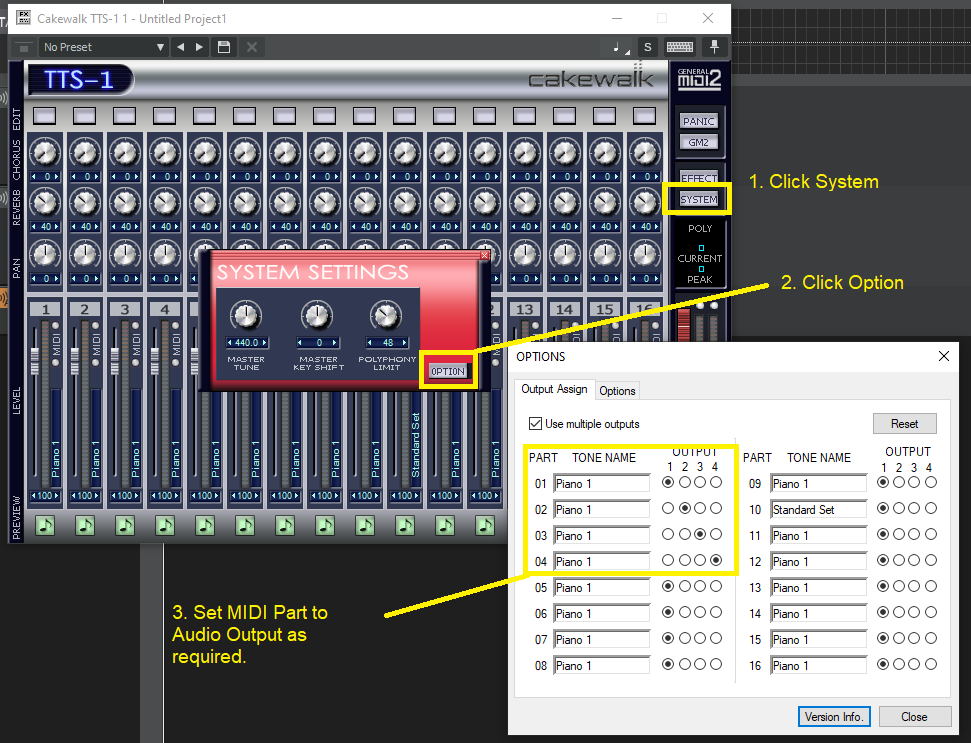
-
New "Add Track" dialog - "instrument track per output" is always grayed out?
msmcleod replied to Sal Sorice's question in Q&A
AFAIK there is nothing that could grey that out - even if you picked an instrument with only a single stereo output, it would just create multiple instances if you asked for more than one track. -
It's only lossy at extreme values, which in audio terms wouldn't really happen - i.e. the quietest sounds would literally be inaudible, and the loudest orders of magnitude times the pain barrier. The max db range is over 1500 db (compared to 144db of 24 bit, which is still massive), but in reality what you get is greater granularity over a smaller db range (similar to the 144db range of 24 bit), because the point "floats". The reason audio engines prefer 32 bit floating point (or 64 bit floating point), is because it effectively means you can never clip internally - only once you convert back to 24 bit for rendering in the audio interface.
-
How to reduce Hiss / Noise on Tail of Audio Clip
msmcleod replied to Stephen Power's question in Q&A
Personally, I'd just use a noise gate (or alternatively just use a volume automation fade) then add a small amount of reverb so the cut-off doesn't sound so abrupt. -
Comparing 32 bit to 24 bit is almost meaningless - 32 bit audio files (and interfaces) are floating point, whereas 24 bit audio files/interfaces are integer. What is stored in the 32 bits is completely different to what is stored in 24 bits. The quality of 32 bit floating point audio is essentially equivalent to 24 bit integer. The only difference being, you can increase or decrease the volume of 32 bit floating point without any loss of quality.
-
For new users needing a GM synth (or simply as an alternative to TTS-1), there are a few GM sound fonts knocking around... Here's one for example: https://musical-artifacts.com/artifacts/2993 Plogue's Sforzando is a free soundfont / sfz player: https://www.plogue.com/products/sforzando.html
-
I've used a MeLe silent PC ( Intel Celeron J4125 @ 2.00GHz, 8GB RAM) for tracking only. CbB running on this easily managed recording 16 simultaneous tracks, whilst playing back 32 tracks. However, I was using no plugins. Plugins are always going to be the deciding factor with a mini pc - expect to have to use higher ASIO buffers (higher latency) and a limited amount of plugins in your project. TLDR - fine for tracking, probably not ok for mixing.
-
That'll be a DX7 with the Gray Matter E! card... https://www.muzines.co.uk/articles/grey-matter-response-e/2082
-
+1 to starting Kontakt standalone to pick up new libraries, and even more so for MassiveX. Both these plugins tend to search/build their libraries when they're started up for the first time. Because of the time this takes, it can cause DAW's to think they're unresponsive. I've certainly seen this with MassiveX in CbB, but also Omnisphere in StudioOne.
-
I pretty much always use the plugin browser search nowadays, typing in 3 or 4 characters of the plugin name usually narrows it down to a small enough list for me to spot it and drag it in... and I've got nearly 2000 plugins on one of my machines.
-
MIDI - only record certain values?
msmcleod replied to BassMasterGeneral's topic in Cakewalk by BandLab
Velocity is a property of the note on message, not a CC. You can't get Cakewalk to alter what is actually recorded, but you can affect playback / echo while recording by adjusting the velocity trim (Gain knob on MIDI tracks, or on the MIDI tab of a soft synth) - turn it up to 127, and everything will come out at velocity 127. It'll even sound at velocity 127 while you're recording. To change what velocity was actually recorded after the fact, select the clip and using Scale Velocity from the Process menu.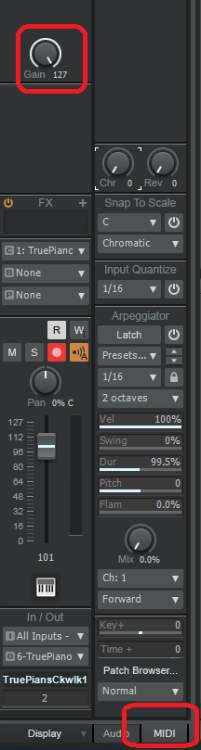
-
There are only 2 inputs on the Scarlett 2i4. If you've set: Track 1 -> Output 1, Track 2 -> Output 2, Track 3 -> Output 3 Track 4 -> Output 4 That's all you need to do. I'm not exactly sure what you're trying to achieve though - I've got 32 inputs / 34 outputs on my interface, and I rarely use more than 2 outputs (i.e. the stereo L/R), unless I'm going out to external hardware effects and back again. Most of the time, all tracks are set to output to the Master bus, and the master bus is set to output to outputs 1L + 2R (stereo). The only time you need to use the additional outputs is: - When you need a send to an external hardware effects unit - When you have a separate (and usually different) monitor mix from your main one.
-
Can I connect my audio interface to an "audio USB Type-C"?
msmcleod replied to Anders Madsen's topic in Cakewalk by BandLab
A USB-C to USB-A adapter should be fine. USB-C is essentially a USB 3 port with a higher power tolerance. AFAIK, the USB-C to 3.5mm jack plugs actually present themselves as a blue-tooth device to phones, albeit wired (my lightning to 3.5mm adapter does). -
Ok, seems that some of the links weren't updated when the old website was moved... so: 1. Log into legacy.cakewalk.com 2. Use this download link: https://legacy.cakewalk.com/support/dl.aspx?DLID=92 Essentially, change any download link that starts with http://www.cakewalk to https://legacy.cakewalk and it should work. I've let the web team know about the issue.
-
Long time Interface driver problems... Please help!!!
msmcleod replied to T Boog's topic in Cakewalk by BandLab
The easiest way to remove drivers (at least in Windows 10) is: 1. Make sure the device is unplugged, and reboot your machine 2. Go into Device Manager ( short-cut WinKey + X, then press M ) 3. On the View menu, ensure "Show Hidden Devices" is checked. This will show drivers for disconnected devices. 4. Expand the "Sound, video and game controllers" node 5. Right click on the driver you want to remove and select "Uninstall device" -
Personally I use AD2 for the quality of the sounds. However for standard rock tracks, I find MT Power Drum Kit 2 works a treat: https://www.powerdrumkit.com/ . Although you're basically stuck with one kit, the sounds it does have are very good and it comes with a bunch of MIDI patterns to drag into your DAW.
-
When I played live, I used one of these for sending MIDI patch / volume / pan / sysex information at the beginning of each song: I've still got two of them, and they're rock solid. My floppies from the early 90's still play without issue.

-
Have you tried setting the clips time-base to absolute before locking them? This should lock the start time to their absolute time in seconds/samples. While they're in musical time, they will move in "real time" because their musical position remains unchanged, even though the actual time in seconds changes due to the change in tempo.
-
We've added a new feature to the new Sonar that will allow you to create Articulations that delay notes either positively or negatively ( +/- 1000 ) in either ms or ticks. You can also decide whether to include a note's end time in the delay, or retain its original end time. Using articulations rather than a track-wide setting allows you much greater flexibility. For example, orchestral strings with a slow attack playing legato could have a negative delay on the start time but when you switch to pizzicato, there is no delay. You could even have different delay times for different octaves if required. For simpler cases where you want everything on the track delayed, just draw the articulation over the whole track duration.
-
I keep hearing the instrumental in the audio
msmcleod replied to Sanera Bloomfield's question in Q&A
Most likely your mic picked up the instrumental through your monitors/headphones whilst you were recording your vocals. The M7 like most condenser microphones is extremely sensitive. When you're recording make sure: 1. You stand a decent distance away from the mic 2. You're wearing closed-back headphones to reduce sound leakage into the microphone. 3. The music in your headphones isn't too loud. If the instrumental backing isn't going to change, and the instrumental on your vocal track isn't that loud, I wouldn't worry too much about it to be honest - all you've got in effect, is a quieter copy of your instrumental track coming through your vocals. -
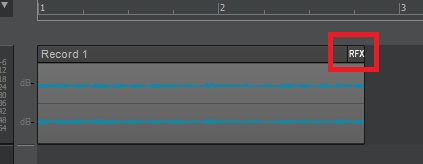
There should be an RFX indicator at the top right of the clip if it's unrendered: