


maxsthaven
-
Posts
15 -
Joined
-
Last visited
Posts posted by maxsthaven
-
-
Please listen to attached memo. Cheers!
-
Never mind the last thing I said. What happened was two-fold: The original post was supposed to say change interleave to mono when your plug-in is on a bus and your guitar signal is being output to that bus—that’s what I meant was was easy to forget and I realized my interleave symbols were not displaying properly because I am using a custom theme. Sorry for the confusion everyone.
-
Oh yeah, they do make music in Uganda 🇺🇬 and Zambia 🇿🇲 ; that should cover at least those two letters. As for the other letters, pick a country.
-
What some artists do is create a following and market and sell to that following: 100,000 followers with 20% of followers purchasing a new single for $2 is $40,000. The real trick nowadays is creating the tribe that follows. So, is the market flooded? Yes. But there’s money to be made; it just takes money to make money and that’s the deterent for most people. The list simply shows the most common places where songs and music are in life. You’d be surprised how many musicians I’ve met over the years who think their new song will get them eating pizza with AC/DC and Metallica (who are supposedly going to open for them at some magic future time) and never consider reality nor the economics of music.
-
😀 That’s happy! Sometimes I think that’s how it should be; then music is genuine, no other motives.
-
One more thing: The music business isn’t what most people think; for example, radio stations won’t play a track just because you’re local and getting a record deal doesn’t guarantee fame. However, getting a deal will likely put your music in most of the above list, but don’t lose heart: there’s still plenty of room in this business of music for those who self-produce/publish and the little guys.
-
If you want to make money from music, you have to know where music is, that is, each place music occurs in our world, and then brainstorm on how you can get your material into those places. This is my A to Z list; have a browse through it and see where your music fits in. You may be surprised at how many or how few options you have for your music!
The A to Z of Songs and Music in the World Today
Air, Land, and Water Travel Entertainment
Army and Navy Morale
Children's Educational Books
Children's Toys
Concerts
Dance Studios
Documentaries
Educational Facilities
Free Online Streaming
Funerals
Hotel and Business Lobbies and Elevators
Internet Websites
Just-For-Fun Bands
Movies
Music Therapy
National Anthems
Night Clubs
Online Music Sales
Operas
Orchestras
Personal Entertainment
Phone Apps
Phone Ring Tones and Alarms
Professional Bands
Public Facility, Shopping Malls and Stores Entertainment
Radio
Radio Commercials
Recording Studios
Research
Restaurant Entertainment
Retro Vinyl, Cassette, and CD Sales
Sports Events
TV Commercials
TV Shows
Vacation Resorts
Video Games
Weddings
Workplace Background Entertainment
Sincerely,
Maximus
-
 1
1
-
-
Saying “you got it now?” is a bit on the rude side Jacobson, but I know what you mean: the interleave symbol shows a stereo symbol when it’s already a mono track, which can be confused as “it is stereo” and so one might think clicking the button will convert it to mono (because after clicking the button it shows a mono symbol, but that actually means “change to mono”). The difference in clicking the interleave is that it will be made stereo (which is what you meant by backwards) and will only have a left or right channel signal, so it will sound weaker, but won’t technically be mono but a one-sided stereo. Got it now?
-
CbB might be different, but according to the Sonar Reference Manual the interleave affects how the signal enters the plug-ins in ProChannel, and then the FX rack. Creatively, one could change a stereo track to mono for a mono plug-in, and vice versa. Since you want it to enter in mono, set it to mono. I do know what you are saying, though, but one will find that doing this creates a worthwhile input difference in a guitar emulation plug-in. If you’re up to it, give it a try.
-
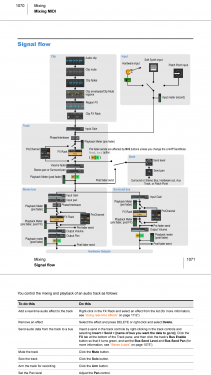
The Signal Flow
Knowing how things flow in your DAW is essential in order to get things flowing with your music. So many questions can be answered, so many things clarified just by viewing the signal flow. The attached PDF is from the Sonar Reference Guide PDF on page 1071. This PDF was created from a screen capture on my iPhone 6s Plus and might not be large enough; if not, search for Signal Flow in the documentation you have access to.
Why know this? You may want to route something a certain way and it’s great to know where your signal is coming from and where it’s going to avoid clipping and to fix problems if something isn’t sounding quite right.
Signal Flow Quick Tip 1: ProChannel flows from top to bottom; so to set up an analog style chain, use Tape Emulation, then Console Emulation, then your compression and EQ will be as if you were compressing/EQ’ing on that console.
Signal Flow Quick Tip 2: If you purchase the FET compressor from Softube, you’ll have an FET compressor module availabe in ProChannel. How sweet is that!
Hope that gets things flowing for you,
—Maximus (Rock Mojo Studio)

-
1
-
 1
1
-
-
On 2/26/2019 at 1:04 PM, maxsthaven said:
case
I thought I would add the following info, just for clarity of technique. After your drums are bounced/recorded, you may wish to set your clip gain (clip gain is for recorded clips; track gain a.k.a volume trim is what you set before your signal enters the ProChannel; and if ProChannel is off, then before it hits the FX rack). This way you can match the RMS of your other tracks and make your drums fit better in the mix. So, record all your tracks and then adjust clip gain to ensure RMS consistency and still have your faders at zero. Use your track gain to avoid clipping your plug-ins/FX rack (esp. important for analog emulation plug-ins), and finally, adjust your faders for best overall sound: clip gain—>track gain (if necessary)—>faders—>no problem. To adjust your clip gain, select Clips in the Track View and then Clip Automation—>Gain. Why is it tucked away and hidden you say? So you don’t accidentally bump it and screw up your mix! But if you wish, you can adjust it from the Clips View as well, and it’s also somewhat hidden tool-wise for the same reason.
-
Having a great drum plug-in, such as Addictive Drums 2 is one thing, but how do you go from programmed MIDI that’s all at velocity 100 to a professional and real sound?
MIDI Drums: The Proper Way
People often can not believe that my drums are MIDI drums, and that the timing on them comes from extracted MIDI grooves. What’s my secret you say? Well, you’re all in luck because here it is...drum roll please!
Professional audio engineers usually record drums, not build them; but if they need to build them, this is how they do it with plug-ins (Superior Drummer, Addictive Drums, NI Studio Drummer, etc.):
If you wish to cut straight to the samples, see link below.
1. Load your plug-in in your DAW
2. Ensure a MIDI track is output to the drum plug-in, and that the drum plug-in is output to a stereo audio track for outputting the sound. Also, know what MIDI notes will trigger different drum hits (e.g. C3=kick, C#3=snare open ... )
3. Craft your MIDI drums (you may find it easier/faster to build them quantized first and set the timing offset or groove after)
4. Apply professional timing to the MIDI by selecting your MIDI for one drum sound at a time and telling your DAW to shift the notes toward a groove file that contains timing information (Ableton, Cakewalk, and other DAWs allow for this type of editing, for example; but, you can also listen to pro drums and make the shifts yourself once you get a sense of how tight pro drumming is compared to quantized. Moreover, you might choose to build groove files by extracting timing info from all the factory grooves and beats that come with the plug-in, as these are played by professionals)
5. Adjust the velocities generally (all selected at once) so that your drums are fit for the genre and song’s intensity. Hard rock cymbals are going to be higher than jazz tip hits, for example
6. Adjust the velocity of individual kitpiece sounds so that the drum kit sounds real and dynamic (having all velocities at 100 is bad, think YouTube metalhead guitarists who quickly whip it up). Note that velocity is how fast a note is struck, which in this case, is heard as how hard a drum kit piece is struck.7. Adjust any final settings of the sound in the plug-in such as pitch; tuning drums is part of a great drum sound, so don’t forget. You can also adjust the faders in your plug-in, but if you’re using a preset, they’re already set
8. Play back your track and observe the RMS level; adjust the master output of your plug-in so that your track is at -18 dBFS RMS
9. Record or bounce your drums (upsampled) to a stereo audio track and re-check your drum RMS levels along with peak levels this time. Adjust your plug-in master bus again, and re-bounce/record, if necessary. (Don’t forget to save your drum preset with your output settings). Play back your track and adjust the fader, not the gain, as you have already set your drums to the correct gain or voltage (1.23 Volts or approx. -18 dBFS), so now you want to set your peak levels by lowering the bounced audio track fader. Aim for -12 to -6 peak depending on how many other tracks you will be adding after the drums (audio tracks sum together and get louder, that is, the more tracks you add, the higher your master level will be)
10. Don’t delete your plug-in yet, or ever. Archive your drum plug-in (to save CPU usage), or mute it audio track especially, as you now have a recording of your plug-in, and don’t want to hear them both simultaneously
11. Build your song as you listen to your drums
12. At various stages of your project, you may wish to edit your drums again, but what if you’ve already recorded your drums? Most DAWs allow you to freeze plug-ins, which will create a bounced version of the plug-in as an audio track, just temporarily, to save CPU usage; so to edit, un-freeze your MIDI drums and adjust the MIDI timing and velocity as needed, then re-freeze. If you’ve already recorded or bounced your drums, don’t worry, you can adjust your plug-in and then bounce/record again
13. Don’t forget to re-check your levels and sound quality if you make changes beyond step #9
14. When your entirely satisfied, bounce or record a final upsampled version
15. EQ and edit the whole stereo drum track as needed (usually for frequency masking/clashing at this point)
16. Head to the restaurant and order a hearty drummer’s meal, and maybe a beer, and cake too to celebrate your new hit song!It’s actually fairly simple, but the trick is to build solid grooves that apply professional timing/velocity to your drums, ensuring that your drums are at -18 dBFS RMS when bounced/recorded, and finally adjusting the bounced/recorded audio track’s fader for peak levels that allow headroom.
For samples, visit
Cheers everyone!
—Maximus, Rock Mojo Studio
-
The LP is set to Non-Linear and there are enough EQ nodes in this plug-in to cover it all, but I hear ya.
-
Do you want perfect sound from your mic that’s as close to natural as it gets? If you own an SM57, AT4050, or MXL V67G, the following are EQs that will create a perfectly flat response. Note that you will need the LP EQ (a.k.a L-Phase Equalizer) as this equalizer has enough nodes for the task, has a non-linear setting, and has a high quality, transparent sound (esp., compared to the ProChannel EQ). First, place the LP EQ on an audio track FX rack (open the plug-in window for the LP EQ and click the Expert button, select Non Linear under Precision and Slow under Analyser for low latency recording); next, create a new aux track from the output of the first track; set input on the first track to your mic input and turn Input Echo ‘on’ (also 48V phantom power—only if you’re using a condenser mic, otherwise leave it off). Now, arm the aux track for recording. Recording with this input channel setup will produce some input latency, so go to Preferences and view your Input latency under Driver Settings. Write down how many samples are shown. After recording, set your Snap tool to Samples and enter this amount. Set Snap to ‘snap by’ and zoom in to the front of your recorded clip. Drag the clip left until it snaps by that many samples—this fixes your recorded latency entirely. You can use this method for any input channel FX in the future, such as compressors and so forth. Also, you can use these on tracks already recorded with the above mentioned mics by placing the EQ on the track’s FX rack. Here are the EQs both written (for those not using the LP EQ) and uploaded (for those using the LP EQ). Enjoy! Sincerely, Maximus, Rock Mojo Studios.
I recommend using these on vocals when the most natural sound is needed or on tambourines, snaps, claps, etc.; try it on your guitar rig and you'll notice that the sound you get is exactly what was playing through the speaker(s) (perfect for when you don't want to change a thing about your settings!)
SM57 Flat Input EQ
(set each to Peak/Dip)
50 Hz, +10dB, Q 9.16
100 Hz, +5dB, Q 6.76
250 Hz, +2dB, Q 2.49
3,000 Hz, -2dB, Q 10.00
4,000 Hz, -4dB, Q 10.00
6,000 Hz, -7dB, Q 10.00
7,500 Hz, -3dB, Q 10.00
9,500 Hz, -4dB, Q 10.00
13,000 Hz, -1.5dB, Q 10.00
15,000 Hz, -2.5dB, Q 10.00
AT4050
(set each to Peak/Dip)
30 Hz, -1.75dB, Q 3.08
1,375 Hz, -0.8dB, Q 10.00
1,725 Hz, -0.8dB, Q 10.00
2,750 Hz, -0.8dB, Q 10.00
4,000 Hz, -0.8dB, Q 10.00
6,000 Hz, -2.4dB, Q 10.00
9000 Hz, -3.75dB, Q 10.00
10,000 Hz, -4.5dB, Q 10.00
13,000 Hz, -2dB, Q 10.00
15,000 Hz, -2.25dB, Q 10.00
20,000 Hz, +10dB, Q 10.00
MXL V67G
(set each to Peak/Dip)
20 Hz, +11dB, Q 10.00
30 Hz, +3dB, Q 10.00
38 Hz, +2.13dB, Q 10.00
50 Hz, +2dB, Q 10.00
60 Hz, +2dB, Q 10.00
70 Hz, +2.13dB, Q 10.00
85 Hz, +2.13dB, Q 10.00
100 Hz, +2.06dB, Q 10.00
150 Hz, +2dB, Q 3.45
375 Hz, +3dB, Q 10.00
400 Hz, +3dB, Q 10.00
500 Hz,+2dB, Q 2.03
1000 Hz, +2dB, Q 10.00
1,500 Hz, +2dB, Q 10.00
2,000 Hz, +0.38dB Q 10.00
3,500 Hz, -1.25dB, Q 10.00
4,250 Hz, +2dB, Q 10.00
20,000 Hz, +1.5dB, Q 5.55
-
 1
1
-
Signal Flow Reference
in Cakewalk by BandLab
Posted
MP3 version of the above file.
Maximus Memo About Post.mp3